Why can't tracks from a disc be downloaded to a PC?
If you insert a CD into a CD/DVD drive, you will see files in Windows Explorer with a .cda extension, each no larger than 1 KB in size. You can select them and even copy them in the usual way, but you won’t be able to listen to them. These files are service files. The audio tracks themselves are stored hidden
.
CDs were originally intended to be played in stereo systems and CD players. When CD-ROM appeared in system units, Windows learned to play audio CDs, and users were able to listen to their favorite songs on their PC. However, a problem immediately became obvious - it was impossible to directly copy music from a disk to a computer, since they were protected from copying.
It was then that a special subclass of applications appeared - audio grabbers or rippers
, which made it possible to transfer tracks from disk media to digital format.
Below you will find two instructions showing how to copy music from a disk to your computer quickly and easily.
For clarity, watch the video tutorial on transferring songs from a CD in the AudioMASTER program:
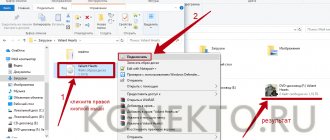
Creating an image and then overwriting it
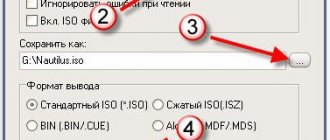
We move on to disk images. What is this, I think you already understand. The same disk, only in digital format, intended for sharing with friends, deceiving the computer, saying that something has already been inserted into it, and so on.
In general, any image can simply be transferred from a computer to a flash drive without any problems using the same principle that I have already described. However, there is an alternative method.
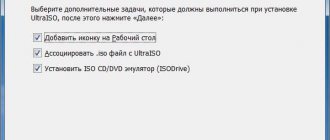
This blog has a detailed article on how to quickly download a disk image to a flash drive using the UltraISO program. In it, I described in detail how to create an image and upload it, so you can read it by following the link.
To make this publication of mine more useful, I will leave you with only a video on this topic, which will allow those who are in a hurry to complete this task faster. I advise others, of course, to read the publication. It describes in detail everything that may be useful.
I also recommend that you download the licensed version of this Ultra ISO program from the Allsoft . There is too much important information stored on any PC that hackers can use to use pirated utilities with peace of mind. I wouldn't want your personal data to be hacked. The risks are too great.
More on the topic: How to reassign keys on the keyboard for Windows 7
Don't forget about antivirus software too. They, of course, are unlikely to get help from well-known scammers who operate on a serious scale, but there are only a few of them, and the interest in other people’s PCs is now enormous. This is very easy money. The phrase “This will never affect me” no longer works. Everyone is interested in you.
You can download a good antivirus from the same Allsoft website. For example, I like NOD32 .
That's all. Don't forget to subscribe to my VKontakte group . See you again and good luck.
start-luck.ru
Method No. 1: Copying from a CD in AudioMASTER
AudioMASTER is a simple and convenient audio editor that includes all the basic functions for working with audio files. One of them allows you to transfer music from a disk to a computer, preserving the original quality of the tracks. We will dwell on this possibility in more detail.
- Step 1. Install the program
The program on disk will take up only 98 MB. AudioMASTER works great on all Windows operating systems, from XP to Windows 10. You can safely download the software without worrying about compatibility.
- Step 2. Prepare
Insert a music CD into your computer's CD/DVD drive, and in the main window of the AudioMASTER program, select "Load from audio CD"
.
Insert the disc and launch the AudioMASTER program
A list of all music tracks that the system finds on the disk will appear. You can select only selected tracks, or check the box next to the “List of tracks” item - then all files will be selected. In the same window, you can listen to songs before copying.
Listen to the tracks and mark the ones you want in the list
- Step 3. Convert music
Next, you will have to choose in which format to save the songs. The most popular solution is to convert music to MP3, but for music lovers the uncompressed WAV format (best quality, but very large file size) and the modern OGG format are available. Once selected, click on the “Save marked tracks” button and specify the folder to place the tracks. You can immediately burn music from a disc to a flash drive; to do this, instead of a folder on your PC, select a partition on your USB drive.
Choose the appropriate format to convert songs
Converting an 80-minute AudioCD will only take you a few minutes. After this, you can immediately go to the library with the saved files. Of course, it doesn’t matter at all what type of CD you are copying from: CD-ROM, CD-R or CD-RW - the sequence of actions will remain the same.
As you can see, transferring music from a disk to a computer using AudioMASTER is not at all difficult. But that’s not all that this simple audio editor will offer you.
Here is a short list of additional software features:
- recording sound from a microphone;
- extract music from any video file;
- converting any audio files (wav, mp3, mp2, wma, aac, ac3, ogg, flac);
- editing, trimming and splicing sound recordings;
- built-in equalizer and dozens of effects;
- creating sound atmospheres.
AudioMASTER allows you to easily create and process audio tracks. You can load the file into the editor, then change the tempo, voice, volume; add echo, reverb, channel rotation; remove noise from an audio recording or create a unique atmosphere. Change the frequency spectrum, shift the pitch, adjust the frequency filter, play with the equalizer sliders. All these improvements are available in just a few clicks!
Installation of Windows 7, 8, 10 operating systems on a USB drive
Installation disks for Windows 7, 8, 10 operating systems do not allow installation on a flash drive. To install on a flash drive, you need to use third-party software. The most suitable program for our task is WinNTSetup . The utility is distributed and supported on the forum of the Internet portal www.msfn.org. You can download it from the forum page www.msfn.org/board/topic/149612-winntsetup-v386.
The most current version at the time of writing is WinNTSetup v3.8.6 . The utility is distributed in the RAR archive “WinNTSetup3.rar”. After unpacking the archive, you can see two executable files “WinNTSetup_x64.exe” and “WinNTSetup_x86.exe”. From the names of the files it is clear that each of them is designed to run on a system with the appropriate bit depth. In our case, we will run the file for a 64-bit operating system. When launched, the utility will display a message asking you to download ADK files for the program to function properly.
Download the ADK files by clicking OK, after which the utility will launch.
Now let's prepare a folder with Windows installation files and a USB drive. For example, we will take the installation disk with Windows 7 and put it in the DVD drive.
After this, return to the WinNTSetup to the “ Windows Vista/7/8/10/2008/2012 ” tab. Now let’s specify the path to the installation file “install.wim”.
At the second stage, we need to select a flash drive on which we will install Windows 7. Before selecting it, we format the flash drive in the NTFS .
Now let’s select in WinNTSetup the place where the bootloader and Windows itself will be installed, namely our flash drive.
After these steps, you can begin installing Windows 7 on a USB drive. To do this, click on the Install button in the lower area of the utility window, after which a message will appear with additional installation parameters.
Without changing the parameters, we will confirm this message by running the installation on the USB flash drive.
Before starting the installation on a flash drive, you can optimize the OS by disabling or enabling its functions. This can be done by clicking on the OS Optimization >>> button.
Having completed the installation, our next step is to restart the computer. Before starting the operating system, let's boot from our USB drive. On different computers, this is done using the F11 and F12 keys or using settings in the BIOS in the BOOT . The system must boot before selecting a username and computer.
In the same way, you can install Windows 8 and 10 operating systems on a portable USB hard drive or flash drive.
More on the topic: How to set an alarm clock on your computer
In the example considered, we used the same disk for both the bootloader and the operating system.
If, for example, you want to install a second OS on a portable USB HDD and want them to have a common bootloader, then you need to select the Windows system drive to install the bootloader. Having completed these steps, when you start the system in the boot menu, you will have a choice to launch from two operating systems.
Method No. 2: Download music in Windows Media Player
If you wish, you can rip an audio CD to your computer using the media player included with Windows. In different versions of the operating system, the program is located in different folders, so the easiest way is to enter “wmplayer”
(without quotes) - and Windows Media Player is there. Or look for it through the Start > Programs menu.
Find and launch Windows Media Player
The player must be configured first. From the Organize menu, select Options, then select the Rip Music from CD
.
Open the copy settings window
Select the file format (MP3) and sound quality (set it to at least 256 Kbps).
Specify the file format and adjust the quality level
Open the main window of Windows Media Player, select a music disc to get started, select the desired tracks in the list and click the “Copy from CD” button. After the operation is completed, the files will be in the “My Music” folder by default, if you did not select your option in the settings.
Mark songs to save and start the download process
How to burn files from your computer to disk
First, let's look at the procedure for recording files for later use and transfer to other devices. These instructions are suitable for most files. This is done very simply.
- To begin, insert the disc into the drive.
- Wait a moment and a menu will appear in front of you; if this does not happen, then you will have to launch the disk manually through “My Computer”.
- Here, select the option “Burnfilestodisc” or “Burn files to disk” (depending on the version of the operating system).
- Then you will need to check one of the options and click “Next”.
In total, there will be two options for how to burn files from a computer to a disk: “As a USB flash drive” and “With a CD/DVD player.” We will talk about their features further.
Burn a disc as a flash drive
If you select the “As a USB flash drive” option, you can write files to the disk and then freely delete them, edit them and add new ones. Of course, it only makes sense to use this option if you are using a reusable disk with an RW or RE extension.
But this option also has a disadvantage. After you burn the disc, it will only work with Windows-based computers.
Writing files this way is very easy. First, you need to wait until formatting is complete. After this, you will need to transfer all the files to the disk, just like you would do with a flash drive. For those who have not done this before, there are two ways: simply hold down the file with the mouse and drag it onto the disk, or select the desired files, hold down the “Ctrl + C” combination, and then open the disk and press “Ctrl + V”.
Once the files are written, you can interact with them as you please, delete, edit, etc. You just have to take one nuance into account: files deleted from the disk do not go into the trash.
Recording a disc with a CD/DVD player
If you select the “With CD/DVD player” option, then in the future you will be able to use the disc on any PC and other devices. However, the recording process here is a little more complicated.
- First, you will again have to wait until formatting is completed.
- After this, you will also need to transfer files to disk (read above for how to transfer files to disk).
- You should then see a message from Windows at the bottom of the screen indicating that you have files waiting to be written.
- After this, you will need to open “My Computer”, open the disk and click on the “End Process” or “Write to Disk” button in the bar at the top (in Windows 10 you will need to open the “Manage” tab first).
- After this, you will need to specify the disk name and its writing speed.
- If you are recording audio, you will also need to specify whether you want to burn an “Audio CD” that will play in audio players.
- When recording is complete, the system will ask if you want to create another copy of the disc; if not, refuse.
You can then remove your disc from the drive and use it as you wish.
conclusions
Both methods for copying music from an Audio CD to a computer are quite simple. In one evening you can convert your entire home library of discs to MP3, which probably contains rare recordings. Don't put off the operation until later - CDs don't last forever. Yes, and your CD/DVD drive may fail.
You will probably need an audio editor to edit audio files, convert them (for example, to FLAC), trim or merge them. If you use the second method, you will have to waste time searching for an additional application. AudioMASTER can do all this by default. The software will help you make a too quiet recording louder, adjust the sound for bass, or turn a song into a ringtone for your phone.
Download AudioMASTER - and you will get a reliable and convenient program for working with audio files!