Requirements
For a successful distribution you need:
- Operating system Windows 7, 8, 10 with administrator rights. Without administrator rights, the program will not be able to put your wireless adapter into distribution mode. For reference, the “top ten” has built-in distribution tools that are better than third-party programs. So if you have any questions, welcome to the comments.
- A Wi-Fi card or adapter - otherwise people are trying to distribute Wi-Fi from a computer where it does not exist. No program will help here.
- Receiving devices – computers, laptops, tablets, smartphones.
- Installed NET Framework 3.5 - usually included with Windows, but if suddenly the program does not start, it’s worth checking it.
Not all Wi-Fi adapters support network sharing mode.
Reason for error
Virtual Router Plus is a program with a simple interface that automates the creation and connection to an access point. The received error indicates problems in the software or hardware of the laptop:
- There is no Wi-Fi adapter.
- Wi-Fi is turned off or airplane mode is on.
- The drivers for the wireless adapter are not installed.
- The adapter or driver does not support running a virtual Wi-Fi network.
- The virtual adapter is not enabled.
Settings
The program is as simple as a stool - this is precisely why I see such popularity in it. Even on Windows 10 with a mobile hotspot, there are more steps to take. Here is the main interface of the program:
Windows 7 users love to use Virtual Router Plus because... There, of the available standard methods for distributing Wi-Fi, only the command line remains.
What you need to do to create an access point:
- We run as administrator - without this, the Wi-fi adapter will not go into distribution mode.
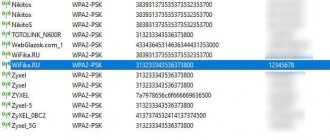
- Network name (SSID) – here we enter the name of the future network, so all connecting devices will see it when searching for wireless networks.
- Password – at least 8 characters, we don’t want everyone to use our Internet uncontrollably, do we?
- General connection - here you select an available wireless adapter, usually it will immediately appear in this list.
- Click “Launch virtual router plus” - if everything goes well, there will be no errors. If an error occurs, write it in the comments, but first it is better to read these instructions in more detail.
All! Our virtual router is running. Now everyone can easily connect to you! The more popular version is made in English. Just in case, I am attaching screenshots and analogues of our translation so as not to get confused:
Network name – Password – Shared Connection
The program distributes the Internet through all available sources - fiber optic cable, ADSL, 3G/4G USB modems.
Setting up Wi-Fi distribution from a laptop
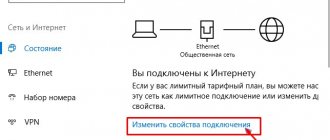
Let me remind you once again that the laptop must be connected to the Internet using a cable and not via a wireless network. Something like this:
And the connection status should be like this:
If everything is connected, we can continue.
Setting up the VirtualRouter Plus program
First download VirtualRouter Plus, you can download version 2.1.0 (which I configured) from the link, or. Links have been verified.
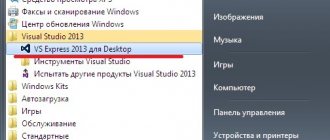
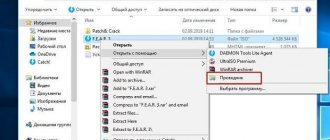
Download the archive and extract it to a folder. In the folder, run the file VirtualRouterPlus.exe
.
A window will open in which we need to fill in only three fields.
Network Name (SSID)
– in this field, write a name for your wireless network.
Password
- password. The password that will be used to connect to your network. Specify a minimum of 8 characters, in English.
Well, opposite Shared Connection
select the connection from which the Internet will be distributed. My Internet connection is via cable, so I left “Local Area Connection” as is.
That's it, click the Start Virtual Router Plus
.
All windows will become inactive and the Stop Virtual Router Plus button will appear (you can use it to turn off virtual Wi-Fi). You can minimize programs and it will hide in the notification panel (bottom, right).
Connecting the device to Wi-Fi
Now take your phone, tablet, or whatever you want to connect (for example, I have an HTC phone on Android), turn on Wi-Fi on it and look for an available network in the list with the name that we set in the Virtual Router Plus program.
I have this network:
Click on this network, enter the password (which we specified when setting up the program) and click Connect
. It should look something like this:
You can already try to access websites from a phone (or other device) that receives the Internet via Wi-Fi from a laptop. But the connection is there, but the Internet may not work. This is true:). Just some more tweaking to do.
The device connects to Wi-Fi, but the Internet does not work
Return to the laptop, open the program in which we configured the distribution and click the Stop Virtual Router Plus
.
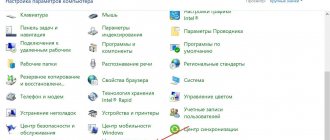
Then right-click on the connection status and select Network and Sharing Center
.
On the left, select Change adapter settings
.
Right-click on the Local Area Connection
and select
Properties
.
Go to the Access
.
Check the boxes like I have in the screenshot below. In the Home network connection
you need to select an adapter.
Everything works fine for me when Wireless Network Connection 3
(you may have Wireless Network Connection 2, or another). Experiment.
Then in the Virtual Router Plus program we launch our network again. The phone should now connect automatically. The Internet should already be working. Everything worked for me, the sites opened!
Converting a laptop into a router was successful :).
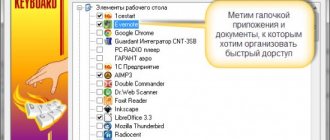
Advice! You can add the Virtual Router Plus program to startup so as not to constantly launch it manually. I wrote about how to do this in the article.
Afterword
Of course, if possible, I would advise buying a router. Even some simple, inexpensive model, for example, will do an excellent job of distributing Wi-Fi to several devices. And you won’t have to torture your laptop :). In addition, the laptop itself will be able to connect via a wireless network, rather than distribute it.
But this method is also good. You can quickly set up a wireless network, even without a router.
If you have any problems, leave questions in the comments, or even better on our forum. We'll figure out. Best wishes!
Also on the site:
How to configure a laptop to distribute Wi-Fi and connect a mobile device to it? Setting up VirtualRouter Plus updated: February 7, 2020 by: admin
Virtual Router Plus is such an excellent program that allows you to set up Wi-Fi distribution from your laptop. Works in Windows 7, Windows 8 (8.1), and even in Windows 10. I have not yet written instructions for setting up Internet distribution via Virtual Router Plus, but I want to tell you how to solve one popular error, with
Virtual Router Plus is such an excellent program that allows you to set up Wi-Fi distribution from your laptop. Works in Windows 7, Windows 8 (8.1), and even in Windows 10 (Windows 10). I have not yet written instructions for setting up Internet distribution through Virtual Router Plus, but I want to tell you how to solve one popular error that many encounter when setting up Virtual Router Plus. This is the error: “Virtual router plus cannot be started.” This is if you have the Russian version of the program. If in English, then the error: “Virtual Router Plus could not be started. Supported hardware may not have been found." She looks like this:
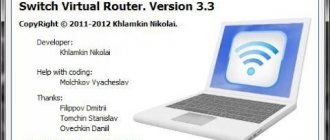
Or like this, in version Virtual Router v3.3:
I want to say right away that if Virtual Router Plus does not work and this error appears, then there is no way to start Internet distribution. You will just see a different error, but the reason is the same. We already have three instructions on our website:
- Distributing Wi-Fi via the command line in Windows 10 (Windows 10).
- Setting up a virtual Wi-Fi network using the Switch Virtual Router program.
- Distributing the Internet from a laptop in Windows 7.
If you want to configure distribution via the command line, you will see the error “The hosted network could not be started. The group or resource is not in the required state to perform the required operation." This is because the problem is most likely not in the Virtual Router Plus program itself, but in your computer. Main reasons:
- Complete absence of Wi-Fi adapter.
- The driver for the Wi-Fi adapter is not installed.
- The adapter/driver does not support launching a virtual Wi-Fi network.
- Wi-Fi is simply turned off.
- The Microsoft Hosted Network Virtual Adapter is not enabled in Device Manager.
If you translate the error from English, it says that Virtual Router Plus cannot be launched because supported hardware was not found on your system. It doesn't matter whether you have Windows 7 or Windows 10 (Windows 10). Everything is the same there in this regard.
The tips from this article are suitable for solving problems with launching a virtual Wi-Fi network when using any method: the command line, or special programs.
Other similar software
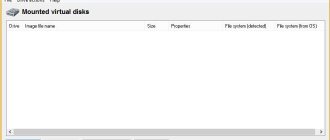
Among analogues, there is also Virtual Router Manager from the author Chris Pietschmann. Essentially, this is the same program, only here there is also a list of connected devices:
I also came across Virtual Wi-Fi Router with a similar name - there is no list of connected devices, but there is a setting for the maximum number of connected devices (Maximum Peers) - but that’s what it turns out to be:
I will not offer these two programs for download. The first one will suit you just fine. The rest can be done with your hands - that would be the goal.
That's all, I hope something turned out to be useful and you were able to launch and configure the program. Write your positive feedback and questions in the comments below - it will be useful for future readers! See you!
MyPublicWiFi program
I wrote about the free program for distributing the Internet from a laptop, MyPublicWiFi, in another article (), where it collected positive reviews: many of the users who were unable to launch a virtual router on a laptop using other utilities succeeded with this program. (The program works on Windows 7, 8 and Windows 10). An additional advantage of this software is that it does not install any additional unwanted elements on your computer.
After installing the application, the computer will need to be restarted, and it will run as Administrator. After launch, you will see the main window of the program, in which you should set the network name SSID, a password for the connection, consisting of at least 8 characters, and also note which Internet connection should be distributed via Wi-Fi. After this, all that remains is to click “Set up and Start Hotspot” to launch the access point on the laptop.
Also, on other tabs of the program, you can view who is connected to the network or set restrictions on the use of traffic-intensive services.
You can download MyPublicWiFi for free from the official website https://www.mypublicwifi.com/publicwifi/en/index.html
Video: how to distribute Wi-Fi from a laptop
Setting up Internet distribution using the program
What are the differences between 3G and 4G networks: features, advantages and disadvantages
Popular programs for sharing the Internet:
- Virtual Router Plus;
- Virtual Wi-Fi Router;
- Switch Virtual Router.
The first one should be used as follows:
- Download from the Internet. No action is required to install the software. The launch immediately follows, as a result of which a window appears.
- Specify the name of the network, password, and select Wi-Fi from the list. A message will appear indicating that the router was created successfully.
- Settings are also required. All connection properties are checked. The program opens again, you must click “Select a connection...”. And choose wireless, No. 2, specifying that it is called that way.
- A new one will appear in the list of adapters, but there is no activity.
This completes the steps to ensure Wi-Fi distribution. When starting, you need to make settings.
Virtual Wi-Fi Router is another program that is provided for free. After downloading and installing it, you need to restart your PC. An interface will open in which you need to go to “Settings” and click “Configuration”. A window will appear where you enter the name of the network, repeat the password twice - this is a set of Latin characters over 8 with the addition of numbers. Click “Start”, considering the setup complete.
There is also a popular program called Switch Virtual Router. To configure, you need to select the Russian language and restart. Specify the network name, password, complete other requested items, and click “OK.” Now in the window you need to click on the “Start” button, after which the finished network will appear. Using the gear symbol, you can make changes if necessary.
Why is this necessary?
Let's say you have several mobile devices with Wi-Fi that urgently need to be connected to the Internet. And as sometimes happens, this “cherished” Internet comes to you via cable and only to your laptop, but you don’t have a Wi-Fi router at hand. This is where this application comes in handy. With its help, you can force your laptop to receive Internet via a cable connection or USB modem and distribute it via Wi-Fi. In this case, the laptop will act as an access point.
Internet distribution option
There are other ways to organize distribution: using the command line or the Connectify Hotspot program. But the virtual router plus program is simple and easy to use, and it is also free to use.
Virtual Router Plus free download
Download the new version of Virtual Router Plus for free in Russian
for Windows 7, 8 and Windows 10. Download the program file from the official website. Our website monitors all software updates so that you have the latest version.
Downloading Virtual Router for Windows 10 is only worth it for those who have a WiFi module on their computer. If you have the latest model of tablet or laptop, then you probably have a WiFi module by default. If you are using a regular personal computer, then before you download Virtual Router, you must acquire a WiFi module; without this, the utility will be simply meaningless. If you don’t have any problems with the hardware, then you can use Virtual Router to turn your computer into a WiFi spot.
This utility is used not only in everyday life, but also by professional system administrators. But this was not the reason why the utility turned out to be overloaded, because it has an extremely accessible and understandable interface. It is likely that the main role in this was played by the fact that Virtual Router is in Russian. The utility also provides detailed help, although you are unlikely to get confused in the settings without this. And if you have already organized an access point, then you can keep track of how many devices are connected to it, as well as monitor their activity. Of course, for all this to work, the Internet must also work on your computer, and for this you need to have
Virtual Router Plus
— software that can organize uninterrupted distribution of a Wi-Fi signal from a laptop or PC (if there is an installed wireless module), without using a router. Such actions will allow you to share your Internet connection with friends and family, for example, while traveling in public transport or in any other place where there is no public wireless access point. Or, if you just use cable Internet directly.
This utility has earned its popularity due to its ease of setup and friendly, intuitive interface. In addition, it is freely distributed and anyone can use it. The only drawback is the lack of Russification, but setting up the access point is so simple and fast that this nuance does not cause any discomfort to the user.
The program is supported by all versions of Windows OS, from XP to the new 10. The distribution kit is very small in size (about 4 GB) and does not require a full installation due to its portability.
Basic information about the program
In theory, a virtual router should turn a computer with built-in Wi-Fi or a laptop into a device that performs the tasks of a router. Software will help create similar conditions for the Windows OS (operating system). After installing it, the built-in Wi-Fi module will be used as a router. That is, you need to download and configure the Wi-Fi router, which is the program. Then it becomes possible to create your own network.
This type of distribution of Internet access is used by experienced users. For example, they do not consider it necessary to buy an additional device. After all, it’s not so easy to find a good device, and if you don’t buy it, then you don’t have to pay money.
Note! Distribution can also be carried out in conjunction with an existing router.