07/13/2018 Category: Personalization and design Author: Ekaterina Vasilyeva
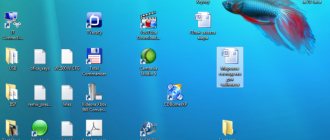
Sometimes Windows 10 clients encounter a problem: they turn on the computer, but their “Desktop” does not have certain icons that they need to work. Why might this happen? What to do in such a situation? Let's consider today how to return the necessary icons and get quick access to services and programs again.
- Putting the icons back on the “Desktop”
Using the context menu options - Restore default icons in Settings
Video: how to replace standard Windows shortcuts
- Video: how to roll back the system using a restore point
Why do icons disappear from the Windows 10 desktop?
Before you solve the problem with icons suddenly disappearing in Windows 10, you need to consider why this could happen. There are several explanations:
- Virus infection. They are capable of making changes to system settings, thereby removing icons. In this regard, before returning the icons to the “Desktop”, you need to scan your PC hard drives for malware using an antivirus, so that after restoring the icons, the situation does not repeat itself.
- System failure. This could be a single bug. In this case, you just need to manually return all the icons.
- Disabled explorer system process.
- Activated "Tablet Mode". To return the usual icons, you need to disable this mode.
- Installing Windows updates with errors. If the icons disappeared immediately after updating the system, the update may have been installed incorrectly. In this case, add the shortcuts again manually.
- Incorrect disconnection of the second monitor.
Registry and its values
Why aren't my desktop icons showing? Maybe the system registry is to blame. It is necessary to make adjustments to its values.
In order to cope with the task, you need:
- Press Win + R.
- In the line that appears, type the command regedit.
- Confirm the operation.
- Look along the path indicated in point a.
- Set the Shell value to “explorer.ese” (in English).
- In the Userinit block, indicate the inscription specified in point b.
- Travel to the section - see point c below.
- Remove subitems that have the word explorer in their names. There must be 2 documents.
Here are the sections and addresses you need to go to:
- HKEY_LOCAL_MACHINE\SOFTWARE\Microsoft\Windows NT\CurrentVersion\Winlogon.
- C:\Windows\system32\userinit.exe.
- HKEY_LOCAL_MACHINE\SOFTWARE\Microsoft\Windows NT\CurrentVersion\Image File Execution Options.
Now everything should work. All that remains is to send the computer to reboot. We found out what to do if the Windows 7 desktop icons and more are not displayed.
Putting the icons back on the “Desktop”
You can correct the situation in several ways: by eliminating the cause itself using the “Task Manager” and “Registry Editor” or by returning the necessary icons manually.
Using context menu options
Utility icons can be removed from the Desktop on their own if their display is disabled. To turn the feature back on, do the following:
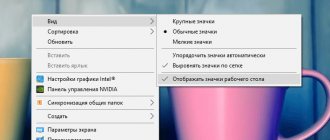
- On the “Desktop”, right-click on a free field. In the list of options, move the cursor to the “View” item.
- In the new menu, see if there is a checkmark next to the “Display desktop icons” element. If it is not there, click on the item with the left mouse button to check the box.
ABOUT
- If it is there, remove it, and then call up the menu again and install it.
- After this, restart your PC.
If this method does not help, create the program icons again manually using another context menu option:
- Again, right-click on the free field on the “Desktop”.
- In the list, click on “Create”. Now click on “Shortcut”.
Click on the “Shortcut” item to create a shortcut for a specific program
- In the new window, click on “Browse” to select the desired program file in “Windows Explorer”.
Click on the Browse button to select the application in Windows Explorer
- As a rule, all utilities are stored on the system disk in the Program Files folder. Find the desired application, for example, Skype. Open the messenger folder and look for the Skype.exe file, which launches the utility. Click on OK.
Select the program file whose shortcut you want to see on your “Desktop”
- Now click on “Next” in the main window.
Click on the “Next” button to continue the shortcut creation procedure
- We print the new shortcut name or leave the standard file name. Click on “Finish”.
Enter the name of the shortcut and click on “Done”
Restore default icons in Settings
If you have lost classic Windows icons on your home screen, such as “Trash” or “My Computer,” you can quickly restore them. Just use the following instructions:
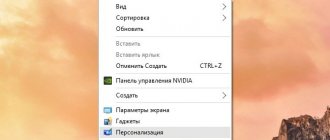
- First, click on an icon-free area on the Windows main screen with the right mouse button to bring up the context menu that is already familiar to you.
Select "Personalization" in the context menu of the "Desktop"
- In the list of options and sections, click on the last item “Personalization”.
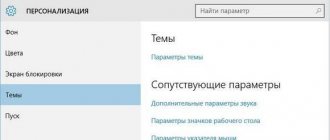
- In the large window, go directly to the “Themes” tab.
- Now let's turn our attention to the right column with links in the window. Click on “Desktop Icon Settings”.
Click on the “Desktop Icon Settings” link
- A small window will open on top of the main one. In it, check the boxes to the left of the shortcuts that you want to see on your “Desktop”. You can install “My Computer”, “Control Panel”, “Trash” and some others.
Mark the icons you need and click on “Apply”
- After that, click on “Apply” and then on OK to close the additional window. The marked icons will immediately appear on your desktop.
Video: how to replace standard Windows shortcuts
Fixing the registry to restore the “Desktop”
The sudden disappearance of icons from the “Desktop” can be caused by errors in the registry - the operating system database, which the latter constantly accesses during operation. It stores all system settings, utilities, connected equipment (printers, headphones, etc.), so it is very important that the registry works correctly. What to do if the reason is an error in the registry?
- On the keyboard, press the Win + R key combination, which will bring up a small “Run” window. In it we enter the word regedit.
Enter the command regedit in the "Open" field
- The Registry Editor window will open. Before further manipulations, you need to create a backup copy of the registry in case of incorrect editing. To do this, click on the “File” object in the top panel, and then on the “Export” option.
Click on "Export" in the "File" menu
- We print the name and save it in any folder convenient for you or even on the “Desktop”. This file will help restore the registry to its previous state. To do this, you just need to launch it by double-clicking the mouse.
Save a backup copy of the registry in any convenient location
- In the left part of the window, open the third main branch HKEY_LOCAL_MACHINE.
Open the third main folder HKEY_LOCAL_MACHINE on the left side of the window
- Now we sequentially launch the following folders: Software - Microsoft - WindowsNT - CurrentVersion - Winlogon.
In the Winlogon folder, look for the Shell entry
- On the right side of the window, look for a registry entry called Shell. We launch it by double-clicking and see what value this parameter has. It should be explorer.exe. If there is another one, we change it immediately.
The Shell parameter must be set to explorer.exe
- Another parameter in the Userinit list should be C:\Windows\system32\userinit.exe.
The Userinit parameter should be set to C:\Windows\system32\userinit.exe
- After changing the values of these two parameters, a black screen may appear. Don't worry, it will disappear in a few seconds.
Restoring icons through Task Manager
The service process explorer.exe or “Explorer” is responsible for the graphical design of Windows. Icons may suddenly disappear from the “Desktop” due to the fact that it is not working correctly or is not running at all. In the first case, it must be restarted. How to do this?
- In Windows 10, launching the “Task Manager” is very simple: right-click on the “Taskbar” and select the desired item in the context menu.
Open the "Task Manager" through the context menu of the "Taskbar"
- In the first “Processes” section, carefully look for the “Explorer” item in the list. Select it with the left mouse button, and then click on the “Restart” button located at the bottom of the window.
Select “Explorer” in the “Processes” tab and click “Restart”
- If you do not find this process in the list, click on “File” in the top panel and select the first item “Run new task”.
In the “File” menu, click on “Run a new task”
- In a new small window, in a single field, type explorer.exe or explorer. Click OK for the created task to run.
Enter the command explorer.exe in the "Open" field
- The same launch command can be sent to the system in another way: using the Run window. Press the Win + R combination on your keyboard. Write one of the two commands and click OK.
Turning off tablet mode
Icons do not appear on the “Desktop” if you have “Tablet Mode” activated. How can I turn it off and prevent the system from turning it on on its own?
- First, you need to make sure that “Tablet Mode” is not activated on your PC. To do this, hold down the Win and A (Latin) keys. An area with notifications and tiles will appear on the right side of the screen. The very first one will be “Tablet Mode”. If it is active (saturated color as opposed to disabled), click on it once with the left mouse button. It will immediately dim and the screen will return to Desktop mode.
- After all the manipulations, you need to turn on the “Start” system menu and click on the gear-shaped icon, which is located directly above the device’s power off button. This action will open the Windows Settings window. Click the gear icon in the Start menu to open Windows Settings
- Launch the first section “System” with one click.
Open the first section “System”
- In the first drop-down menu, select “Use desktop mode” as the value, and in the second, “Always ask for permission before switching mode.”
In the first drop-down menu, select "Use Desktop Mode"
- Move the two sliders to the “On” position and then to the “Off” position again.
Turning off the PC using the button on the laptop
A non-standard way to get the icons back is to turn off the device using the power button, rather than through the system Start menu. To do this, you need to close all utility windows and hold down the button. After turning on the computer, the shortcuts should appear on the “Desktop” again.
Scan explorer.exe file
Icons can be removed from the “Desktop” on their own if the explorer.exe file, which is responsible for the windowed interface of Windows 10, is damaged. What can be done in this case? You need to scan the file using special commands:
- Press the Win + R key combination again so that the “Run” window appears on the screen. Paste the copied command sfc /scannow into the field and click OK.
Enter the command sfc /scannow in the Open field
- We are waiting for the check to finish. After this, execute another command in the same “Run” window: sfc /scanfile=C:\Windows\explorer.exe. If you have the OS installed on a drive other than the system drive, indicate its letter.
Paste the command sfc /scanfile=C:\Windows\explorer.exe into the Open field
- If the shortcuts still do not return to the Desktop, check whether the explorer.exe file is in the Windows folder on the system drive. If there is no application file, you need to roll back the system using a restore point. To do this, use the instructions presented below in the “System Rollback” section.
Find the explorer.exe application in the Windows folder on the system drive.
Video: several methods for restoring desktop icons
System rollback
One of the most effective ways to return icons is to restore the system to its previous state, when all the necessary icons were still on the “Desktop”. This method will help you if all the others fail and you don't want to return them manually. Use the following instructions:
- Click on the magnifying glass icon on the “Taskbar” located next to the “Start” button. We print the request “Control Panel”. As you type, the system will display expected search results. Left-click on the item with the corresponding name.
Open Control Panel using Windows Search
- Find the search bar at the top and enter the query “Recovery”. In the results, run the section with this name.
Open the "Recovery" section in the "Control Panel"
- Now you need to click on the second option “Run System Restore”.
Click on the second item “Run System Restore”
- The Recovery Wizard window will appear on the screen. Read the information and simply click on the “Next” button in the lower right corner of the window.
In the wizard window, click “Next”
- In the list of recovery points, select the desired one with the left mouse button. Click on “Next” again.
Click on the desired restore point, and then click on “Next”
- Using the “Search for affected programs” button, you can find out which applications will be deleted and which will be restored. The list may be empty.
The “Search for affected programs” button allows you to find out which utilities and drivers will be removed and which will be restored
- Click on “Finish” so that the system starts the recovery process - rolling back to the time when the shortcuts were still on the “Desktop”.
Click “Finish” to start the recovery process
Video: how to roll back the system using a restore point
Customizing system icons
After installing Windows 7, the “Trash” system icon is already present on the PC desktop. During the initial setup, as a rule, several others are added to it. Almost always this is the “Computer” icon (in previous versions - “My Computer”), a folder with user files, sometimes the “Network” and “Control Panel” icons. How to restore the shortcut to my computer and others? If shortcuts and folders have disappeared from the desktop, it is easy to get them back by implementing the following sequence of actions.
- Call up the desktop context menu by right-clicking on an empty space.
- In the list that appears, click the “Personalization” line.
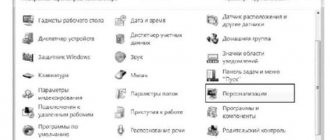
- In the new window, click “Change desktop icons.”
- In the window that appears, check the boxes next to the required components (and, of course, click OK). In the above screenshot, the selected “User Files” corresponds to the Ark icon.
Why are shortcuts not displayed on the desktop even after these actions? The fact is that displaying Windows desktop icons is part of the functions of a special file explorer.exe, which is launched when the computer is turned on along with the system. If the computer is seriously infected, the launch of this file is blocked. In this case, checkmarks may be present next to the components, but the icons will not be displayed. How to return all shortcuts to the desktop? To solve the problem, you will need to restore the normal launch of the explorer.exe file.
