When working on a computer, many users need to enlarge or reduce their desktop icons. The level of vision of all people is different, so it will be more comfortable for the user to adjust the display of the size of the Desktop icons to suit their needs.
By default, the size of Desktop icons is adjusted depending on the monitor screen resolution on a particular computer. The dimensions of all desktop elements can be changed if necessary.
In the Windows operating system, you can change the size of icons on the Desktop using standard system tools. These methods work on Windows 10, Windows 8, and Windows 7 operating systems.
Let's look at two options separately: how to make the icons on the Desktop smaller, and how to enlarge the icons on the Windows Desktop. We will consider changing the size of Desktop icons using the Windows 10 operating system as an example.
The easiest way to make your desktop icons smaller is to use your keyboard keys. This is the simplest and easiest way to change the size of icons on your computer desktop.
How to make desktop icons smaller (method 2)
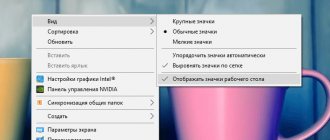
After right-clicking on the Desktop, click on “View” in the context menu, and then select “Small Icons”.
All icons on the desktop have become small and decreased in size.
You may also be interested in:
- How to remove icons from the Windows Desktop - 3 methods
- How to return My Computer to the Desktop in Windows
How to make desktop icons smaller or larger by changing screen resolution
A third and more drastic way to change the size of desktop shortcuts in Windows is to change the resolution used by your display. More precisely, to make the icons on the desktop smaller, you need to increase the screen resolution. If you need larger icons on your desktop, you should reduce your screen resolution.
However, keep in mind that changing the resolution not only changes the size of your desktop shortcuts, but also everything else that appears on the screen. This means apps, text, icons and everything else. Don't do this unless you want to make everything smaller or smaller.
How to enlarge desktop icons in Windows 10 (3rd method)
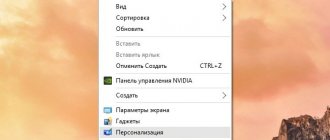
In Windows 10, right-click on the Desktop and select “Display Settings” from the context menu.
In the “Display” section, under “Change text, apps, and other items: 100% (recommended),” move the slider on the scale to the desired position.
The size of the Desktop elements will change depending on the position of the slider on the scale.
In addition, you can enlarge a specific part of the monitor screen using Screen Magnifier.
#2 Using keyboard and mouse
Let's look at a simple example. You turn on your computer and see very large icons on the desktop of your Windows 7. What will you do? Of course, after the previous method, you will try to change the size through the context menu. What if it suddenly doesn’t work? (This often happens on Windows 7, by the way).
Scaling via the Ctrl button will come to the rescue!
Using the Ctrl key and the mouse wheel, you can resize icons without resorting to the context menu. Scrolling the wheel up will increase the size of the icons, and scrolling down, on the contrary, will decrease it.
Unlike the context menu, where only 3 sizes are specified, you can customize the size “to suit you,” thereby personalizing your computer.
Important information
Some users may encounter the problem of blurry icons on the Windows 10 desktop. This is a known situation of scaling problems on older versions of the system.
To solve this problem, in the scaling settings (System - Screen), set the recommended scaling or “play” with the size, setting a convenient scale and return the clarity of the icons.
We hope that we have answered all your questions in this article. The more you know about the system, the easier it is to customize it and solve problems that arise. If you have any questions, we will be happy to help you in the comments.
#3 Through theme options
This wonderful option will help not only change the small icons on the Windows 7 desktop, but also change the size and font of the system. To do this, follow these steps:
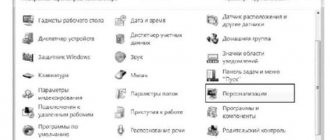
- Open Control Panel.
- Go to the “Personalization” settings.
- Select Window Color.
- Then, for Element, select Icon.
- In these settings for Windows 7 desktop icons, you can specify the size that is convenient for you, select the font size and type of signatures for most system elements.
- To reset this setting, you must install the default Window theme.
Fine-tuning Windows 7 shortcuts
If with the two previous methods we enlarged or reduced the icons, then this method will show how, in addition to resizing, we can also customize the visual display and font style of the label names.
To change sizes and fonts, you need to open additional visual window settings. In different editions of Windows 7, it opens differently.
1. In Windows 7 edition Starter, Home Basic, click “Start” -> “Control Panel”, then find “Display”.
In this window, in the left menu, click the “change color scheme” link. Then click the "other" button.
2. In Windows 7 Ultimate, right-click on an empty space within the desktop, then click the last item “personalization”. In the bottom block of the new window, click the “window color” link.
In the option to change the color of the taskbar and windows, click the design options link (picture below).
In the “window color and appearance” window, in the “element” field, select the “icon” line from the drop-down list. To the right of the line in the “size” field, set the size of the labels.
In the line below, select the font to your taste, and also adjust its size, boldness or italics.
Note: when you change the font in Windows 7, the font of the entire interface will also change.
Click "apply" and see the result. If everything is ok, click “OK”.
You can change the size of desktop icons in Windows 7 and 8 in a few seconds by setting a custom or standard size. If you spend more time, you can add elegant fonts to the names of the shortcuts.
Using hot keys
Now let's see how to reduce or enlarge icons on the desktop using the keyboard, that is, hot keys. Hold Ctrl and scroll the manipulator roller up or down, depending on whether you want to make the icons larger or smaller. Like the previous one, this method is universal; in addition, it allows you to change the size of the labels over a wider range.
Changing the size of icons in personalization settings
Let's go to the personalization settings section by right-clicking on an empty space on the desktop.
In the window that opens, click on the “Window Color” link
and then click on the “Advanced design options” link.
Select the “Icon” item in the drop-down list of customizable elements, then set the desired size value (default is 32) by clicking on the up/down arrows (to the right of the input field) or directly by entering the desired value. Below you can set the font and size of the icon name.
Click on the “ Apply ” button to save the changes and on the “ Ok ” button to close the settings window. Close the “Window Color and Appearance” window by clicking on the “ Save Changes ” button.
Close the personalization settings by clicking on the diagonal cross in the upper right corner of the window.
Share.
More on the topic:
- What is the Windows Registry? Most users have heard about the Windows registry, but have no idea about it. In this material you will learn what a registry is, why it is needed and where it is located. In this article we do not [...]
- How to update Windows yourself? Simple tips for novice users Not all operating systems work successfully, so for many of them, developers create new add-ons and packs that greatly improve the condition of the computer. How can you update [...]
- How to set a password on Windows, remove it and reset it Password protection in Windows OS greatly helps to save important user data. However, in some situations, a password can completely interfere with work, creating a lot of inconvenience. How […]
- 10 Tips for a Faster, More Stable Windows 10 Windows 10 is still a fairly new and popular system, but it needs some extra optimization to get the most out of it and keep up with the resources […]
- How to install Windows from a flash drive Without an operating system, a personal computer is nothing more than a set of components assembled in a system unit case. To make these components interact with each other, [...]
Via context menu
The simplest, fastest and most universal way to choose a comfortable size for desktop icons is to use its context menu. Let's apply this method equally to the seventh, eighth and tenth versions of Windows. Right-click on the desktop and select the desired icon size in the “View” submenu. There are three templates in total – large, medium and small icons.
Changing the size of icons in the context menu
To make the icons larger or smaller, do the following:
- Right-click on an empty area of the desktop to open the context menu.
- Select the “View” item in the menu, where next select the type of icons: “Large”, “Regular”, “Small”
As you can see, fixed icon sizes are selected using this method. Is it possible to select custom size options? The Windows 7 operating system (except for the Starter and Home Basic versions) provides this option, but to do this you will have to go into the personalization settings.
Ways to resize icons
There are several methods for accomplishing this task. According to the first method, the user will only need to perform the following few steps:
- From the “Seven” desktop you need to call the context menu;
- Next, place the cursor on the “View” line and wait for the additional menu to appear;
- Then, from the displayed list of three options offered by the system by default, select the most suitable one.
The second method already allows the user to independently set any size of icons with their smooth manual adjustment. To do this you need to take the following steps:
- Click once on one of the icons;
- After this, press and hold “Ctrl” while turning the mouse wheel. During these actions, the size of the icon will immediately change depending on the direction of rotation.
For most users, this method of adjusting the size of icons is the most convenient, but if you do not like the result after making changes, then the first method always works with fixed options for the displayed desktop elements.
Therefore, in case of an unsuccessful attempt at manual intervention, it is recommended to return to the 1st method and quickly restore everything again, leading to its normal appearance.
How to hide and add standard icons?
Many people have probably had such a case when the “My Computer” icon disappeared and you didn’t know how to get it back. Someone copied a shortcut from File Explorer, but the correct step would have been to go to the Control Panel.
- Go to Personalization options.
- Select "Change icons...".
- Then check the box for the application whose icon you want to display. Or remove it to hide the icon on the Windows 7 desktop.
In the same window, you can reset the appearance of icons if they have been changed by the theme or another user. After all, someone could create identical icons on the Windows 7 desktop for each shortcut to play a trick on you. There are also small viruses that engage in such sabotage, but most of them only interfere, rather than actually causing harm.