A Windows 10 user may encounter a situation where, without any action on his part, icons begin to be deleted from the desktop. To get rid of this problem, you need to find out why it might have appeared.
- How to return icons to your desktop
Removing viruses - Activating icon display
Video: How to add a My Computer icon to your desktop in Windows 10
- Video: how to disable “Tablet Mode” in Windows 10
- Video: How to remove an update in Windows 10
- System Restore
- Checking the Taskbar settings
Reasons why desktop icons may disappear
Program icons or user-created shortcuts on the Desktop, as well as icons from the Taskbar, may disappear for various reasons. We can roughly divide them into basic and rare ones.
The main ones include:
- Automatic system update failed. In this case, you need to remove the latest updates and return the system to its original state. The second option is to reinstall the video adapter driver, which is often important for outdated computers.
- Penetration of malware into the system from the Internet or from an external device such as a flash drive, tablet or smartphone. You need to use an antivirus program to search for and remove viruses.
- System error in Windows 10 files. You can try to fix system failures using special programs such as Glary Utilites or Wise Care 365. The second option is to roll back to its original state using a system restore point.
- Basic registry settings have been damaged or changed. You need to check the values in the registry branches and make changes if necessary.
Rarely encountered ones include:
- Accidental activation of “Tablet Mode”. In this mode, a number of system properties can be changed. You just need to disable hiding icons in “Tablet Mode” in the system settings.
- Self-disabling of the Explorer.exe procedure, which is responsible for displaying pictograms and icons. This procedure must be restarted.
- The second monitor is incorrectly connected or disconnected when working in dual-screen mode. You need to change your video adapter or display settings.
- The option to display icons in the Desktop properties is disabled. You need to turn it on.
Putting the icons back on the “Desktop”
You can correct the situation in several ways: by eliminating the cause itself using the “Task Manager” and “Registry Editor” or by returning the necessary icons manually.
Using context menu options
Utility icons can be removed from the Desktop on their own if their display is disabled. To turn the feature back on, do the following:
- On the “Desktop”, right-click on a free field. In the list of options, move the cursor to the “View” item.
- In the new menu, see if there is a checkmark next to the “Display desktop icons” element. If it is not there, click on the item with the left mouse button to check the box.
ABOUT - If it is there, remove it, and then call up the menu again and install it.
- After this, restart your PC.
If this method does not help, create the program icons again manually using another context menu option:
- Again, right-click on the free field on the “Desktop”.
- In the list, click on “Create”. Now click on “Shortcut”.
Click on the “Shortcut” item to create a shortcut for a specific program
- In the new window, click on “Browse” to select the desired program file in “Windows Explorer”.
Click on the Browse button to select the application in Windows Explorer
- As a rule, all utilities are stored on the system disk in the Program Files folder. Find the desired application, for example, Skype. Open the messenger folder and look for the Skype.exe file, which launches the utility. Click on OK.
Select the program file whose shortcut you want to see on your “Desktop”
- Now click on “Next” in the main window.
Click on the “Next” button to continue the shortcut creation procedure
- We print the new shortcut name or leave the standard file name. Click on “Finish”.
Enter the name of the shortcut and click on “Done”
Restore default icons in Settings
If you have lost classic Windows icons on your home screen, such as “Trash” or “My Computer,” you can quickly restore them. Just use the following instructions:
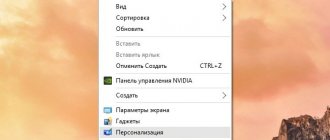
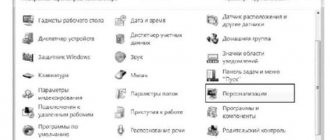
- First, click on an icon-free area on the Windows main screen with the right mouse button to bring up the context menu that is already familiar to you.
Select "Personalization" in the context menu of the "Desktop"
- In the list of options and sections, click on the last item “Personalization”.
- In the large window, go directly to the “Themes” tab.
- Now let's turn our attention to the right column with links in the window. Click on “Desktop Icon Settings”.
Click on the “Desktop Icon Settings” link
- A small window will open on top of the main one. In it, check the boxes to the left of the shortcuts that you want to see on your “Desktop”. You can install “My Computer”, “Control Panel”, “Trash” and some others.
Mark the icons you need and click on “Apply”
- After that, click on “Apply” and then on OK to close the additional window. The marked icons will immediately appear on your desktop.
Video: how to replace standard Windows shortcuts
Fixing the registry to restore the “Desktop”
The sudden disappearance of icons from the “Desktop” can be caused by errors in the registry - the operating system database, which the latter constantly accesses during operation. It stores all system settings, utilities, connected equipment (printers, headphones, etc.), so it is very important that the registry works correctly. What to do if the reason is an error in the registry?
- On the keyboard, press the Win + R key combination, which will bring up a small “Run” window. In it we enter the word regedit.
Enter the command regedit in the "Open" field
- The Registry Editor window will open. Before further manipulations, you need to create a backup copy of the registry in case of incorrect editing. To do this, click on the “File” object in the top panel, and then on the “Export” option.
Click on "Export" in the "File" menu
- We print the name and save it in any folder convenient for you or even on the “Desktop”. This file will help restore the registry to its previous state. To do this, you just need to launch it by double-clicking the mouse.
Save a backup copy of the registry in any convenient location
- In the left part of the window, open the third main branch HKEY_LOCAL_MACHINE.
Open the third main folder HKEY_LOCAL_MACHINE on the left side of the window
- Now we sequentially launch the following folders: Software - Microsoft - WindowsNT - CurrentVersion - Winlogon.
In the Winlogon folder, look for the Shell entry
- On the right side of the window, look for a registry entry called Shell. We launch it by double-clicking and see what value this parameter has. It should be explorer.exe. If there is another one, we change it immediately.
The Shell parameter must be set to explorer.exe
- Another parameter in the Userinit list should be C:\Windows\system32\userinit.exe.
The Userinit parameter should be set to C:\Windows\system32\userinit.exe
- After changing the values of these two parameters, a black screen may appear. Don't worry, it will disappear in a few seconds.
Restoring icons through Task Manager
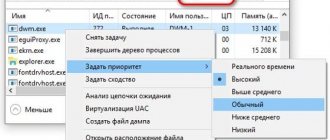
The service process explorer.exe or “Explorer” is responsible for the graphical design of Windows. Icons may suddenly disappear from the “Desktop” due to the fact that it is not working correctly or is not running at all. In the first case, it must be restarted. How to do this?
- In Windows 10, launching the “Task Manager” is very simple: right-click on the “Taskbar” and select the desired item in the context menu.
Open the "Task Manager" through the context menu of the "Taskbar"
- In the first “Processes” section, carefully look for the “Explorer” item in the list. Select it with the left mouse button, and then click on the “Restart” button located at the bottom of the window.
Select “Explorer” in the “Processes” tab and click “Restart”
- If you do not find this process in the list, click on “File” in the top panel and select the first item “Run new task”.
In the “File” menu, click on “Run a new task”
- In a new small window, in a single field, type explorer.exe or explorer. Click OK for the created task to run.
Enter the command explorer.exe in the "Open" field
- The same launch command can be sent to the system in another way: using the Run window. Press the Win + R combination on your keyboard. Write one of the two commands and click OK.
Turning off tablet mode
Icons do not appear on the “Desktop” if you have “Tablet Mode” activated. How can I turn it off and prevent the system from turning it on on its own?
- First, you need to make sure that “Tablet Mode” is not activated on your PC. To do this, hold down the Win and A (Latin) keys. An area with notifications and tiles will appear on the right side of the screen. The very first one will be “Tablet Mode”. If it is active (saturated color as opposed to disabled), click on it once with the left mouse button. It will immediately dim and the screen will return to Desktop mode.
- After all the manipulations, you need to turn on the “Start” system menu and click on the gear-shaped icon, which is located directly above the device’s power off button. This action will open the Windows Settings window. Click the gear icon in the Start menu to open Windows Settings
- Launch the first section “System” with one click.
Open the first section “System”
- In the first drop-down menu, select “Use desktop mode” as the value, and in the second, “Always ask for permission before switching mode.”
In the first drop-down menu, select "Use Desktop Mode"
- Move the two sliders to the “On” position and then to the “Off” position again.
Turning off the PC using the button on the laptop
A non-standard way to get the icons back is to turn off the device using the power button, rather than through the system Start menu. To do this, you need to close all utility windows and hold down the button. After turning on the computer, the shortcuts should appear on the “Desktop” again.
Scan explorer.exe file
Icons can be removed from the “Desktop” on their own if the explorer.exe file, which is responsible for the windowed interface of Windows 10, is damaged. What can be done in this case? You need to scan the file using special commands:
- Press the Win + R key combination again so that the “Run” window appears on the screen. Paste the copied command sfc /scannow into the field and click OK.
Enter the command sfc /scannow in the Open field
- We are waiting for the check to finish. After this, execute another command in the same “Run” window: sfc /scanfile=C:\Windows\explorer.exe. If you have the OS installed on a drive other than the system drive, indicate its letter.
Paste the command sfc /scanfile=C:\Windows\explorer.exe into the Open field
- If the shortcuts still do not return to the Desktop, check whether the explorer.exe file is in the Windows folder on the system drive. If there is no application file, you need to roll back the system using a restore point. To do this, use the instructions presented below in the “System Rollback” section.
Find the explorer.exe application in the Windows folder on the system drive.
Video: several methods for restoring desktop icons
System rollback
One of the most effective ways to return icons is to restore the system to its previous state, when all the necessary icons were still on the “Desktop”. This method will help you if all the others fail and you don't want to return them manually. Use the following instructions:
- Click on the magnifying glass icon on the “Taskbar” located next to the “Start” button. We print the request “Control Panel”. As you type, the system will display expected search results. Left-click on the item with the corresponding name.
Open Control Panel using Windows Search
- Find the search bar at the top and enter the query “Recovery”. In the results, run the section with this name.
Open the "Recovery" section in the "Control Panel"
- Now you need to click on the second option “Run System Restore”.
Click on the second item “Run System Restore”
- The Recovery Wizard window will appear on the screen. Read the information and simply click on the “Next” button in the lower right corner of the window.
In the wizard window, click “Next”
- In the list of recovery points, select the desired one with the left mouse button. Click on “Next” again.
Click on the desired restore point, and then click on “Next”
- Using the “Search for affected programs” button, you can find out which applications will be deleted and which will be restored. The list may be empty.
The “Search for affected programs” button allows you to find out which utilities and drivers will be removed and which will be restored
- Click on “Finish” so that the system starts the recovery process - rolling back to the time when the shortcuts were still on the “Desktop”.
Click “Finish” to start the recovery process
Video: how to roll back the system using a restore point
Act three. Displaying desktop icons
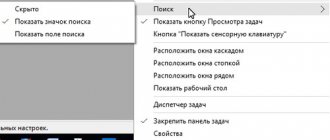
Sometimes, due to crashes in the Windows 10 operating system, some options are no longer selected. One of them is the “Show desktop icons” feature. To enable it again, do this:
- right-click on the desktop;
- in the drop-down menu, select “View” (hover your mouse cursor over this section and another auxiliary menu will open on the right);
- and then click on “Display desktop icons” .
Enabling the “Show desktop icons” option
Disadvantages of Windows 10 virtual desktops
The presence of an option that allows you to create virtual screens in Windows 10 makes it more attractive among its competitors. Since this option is new among the operating systems presented by Microsoft, according to some parameters it is still quite “raw”.
For example:
- All created tables are strictly in their places. For convenience, this function could be made more dynamic.
- It is also worth noting that the proposed virtual space setup is very sparse in functions.
- There is no way to give your own name to the created screen. The name is a serial number.
- The settings you make are not saved after a reboot.
- It is not possible to create different working screens on two or more monitors connected to the computer. This feature would be a very big advantage for switching between tables.
- Each newly created table is similar to the previous one. Setting up one space or another changes all others.
Surely, many have noticed that with the advent of new operating systems, namely Windows 8 and 10, after installing them, the icons so familiar to everyone disappeared: recycle bin, computer, documents. More precisely, they did not disappear, but simply hid from users and moved to the Start menu, where they were displayed as tiles. But, having found these shortcuts in Start, users had a new problem - they could not be returned back to the desktop. By calling the shortcut property, it could be pinned to the taskbar, but there was not a word about the desktop in the properties.
As a result, the question of how to return icons to the desktop and why they disappeared began to be asked by users more and more often. This is not surprising, since these icons position themselves as things that must be on the desktop. So I, always after or after, first of all, return the icons of my documents, computer and recycle bin to their place.
Process explorer
Explorer is responsible for displaying the contents of the desktop, namely the explorer system process. Although in the latest Russian-language versions of Windows it is called Explorer. Let's find it in the Task Manager (how to open the Manager - read in detail here).
Find “Explorer” in the processes, right-click and click “Restart”.