Author of the article
Mikhail Romanovsky
Computer repair engineer, technical support specialist
Top solutions among routers are often purchased for special tasks, but it also happens that the average user lacks the functionality of cheaper models. Keenetic Ultra (KN 1810) is the most powerful representative of the Kinetic line. It is suitable both for those who want to have a full-fledged NAS at home, and for lovers of smart home systems. But at the same time, a person who just wants very fast Internet will also like it - there are gigabit ports here, and the corresponding tariffs from providers are almost no longer a luxury.
Indicators and connectors
On the right side of the router there are 2 USB ports, which can be disabled in some revisions and not in others. They are quite nicely framed with rectangular holes for heat removal.
The ports are spaced far apart, apparently so that even the most massive 4G modems do not overlap the adjacent connector. In total there are 1 USB 2.0 and 1 USB 3.0, differing in data transfer speed. The first one can be used to connect a modem, and the second one can be used for network storage.
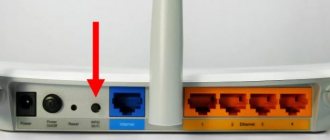
On the back are 2 of 4 antennas and the remaining connectors. From left to right:
- Hidden factory reset button.
- Gigabit LAN ports for connecting devices into a local network via wire.
- Blue WAN port for connecting an Internet cable from your provider.
- SPF port for connecting fiber optic cable.
- Connector for connecting the supplied power supply.
The indicators on the front panel look like this:
Not all symbols can be guessed without problems, and they are a little difficult to see due to the lack of contrast:
- Nutrition status.
- Status of connection to the external network.
- Two program-configurable indicators.
- Wireless connection status.
- Power button.
On the left side there are only ventilation holes and one of the antennas, at the bottom there is a sticker with service information, rubber feet and “ears” for mounting on the wall.
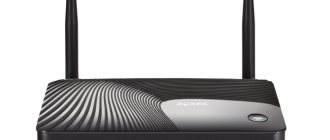
So, let's start the review of Zyxel Keenetic Ultra with the appearance, like the entire Zyxel Keenetic II line, the router is black, the upper part is decorated with wavy protrusions, and you can’t help but notice a large button with dual functionality:
Short press of the button - Launches the quick connection function (WPS). Press for more than 3 seconds - Turns the wireless network on or off. At the back there are three rotating antennas, which, unlike the younger models of the Keenetic II family, are non-removable. There is also a power switch, a reset button hole and a small universal button, the purpose of which can be changed, 4 connectors for connecting local network devices and one network connector for connecting the Internet. On the right side there are two USB 2.0 sockets, to which you can connect flash drives, disks, printers, and other external devices.
The front panel is strewn with indicators, let's figure out what each of them means
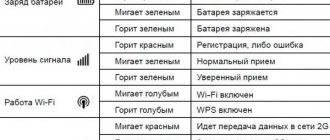
Indicator - Status Off Zyxel Keenetic Ultra is turned off. Flashes rarely The router is loading. If the indicator blinks for more than two minutes, the Internet center may be faulty. Flashing rapidly Firmware update. is on - the center is turned on and functioning normally.
Indicators 0-4 Connection to network connectors Off The cable is not connected to the corresponding connector of the Internet center, or the network connection is not established. Lit or flashing The network connection has been established and information is being transferred.
Indicator - Wireless network Wi-Fi There are two of them, each corresponding to its own frequency of 2.4 GHz and 5 GHz
Off The Wi-Fi network of the corresponding frequency band is turned off. On The Wi-Fi network is on. Blinking, fast Data is being transmitted over the wireless network. Blinking, rarely A quick wireless connection setup session using WPS technology has been launched.
Indicator - Internet Off Zyxel Keenetic Ultra did not receive IP parameters from the provider to connect to the Internet or did not pass authorization. On The IP settings for connecting to the Internet have been set.
Indicator - USB connections.
Does not burn
The router did not detect compatible equipment connected to the “USB” connectors, or the USB device is not ready for use. Some USB devices take up to 30 seconds to get ready for use.
Lit
USB device is connected.
Flashing
Preparing to safely remove a USB storage device. Unplug the drive only after the indicator stops blinking
Filling and technical characteristics of the router.
| Router ZyXEL Keenetic Ultra | |
| Wi-Fi standards | IEEE 802.11 a/b/g/n (2.4/5 GHz) |
| Chipset/controller | Mediatek/Ralink RT6856 (700 MHz) + RT5392 + RT3593; Realtek RTL8367RB |
| Memory | RAM 256 MB/ROM 16 MB |
| Antennas | 3 x non-removable omnidirectional 3 dBi; 2x2:2 (2.4 GHz); 3x3:3 (5 GHz) |
| Safety | 64/128-bit WEP/WPA/WPA2, 802.1x, 802.1Q, WPS |
| Wi-Fi speed | 802.11n (2.4 GHz): up to 300 Mbps, 802.11n (5 GHz): up to 450 Mbps |
| Interfaces | 5 x 10/100/1000 Mbps LAN/WAN, 2 x USB 2.0 |
| Hardware buttons | Power, Wi-Fi + WPS off, factory reset, FN button |
| Dimensions (WxDxH) | 186x120x39 mm |
| Weight | 310 g |
| Nutrition | PSU AC 100-240 V, 50/60 Hz, 0.8 A; DC 12 V, 2 A |
Setting up ZyXEL Keenetic Ultra
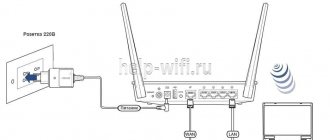
In order to set up the router, you need to connect it to your computer/laptop using an Ethernet cable and connect the Internet cable to the Internet port. Don't forget to connect power to the Zyxel Keenetic Ultra and press the power button on the case. In the computer/laptop settings, set to automatically receive network settings . After this, open any browser (IE, Chrome, Opera), the web interface of the router will open, if this does not happen, enter 192.168.1.1 or my.keenetik.net , a web interface window will open offering a choice - go to the web interface or run quick setup . I suggest starting with a quick setup.
The first step will be setting up the Internet; the router supports various types of VPN connections (PPTP and L2TP), PPPoE, 802.1X, VLAN 802.1Q, IPv4/IPv6. In order to properly configure the Internet, I recommend contacting your provider. After the global network is configured, Zyxel Keenetic Ulta will offer to update its firmware, we agree and click “ Update ”.
After installing the updates and rebooting the router (this will take no more than 5 minutes), you will see a window stating that the Internet Center components are updated and you can proceed to the next step, click “ Next ”.
Next, I propose to consider the main functions of the ZyXEL Keenetic Ultra router; for this, in the next window, go to the “ Web Configurator ”.
The first thing you will see after this is the ability to set a password for the web interface; I recommend using a complex password consisting of at least 6 characters with numbers, large and small letters, and special ones. signs ( [email protected] #$), just don’t forget it later, otherwise you’ll have to press the Reset button and return the router settings to factory settings and then configure everything again.
After entering the password, you need to log in (enter your login and password), login - admin password - <the one you just set>. After this, you will be taken to the web interface of the router, where you will see System Monitor, it shows information about the system, the status of the router, and network interfaces.
Zyxel Keenetic Ultra firmware update.
Video review of the Zyxel firmware update.
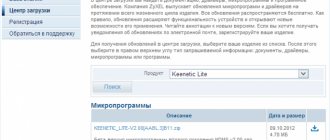
In each new version of the router firmware, old bugs are eliminated, and sometimes features are added or improved. Therefore, I recommend occasionally updating the Zyxel Keenetic Ultra firmware. This can be done quite simply; on the router’s web interface, select the “ System ” button in the menu at the bottom, then the “ Components ” tab. Select the required components (preferably, I think, all the ones you use) and click the “ Update ” button.
Attention!!! To update components, you must be connected to the Internet.
Setting up a Wi-Fi network on Zyxel Keenetic Ultra.
Let's move on to setting up the Wi-Fi network. To do this, select a Wi-Fi network in the menu below.
Several tabs will appear at the top:
2.4 GHz access point - configures Wi-Fi at 2.4 GHz frequency
5 GHz access point - configures Wi-Fi at 5 GHz frequency
Guest network - used to set up a Wi-Fi network without access to the local network, only for the Internet. Typically, a Guest network is used in an office so that non-employees of the enterprise can connect to the Internet without access to the local network.
Access list - allows you to create two lists “Black” and “White”. In the “White List” mode, network access will be limited only to devices on this list, and blocked for all others; in the “Black List” mode, network access will be blocked to all devices from the specified list.
the Network Name (SSID) and Network Key fields , these are the values that were specified by the manufacturer, which can be found on the router sticker. And if you are not confused by the name of the Wi-Fi network and password, you can leave these values or you can change them to others (I recommend leaving the remaining fields at default).
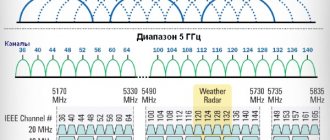
One more point, since the device uses two frequency ranges, each of them is configured separately, with different Wi-Fi network names (usually -5G ). Let me remind you that in order to enjoy all the benefits of the 5 GHz frequency , it is necessary that the device from which you are connecting supports operation with this frequency, otherwise you will not move the network to 5 GHz.
How to find out who is connected to the Zyxel Keenetic Ultra router.
In order to see who is connected to the router, you need to go to the “ Home Network ” menu on the router’s web interface; in the devices tab you will see all the devices connected to the router.
Setting up a torrent on Zyxel Keenetic Ultra.
In the router interface, go to the “ BitTorrent Client ” tab and check the “ Enable ” box, below indicate the Directory for storing files (USB drive). Don't forget to click " Apply " at the end.
Now you can download the torrent file on your computer/laptop; it will weigh several KB. In the browser, enter the address my.keenetik.net:8090 - you will be taken to the web interface of the program for working with torrents, by clicking on the button in the form of a folder, add the downloaded torrent file.
After a few seconds, the file will begin downloading.
In order to control the operation of the torrent file, use the web interface with the address my.keenetik.net:8090. Let me remind you that the download speed is reduced by the manufacturer to 5 MB/s to ensure stable operation of the main functions of the Internet center.
Using DLNA in Zyxel Keenetic Ultra.
The router can act as a DLNA server for distributing multimedia files (movies, music, images) to the local network. In order to use the DLNA function, you need to connect a USB device with data, go to the router’s web interface, go to the “ Applications DLNA Server tab , check the “ Enable ” checkbox and indicate the directory where the necessary multimedia files are located, click the “ Apply” ".
Now on a TV that supports the DLNA function you will see the contents of the specified directory.
Enabling the swap file in Zyxel Keenetic Ultra.
For faster operation of the device, you can add virtual memory from a connected external hard drive (external hard drive, a USB flash drive will not work in these cases). To do this, go to the “ Applications ” menu, the “ Swap file ” tab, check the “ Use paging file ” box, select the connected external hard drive and specify the size of the paging file, the manufacturer recommends specifying 256 MB, this size will be indicated.
IPTV in Zyxel Keenetic Ultra.
In order to configure IPTV, go to the “ Applications ” menu, the “ udpxy Server ” tab, enable this function and configure it.
When you finish the settings, don’t forget to click the “ Apply ” button.
After configuring the router, you can begin setting up a local network on Windows XP or Windows 7 , making a network folder or setting up a network printer .
I really hope my article helped you! Please share the link with your friends:
Connection
Depending on how you need to set up your network and what cables are coming into your home from your service provider, the connection process may vary. If, for example, the provider has laid out optical fiber, you can use the SPF port, but the blue WAN will no longer be available.
They sit on the same processor bus, which means that only one connector can receive data.
When installing for the first time, it is better to take care of the available free space around the device. Firstly, as mentioned earlier, it is quite hot and if some things are placed near or on it, it may overheat and fail. Secondly, there are USB connectors and it is advisable to free up space around them to use them.
Setting up a connection to the global network
You need to do the following:
- Go to the “Internet” tab;
- Open the “List” subsection;
- Check the box “Enable”;
- In the “Broadband connection” column, check the Internet connector;
- Next, go to the “Authorization” section, where several connection options are possible:
- PPPoE connection: at your discretion, enter a name in the “Description” column; in the “Type” item, select “PPPoE” from the drop-down menu; in the “Connect via” section enter “ISP”; print the name and code, copying it from the contract with the Internet provider;
- L2TP: set “L2TP” in the appropriate position; check the boxes as in the screenshot below; at your discretion, enter a name in the “Description” column; print the name and code, copying it from the contract with the Internet provider; In the “Connect via” section, enter “ISP”.
Automatic setup
The first window that greets the user when connecting to the network is the main page of the NetFriend assistant. This is a wizard that can help even the most untrained user intuitively configure their device.
Clicking on the “Quick Setup” button will launch an automatic process in which the owner will have significantly less freedom in terms of fine-tuning the parameters, but at the same time everything will go quickly and successfully.
Next you need to enter the MAC address.
If the provider did not focus on this when drawing up the contract, you can skip this item by selecting “My provider does not register MAC addresses.”
But if the service provider has registered some address, for example, the network card of the computer to which the cable was connected, it is better to select “MAC address of this computer.” The “MAC address of this Internet center” option is used when the connection is made for the first time and this is the first network device in the house. In all other cases, you should select the last option, “Other address.”
After this, obtaining an IP address is configured. If the provider did not emphasize that the user was assigned a static IP, you should select “Automatic”.
Next you need to enter your login information. They must also be provided by the provider when the connection is via the PPPoE protocol or another similar one, for example, via a VPN. If this is not the case, you need to check the box next to “I don’t have an access password” and click “Next”.
After this, the system will check for firmware updates via the Internet and offer to download them:
The installation will require a reboot, but the connection will be restored automatically; there is no need to log in again. Next comes a screen with the setup results; there is a “Go online” button on it, which will open access to the network.
This is where the automatic setup ends.
Setting up DLNA
To watch downloaded TV series and your own photos and videos on your SmartTV, turn on the DLNA server, adding the /download and /media folders as content sources.
Let's check the operation of DLNA by recording some TV series in the /media folder and installing the DMS Explorer program from Google Play Market on your smartphone. When setting up, it is worth considering that you can offer the DLNA server several directories: with torrents, with your own media archive, and place the server database in a separate directory, even on an SSD, if necessary. The router will automatically re-index all movies added to active folders, but in the Keenetic Ultra settings you can always give a command to manually re-index the media library, although there is no point in this. Let's see if it makes sense to move the DLNA database outside the disk on which the movies are stored?
I added 1429 files to the library directory, mostly BDRips, including undownloaded ones from torrents. Their total volume was 499 GB, and the media library folder was stored on the same hard drive as the series archive.
- Archive scanning time - 24 minutes
- DLNA database folder capacity - 1 file 2.05 MB
As you can see, the database does not take up any space on your hard drive, and the index file itself can easily fit in the router’s memory. Let's see if the DLNA server copes with its tasks while simultaneously downloading 10 torrents?
We don't have 8 TVs at HWP, but we do have a nice virtualization booth. I launched 8 instances of Windows 7, each of which watched one movie via DLNA with Keenetic Ultra. At the same time, the Transmission client was launched on the 9th machine to see how everything was swinging there, and from the physical machine I recorded several more films in the /Media directory. The computer was connected to the Keenetic Ultra router not directly, but through a managed Netis ST3310GF switch so that extended traffic statistics could be seen through the network port.
You can see the results in the screenshot: at its peak, traffic reached 40 Megabytes per second in both directions. Download speed dropped to 4 Megabytes per second, but 8 clients over DLNA did not experience any lag or frame drops.
The same experiment, but with 8 HD streams, has already led to the fact that torrent downloading slowed down to 700 KB/s, and copying began to go a little slower - 22 MB/s, port statistics showed an increase in traffic to 80 MB/s in each direction, which I associate with file protocol caching, but we must stop here and conclude that Keenetic Ultra passed the test: at the same time it can download torrents, play HD video via DLNA and support the operation of a file server, so we have to go further.
You need to know the following about DLNA: the service does not work through a VPN channel, so if you want to watch TV series from your home media archive from work or from the trolleybus, scroll through our review further - we will tell you how to do this.
Manual setting
For more detailed changes to the parameters on the screen from the previous picture, you need to click the “Web Configurator” button. After this, the owner will be greeted with the following interface:
Here you can find service information about the status of the Keenetic Ultra (KN 1810) router and its technical parameters. At the top there are tabs into which fine-tuning elements are conveniently sorted:
- Routes – for managing packets and forwarding mechanisms.
- Connections – to change the parameters of current connections.
- Home network – management of computers and other devices that are connected to the network both wired and wireless.
- USB – parameters for data transfer from storage devices and modems connected to the router.
Setting up Apple Time Machine
If you have an Apple laptop or desktop, it makes sense to use the Time Machine service to automatically save backups to a disk connected to Keenetic Ultra. Let's set Time Machine storage in the /backup folder.
By the way, the transfer of files via the AFP protocol itself was done by Apple so disgustingly that apart from Time Machine, this service is no longer suitable for anything: both phones and laptops connect perfectly via Samba, so I don’t mount the /public and /media folders in AFP I will. Let's test how quickly Apple's brainchild will copy its 140 GB SSD drive to Time Machine, and will it even work? We have an old Macbook Pro with the MacOS 10.11.6 El Capitan operating system, which only supports backup via the AFP protocol, so we will use it.
Here it should be noted that our test MacBook Pro from the prehistoric times of the 2008 model year supported only the 802.11n draft standard, so the backup speed in Time Machine is, frankly, disgusting. Modern MacBooks with support for 802.11ac and a 3x3 or 4x4 antenna formula can fully unleash the wireless potential of Keenetic Ultra routers, and you can easily back up built-in disks with a capacity of up to half a terabyte or even more.
By the way, if you plan to use Time Machine, we recommend that you prepare your hard drive for MacOS by formatting it in HFS+ (MacOS Journaled File System), because if your Keenetic router breaks down, you can always connect the disk enclosure directly to your laptop and gain access to time machine backups.
Setting up via mobile application
The QR code for downloading the application for phones running on iOS and Android is located on the bottom wall of the router or on the box. The program is called My.Keenetic and provides access to a simplified version of the NetFriend customizer, which is better adapted for touch input.
To start setting up, you need to connect your phone to the access point, which is distributed by the router, using the default password. After that, in the application you need to click the “OK, Wi-Fi connected” button.
Next, a window will be displayed with a button to launch the standard NetGriend wizard. The principle of configuration using it is already described in the “Automatic configuration” section.
Login to router settings
Login to the router settings occurs at the standard address: https://192.168.1.1. Type it into your browser's address bar and press Enter. A window will open to enter your username and password. By default: login – “admin”, password – “1234” or “admin”. Login information may be changed by your operator. In this case, see the current information in the contract.
For security purposes, you will be asked to change the standard login and password. Enter new data or close the window by clicking on the “Do not set a password” button.
Wi-Fi connection and settings
All information about connections, their status and available capabilities is collected in the main window of the My.Keenetic program (the name is common for both mobile and desktop versions). The system monitor looks like this:
In the upper left part there is a graph with the connection status and the current data transmission and reception speed. To the right are active networks, in our case both bands are turned on, and two more devices are connected to the LAN connectors.
Below are the parameters of the guest network, which can only operate in the 2.4 GHz band. It can be password protected, but by default it has no protection. It is distinguished by strong limitations in the hierarchy and the ability to set a connection time limit, after which the “guest” must connect again.
Bottom left – devices connected via USB. The router also recognizes printers; you can deploy a convenient and compact print server on it, giving access to the printing device from all computers and phones on the network wirelessly. The function of automatically uploading backup copies of operating systems from all supported manufacturers to external drives is also supported. For this purpose, a special section is allocated for storage.
Setting up Wi-Fi on the router
At the bottom of the page, select the Wi-Fi .
- In the window that appears, in the Network name (SSID) , enter the name of your network (any).
- In the Network Security , select WPA2-PSK .
- In the Network Key , enter your password to access the network (any).
- In the Channel: select Auto .
- Enable WPS - uncheck the box
- After filling in all fields, click the Apply .
Setting up IPTV
Keenetic Ultra has two methods of connecting to IPTV:
- Using the LAN port and the set-top box from the provider.
- Using built-in IPTV functionality.
The first method is suitable for those who already have a set-top box; it is better than the built-in one (for example, it supports many different types of hardware decoding or 4K resolution) and there is no data received from the provider about connecting to a virtual local network. You need to go to the “Wired Connections” section in the System Monitor and select the port to which the set-top box is connected. After this, it needs to be switched to “IPTV” mode. Next, two fields will appear - IP and password, in which you need to indicate the data provided by the service provider.
The second method is much easier, but more limited in capabilities. If the IPTV function is enabled, it will work out of the box. Perhaps the picture resolution will be lower, and it’s impossible to record your favorite show and watch it later, but the connection itself is simple – turn on the router, and it works.
Internet setup
The ZYXEL KEENETIC ULTRA device can be configured in various modes: PPTP, DHCP, L2TP (Beeline) and PPPoE (Dom.ru, Rostelecom). Let's try to figure out all the options.
DHCP setup
In the web interface you are already familiar with, you need to go to the “Internet” item. Next, you should select ISP (Broadand connection), enter the numbers 1500 next to the “MTU size” field and enable auto configuration of IP parameters. After that you can enjoy the Internet.
L2TP setup
To configure the World Wide Web for KEENETIC ULTRA in the specified mode, you must select the following parameters in the “Internet” section of the interface:
- enter the name of your connection in the “Description” field;
- L2TP protocol;
- verification method - Auto;
- copy the server address, password and user name from the contract issued by the provider.
Having dealt with all the points, you can safely save the settings.
Setting up PPTP
If your computer receives a local IP address in auto mode, find the “Authorization” section in the router interface. You will need to fill in the fields here in a certain way:
- PPTP - Type (protocol);
- connect via ISP;
- the address, password and username are issued by the provider company, this information must be taken from the contract;
- the remaining elements can be left untouched.
Click “Apply” for the new router settings to take effect.
Setting up PPPoE
As in previous options, you need to change the settings in the “Internet” section of the KEENETIC ULTRA router interface. It is enough to enable auto configuration of IP parameters, enter the user pass/login issued by the provider, and also switch the protocol type to “PPPoE”. As for the authentication method, it is recommended to select the "Auto" option. The remaining lines do not need to be changed.
Change Password
To change the passphrase for a connection with the 2.4 GHz band, you need to enter the “Home Network” segment in the System Monitor and change the phrase in the “Password” field, after selecting WPA2-PSK protection from the list above.
If you scroll a little lower, you can find a similar setting for the 5 GHz band:
The administrator password is changed in the system settings and, as a rule, requires re-logging into the configuration program.
Setting up the ZYXEL Keenetic Ultra II router
Now you need to configure the router. First of all, let's secure the wireless network by setting a password for wi-fi. Then you will need to find out what type of connection is used to access the Internet, is it PPTP, L2TP or PPPOE. You can find out by calling your provider (this is the organization with which you entered into an agreement to provide Internet services). So, let's start setting up the router.
Setting a password for wi-fi
The ZYXEL Keenetic Ultra II router is dual-band, which means that the router supports 2 operating frequencies for wireless connections, 2.4 GHz and 5 GHz. 5 GHz allows for higher throughput, but has a shorter range than 2.4 GHz; 2.4 GHz is more susceptible to interference. 5 GHz is not supported by all devices. You can select both, and depending on the circumstances, change the wireless connection on the devices. I offer Video instructions for setting up a Wi-Fi password on the ZYXEL Keenetic Ultra II using the example of the ZYXEL Keenetic Omni II router.
Let's also take a written and illustrative look at setting up a wi-fi password on the ZYXEL Keenetic Ultra II in two frequencies. 1. On the Web interface, click on the “ Wi-Fi network 2.4 GHz access point network settings . 2. Check to see if the box next to “ Enable access point ” is checked, then in the “ Network name (SSID) ” field, come up with and specify a name for the wireless network; this name will then light up when you connect to the network. I advise you to indicate the frequency used in the name of the network, for example: “imya seti 2.4”. 3. “ Network security ” - WPA2-PSK . 4. Now you need to set a password for the wireless network. In the “ Network key ” field, we come up with and enter a password. 5. “ Channel width ” - “ 20 MHz ”. 6. Click “ Apply ”.
7. Click the “ 5 GHz access point ” tab. 8. Check if the box next to “ Enable access point ” is checked, then in the “ Network name (SSID) ” field, come up with and specify a name for the wireless network. I advise you to indicate the frequency used in the name of the network, for example: “imya seti 5”. 9. “ Network security ” - WPA2-PSK . 10. Now you need to set a password for the wireless network. In the “ Network key ” field, we come up with and enter a password. 11. “ Channel width ” - “ 20/40/80 MHz ”. 12. Click “ Apply ”.
Setting up PPTP
I offer Video instructions for setting up the PPTP on the ZYXEL Keenetic Ultra II using the ZYXEL Keenetic Omni II router as an example.
Let's also take a written and illustrative look at setting up a PPTP on the ZYXEL Keenetic Ultra II . 1. Internet shortcut in the bottom menu . 2. Select the “ PPPoE/VPN ” tab and click “ Add connection ”.
3. In the window that appears, check the checkboxes opposite “ Enable ” and “ Use to access the Internet .” 4. In “ Description ” enter any words in Latin, for example “Host”, “ Type (protocol) ” select “ PPTP ”, “ Connect via ” select “ Broadband connection (ISP) ”. 5. Below you are asked to indicate your user name (in the “ Username ” line) and password (in the “ Password ” line). You will also need to specify the server IP address (in the “ Server Address ” line). All of the above data is provided by the provider (the organization that provided the Internet). All this data is usually specified in the contract with the provider. If for some reason you couldn’t find them, you need to call the provider’s hotline and find out how you can get them. 6. “ Configuring IP parameters ” - “ Automatic ”. 7. After you have entered all the necessary data, click the “ Apply ” button.
Setting up PPTP with a static IP address
Let's look at setting up a PPTP connection with a static IP address on the ZYXEL Keenetic Ultra II . Typically, a static IP address is provided to legal entities, or as an additional service to the basic tariff to individuals. 1. Internet shortcut in the bottom menu . 2. Select the “ PPPoE/VPN ” tab and click “ Add connection ”.
3. In the window that appears, check the checkboxes opposite “ Enable ” and “ Use to access the Internet .” 4. In “ Description ” enter any words in Latin, for example “Host”, “ Type (protocol) ” select “ PPTP ”, “ Connect via ” select “ Broadband connection (ISP) ”. 5. Below you are asked to indicate your user name (in the “ Username ” line) and password (in the “ Password ” line). You will also need to specify the server IP address (in the “ Server Address ” line). 6. Since the connection uses a static IP address, select “ Manual ” opposite “ Configure IP parameters ”. 7. Specify IP addresses and DNS. All of the above data is provided by the provider (the organization that provided the Internet). All this data is usually specified in the contract with the provider. If for some reason you couldn’t find them, you need to call the provider’s hotline and find out how you can get them. 7. After you have entered all the necessary data, click the “ Apply ” button.
L2TP setup
I offer Video instructions for setting up the L2TP on the ZYXEL Keenetic Ultra II using the example of the ZYXEL Keenetic Omni II router.
Let's also take a written and illustrative look at setting up an L2TP on the ZYXEL Keenetic Ultra II . 1. Internet shortcut in the bottom menu . 2. Select the “ PPPoE/VPN ” tab and click “ Add connection ”.
3. In the window that appears, check the checkboxes opposite “ Enable ” and “ Use to access the Internet .” 4. In “ Description ” enter any words in Latin, for example “Host”, “ Type (protocol) ” select “ L2TP ”, “ Connect via ” select “ Broadband connection (ISP) ”. 5. Below you are asked to indicate your user name (in the “ Username ” line) and password (in the “ Password ” line). You will also need to specify the server IP address (in the “ Server Address ” line). All of the above data is provided by the provider (the organization that provided the Internet). All this data is usually specified in the contract with the provider. If for some reason you couldn’t find them, you need to call the provider’s hotline and find out how you can get them. 6. “ Configuring IP parameters ” - “ Automatic ”. 7. After you have entered all the necessary data, click the “ Apply ” button.
Setting up L2TP with a static IP address
Let's look at setting up an L2TP connection with a static IP address on the ZYXEL Keenetic Ultra II . Typically, a static IP address is provided to legal entities, or as an additional service to the basic tariff to individuals. 1. Internet shortcut in the bottom menu . 2. Select the “ PPPoE/VPN ” tab and click “ Add connection ”.
3. In the window that appears, check the checkboxes opposite “ Enable ” and “ Use to access the Internet .” 4. In “ Description ” enter any words in Latin, for example “Host”, “ Type (protocol) ” select “ L2TP ”, “ Connect via ” select “ Broadband connection (ISP) ”. 5. Below you are asked to indicate your user name (in the “ Username ” line) and password (in the “ Password ” line). You will also need to specify the server IP address (in the “ Server Address ” line). 6. Since the connection uses a static IP address, select “ Manual ” opposite “ Configure IP parameters ”. 7. Specify IP addresses and DNS. All of the above data is provided by the provider (the organization that provided the Internet). All this data is usually specified in the contract with the provider. If for some reason you couldn’t find them, you need to call the provider’s hotline and find out how you can get them. 7. After you have entered all the necessary data, click the “ Apply ” button.
Setting up PPPOE
I offer Video instructions for setting up the PPPOE on the ZYXEL Keenetic Ultra II using the example of the ZYXEL Keenetic Omni II router.
Let's also take a written and illustrative look at setting up a PPPOE on the ZYXEL Keenetic Ultra II . 1. Internet shortcut in the bottom menu . 2. Select the “ PPPoE/VPN ” tab and click “ Add connection ”.
3. In the window that appears, check the checkboxes opposite “ Enable ” and “ Use to access the Internet .” 4. In “ Description ” enter any words in Latin, for example “Host”, “ Type (protocol) ” select “ PPPOE ”, “ Connect via ” select “ Broadband connection (ISP) ”. 5. Below you are asked to indicate your user name (in the “ Username ” line) and password (in the “ Password ” line). All of the above data is provided by the provider (the organization that provided the Internet). All this data is usually specified in the contract with the provider. If for some reason you couldn’t find them, you need to call the provider’s hotline and find out how you can get them. 6. “ Configuring IP parameters ” - “ Automatic ”. 7. After you have entered all the necessary data, click the “ Apply ” button.
Setting up PPPOE with a static IP address
Let's look at setting up a PPPOE connection with a static IP address on the ZYXEL Keenetic Ultra II . Typically, a static IP address is provided to legal entities, or as an additional service to the basic tariff to individuals. 1. Internet shortcut in the bottom menu . 2. Select the “ PPPoE/VPN ” tab and click “ Add connection ”.
3. In the window that appears, check the checkboxes opposite “ Enable ” and “ Use to access the Internet .” 4. In “ Description ” enter any words in Latin, for example “Host”, “ Type (protocol) ” select “ PPPOE ”, “ Connect via ” select “ Broadband connection (ISP) ”. 5. Below you are asked to indicate your user name (in the “ Username ” line) and password (in the “ Password ” line). 6. Since the connection uses a static IP address, select “ Manual ” opposite “ Configure IP parameters ”. 7. Specify IP addresses and DNS. All of the above data is provided by the provider (the organization that provided the Internet). All this data is usually specified in the contract with the provider. If for some reason you couldn’t find them, you need to call the provider’s hotline and find out how you can get them. 7. After you have entered all the necessary data, click the “ Apply ” button.
Firmware update
If you choose an update method based on the amount of effort expended, the most profitable and time-saving option would be to use a mobile application. Just click on the “Firmware” button in the “System” tab and wait for the update to complete.
The same function in the System Monitor is located in the “About System” tab. There, next to the current software version, there may be a link to an update that looks like this: