Computer functionality
The simplest and most accessible option is the standard utility in the Windows operating system. In order to use it, you do not need to download special software or go to websites. You can open it like this:
Start/All Programs/Accessories/Sound Recorder
There is another option:
- open the search bar and write the word “Sound recording”;
- in Windows 7 and other early operating systems, look for the “Run” window, you can activate it by using the combination Win + R and entering the line soundrecorder;
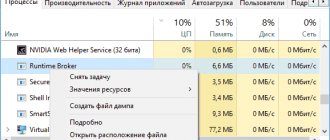
- A small window will open with a minimal set of buttons. To start the process itself, click “Start recording”;
- when the microphone is functioning correctly, there are no conflicts with the system, a frequency scale appears. To disable, click Stop.
With this voice recorder, you can easily record files in mp3 format on your home computer and send them to folders for saving. In Windows 10, instead of the “Sound Recording” utility, a product from the Microsoft Store, “Voice Recording,” works, but its essence has not changed.
Using the Voice Recording app
Record Windows 10 screen with audio from desktop
As mentioned earlier, in Windows 10, microphone recording can be done using the built-in Voice Recording utility. To launch this built-in program, just enter “Voice recording” in the search bar and press “Enter” on the keyboard to start the search. Then launch the element you are looking for.
How to find an application in Windows 10
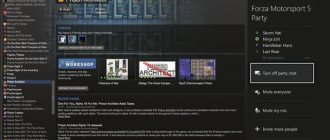
The program interface is very simple and intuitive. The user just needs to click on a single button, which will be located in the center of the window. This manipulation will begin the process of recording your voice through a microphone. If you want to record third-party sounds, then three buttons will be displayed on the screen: stop, pause and marks. The mark button visually resembles a flag and is designed to highlight points of interest that may come in handy later.
After the user clicks “stop”, recording from the Windows 10 microphone will be stopped and all available recordings will be displayed on the screen. There will also be an ellipsis at the bottom of the screen to display additional functions: share, give the recorded file a new name, trim, etc.
Program interface Voice recording in Windows 10
Now it’s worth familiarizing yourself in more detail with the features of using Voice Recorder Windows 10. To record sound, you first need to connect a microphone, and then follow the step-by-step instructions:
- Open the Voice Recorder application.
- The system will prompt you to allow microphone access. To continue, you need to click “Yes”.
- To start recording, you can click on the microphone image or use the keyboard shortcut “Ctrl + R”.
- If the user needs to stop recording without interrupting the session, you need to click on the “Pause” button. To end the session, click “Stop”.
All audio files are saved automatically in .mp4 format. in the Sound Recordings folder located in another folder called Documents.
Online assistants
If you don’t want to download and install third-party software, but you urgently need to use a voice recorder on your computer, try the Online voice recorder web service.
It has modest capabilities, but in some cases they can be very useful:
- firstly, it records sound using a microphone or webcam built into the laptop;
- secondly, there are options for slicing and cutting in the finished file;
- thirdly, the results of the work are saved in MP3 format;
- Finally, in automatic mode it detects silence and adjusts the noise level.
You can download any voice recorder to your personal computer from this review. If you do not plan to use it often, you can work with the built-in Windows utility; it will be enough for basic manipulations with sound.
VideoSolo Screen Recorder - High Quality Voice Capture on Windows and Mac
VideoSolo Screen Recorder, as a top-notch recorder in the market, will not let you down if you try it. Although, based on the name, you would spontaneously think of it as purely a screen recorder, it is actually a multi-functional recorder that includes audio recording functionality through a microphone and the system's sound card. You can easily enable both of them or one of them with one click. Moreover, the output quality is excellent and users are offered output formats to choose from.
In the next minutes, I will tell you how to record voice on computer using VideoSolo Screen Recorder.
Step 1. Connect the microphone and start the recorder
If you have an external microphone, connect it to the dedicated jack on your computer and make sure the microphone on your computer is activated.
After downloading VideoSolo Screen Recorder using the above button, you should install After a few clicks on the instructions, launch it on your computer.
Step 2: Open "Audio Recorder" and go to Microphone
On the main interface, click "Audio Recording". First, you must turn on the microphone and move the sliders lower to adjust the audio volume. If you want to record system audio from output devices while recording a microphone, you can enable the first button to allow your computer to simultaneously capture audio sources. To get the best output quality, record microphone audio in a quiet environment.
Tips: You need to install the audio driver before recording audio in the Mac version due to some limitations of the Mac system. The process can be completed in minutes.
Step 3. Preset Audio Quality and Output
Before you start recording your voice, you must configure your audio by clicking the gear icon. Scroll down to the output field where you can select the audio format (WMA, MP3, M4A and AAC.) and quality (from "Least" to "Lossless") as you wish. Save the settings by clicking "OK".
Please note: The Mac version offers more audio output formats (MP3, M4A, WMA, CAF, FLAC, OGG and OPUS).
Step 4. Initiate audio recording and save it
Once you are fully prepared, press "REC" and start recording your voice from the microphone. When you finish your speech, simply click the Stop icon to end the recording. Then save it to a specific location on your computer after previewing it. Now you can easily enjoy the recorded audio file at the location where you have placed it.
Programs for recording sound from a microphone and audio card
The above method is simple and convenient, but, alas, it is not suitable for everyone. The fact is that the “Stereo Mixer” device may either not be implemented at the driver level, or may be blocked by the sound card manufacturer. The sound from the audio card, however, can still be recorded, but for this you will have to use third-party programs. There are many such programs, both paid and free. One of them is Audacity , a simple but powerful program for recording and editing digital audio.
The program can record sound from an external and built-in microphone, mixer and Line In channel. On some audio card models, it is possible to capture streaming Internet radio broadcasts, that is, the application can be used as a means of recording sound from the Internet to a computer. Audacity also has many other functions, but in this case we are interested in sound recording. The procedure is as follows. Launch the program, select Windows WASAPI as the signal source, and the device you need, that is, a microphone or audio card, as the sound source.
Unfortunately, for some reason the names of the available devices in Audacity are displayed in clutter, but this is not such a problem, in the end, you can make test recordings from both outputs, determine the best one and continue to choose it. To capture an audio stream, press the red round button; to stop, press the black square. To save the recorded data to a file, go to the File – Export menu and select the desired format.
To save a recording to MP3, you may need to install the lame_enc.dll library
A good alternative to Audacity is Moo0 VoiceRecorder , a simple program for recording audio from a computer. VoiceRecorder allows you to record sound from an audio card, microphone and audio card/microphone simultaneously; the required mode is selected in the drop-down menu. The program supports recording in MP3 and WAV, cutting out silence, and selecting the quality of the output file. Audio is captured by pressing the “Record” button, and saved by pressing the “Stop” button.
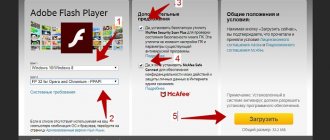
Among the paid applications, we can recommend the AudioMaster , especially if you need to record sound on your computer from a microphone. To do this, click “Record sound from microphone” in the menu, in the window that opens, select, if necessary, a sound recording device and click the “Start new recording” button.
Upon completion of the recording, AudioMaster will offer to edit it - change voice parameters, increase the volume, add effects, etc. However, you can save the recorded voice without preliminary editing. Click on the save icon located on the toolbar and select the appropriate format in the wizard window.
Where are the recordings from the voice recorder on the Samsung Galaxy
If you can’t find where the recordings from the voice recorder are stored on a Samsung Galaxy running Android OS, see the method below. By default, after recording is completed, files are saved to the internal memory in a specific folder. If you wish, you can change it or move the entries to another location. To find audio recordings, follow the path: Files tab > Phone storage tab > Sounds.
And if you need to listen to audio and transfer it to your computer, when connecting the device to your PC, select: desktop shortcut My Computer > Name of your smartphone > Internal memory > Sounds.