To create a presentation or other design layout, you often need an image without a background. You can search for a ready-made image in PNG format or select and cut out the image yourself along the outline, then remove the background and save it as PNG to use the image in presentations or design layouts.
How to cut a picture along a contour online
How to cut a picture along the contour in Photoshop?
Color range
Pen highlighting
Selection using a mask
Highlighting hair through increased contrast
Using various selection tools, you can tell the program exactly which parts of the image you want to work with, down to the pixel.
How to cut a picture along a contour online
Beginners can try to separate the picture from the background using online editors.
For the Internet. Fast, simple, but with a loss of size. Online service Remove.bg
Remove.bg will appeal to webmasters and SMM specialists. This is a free, simple and convenient service that will help you remove the background and save the image with transparency in PNG format. Using cut out images you can easily create images for websites and social networks:
Cons: 1. Produces small photos. I got 612 by 408.
To replace the background, use Photoshop online
This is an analogue of Photoshop, there are fewer tools, but simple operations can be performed.
Labor-intensive, but accurate and beautiful in Gravit Designer
You can select an image along its contour and hide unnecessary parts of the photo using the Gravit Designer vector browser editor. This is a professional approach that will allow you to make a perfectly even selection of the shape you need. The algorithm is quite simple - trace the outline with a pen, place the raster image inside the outline, make the background transparent, and export. It will be difficult for beginners to master vector drawing at the first stage, but the result is worth it.
The obvious disadvantage of this solution is that objects of complex shapes will take quite a long time to select in this way.
The easy way. What to do when you need to remove some elements
Let's say you liked a photo from the Internet, but it contains unnecessary elements - such as a logo, a link or something like that. The steps are extremely simple. You don’t even have to download the full version of Adobe Photoshop; you can use the online service Online-fotoshop.ru .
With your permission, I will still use my CC, it’s much more convenient. Open the image we are going to work with.
Select the frame tool.
A grid appeared along the contour of the picture. You can drag any edge to make the design larger or smaller.
If you make it smaller, the margins that will be cropped will not be as bright as the area selected for cropping.
If you make the photo larger, additional fields appear. Sometimes they are displayed as a checkerboard (transparent), and sometimes they are filled with color, as in my case. In the end they will still be transparent. You can fill it with your own color if necessary.
Press Enter from the keyboard and you're done. The picture is cropped.
Magnetic lasso
A good tool for selecting objects with smooth contours. The magnetic lasso works very simply. Zoom in, then click on the outline of the selection object. The first marker will appear. Next, move the cursor along the outline of the figure; as you move, new markers will appear. To highlight the contour of an image, algorithms are used that find the most contrasting areas of the image, which are most likely to be the contour separating the figure from the background. The user needs to indicate which part he wants to keep and which part to delete.
Unfortunately, the contrast between the figure and the background is not always enough for the program to correctly recognize the contour.
Therefore, it is important to choose or take a suitable photo. The ease of isolating a figure and removing the background will depend on the characteristics of the image itself. If you want to make things easier for yourself, use images with an object that is sufficiently contrasting with the background - significantly darker, lighter, or simply a different color. The ideal solution would be a studio photograph taken on a plain background. Special effects specialists use green for the background - the likelihood of the color of the figure and the background matching is vanishingly small. The algorithms of graphic and video editors do an excellent job of removing the green background. In all other cases, selecting an image will require additional settings and human intervention.
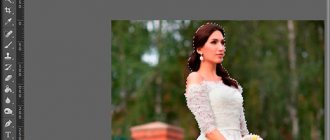
In this example, we can see that the selection tool with basic settings recognized the outline of the face well, but did not separate the white clothes from the white background. There will also be problems with hair separation here.
If the contrast between the background and figure or the clarity of the photograph is poor, the markers may not be placed correctly. In this case, force them by clicking the LMB. To move around the enlarged image, press and hold the Spacebar. Gradually you will close the outline, after which a dotted line will run. Double-clicking the LMB also closes the path. Unfortunately, in our case this is too difficult - the boy’s hairstyle does not allow us to quickly highlight the picture in this way.
Useful tips for work
If you have the opportunity to choose a picture from which you will subsequently cut something out, try to select a picture with a plain background - white, green, red. It doesn’t matter, you need contrast, then it’s easier to work.
If you are interested in lessons and want to learn how to use Photoshop at a professional level, I recommend you Zinaida Lukyanova’s course - “ Photoshop from A to Z ”.
Online lessons will allow you to quickly master technical skills and move on to practice, gaining valuable and personal experience in the shortest period of time. You will be able to quickly move from being a beginner to a specialist, and then, thanks to everything you can achieve with your mind, you are not far from becoming a professional!
Now let's get acquainted with the tools. Each of them can be useful in one case or another. I recommend that you find out all the possibilities, and then choose based on the situation what is more effective and when. Over time you will learn.
Magic wand
This tool, by clicking LMB, will select an area painted with similar shades. The range of shades that the program will include in the selected area can be increased or decreased using the “Tolerance” setting. Tolerance 32 is set by default. Reducing the tolerance will increase the sensitivity of the instrument. It will highlight small fragments that are very similar in color. To expand the selection area, you need to select the “Add to selection” mode. This way you can select a uniformly colored background with a few mouse clicks.
It took me 3 clicks, after which I discovered that the highlights on the jeans were included in the selection.
Switching to the “Subtract from selected area” mode can easily correct this shortcoming. Unfortunately, this tool does not solve the problem of precise hair selection.
Color Range
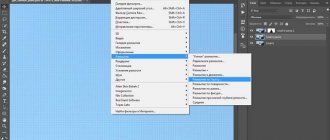
Let's talk about Photoshop's selection tool, Color Range, which selects areas in an image based on tone or color. This tool is similar in principle to the Magic Wand Tool in that they both select areas of an image based on tonal and color values, but that's where the similarities end. To activate this tool, you need to right-click on any selection tool or on the main menu tab “Select” and select the appropriate line.
At the very top of the Color Range dialog box, there is a Select option that allows us to choose where to sample colors from. There are two options - take samples from the image or use a ready-made set of colors pre-installed in Photoshop.
The default option is “Sampled Colors”. The “By samples” parameter determines that we will independently select samples in the image. In order to select areas with similar colors, just click on the desired area in the image, and Photoshop will select all similar pixels within the specified specific range (hence the name of the tool).
When using the “Color Range”, click on the desired area with the cursor, which then takes the form of an eyedropper. This tool provides three kinds of eyedropper tools for use - the main one to make an initial selection, the second one, the plus eyedropper, which is an add to selection tool, and the third one, the minus eyedropper, is a subtracts tool from a selection.
You can click on the icons to switch between these tools, but it is better to use another method. The main eyedropper is selected by default, and we can temporarily switch to other tools directly from the keyboard. To move from the main eyedropper to the add eyedropper, simply press and hold the Shift key. To access the subtractive eyedropper, press and hold Alt.
How to cut out an object in Photoshop. 4 easy ways
How often have you needed to cut out an object from a photo in Photoshop to overlay it with another or simply remove the current background? In this article, I'll talk about 4 selection methods, each of which will be better suited for a different type of image.
In Photoshop, a lot of attention is paid to the selection tools, some of them work quite simply, others have more complex settings and are more difficult for a novice user to understand how they work.
For example, an object that is on a white background can be cut out with just a few clicks of the mouse. How to accurately cut out complex elements on a dark background or a person’s curly hair? The standard lasso tool will not work here...
Of course, there are many more ways to crop an object from a photo than the 4 I've described. In my opinion, these are the most convenient, each method differs in the principle of selection and therefore, before processing the photo, you can understand which one will be better suited for this type of photography.
Selection using lasso tools.
If the subject is on a white background, you can try highlighting with a magic wand . This tool automatically recognizes spots of the same color and highlights them.
If the selection does not capture part of the background, then holding down the SHIFT key you can add a piece to the selected area. The greater the sensitivity of the magic wand, the more it “grabs.”
If the background is not uniform and there are many other details on it, but a clear boundary between the subject and the background is visible, then you can use the magnetic lasso . The line of this lasso sticks or is magnetized to the edge of the object; you just need to move the cursor along the contour.
Highlighting with a quick mask.
For this method, take a black brush and go to quick mask mode. By painting with a black brush, the object is painted red. The unpainted part will become selected when you click on the quick mask mode again.
The main advantage of this method is the ability to not only paint over, but also erase the red area (with a white brush). And by changing the brush parameters, you can get a selection with hard and soft boundaries.
It is convenient to use if the object has clear edges in some places and blurred contours in others.
Wiping the background with an eraser
Once you've converted the background to a layer, eraser to erase everything you don't need. This method is useful when editing on another background, when it is not clear what should remain and what should not.
The eraser tool also has additional benefits. For example, have different transparency and different brush softness. But unlike the previous method, it does not allow you to return what was erased.
So if you need insurance, use the quick mask tool, or better yet, the “layer mask.”
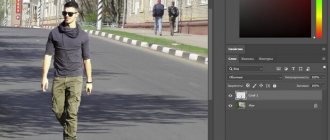
Hair cutting
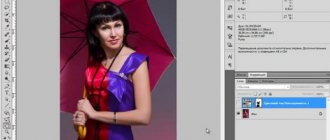
Cutting hair from the background by hand is very difficult, especially such curly curls as in the photo. First create a duplicate of the layer that we will transform. By increasing the contrast between the background and the subject using levels (CTRL+L), it becomes easier to highlight them in an automatic way.
The hair became darker and the background lighter. But the face remains light; it is better to paint it over with a black brush to highlight only the background.
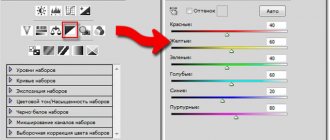
Click - Highlight/Color Range... Now adjust the sensitivity as shown in the image below. Click OK. The selection has loaded.
The duplicate layer is no longer needed, delete it.
This is the last and most interesting way of highlighting. To efficiently cut out an object in Photoshop, you can use all the selection methods described, and sometimes you need to skillfully combine them for a good result.
VIDEO LESSON. Learn more about four ways to cut out an object in Photoshop:
(Visited 186,629 times, 86 visits today)
Check out more articles on this topic:
Selection using a mask
You can accurately and accurately select a figure by creating a black and white mask. What are masks for? They allow you to remove (hide) unnecessary parts of a photo, for example, remove the background. Masks allow you to restore erased areas of a photo at any time if you don’t like something.
How to create a mask? In the layers panel, pay attention to the button highlighted below.
After creating a mask, you can edit it. The mask can be painted using regular black or white brushes. By painting with black, we hide what is unnecessary, and with white, we restore the necessary areas of our photo. At the same time, you can change the softness of the edges of the brush, its size, etc.
Easy cropping with the Frames tool
In order to leave a specific part of the image, do the following.
- Open the photo or snapshot in the program.
- Select “Frame” on the side toolbar.
- By shifting the boundaries of the selected area (using the left mouse button held down), we leave only the part that we need. The dark areas will be removed.
- Press the Enter key to crop the photo.