Indie developers often have to combine several roles at once: game designer, programmer, composer, artist. And when it comes to visuals, many people choose pixel art - at first glance it seems simple. But to do it beautifully, you need a lot of experience and certain skills. I found a tutorial for those who have just begun to comprehend the basics of this style: with a description of special software and drawing techniques using two sprites as an example.
Background
Pixel art is a form of digital art in which changes are made at the pixel level.
It is mainly associated with video game graphics from the 80s and 90s. Back then, artists had to take into account memory limitations and low resolution. Nowadays, pixel art is still popular in games and as an art style in general, despite the ability to create realistic 3D graphics. Why? Nostalgia aside, creating cool work within such a tight framework is an enjoyable and rewarding challenge. The barrier to entry into pixel art is relatively low compared to traditional art and 3D graphics, which attracts indie developers. But this does not mean that it will be easy to finish
game in this style. I've seen a lot of indie developers with pixel art metroidvanias on crowdfunding platforms. They thought they would finish everything in a year, but in reality they needed another six years.
Metal Slug 3 (Arcade). SNK, 2000
Pixel art at the level at which most people want to create it takes a lot of time, and there are very few short tutorials. When working with a 3D model, you can rotate it, deform it, move its individual parts, copy animations from one model to another, and so on. High-level pixel art almost always takes a lot of effort into meticulously placing pixels on each frame.
In general, I warned you.
And now a little about my style: I mainly draw pixel art for video games and find inspiration in them. In particular, I'm a fan of the Famicom/NES, 16-bit consoles, and 90's arcade games. The pixel art of my favorite games of the era can be described as bright, confident and clean (but not too clean), rather than stark and minimalistic. This is the style I work in myself, but you can easily apply the ideas and techniques from this tutorial to create completely different things. Explore the work of different artists and create pixel art that you like!
MyPaint
For creating drawings from scratch. The program simulates real tools (brush, pencil, etc.) and allows you to create art. You will be able to draw your own illustrations from scratch and process photographs by applying various effects to them. There are many customizable art brushes to choose from.
ScreenshotsVideoSpecifications
| OS: | Windows 10, 8, 7, Vista, XP |
| Bit capacity: | 32 bit, 64 bit |
| Russian language | Eat |
| Version | v2 (2019, Alpha) |
| Free | Completely |
Software
The basic digital tools for pixel art are Zoom and Pencil to place the pixels. You will also find Line, Shape, Select, Move and Paint Bucket useful. There are many free and paid software with such a set of tools. I will tell you about the most popular ones and those that I use myself.
Paint (free)
If you have Windows, the built-in Paint is a primitive program, but it has all the tools for pixel art.
Piskel (free)
An unexpectedly functional pixel art editor that runs through the browser. You can export your work as PNG or animated GIF. An excellent option for beginners.
GraphigsGale (free)
GraphicsGale is the only editor I've heard of that is designed specifically for pixel art and includes animation tools. It was created by the Japanese company HUMANBALANCE. It has been available for free since 2020 and is still in demand, despite the rise in popularity of Aseprite. Unfortunately, it only works on Windows.
Aseprite ($)
Perhaps the most popular editor at the moment. Open source, tons of features, active support, versions for Windows, Mac and Linux. If you're serious about pixel art and still haven't found the right editor, this might be the one you need.
GameMaker Studio 2 ($$+)
GameMaker Studio 2 is an excellent 2D tool with a good Sprite Editor. If you want to create pixel art for your own games, it is very convenient to do everything in one program. I'm currently using this software to work on UFO 50, a collection of 50 retro games: I create sprites and animations in GameMaker, and tilesets in Photoshop.
Photoshop ($$$+)
Photoshop is expensive software, distributed by subscription, and not designed for pixel art. I do not recommend purchasing it unless you are involved in rendering illustrations in high resolution, or you do not need to carry out complex manipulations with the image, like me. You can create static sprites and pixel art in it, but it is quite complex compared to specialized software (for example, GraphicsGale or Aseprite).
openCanvas
The program is something between Paint and editors like Corel Painter or Adobe PhotoShop.
The editor has a simple and well-organized interface that makes creating and editing digital illustrations convenient and easy.
ScreenshotsVideoSpecifications
| OS: | Windows 10, 8, 7, Vista, XP |
| Bit capacity: | 32 bit, 64 bit |
| Russian language | No |
| Version | 7.0.25 (15.11.2019) |
| Free | Trial for 120 days |
Other
My pixel art kit. Everything is black, I just noticed it now.
Graphics tablet ($$+)
I recommend graphics tablets for any digital illustration work to avoid carpal tunnel syndrome. It is much easier to prevent than to cure. One day you will feel pain and it will only increase - take care of yourself from the very beginning. Because I used to draw with a mouse, I now have a hard time playing games that require me to press keys. I'm currently using Wacom Intuos Pro S.
Wrist support ($)
If you can't get a tablet, at least get a wrist support. My favorite is the Mueller Green Fitted Wrist Brace. The rest are either too tight or don't provide enough support. Calipers can be ordered online without any problems.
Adobe Photoshop
Make way! Leader in the graphics editor market. Aimed primarily at working with raster images, but is often used as a drawing program on a tablet. Sets the tone for all other editors, with many innovative solutions. The richest toolkit. Lots of plugins, tutorials, followers.
ScreenshotsVideoSpecifications
| OS: | Windows 10, 8, 7, Vista |
| Bit capacity: | 64 bit |
| Russian language | Eat |
| Version | 21 (2020) |
| Free | Trial for 7 days |
- Brushes for Photoshop (in Russian)
96x96 pixels
Final Fight.
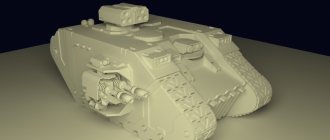
Capcom, 1989 Let's get started! Let's start with a 96x96 pixel character sprite. As an example, I drew an orc and placed it on a screenshot from Final Fight (picture above) so that you can understand the scale. This is big
sprite for most retro games, screenshot size: 384x224 pixels.
On such a large sprite it will be easier to show the technique I want to talk about. Per-pixel rendering is also more similar to traditional forms of art (like drawing or painting) that you may be more familiar with. Having mastered the basic techniques, we will move on to smaller sprites.
Choosing a palette
Pixel is a much deeper concept in pixel art than in any other digital realm. Pixel art is defined by its limitations, such as colors. It is important to choose the right palette; it will help determine your style. But at the start, I suggest not thinking about palettes and choosing one of the existing ones (or just a few random colors) - you can easily change it at any stage.
For this tutorial, I'll be using the 32-color palette we created for the UFO 50. For pixel art, they're often made up of 32 or 16 colors. Ours is designed for a fictional console that would appear somewhere between the Famicom and the PC Engine. You can take it or any other - the tutorial does not depend at all on the selected palette.
MediBang Paint Pro
It was developed specifically for creating comics and digital art. MediBang Paint offers a large selection of ready-made brushes (Mapping Pen, GPen, etc.), and also allows you to customize your own by selecting the desired parameters. With powerful functionality for creative people whose profession is drawing and creating professional comics.
ScreenshotsVideoSpecifications
| OS: | Windows, iOS, Android |
| Bit capacity: | 32 bit, 64 bit |
| Russian language | Yes (only in applications) |
| Version | 24.6 (28.11.2019) |
| Free | Yes |
Rough outlines
Let's start drawing using the Pencil tool. Let's draw a sketch in the same way as we do with a regular pen and paper. Of course, pixel art and traditional art overlap, especially when it comes to such large sprites. My observations show that strong pixel art artists are at least good at drawing by hand and vice versa. So developing your drawing skills is always useful.
BlackInk
The program is unique in its kind. Custom Brushes ,
which will allow you to draw whatever you want as quickly as possible. You can use any brush with other innovative Black Ink tools.
But it lacks standard tools that other editors have. And only 8 layers.
ScreenshotsVideoSpecifications
| OS: | Windows 10, 8, 7, Vista |
| Bit capacity: | 64 bit |
| Russian language | No |
| Version | v.2020 (16.01.2020) |
| Free | Trial |
Working out the contours
We refine the contours: remove extra pixels and reduce the thickness of each line to one pixel. But what exactly is considered superfluous? To answer this question you need to understand pixel lines and irregularities.
Irregularities
You need to learn how to draw two basic lines in pixel art: straight and curved.
With pen and paper it's all about muscle control, but we're working with tiny blocks of color. The key to drawing correct pixel lines is jaggies. These are single pixels or small segments that destroy the smoothness of the line. As I said before, a single pixel makes a huge difference in pixel art, so unevenness can ruin the entire aesthetic. Imagine drawing a straight line on paper and suddenly someone hits the table: the bumps in pixel art look just like a random squiggle.
Examples:
Direct
Curves
Irregularities appear in curves when the length of line segments does not increase or decrease gradually.
It's impossible to completely avoid bumps - all your favorite retro games have them (unless, of course, the pixel art consists solely of simple shapes). Goal: Keep unevenness to a minimum while still showing everything needed.
Applying the first colors
Color your character using fill or other suitable tool. The palette will simplify this part of the work. If the software does not provide for the use of palettes, you can place it directly in the picture, as in the example above, and select colors using an eyedropper.
In the lower left corner I drew our friend, meet, this is Ball. It will make it easier to understand what exactly is happening at each stage.
CorelDRAW
Advanced graphic design software. The package includes all the industry-recognized tools presented in the CorelDRAW Graphics Suite. The division occurs based on working with raster, vector, animated graphics, as well as screenshots. We also created a separate application for viewing and editing digital images.
ScreenshotsVideoSpecifications
| OS: | Windows 10, 8, 7, Vista, XP |
| Bit capacity: | 32 bit, 64 bit |
| Russian language | Eat |
| Version | 21 (2019) |
| Free | Trial for 15 days |
Shading
It's time to display the shadows - just add darker colors to the sprite. This will make the image look three-dimensional. Let's assume that we have one light source located above the orc to the left of it. This means that everything that is above and in front of our character will be illuminated. Add shadows to the bottom right.
Shape and volume
If this step is challenging for you, think of your drawing as three-dimensional shapes rather than just lines and color. Shapes exist in three-dimensional space and can have volume, which we build with the help of shadows. This will help you visualize the character without details and imagine that he is made of clay and not pixels. Shading is not just adding new colors, it is the process of building a shape. On a well-designed character, the details don't hide the underlying shapes: if you squint, you'll see some large clusters of light and shadow.
Anti-aliasing (anti-aliasing)
Each time I use a new color, I apply anti-aliasing (AA). It helps smooth out the pixels by adding intermediate colors at the corners where two line segments meet:
Gray pixels soften the “breaks” in the line. The longer the line segment, the longer the AA segment.
This is what AA looks like on an orc's shoulder. It is needed to smooth out the lines showing the curve of his muscles
Anti-aliasing should not extend beyond the sprite that will be used in the game or on a background whose color is unknown. For example, if you apply AA to a light background, the anti-aliasing will look ugly on a dark background.
Selective outline
Previously, the outlines were completely black, which made the sprite look very cartoonish. The picture seemed to be divided into segments. For example, black lines on an arm provide too much contrast to the musculature, making the character look less cohesive.
If the sprite becomes more natural and the segmentation less obvious, the basic shapes of the character will be easier to read. To do this, you can use a selective outline - partially replace the black outline with a lighter one. On the illuminated part of the sprite, you can use the lightest colors, or, where the sprite touches negative space, you can remove the outline completely. Instead of black, you need to use the color that was chosen for the shadow - this way the segmentation will be preserved (to distinguish between muscles, fur, and so on).
I also added darker shadows at this stage. The result was three gradations of green on the orc's skin. The darkest green color can be used for selective outline and AA.
Clip Studio Paint
Formerly known as Manga Studio, it is a family of software applications for macOS, Microsoft Windows and iOS, developed by Celsys. Used for digital creation of comics, illustrations and 2D stop-motion animation.
Using Clip Studio Paint, you can draw manga on your computer just like you do on paper.
ScreenshotsVideoSpecifications
| OS: | Windows 10, 8, 7, Vista |
| Bit capacity: | 64 bit |
| Russian language | No, only English |
| Version | 1.9.7 (19.12.2019) |
| Free | Trial for 30 days |
Final touches
Finally, it's worth adding highlights (the lightest spots on the sprite), details (earrings, studs, scars) and other improvements until the character is ready or until you have to move on to the next one.
There are several useful techniques that can be applied at this stage. Rotate the drawing horizontally, this often helps to identify errors in proportions and shading. You can also remove the color - set the saturation to zero to understand where you need to change the shadows.
Creating noise (dithering, dithering)
So far we've mostly been using large, solid shadow areas. But there is another technique - dithering, which allows you to go from one color to another without adding a third. Look at the example below.
The top dark to light gradient uses hundreds of different shades of blue.
The average gradient uses only nine colors, but there are still too many shades of the same color. A so-called banding arises (from the English band - stripe), in which, due to thick uniform stripes, the eye focuses on the points of contact of the colors, instead of the colors themselves.
On the bottom gradient we applied dithering, which avoids banding and uses only two colors. We create noise of varying intensity to simulate color gradation. This technique is very similar to halftone (halftone image) used in printing; as well as stippling (grainy image) - in illustrations and comics.
On the orc, I dithered quite a bit to convey texture. Some pixel artists do not use it at all, others, on the contrary, are not shy and do it very skillfully. I find that dither looks best on large areas filled with a single color (look at the sky in the Metal Slug screenshot above) or on areas that should look rough and uneven (like dirt). Decide for yourself how to use it.
If you want to see an example of large-scale and high-quality dithering, check out the games of The Bitmap Brothers, a British studio from the 80s, or the games on the PC-98 computer. Just keep in mind that they are all NSFW.
Kakyusei (PC-98). Elf, 1996 There are only 16 colors in this image!
Krita
Its main task is drawing on a computer and creating art, but it can be used for photo retouching and even editing vector images. The program includes a large set of brushes and other tools, allows you to work with layers, supports most image formats, a cropping function, vector modifications, and a color palette.
ScreenshotsVideoSpecifications
| OS: | Windows 10, 8, 7, Vista |
| Bit capacity: | 64 bit |
| Russian language | Eat |
| Version | 4.2.9 (27.11.2019) |
| Free | Yes |
Last look
One of the dangers of pixel art is that it seems easy and simple (due to its structure and style limitations). But you will end up spending a huge amount of time refining your sprites. It's like a puzzle that needs to be solved - which is why pixel art attracts perfectionists. Remember that one sprite shouldn't take up too much time - it's just a tiny piece of an extremely complex collection of pieces. It is important not to lose sight of the big picture.
Even if your pixel art isn't for gaming, sometimes it's worth telling yourself, "It's already good enough!" And move on. The best way to develop your skills is to go through the entire process from start to finish as many times as possible, using as many topics as possible.
And sometimes it’s useful to leave a sprite for a while so that you can look at it with fresh eyes a little later.
32x32 pixels
We created a large 96x96 pixel sprite first because at that size it's more like drawing or painting, but with pixels. The smaller the sprite, the less similar it is to what it is supposed to display, and the more important each pixel is.
In Super Mario Bros. Mario's eye is just two pixels, one on top of the other. And his ear too. Character creator Shigeru Miyamoto said that the mustache was needed to separate the nose from the rest of the face. So one of the main features of Mario is not just a character design, but a pragmatic ploy. Which confirms the old wisdom - “necessity is the mother of invention.”
The main stages of creating a 32x32 pixel sprite are already familiar to us: sketch, color, shadows, further refinement. But in such conditions, as an initial sketch, I select colored shapes instead of drawing outlines due to the small size. Color plays a more important role in defining a character than outline. Look at Mario again, he has no outline at all. It's not just the mustache that's interesting. His sideburns define the shape of his ears, his sleeves show his arms, and his overall shape more or less clearly shows his entire body.
Creating small sprites is a constant compromise. If you add a stroke, you may lose space for the shadow. If your character has clearly visible arms and legs, the head probably shouldn't be very large. If you use color, selective stroke, and anti-aliasing effectively, the rendered object will appear larger than it actually is.
For small sprites I like the chibi style: the characters look very cute, they have big heads and eyes. A great way to create a colorful character in a limited space, and overall a very nice style. But perhaps you need to show a character's mobility or strength, then you can give less space to the head to make the body look more powerful. It all depends on your preferences and goals.
The whole team is assembled!
TwistedBrush
For those who want to have some fun. It has an outdated interface from the 00s. Developers have the audacity to ask for money for their software, although competitors can purchase a more advanced editor for the same amount. And they continue to record video lessons on their software, and no one else... It's so sad...
ScreenshotsVideoSpecifications
| OS: | Windows 10, 8, 7, Vista, XP |
| Bit capacity: | 32 bit |
| Russian language | No |
| Version | 23 (20.08.2018) |
| Free | Trial for 15 days |
File formats
This result can make any pixel artist nervous.
The picture you see is the result of saving the drawing in JPG. Some data was lost due to file compression algorithms. High-quality pixel art will end up looking bad, and returning it to its original palette will not be easy.
To save a static image without losing quality, use the PNG format. For animations - GIF.
Rebelle 3
Amazing program! The most realistic watercolor painting is realized in this program. The drawing looks natural, the paint spreads after a stroke, is absorbed by the canvas, and even dries. Moreover, the drying speed, brush moisture, spreading direction can be adjusted in the settings.
ScreenshotsVideoSpecifications
| OS: | Windows 10, 8, 7, Vista, Mac OS |
| Bit capacity: | 64 bit, 32 bit |
| Russian language | No |
| Version | v.3.1.8 (2019) |
| Free | Trial for 30 days |
How to properly share pixel art
Sharing pixel art on social networks is a great way to get feedback and meet other artists working in the same style.
Don't forget to use the hashtag #pixelart. Unfortunately, social networks often convert PNG to JPG without asking, making your experience worse. Moreover, it is not always clear why your image was converted. There are several tips on how to save pixel art in the required quality for various social networks.
To ensure your PNG file doesn't change on Twitter, use fewer than 256 colors or make sure your file is smaller than 900 pixels on the longest side.
I would increase the file size to at least 512x512 pixels. And so that the scaling is a multiple of 100 (200%, not 250%) and sharp edges are preserved (Nearest Neighbor in Photoshop). Animated GIFs for Twitter posts must be no more than 15 MB in size. The image must be at least 800x800 pixels, the looping animation must repeat three times, and the last frame must be half as long as all the others - the most popular theory. However, it is unclear to what extent these requirements need to be met, given that Twitter is constantly changing its image display algorithms.