Every day you use touch typing on your phone for small messages. But this still provides some inconvenience and limitations compared to typing using a physical PC keyboard. How about connecting it to Android?
Successfully connecting a full-size input device will provide new opportunities, allowing you to quickly type large texts, work with office documents, and more, directly on the phone.
Below we will look at all the possible ways to connect a keyboard to a smartphone and tablet.
Connecting the keyboard via USB cable to an Android device
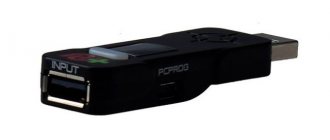
To connect a USB keyboard to an Android phone, you will need a USB OTG adapter, and this is provided that your smartphone supports a USB OTG adapter.
If you bought an Android device recently, then most likely it is ready to support the use of a USB OTG adapter.
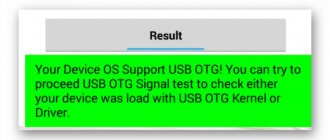
However, if you are unsure or don't know whether your device supports this feature, you can easily check it using the OTG Checker app.
Once launched, it will automatically scan and determine the required OTG interface support for the software.
With the OTG adapter, do the following:
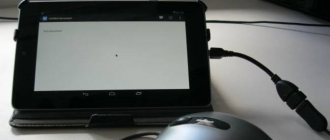
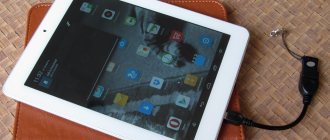
- Connect the input device to the USB adapter connector, and the smartphone to the micro-USB connector.
- The external keyboard will automatically connect in the same way as it connects to the computer.
- Open the desired application and try entering information on the keyboard, words will begin to appear. Everything is working.
After a successful connection, you can use all standard keyboard shortcuts (Ctrl + A, Ctrl + C, Ctrl + V and others) for convenient work with documents and texts.
How to choose a wireless keyboard
The keyboard is a significant element of the computer. The right choice guarantees comfort and convenience while working, typing or playing games. The wireless model differs from the wired model in the absence of cables. The best panel comes with a mouse and low-battery warning software. Purchasing a device primarily depends on the user's preference. The keyboard can connect to the computer via radio frequencies or Bluetooth. In the first case, you can work over a wide radius (up to several tens of meters). In this case, the occurrence of possible obstacles between the PC and the keyboard does not affect the functioning of the latter. This connection method is optimal and most common. In stores you can buy panels that connect to your computer via Bluetooth. This technology is inferior to radio frequency technology, because it has a shorter range and does not allow you to move further than 10 meters from the PC.
Connecting a wireless keyboard to an Android phone
The Bluetooth enabled input device can also be connected to your Android phone, making it more convenient and easy to set up. For testing we used a wireless Bluetooth keyboard Oklick 840C.
It connects easily to any device. It has a convenient layout despite its small size (you can carry it with you everywhere).
What you should do:
- Turn on bluetooth on your keyboard and smartphone.
- From the list of all Bluetooth devices, select your keyboard and click “Sync.” After that, it will appear in the list of previously connected devices.
- To connect to a smartphone or tablet, select a keyboard from the list and click on it.
- A window with the connection code will appear. Directly on the input device, type the six digits of the code and the Enter key.
- The keyboard will connect, the window will disappear, and you can start typing information.
Android and bluetooth keyboard
Getting started is the hardest thing, so I'll skip the introduction. Everything is essentially.
What are the advantages and disadvantages of using a bluetooth keyboard?
+ Using a Bluetooth keyboard, typing is faster. (Of course, with swiping the speed is higher, but (at least for me) only if you do not take into account typos). + By typing “by touch”, you can divert at least some of your attention from the keyboard. + Quick access to all special characters. For example, when programming on a phone, this is a big plus. + Unlike the built-in one, you don’t have to carry a Bluetooth keyboard with you if you don’t have to type anything big. - Extra device. — A small, but still a discharge of the battery. - You can’t really type much on the go, for example, in ICQ - holding both the phone and the keyboard at the same time, while also typing something... It’s possible, but it’s not very convenient, and it looks strange.
So, if you only need to type occasionally: a little in Google search, a little in SMS, a little more in some Internet messenger - you don’t need a Bluetooth keyboard. But if you need to print a lot, such a device can make life much easier.
Where to buy a bluetooth keyboard?
- ebay.com. Disadvantage: delivery takes too long. I waited 25 days for the keyboard and by the time it arrived, I had already forgotten why I bought it. — In one of the many online stores. There is a downside here - the price is too high. On ebay the keyboard cost 18 dollars, here the same one costs an average of a thousand rubles.
How to connect this keyboard to Android phone?
This is why, perhaps, I decided to write this article. Share some tips.
There are a large number of applications on the market for using a Bluetooth keyboard. Most are free.
At first I installed Blueinput from 4pda. But, unfortunately, this program worked very mediocrely for me - it often lost the connection and could not automatically pick up the keyboard. Often refused to connect. In addition, it was not clear how to add the Russian language.
I went to the market and came across this program. I was captivated by the word root, “Since root rights are used, maybe it will at least emulate keystrokes normally?” - I thought. Fortunately, I was not mistaken - it works really great. The essence of the program comes down to the following: the program loads a couple of drivers (this is what root rights are needed), after which you can pair the phone and keyboard, and every five seconds it checks to see if there is a keyboard nearby. If there is, it connects.
Keyboard settings
All these keyboards are so different. They all have their own tricky buttons, like player control buttons. But Android may not see them. And to fix this, you will have to tinker.
— We need to make a list of key codes that do not work correctly. To do this, you can use this program. (Write down scancode). — Remove the qwerty.kl file from your phone. It is located in the /system/usr/keylayout/ folder. Open it with any text editor. — The lines of this file have the structure “key <key code> <action> <special properties of the key>”. Change it to suit your keyboard.
> List of actions: > - 0-9 > - AZ > - Special characters: LEFT_BRACKET, RIGHT_BRACKET, BACKSLASH, SEMICOLON, APOSTROPHE, > COMMA, PERIOD, SLASH, MINUS, EQUALS, AT, SPACE, ENVELOPE > - Important buttons: ALT_LEFT, ALT_RIGHT , SHIFT_LEFT, SHIFT_RIGHT, DEL, ENTER > - SYM - (for me) input means selection window > - MEDIA_STOP, MEDIA_PREVIOUS, MEDIA_PLAY_PAUSE, MEDIA_NEXT - player control. > - VOLUME_DOWN, VOLUME_UP - volume > - HOME, SEARCH, MENU, CALL, ENDCALL, BACK - regular keys > - SOFT_LEFT, SOFT_RIGHT, MUTE, GRAVE - unknown keys, it is unclear what they do > - CAMERA, FOCUS - in theory, launching the camera and focusing > - DPAD_CENTER, DPAD_DOWN, DPAD_UP, DPAD_LEFT, DPAD_RIGHT - trackball (there is one bug associated with these buttons - they change their functions counterclockwise when the device is rotated) > There is such an important action missing as, judging by various sources, CAPS or CAPS_LOCK. Neither one nor the other works for me. By the way, if the action is not recognized, all the lines below will not be processed. > Special properties: > - WAKE - the device will wake up and respond to pressing. > - WAKE_DROPPED - the device will just wake up. — Upload the modified file back. Set access rights to 644. - Reboot.
You can also look at the contents of the file qwerty_ru.kcm.bin. These are letters for each of the actions, four of them. In theory, you can Russify the keyboard right from here, but this is far from the best solution. But if you want, try it. True, they are compiled - look online for the source file.
Russification of the keyboard
Well, everything is quite simple here. It’s worth installing something like ruKeyboard, and it will provide you with a large selection of layouts (if there are not enough of them, nothing prevents you from adding your own) and the ability to quickly switch by pressing Shift+Space.
And to make it really cool, for 150 rubles you can buy stickers with Russian letters for a small keyboard.
Applications
If you become the owner of the same keyboard as me, with forty-nine keys, here are my files: - qwerty.kl - arrays.xml - a small mod for ruKeyboard: adds a layout more suitable for this keyboard.
Materials used
- www.kandroid.org/android_pdk/keymaps_keyboard_input.html - chris.boyle.name/2010/08/android-keymaps - www.slatedroid.com/index.php?/topic/10538-keyboard-layout-qwertykl-thread
Connect your PC keyboard to Android via WiFi
Using the Android application, you can connect your PC keyboard to your smartphone via Wi-Fi wireless connection and transfer the information entered on the keyboard from your computer to your phone. This option is probably good when you need to type a lot of information on your phone.
A great app for this is WiFi Keyboard, which syncs both devices and transfers text using a browser window. After installing the application, you must select it as the main input method on your smartphone.
- Go to main “Settings” → “ System ” and select the “ Language and input ” section.
- To select, click on the subsection “ Virtual Keyboard ”, and then “ Manage Keyboards ”.
- Here you put the switch on WiFi Keyboard.
- Click on the “ Current Keyboard ” function again and confirm WiFi Keyboard.
- Reboot your phone.
- After the reboot, launch WiFi Keyboard, and you see several addresses http//…..
Select one of several addresses and enter it in the address bar of the browser on your computer.
A web interface for synchronizing the WiFi keyboard will open in the browser at this address.
- The connection status in the window should contain a green inscription about the synchronization status - Connected . You can also switch the text input mode to keyboard or game mode.
- You open any application, browser, instant messenger, documents and you can type text on the external physical keyboard of your computer, and on your phone it will appear in the specified location.
Whatever you type into the web interface's preview field is sent to your phone. In my case, typing was very responsive, but the text did not appear in the preview window in the browser. Perhaps this is a flaw of the developers. Therefore, it is better to monitor your typing directly on the phone screen.
Advice. If you do not use the keyboard for a long time in one session, be sure to turn it off after use, as this and other methods affect the phone's power drain quickly.
Connecting a keyboard: step by step
RF model with adapter (to Windows computer)
The most common version of the keyboard. Ideal for classic computers. This version of the keyboard comes with a small adapter (looks like a mini flash drive) that plugs into the USB port. I note that setting up a radio frequency keyboard is the simplest compared to all other types.
Typical RF keyboard with adapter
Now about the connection.
1) And so, the first step: connect the adapter to the USB port of the computer (laptop) and install the battery in the keyboard.
Connecting an RF Keyboard
2) Carefully inspect the keyboard case - most models have special ones. switch: it needs to be switched to “ON” mode (that is, “turned on”). See the example below in the screenshot.
Move the switch to the ON position
3) Turn on the computer.
4) Open some editor (Word, for example) and try to press a few keys. In the vast majority of cases, Windows automatically recognizes the keyboard and you can already work with it.
5) If you have an unusual keyboard (for example, with special keys for gamers), you may need to update the driver. It is best to use the version of the driver that came with the keyboard for this. However, you can update using special. utilities
Bluetooth version (for Windows computer)
These keyboards come without special ones. adapter. As a rule, they cost a little more than radio frequency ones, but they can be connected to devices that do not even have a USB port (which is very convenient in some cases).
Perhaps the only problem with them is the more complex pairing of devices with each other (in some cases you have to tinker with this Bluetooth connection).
By the way, if you are pairing a keyboard with a classic PC, you may need a Bluetooth adapter (not all PCs have a built-in version). More details about this here =>
Connection example
1) First you need to click on the Bluetooth icon in the tray (next to the clock) and select the option “Add device”.