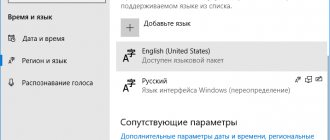
Along with important primary functions, Windows 10 also has auxiliary tools that make life much easier for the user. Among them are, for example, a screen reader or an on-screen keyboard. The latter will be discussed below.
The virtual keyboard is most often used when problems arise with the correct operation of a regular keyboard. In some cases, it is used when there are certain suspicions regarding the presence of a working keylogger in the system (see also on our website how to disable a keylogger in Windows 10).
Let's figure out how the on-screen keyboard is enabled in Windows 10, how to disable it, and also look at problems associated with the virtual keyboard and ways to solve them.
The usual way to enable the on-screen keyboard
See also: “How to change the font on your computer in Windows 10”
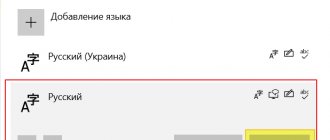
The most common way to launch the on-screen keyboard in Windows 10 is to click on its icon, which is located on the right side of the taskbar.
If the keyboard icon is not displayed, right-click on the taskbar and select “Show touch keyboard button” from the list that opens.
After completing this action, the touch keyboard icon will appear on the Taskbar, and now you can launch it by clicking on it.
Enable or disable the on-screen keyboard in Windows 7
All Microsoft Windows operating systems have an interesting system tool built into them: the On-Screen Keyboard.
General information about the On-Screen Keyboard tool
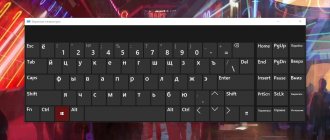
An on-screen keyboard will be useful if your keyboard on your laptop, netbook or computer is broken or missing. With this tool you can use all the features of a physical keyboard. Typing text and symbols is carried out by selecting the desired key using a computer mouse or any other device that coordinates cursor control.
— The virtual keyboard is a special tool that opens up additional opportunities for people with poor finger mobility or limb injuries.
— The on-screen keyboard is indispensable when working on a tablet computer running Windows operating systems.
— The on-screen keyboard is an excellent tool for protecting against a keylogger (a program or device that reads and transmits keystrokes to scammers or other interested parties).
The process of enabling and disabling the on-screen keyboard on PC
To enable the on-screen keyboard, go to the Start menu and click on All Programs. Then go to the “Standard” item and expand the “Special Features” item. After that, click the “On-Screen Keyboard” program shortcut.
See screenshot No. 1
Once these conditions are met, the on-screen keyboard will appear on your desktop. After restarting the PC, you will have to search for the on-screen keyboard using the same algorithm. However, you can pin it or, on the contrary, unpin it if you already have it pinned. To do this you need to do the following. On the launched on-screen keyboard, find the “Options” button. Move the cursor over it and click with the left mouse button. After this, a new “Options” window will appear. At the bottom, with the left mouse button, click on the item “Manage the launch of the on-screen keyboard at login.”
— To enable the on-screen keyboard every time you start the Windows operating system, check the “Use on-screen keyboard” checkbox. Then click "Ok" and "Apply".
See screenshot #2
— To disable the on-screen keyboard every time you start the Windows operating system, uncheck the “Use on-screen keyboard” checkbox. Then also click “Ok” and “Apply”.
Let's sum it up
As we can see, the useful “On-Screen Keyboard” tool for the Windows operating family was introduced by Microsoft developers not just like that, but to solve specific problems posed by the user. The virtual keyboard will be extremely useful for people with disabilities. Also for users who are forced to temporarily do without a physical keyboard, for example, if it breaks or some keys stick.
Enable the touch keyboard through System Settings
- Go to System Settings by pressing the Win+I keys, or by clicking on the corresponding icon in the Start menu.
- Click on the “Special Features” section.
- Go to the “Keyboard” section. Here, on the right side of the window, enable the “Enable on-screen keyboard” button by clicking on it.
Activating the virtual keyboard via the search bar
Like many other tools and features, the keyboard in Windows 10 can be launched by using the search bar, which is located next to the Start menu.
The procedure is extremely simple and quickly implementable. Click on the magnifying glass icon, write the word “on-screen keyboard” in the line that appears and select the best match by clicking on it.
Please note that the keyboard launched in this way is different from the one that is called up by simply clicking on the icon located on the Taskbar.
Using the Shell
See also: “How to change the computer name in Windows 10”
There are users who are accustomed and love to use the “Run” window in their work. The on-screen keyboard can also be opened using this system tool.
Click Win+R, in the window that opens, type the system command “osk”, press Enter or OK.
Disable the on-screen keyboard service
Stopping a service will prevent it from being available for application calls.
Go to system services using the services.msc command from a command interpreter window (Win + R).
Find the Touch Keyboard and Handwriting Panel service and double-click it to open its properties.
In the startup type line, expand the drop-down list and switch the value from automatic to “Disabled”. Then save the changes and restart your computer.
Launch via Control Panel
The list with ways to launch the on-screen keyboard would be incomplete if we did not consider this option through the Control Panel.
- Launch the Control Panel, configure the view in the form of small or large icons and click on the “Ease of Access Center” section.
- A window will open in which you need to click on the “Enable on-screen keyboard” button.
How to enable and call the on-screen keyboard in the operating system Windows XP, 7, 8/8.1, 10?
Method 1. How to enable and call the on-screen keyboard on Windows via Search?
So, below we have provided the instructions that will allow you to enable the on-screen keyboard on Windows:
- Step 1 . Click the "Start" and click on the "Search programs and files" .
Figure 1. Click on the Search programs and files field.
- Step 2 . Type "On-Screen Keyboard" into the search. As a result, you will get a result similar to the one in the picture below.
Figure 2. Click on On-Screen Keyboard.
Step 3 . A keyboard will appear, use it in any application or document. If necessary, change the size of the keys by simply dragging any edge of the window.
Method 2. How to enable and call the on-screen keyboard on Windows via Run?
- Step 1 . Open the Run . You can open the Run by pressing the Win+R .
Figure 3. Open the Run window.
- Step 2 . Type the command "Control" (without quotes) and press "Enter" .
Figure 4. Enter the Control command.
- Step 3 . Click the Ease of Access Center button.
Figure 5: Click on Ease of Access Center.
- Step 4 . Now click on the “Enable On-Screen Keyboard” to make an on-screen keyboard appear on your PC screen.
Figure 6. Click on Enable on-screen keyboard.
Step 5 . A visual keyboard will appear on the desktop. If necessary, change the size of the keys by simply dragging any edge of the window.
Figure 7. Displaying the on-screen keyboard on the Windows desktop.
Method 3. How to enable and call the on-screen keyboard on Windows via Start?
So, below we have provided the instructions that will allow you to enable the on-screen keyboard on Windows:
- Step 1 . Click the "Start" and click on the inscription "All programs" .
Figure 1. Click All Programs.
- Step 2 . Now go to Accessories > Accessibility and tap on On-Screen Keyboard.
Figure 2. Click on On-Screen Keyboard.
- Step 3 . A keyboard will appear, use it in any application or document. If necessary, change the size of the keys by simply dragging any edge of the window.
Figure 3. The on-screen keyboard appears on the desktop.
How to disable the on-screen keyboard
In cases where the on-screen keyboard is no longer needed, it should be closed. Regardless of how you launch it, you can simply click the cross in the upper left corner.
Also, if a corresponding icon appears on the taskbar when you open the keyboard, you can right-click on it and select “Close window” in the context menu.
Possible problems with the on-screen keyboard
After we've looked at ways to enable and disable the keyboard, let's look at what problems may arise when working with it and how they can be resolved.
The keyboard cannot be opened using any of the methods described above.
- Probably the function that is responsible for launching and operating the tool is disabled.
- Launch the “Run” window, type the text “services.msc” (you can use the search bar by entering the same command), click Enter or OK.
- We look for the virtual keyboard service in the window that opens and double-click on it to open properties.
- In the startup type, select one of the options offered by the system (manually or automatically), then click OK to save the settings and exit the properties.
- Close the window with the list of system services. Now everything should work.
The keyboard icon does not appear in tablet mode
Icon display options on the Taskbar are configured separately for normal and tablet modes.
To enable display, after you have switched to tablet mode, you simply need to enable display of the keyboard icon through the taskbar context menu.
The on-screen keyboard constantly appears everywhere
Possible reasons for such actions may be incorrect settings set in the Ease of Access Center.
- Go to the “Ease of Access Center”, located in the Control Panel, and click on the item “Use the computer without a mouse and keyboard.”
- Uncheck the box next to “Use on-screen keyboard” and click OK.
How is deactivation done?
To temporarily disable the on-screen keyboard, simply close it. Sometimes it just collapses and ends up in hidden icons, so you need to deactivate it from there. After these easy actions, she will disappear. Well, have you figured out how to remove the on-screen keyboard? But things are not always simple. Sometimes it happens that it appears again after restarting the computer, that is, every time you start/reboot, this function is turned on again. This is done so that the user does not waste time each time to enable the function. But this clogs up the computer, and the more items in the startup menu, the slower it loads. Solving this problem is as easy as shelling pears. You need to remove the on-screen keyboard from startup as soon as possible.
Deactivating the keyboard:
- go to the control panel;
- go to the “Accessibility” section, and from there to the “Ease of Access Center” tab;
- we see the button “Use (or use) a computer without a mouse and keyboard”, click on it;
- A new page opens where you just need to uncheck the box next to “Use the on-screen keyboard.”
After these steps, the program will not be activated every time you start Windows. This method works on Windows Vista, XP, 7, 10. Although the on-screen keyboard is a very useful tool, its startup on weak devices can greatly slow down the startup time of the computer as a whole. So if the program is not used, it is better to disable it.