The saturation of the global router market with various manufacturers and models of their devices raises questions among users about the initial setup of newly purchased equipment. How to log into Keenetic routers from the company of the same name in order to change the configuration is no exception.
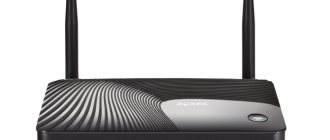
The routers presented by this manufacturer are of quite high quality and have a number of interesting functions. You can recall the fact that the company gained fame through its collaboration with the ZyXEL group, which serves as a kind of standard for supplied equipment aimed at network use.
Configuring Keenetic routers is practically no different from most models presented on the open market, and is carried out through a web interface provided by the router itself to the network. The only nuance is the availability of an initial hardware connection via Wi-Fi and operation not through a pure IP, which may change depending on general network conditions, but by typing the domain name my.keenetic.net in the address bar. The actual substitution of the correct values regarding the identifier numbers will be carried out in a mode transparent to the user by the device itself. Its capabilities are sufficient to include, among other integrated functions, a DNS server, which translates the internal IP address into familiar and readable names.
Connection
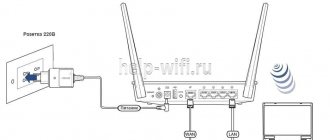
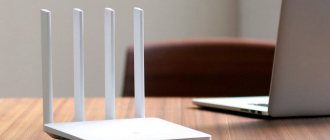
The first thing you need to do to set up is to physically connect to the router. In the case of Keenetic, you can perform the action in two ways: by connecting via Wi-Fi or using a regular network cable.
Devices connected to the router in possible ways are shown in the figure below.
Cable
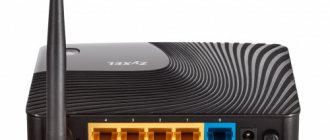
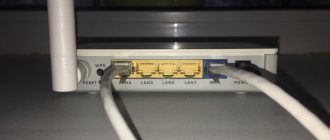
On the back of the router there are several RJ-45 connectors, which are designed for network integration of the device. They are located in groups, marked in different colors. Typically, Keenetic routers use 4 yellow connectors and 1 blue connector. The first are intended for the purpose of combining local equipment, and the contact included in the second group is necessary for external connections, the so-called WAN port. The cable supplied in the kit is used to connect a home computer, another switch or laptop with a router through the connectors included in the yellow group. Immediately after this, in the Windows or Linux control panel, when the router is running, the connection icon will change its status, indicating that the network has been detected.
WiFi
Immediately after purchase, even without preliminary setup, you can connect to the router via a Wi-Fi network. The method is convenient because not everyone has a personal computer or laptop, but many have a tablet, digital TV or smartphone. They can also be used to configure the Keenetic router.
The default wireless network settings are listed on the label located on the bottom of the router. By indicating them to your device, you connect to the switching device.
Wi-Fi setup
To set up a Wi-Fi connection on the Keenetic City router, you need to do the following sequence of actions:
- While in the web configurator , select Home Network . Here you can set up a 2.4GHz and 5GHz Wi-Fi network
- Set the Network Name (SSID ) in a custom format
- Network security - WPA2-PSK
- Set the password in a custom format (minimum 8 characters)
Login via browser
After physically setting up the network with a personal computer or laptop, you need to open a browser. Any version of it will do - Chrome, Yandex, Firefox, Edge, Safari or another, except perhaps the most primitive ones.
In the address bar to access the router settings, you need to type my.keenetic.net and press Enter on the keyboard. A login page will open, requiring you to enter the administrator name and password. Information about them is provided in the documentation for the device. Typically, Keneetic uses the username admin, entered in small English letters, and the password 1234. Next, click the “Login” button on the screen with the mouse.
If everything is correct and the router settings are initial, then after these steps you will be given access to the page for changing the device configuration.
Modern equipment options, when entering the account for the first time, will redirect the user to the “Quick Setup Wizard”, with the help of which, by selecting the most common actions from the list on the screen, you can configure the device in the shortest possible time. The initial information necessary for its functioning is also indicated there: time zone, application niche, language.
If you need to call the wizard again, for example, if the configuration is not working, then just type https://192.168.1.1/wizards/initial-setup in the address bar or reset the device to its factory state.
Setting up wifi on Zyxel
If there is a need to change the password for accessing the wifi connection or other information, you can do this in the configurator. First, you need to log in to the device at https://my.keenetic.net, and in the window below, click on the wireless network icon.
The page that opens contains all the parameters that can be changed, including the access password. The network name is the name of the device, which can be changed to whatever you like, and the network key is the access password through which you can connect any portable device to your home Internet network. All parameter fields are clear even for novice users, so there should not be any difficulties. After all the changes, you need to click on the “Change” button and reconnect to the wireless network, using the new parameters to access.
Login using the mobile application
One of the interesting functional features of the router is the presence of its own developed program for managing settings from mobile devices. You can download it for Android and iOS from the standard application store of your phone or tablet.
So, by launching, a program window will open on the screen of the controlling device.
Connecting to the settings can be done in two ways: by scanning the QR code located on the router label, or manually by entering data from it into the Wi-Fi parameters. Naturally, the above applies only to cases where the router has not been previously configured.
The easiest option is to connect via code by pointing your device’s camera at the router’s label. The QR itself looks like below.
After it is accepted by the “my.keenetic” program, you will enter the configuration center of the switch itself. If the configuration has not been performed previously, it will first ask a question about the new administrator password. Subsequently, the entered combination will be used always and everywhere when logging into the router control panel, in conjunction with the username admin.
Configuration using static Internet protocol
The beginning of setting up a connection using static IP, PPPoE and L2TP is similar to that described above. But after the user marks the presence or absence of a MAC address in the window, changes begin. Now you need to enter the IP address into the router settings. To do this you need:
1.In the window that opens, select the address setting method: automatic or manual.
2. Enter the user login and password that were issued by the Internet provider to enter your personal account. Or mark the line that there is no such data.
3. If the connection parameters are not configured automatically, then you should go to the “Internet” tab, select the connection type and add the necessary data. They can be obtained at any time from your Internet connection provider.
After clicking the “connect” button, the device will connect to the global network. Now the user can not only connect to the Internet via a network cable, but also turn on Wi-FI. By default, which is given the login and password specified on the bottom side of the router.
Problem solving
There are situations when the device works, but you cannot connect to it. There are several options here: there is no physical or network connection, there is no access to the control panel, or the password is incorrect. Human error is also possible when incorrect data is accidentally entered. In addition to those mentioned, there is another option - the router was previously configured, for example, for a test, and you need to reset its configuration to factory settings.
Physical connection problems
Here, first of all, you need to change the connection format. If the connection is made via Wi-Fi, you should try connecting via cable or vice versa. With a wired connection, it may be useful to select a different physical access port. You need to check and clarify whether the computer itself shows the connection (the icon on the panel). If not, but a cable is used, then the first thing you need to find out is whether the network card of the PC or laptop itself is turned on and whether drivers are installed for it. In Windows this is done through "Network Connections". To enter them, you need to press the Win checkbox on the keyboard and without releasing the letter R. A window will open in which you type “ncpa.cpl” without quotes and press “OK”.
Afterwards the network connections themselves will open. Here you need to pay attention to the adapters marked “disabled”.
If they are present in the list, then on such an icon (when you hover the mouse cursor), you need to right-click the pointer and select “Enable”. Next they look at the computer’s reaction. If the network connection becomes active, then try to configure it - if not, you may need to change the connecting cable.
For those cases when the list is empty, you need to install the drivers for the network card itself.
Human factor
Nobody is perfect. It is necessary to check the correct spelling of the address in the browser line - “my.keenetic.net”. An unintentional mistake may have been made.
Can't access control panel
If the physical connection is working, everything is entered correctly, but the panel does not open, then you should first try replacing my.keenetic.net with the device address - 192.168.1.1 or 192.168.0.1. They are equivalent.
If this does not help and problems with opening continue, then you should try resetting the network settings of your computer or laptop manually. To do this, launch the network connections panel in the manner described earlier, select the active adapter using the right mouse button and enter the “Properties” item. The network card settings window will open.
Here, with a single click, select “Internet Protocol Version 4...” and activate the “Properties” button that has become available. The position of the regulators must be translated into the following form and click “OK”.
Next, you can try to configure the router using the methods described earlier.
Reset
For this method, it is necessary to take into account that all parameters previously entered into the router will be lost, and the device will be restored to its original state, as it was after release by the manufacturer. To clean, you need to press the Reset button on the back of the device for 10–30 seconds. This is done with a thin object - a match or a paper clip. The router must be turned on. It will inform the user about the reset moment, after which the key can be released, by lighting up and extinguishing all the front side indicators once.
If it doesn't come in
I will list here the main reasons why you may not be able to access the Zixel settings. By the way, this also applies to all other routers. My most common reasons for this problem are:
- Connection problems. If you are connected via wire, see if the connection indicator is on, is there a network on the computer, or maybe the router is simply not connected to power? If via Wi-Fi, everything should also be connected. What I mean is that sometimes people simply forget to connect to the router and are already trying to enter the settings.
- Reboot your computer and modem - it often helps to avoid having to figure out the problem.
- One possible reason for this is that the settings for connecting to another network were initially set in your system. And in this case, you can be physically connected, but be on different networks. The best solution is to get automatic settings. Actions: Right-click on the network connection near the clock - Network Control Center... - Change adapter settings. And then install everything as in the figure below (the method is suitable for all versions of Windows)
- The point above will be completely sufficient for most problems. It just happens that people have special DNS servers set in the same settings. For example, from Google 8.8.8.8. Then the digital IP address will open, but the domain keenetic.net will not, because Google DNS on your network does not know about it)
- Check your login address. Better yet, just follow the link at the beginning of the article, everything will open fine there. Some people enter mE.keenetic.net or mI.keenetic.net - but the correct option is MY. Another mistake is that they are trying to enter the protocol https://my.keenetic.net or https:// - this is also not necessary. WWW is also not necessary.
- If nothing works at all, try logging in from another device, for example, a phone or tablet. If it opens there, it means the settings on the first device were not in order. If it doesn’t log in from others, it means there’s some problem with the router.
- Try resetting Kinetics to factory settings.
What do I miss in Keenetic
In order for the Keenetic line to be completely ideal for all applications, I do not have enough Wi-Fi access points in the range. We can create a system of Keenetic routers, setting up one as the main one and the rest as additional ones.
We can perfectly place a router that works as a Wi-Fi access point in a closet or in a cabinet with equipment under the TV or even behind the TV. Or under the workplace. At the same time, another convenience will be that we will extend one twisted pair cable from the input router to this place, and the router will have 3-4 ports for connecting equipment. But if there are no places in the apartment or house where you can put a large router, or they are located inconveniently in terms of indoor Wi-Fi coverage, then I would like to use a device like Ubiquiti or Microtik access points or even TP-Link, preferably with PoE power , which could be placed anywhere on the wall and ceiling so that it does not spoil the interior.
TP-Link Wi-Fi hotspot
Moreover, it would be nice if such an access point had two Ethernet ports: for entering the network and for connecting some other device.
Another idea for those who forgot to install additional LAN sockets is an access point, also known as a repeater, that is plugged into a socket. There are many such devices on Aliexpress.
But those models on Aliexpress have extremely terrible firmware. I would like to get all the cool functionality of Keenetic. Moreover, you can insert a cable from the router into the network port (the device will be in access point mode), or you can connect a client (the device will be in Wi-Fi client and repeater mode).
I suspect that something like this will appear soon. Technical support replied that it was worth waiting, but not earlier than in a year.
By the way, if you want to power the router via PoE, you can use a PoE splitter.
But then the network speed will be limited to 100 megabits, which can be transmitted over two pairs.
22, total, today
1+
Related posts:
- Seamless Wi-Fi Internet for an apartment and a country house Article updated in May 2020 What is important in Wi-Fi...
- How many internet outlets do you need in 2020? I have a short but very readable article from 2020...
- Introductory router for local network. Review of Mikrotik RB2011UIAS-RM If we have a minimal computer network in our apartment, then it’s suitable...
- Video surveillance systems: analogue, digital, AHD and others I have been involved in video surveillance since 2008. I was selecting systems then...
- Convenient light control in a smart home Modern design trends tend to increase the number of light groups. Built-in lights…
- Seamless Wi-Fi in Keenetic routers I have always really liked Keenetic routers. Since then...
- Fibaro Home Center 2: radiator control I continue to write about setting up the climate control system on Z-Wave equipment….
Setting up Wi-Fi on Zyxel Keenetic equipment
The required protocol has been installed - the Internet should already be working on the devices. But don’t rush to complete the setup - you still need to set a few parameters for the Wi-Fi wireless network:
- We need a “Wi-Fi” block (the image of the tower distributing the signal is on the panel below). Let's go into it.
- We carry out all the settings in the first tab for the access point. We write down the new network name (you can leave the previous one - this is optional). Remove the checkbox from the “Hide SSID” item if it is there.
- In the connection security, we indicate the combined type - WPA PSK and WPA2 PSK. In the line below we enter the security key.
When setting up the network, it is important to specify a password for the access point
- In additional settings, you can change the transmission channel - set the freest one. Or leave automatic switching between channels. In the next menu, set the mixed communication standard “Wi-Fi” with the designation bgn at the end. We set the signal strength to high if you need to get the widest possible coverage area in the apartment. At the bottom, click on “Apply”.
Manually changing parameters
If the Internet does not work or you want to change the factory WiFi security settings, after completing the quick setup, click the “Web Configurator” button. A menu will open with all possible parameters divided into 5 categories, and a tab with information about the network status. On the latter you can find out whether data packets are being received and transmitted and whether connection parameters need to be changed, or whether the Internet is not working for reasons unrelated to the router.
Internet connection
To change your Internet connection settings, you need to open the “Internet” tab by clicking the planet icon at the bottom of the interface. A window will open with several settings sections. In the first of them you can see all the created connections - functioning ones are marked with a green checkmark, and a red cross is placed next to non-working ones.
This menu is useful when you only need to change some of the settings. One common case is the need to set a static IP address; in such a situation, the connection created during quick setup will not work. Using a ZyXEL WiFi router, you can change the IP receiving mode as follows:
- Click on an inactive connection.
- Select manual IP address setting in the appropriate column.
- Enter the IP address, gateway and subnet mask received from your provider.
Here you can also select the Internet protocol (PPPoE, PPTP or L2TP), specify the MAC address, etc. It is important to make sure that the “Enable” and “Use to access the Internet” checkboxes for the connection are active. After making changes, you need to click the “Apply” button and reboot the router.
The second useful section on the Internet tab is PPPoE/VPN. Here you can create a new connection from scratch, specifying the login and password for access, the connection protocol, the mode for obtaining an IP address and other parameters. This should be done if the Quick Setup Wizard cannot find the optimal settings.
Wireless access point
In order for the router to distribute wireless Internet, you need to activate and configure the access point. This is done on the “Wi-Fi Network” tab. It has 5 sections, 3 of them are the most useful:
- WPS;
- "Compound";
- "Safety".
In the first one, you can activate WPS (Wi-Fi Protected Setup) technology. It allows you to quickly transfer secure network settings to your mobile device without having to manually enter a password. For the technology to work, at the moment of connection you need to press the arrow button on the back wall of the router. Through the parameters, you can make it so that instead of a password, the network requires entering a short PIN code to connect.
In the second section, you can change the standard name of the network being created and change the data transfer standard. In addition, here you need to check the Wi-Fi activation checkbox if it was not selected by default. It is not recommended to change other parameters.
In the “Security” section, you set the type of network protection - it is best to select WPA2-PSK technology and a password. By default, the combination written on the sticker on the router body is installed; This password is easy to guess, so you need to change it the first time you start the device. You cannot select an encryption technology when setting up ZyXEL Keenetic Lite III.