With default settings, the Windows operating system creates restore points automatically if system protection is enabled on the computer. This functionality allows you to roll back the system to a working state.
When working on some computers, Windows crashes and problems occur due to various reasons, including the actions of the user himself. No one is immune from this.
If the cause of the failure cannot be eliminated in various ways, there are two options for solving the problem, without completely reinstalling the system:
- Restore Windows from previously created restore points.
- Restoring the operating system from a backup created in advance.
In the first case, the user launches OS recovery on the PC, selects a suitable recovery point, and then the process of restoring Windows occurs to the state it had at the time the recovery point was created.
In the second case, the user carries out the Windows recovery process using a previously created backup copy of the system, which for safety is usually saved on external media, most often on an external hard drive.
Both options have their pros and cons, and to use they require the presence of a source for recovery: a previously created restore point or a backup system image.
How to check if system recovery is enabled on your PC
First, you need to make sure that the restore point creation feature is enabled on your computer. Otherwise, after an emergency occurs, you will not be able to use the tool to restore the system state from a restore point.
Follow these steps:
- Press the "Win" + "R" keyboard keys.
- In the Run dialog box, enter the command: “systempropertiesprotection”, click on the “OK” button.
- The “System Properties” window will open in the “System Protection” tab.
- In the “Protection Settings” section, next to the available system drive, usually “Local Disk (C:) (System)” should be written “Enabled”.
If protection is disabled, it must be enabled:
- Click on the “Configure...” button.
- In the “System Protection for Local Disk (C:)” window, in the “Recovery Options” section, activate the “Enable System Protection” option, and in the “Disk Space Usage” section, set the maximum amount of disk space used by the System Protection feature.
- Click on the "OK" button.
Restore points take up some disk space. Depending on the size of the system disk, it is necessary to select the optimal percentage used by the system protection function. As new restore points are created and the allocated space is filled, the oldest restore points will be deleted to make room for new checkpoints.
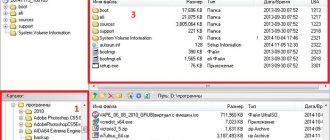
Windows restore points are located in the System Volume Information folder. The user has the opportunity to disable system protection on the computer, delete all or unnecessary system restore points.
You may also be interested in:
- Deleting system restore points
- Why System Restore Doesn't Work: Solving the Problem
What you need to know for recovery
At first glance, there is nothing complicated, but this function has its own subtleties that every person should know before proceeding to restore the Windows 7 system and others. You will now recognize some of them.
Before running this function, you should be aware that the changes made in most cases relate to system and software settings of Windows operating systems. All programs that you downloaded after a specific restore point will be automatically deleted. Keep this in mind when you restore your Windows.
Let's say we have a restore checkpoint created on July 25th, and today is August 3rd and you want to return the previous state of Windows to July 25th. To do this, you need to go into system recovery, select the date July 25 and begin the rollback process. Programs that were downloaded and installed during this period of time will be deleted accordingly, and all data should remain unchanged.
If you want to use Windows 7 recovery to get back previously deleted files, then you won’t be able to do it. To do this, you can use data recovery information - it really works.
You can also use the Previous versions of files function, but for this, you must have System Protection enabled on your local disk, and in the Recovery Options settings, the Restore settings of your system and previous versions of files function must be checked and enabled.
When I click on the Configure button, only five percent is allocated in my Windows 7 operating system (local disk). I recommend moving the slider by 10 or 15%, it all depends on the size of your physical hard drive.
How long the recovery points will be stored will depend on the allocated hard drive space; accordingly, the more space, the longer the storage. When creating a new restore point in Windows 7, if there is not enough space, the old point is deleted and a new one is written in its place.
If your computer is broken and you don’t know what to do with it, I recommend that you check out Computer Repair in Astana.
How to create a restore point automatically using Task Scheduler
Some users want to automatically create a Windows restore point after a certain period of time. During normal operation, the operating system does not create restore points very often, so an automatically created restore point by the system will not be relevant for recovery in this situation.
By creating a task in Windows Task Scheduler, the user can independently configure the frequency at which the automatic creation of restore points function runs.
You will need to go through the following steps:
- Launch Task Scheduler, a system tool that is part of the Microsoft Management Console (MMC).
- In the folder tree, follow the path:
Task Scheduler Library -> Microsoft -> Windows -> SystemRestore
- In the top center window of the Scheduler, right-click on the "SR" file, and then select "Properties" from the context menu.
- In the window that opens, go to the “Triggers” tab, click on the “Create...” button.
- In the Create Trigger window, select the conditions for executing the task. In the “Start task:” field, select the appropriate option, in my case “On schedule”. Configure launch settings, for example, once a day or once a week, select convenient days of the week. Check the box next to “Enabled”.
- Click on "OK".
- A new task will be added in the “Triggers” tab. Click on the "OK" button.
A new task has appeared in the “Task Scheduler” window, when executed, regular system restore points will be created at the selected frequency.
How to see the presence of restore points
If you are using the Windows XP operating system, then you need to go to the Start menu > All Programs > Accessories > System Tools > System Restore.
Select Restore your computer to an earlier state and click Next.
A regular calendar will appear in front of us, in which there are dates, numbers and months. We go to the desired month and look at the dates. If the number is in bold, then there is a system recovery checkpoint on that date. All dates not highlighted in bold have no recovery points recorded.
If you are working on the Windows 7 operating system, then the procedure is almost no different from XP, the only thing is that there are several ways to view recovery checkpoints.
You can go through the Start menu > All programs > and so on. Or you can use smart search; to do this, you need to again click on the Start menu and where it says Find programs and files (search), enter the word system recovery.
After which, the Restoring an earlier saved state of this computer window will open in front of us; we need to click Start system recovery.
The following Restore system files and settings window will appear - click Next.
After this, a tab will appear where you can see the presence of Windows 7 restore checkpoints.
This is how you can see the presence of rollback checkpoints in two operating systems.
Disk space and deleting Windows 7 restore points
You probably understand perfectly well that all our super-points created on the computer during our entire work cannot be stored forever. Therefore, old ones are usually automatically erased when the storage capacity threshold is exceeded. You can set the volume yourself using the slider in the “System Protection” window:
It is recommended to set it around 15%.
Now about deleting Windows 7 restore points. Sometimes you have to do this too. So, if you need to remove them all . Then in the window shown at the top, you need to click on the button labeled “Delete”. If you decide to leave the last one , then click “Start” and in the command line type “Disk Cleanup”. Then click on the found line:
Now select the disk and click “OK”:
The next step is to estimate the amount of space that can be freed up:
And in the window that appears, select the “Advanced” tab, and in the “System Restore and Shadow Copy” field, click “Clear”:
Now there is only one last point left on your computer.
How does it work
The settings are saved automatically. Registry changes are taking place. For example, when installing a new driver or software. The OS records this and creates a recovery file. If the installation is unsuccessful, it helps to return the system to a working state.
Backups are created automatically and manually. Do them when you want to install software that changes the configuration of system files, drivers, and antivirus software.
Peculiarities
What to consider when you are going to set up the creation of a restore point in Windows 7:
- Works on HDDs formatted in NTFS (OS file system);
- The protection works on the disk where the system is installed. Activated on any HDD if necessary;
- For the operation of the “Protection” component, a space is allocated on the HDD; when filled, old data is deleted and new data is written in its place;
- In the settings, specify how much space on the HDD to allocate for recording;
- When you disable the function, the created files will be deleted. When it is reactivated, they will be re-created;
- The function may not work if multiple operating systems are installed on the PC.
Recovering via Safe Mode
If your computer does not boot or boots and does not work correctly, then you can use the Windows 7 restore point. To do this, you need to go into safe mode; here you will not be able to create a checkpoint, but it is quite possible to use it and return to an earlier state of the computer.
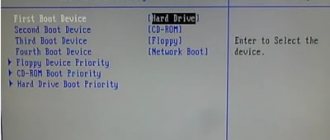
To enter safe mode, you need to press the F8 button (additional boot options) when starting the computer; you can read more about this in the useful F8 article.
In the additional boot options window that appears, you must select Safe Mode and press Enter.
Next, go to the Start menu > Control Panel > Recovery, where System Restore and Run Recovery will appear. We select the desired control point and proceed to rollback the system.
If safe mode did not help you, or you were unable to enter it, then do not be upset.
You can select the Windows 7 restore points you want by going to More boot options > Troubleshoot your computer > System Restore.
If you changed your Windows login password after the restore points were created, you will have to strain your brain and remember the old password. If you remember your old password, it’s good, if you can’t remember, I wrote an article on my blog specifically for this: How to hack a password on a computer.
Let's sum it up
Well, friends, the large and informative article Windows 7 restore point has come to an end. Today we learned what restore points are, why they are needed, what you need to know before running system restore, we figured out how to view and create restore points in two operating systems Windows XP and Windows 7 systems, we learned how to restore using safe mode, we also deleted old checkpoints and analyzed the possible causes of problems when creating restore points.