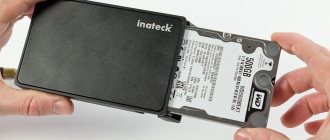
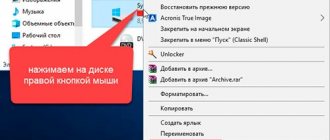
More and more people nowadays use external hard drives. Modern USB drives have good operating speed, which is increasing every day, and are also very affordable devices in terms of price. Well, and importantly, they have a very considerable amount of memory in relation to their price. This is most likely what makes external hard drives so popular among modern computer users.
Despite the fact that external hard drives have a very reliable and high-quality file structure and protect the information stored on them very well, they are nevertheless subject to a number of different risks, much more than internal hard drives. That is why such a process as restoring an external hard drive is very popular nowadays, since there are often cases when, for one reason or another, information from USB drives has become impossible to read.
Causes of damage to external hard drives
Actually, this state of affairs is not at all surprising, since there is always a risk of dropping a USB drive, or causing certain physical damage to it, which will become a serious obstacle to its normal operation. It is also not uncommon for owners of external hard drives to leave them for long periods of time in extremely cold or extremely hot temperatures, which can greatly affect their performance.
But in addition to obvious physical reasons, disk damage can also be caused by software reasons. For example, logic errors that may occur due to improper removal of a disk or due to power failures can also cause problems with the storage device. Therefore, if you use external hard drives, be sure to use the eject function, which is available on every computer, before removing the external drive. This way, you can protect yourself from such problems. Because it is very dangerous to remove the disk without prior preparation, this is especially dangerous when the disk is used by the operating system. Such extraction can lead to problems in the file system of the external drive.
Even if you damage your USB drive, you shouldn’t worry, since there are many methods that allow you to carry out high-quality and effective recovery of an external hard drive, even on your own.
How can I recover information from an external hard drive?
The reasons for problems with the operation of a USB drive are quite obvious, we have listed them above, but it is much more interesting to know methods for solving this problem, methods that will allow you to restore information that has become inaccessible for one reason or another.
At the moment there are quite a large number of ways to do this. It should be noted that such a service as external hard drive recovery is provided by many modern repair and information companies. Specialists in this matter working in such places are always ready to provide high-quality information recovery services. But do not forget that such a service costs money, so it is best to contact such places in the most advanced cases. If you want to try to cope with this problem yourself without spending your own money, there are several very good methods that can help in many cases.
There are several very good programs that can cope in cases where the external hard drive is not visible and when an urgent need to restore the external hard drive is simply necessary. Let's briefly look at the main ones.
Recuva program
One of the best programs for recovering lost information from hard drives. With all its powerful functionality and good quality restoration, it is very simple and easy to use, and it takes up very little space.
In order to begin data recovery using this software solution, you need to download one of the latest versions of this program and install it on your computer. After which you should launch the program, and a special wizard will start along with the program, which will help you correctly recover lost information from a particular drive. The first thing you will see from the wizard is a welcome window, in which you need to click Next.
In the next window that appears after the welcome window, you should select the type of files that you want to restore. Let's say, if you want to recover lost photos, you must select the picture type, if you have lost some audio files, you should select the music type, if video files are lost, then select the video type and everything like that. If you want to recover all lost data from the drive, then you should select the All files item. After making your selection, click Next.
In the future, you should select the path to the drive on which you want to restore this or that information. After this operation is completed, a special window will appear in which the program will inform you that it is ready to begin searching for lost files. If you want to get the highest quality and effective result, and you are not very pressed for time, in this case, check the box next to Enable in-depth analysis and click on the Start button.
After clicking the start button, Recuva will immediately begin analyzing the USB drive in which you want to recover data. All you have to do is wait a little, the program will do everything on its own. After the analysis is completed, a list of files that are available for recovery should appear. You need to select all the files that you are interested in recovering and click on the Recover button. Before the program begins restoring the selected files, you must also select a location on the computer where they will be saved.
Actually, that’s all you need to know about how this program works in order to successfully recover damaged files on an external removable drive.
A short overview of programs for recovering data from a removable hard drive
When choosing a data recovery program, you should especially pay attention to the following parameters:
— types of file systems that the program supports; — what devices the program can work with (removable hard drives, built-in hard drives, flash drives, memory cards, and so on); — what types of files are most successfully restored by the program (this information is not always easy to find; often only specialists can give a reliable answer); — program operation algorithm (what sequence of actions is required to recover files, what information can be obtained about the state of the media and files while the program is running).
Among the free programs, in addition to Recuva, there are others. R.saver allows you to work with many types of file systems, including EXT2, EXT3 and EXT4 of the Linux operating system, which cannot be processed by standard Windows tools without this program. By the way, this advantage also applies to the Recuva program. Among the paid programs, in addition to the R-Studio mentioned above, Stellar Phoenix, Data Rescue PC, Recover My Files, GetDataBack and others have proven themselves well. Data Rescue PC has a simple and intuitive interface. This program is also interesting because it can work even when Windows does not start. It also works via the network. GetDataBack also allows you to recover data over the network. At the same time, program updates are available for life for those who purchased it. This may be important for those users who regularly face the problem of data loss.
R-Studio
An equally popular and equally high-quality program that allows you to recover information from a damaged disk is the R-Studio program. This utility is very good because it allows you to see data that the OS does not notice. Likewise, if for one reason or another you cannot see your external hard drive, feel free to use this program, it will allow you to see the damaged information.
It is best to recover data using R-Studio if the drive is damaged due to a logical error, but from a physical point of view it is completely intact. If the disk is physically damaged, in this case this program may not help, and then it is much better to seek help from professionals in the matter of data recovery.
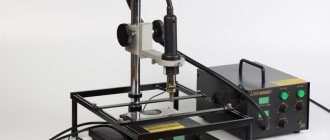
An equally important point when working with this software solution is to use the fastest possible interface. Many modern USB drives have additional interfaces, such as eSATA. Such interfaces usually work faster even than USB 3.0, so their use in this case is quite rational, as it allows you to recover lost information faster and sometimes with better quality. This is especially important if you have a 2 TB or larger external hard drive.
In addition to using faster interfaces, before starting the data recovery process, you need to check the availability of free space that will be used to save the recovered files. An important point is that to obtain the necessary functionality of R-Studio, you do not need to buy the full version of the program; even the demo version of this utility can provide the user with many of the necessary functions for high-quality file recovery.
When everything has been selected, checked and prepared as correctly as possible, you can safely begin the process of restoring information on the damaged disk. Therefore, we launch the program and perform the following actions:
- Open R-Studio and identify the damaged disk. Most often, the file system for the damaged disk is not specified.
- We scan the damaged disk. To do this, you need to right-click on the disk with the damaged data, and select Scan from the context menu that appears. After this operation, a dialog box should open in which you should set important parameters. The main ones:
Scan area
It is best to choose scanning the entire disk, since damaged information may be hidden in all its partitions.
File system
If you do not know the file system used on the disk before the damage, then select NTFS for Windows, Ext2/Ext3/Ext4 for Linux, HFS for MAC.
Search for known file types
Check the box next to this item. If you check this box, additional file search and recovery algorithms will be activated, which can increase the efficiency of the process of recovering lost information.
Scan type
If you choose the simple scanning method, the speed will only be affected if you are using an old computer. In all other cases, this will not affect the scanning speed at all, so we leave it as default.
After selecting all the necessary parameters and settings, feel free to click on the scan button and R-Studio immediately begins scanning the damaged disk and searching for those files that can be recovered.
- We look at the scan results using the R-Studio program. The utility should show recognized partitions in different colors, which depend on the found partition elements. On all found partitions, you can search and restore files, and they are not virtual objects.
- Double-click on the detected sections to view their contents.
- In the list of files and folders that opens, you need to mark those objects that you want to restore. To do this, you need to check special boxes next to the required files in the Contents panel.
- Recovering marked files. For these purposes, you must use only the registered version of the R-Studio program.
This is how you can restore an external hard drive quite simply and quickly. And it doesn’t matter what size it is, whether it’s a 1 TB external hard drive or a 500 GB external hard drive, if you follow all the steps correctly, the likelihood of recovering information will significantly increase.
How to fix/recover a faulty hard drive in Windows 10?
If your hard drive contains important data, you need to use software that can retrieve photos, music, video clips and other files before they disappear forever. A wonderful data recovery tool, Starus Partition Recovery .
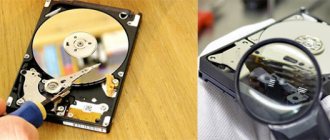
Before we move further along the path of restoring the performance of an out-of-control disk, we must start with something simple. It would not be superfluous to carry out an external inspection, which will visually assess whether the breakdown was caused by a technical malfunction - for example, a loose bolt or poor cable contact. If everything is in order and everything looks normal, then we move on to the next stage. The following will describe tips that may be useful in troubleshooting.
Checking the power supply.
If you are using an external hard drive, then it is possible that it is drawing power from the USB port it is connected to. Try disconnecting the hard drive and connecting it again. You can also try connecting to a different USB port on your computer, the one you are using may not be working correctly. Make sure the USB port is not disabled in settings.
Some external hard drives come with a separate power supply, so check to see if it's working properly. Checking the power supply in the case of an internal hard drive can be a little more difficult. However, if your computer detects the internal hard drive, it is unlikely that there is anything wrong with its power supply.
Connect the hard drive to another computer if yours cannot detect it.
It may be that only your computer cannot read the hard drive. Connect the media to another PC, you may be relieved to see that it works fine on the other one.
If so, then there may be some problem with the device drivers. You can reinstall hard drive drivers by calling the context menu of the “This Computer” using the right mouse button, then Manage> Device Manager .
Right-click the hard drive name, select Delete .
Now restart your computer and connect the hard drive. In most cases, driver installation will begin automatically.
You can also change the drive letter assigned to the media. To do this, go to the “This PC” folder, then, using the right mouse button, select Management> Disk Management . Right-click your hard drive and select "Change drive letter and drive path..." .
Now right-click and select “change drive letter or drive path.” Select the desired letter and click OK. You will see a warning that programs using this drive may stop working when its letter changes. Such manipulation is dangerous for the partition on which applications and the Windows system are installed. Since the disk being restored is not a system disk, we can safely confirm the choice.
Checking the hard drive for errors.
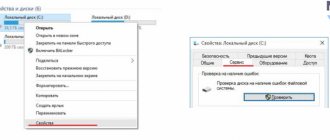
Windows has a built-in hard drive repair mechanism that allows you to check the media, internal or external hard drive, for errors. In some cases, Windows will automatically ask for permission to scan the drive when you connect it to your PC. If this does not happen, open the This PC folder, point to the drive, use the right mouse button to select Properties > Tools tab . Click the Check .
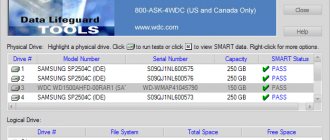
Checking the SMART status of a hard drive using the command line
The hard drives we use in our computers and laptops have built-in hardware monitoring technology SMART (self-monitoring, analysis and reporting technology). However, Windows does not have any built-in facility to display the data received from SMART. But you can check the overall status using WMIC (Windows Management Instrumentation Command-line) and try your hand at disk recovery using the command line.
- Open a command prompt. To do this, click on the “Start” button and enter cmd in the search for programs and files field. The search results will display the cmd.exe file, which must be run as an administrator.
- At the command prompt, type wmic and press enter.
- Type diskdrive get status and press Enter.
The following window will be shown:
The window will display the SMART status of your hard drives. If “OK” is as many as there are disks in the system, this means that everything is in order. In any other case, you can start to worry; it is quite possible that the disk will die in the near future. It's easy to get confused when you have multiple drives on your system because the command line doesn't display the drive name, you just see "OK."
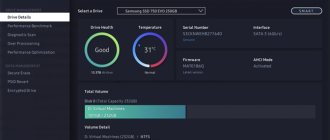
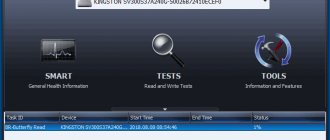
Alternatively, you can obtain SMART data using the CrystalDiskInfo . It can show you the values associated with certain attributes of the hard drive, as well as its overall health, temperature, number of starts, total operating hours, etc.