Windows
Author Irina Luneva
Date
Feb 10, 2016
8 247
Share
From time to time, when using a USB drive, difficulties arise with placing files on a flash drive, since there is no free space, and the storage capacity has decreased significantly. In this case, do not rush to buy new media or delete information from the old one; try adjusting the disk parameters using the DiskPart command. There are a considerable number of applications that need to take up a certain amount of space on the storage device in order to function properly. But the user cannot see the amount of occupied space, since this program tends to hide this information. Such software includes emulation programs and applications designed for backup. Typically, such products occupy a separate volume on a USB drive.
- LiveJournal
- Blogger
As a result, the user is faced with a problem when he needs to delete volumes, but it is impossible to do this using the standard formatting method.
- Removing USB partitions using DiskPart
- Performing other operations to format a USB storage device
Using the media context menu, you can remove only those volumes that are visible; removing hidden software requires a special approach. How to delete partitions on a flash drive is described in detail in this article.
Let's try to make do with WIndows
It is important to know that a split USB drive in this way will only be visible on the computer where the manipulations that will be described below directly took place. Other computers will only see the first partition of the media. An extra piece of knowledge will never hurt us.
So, we have a flash drive, there is a lot of free space on it, let’s say it’s a multiboot drive, and we can, if necessary, install any of the provided operating systems from it.
It is problematic to partition the drive using internal Windows tools, let's go to the Disk Management snap-in. To do this, right-click on “My Computer” (if you have Windows 7) or “This PC” (if you have Windows 10) and select “Manage”, then go to disk management.
We have our removable device in front of us; there is simply no way to divide the flash drive into sections. But you can still do this using a special driver.
Removing partitions on a USB drive using DISKPART
In Windows 7, 8 and Windows 10 earlier versions, actions on partitions on a flash drive are not available in the Disk Management utility, and therefore you will have to resort to using DISKPART in the command line.
In order to delete all partitions on the flash drive (the data will also be deleted, take care of their safety), run the command line as an administrator.
In Windows 10, start typing “Command Prompt” in the taskbar search, then right-click on the result and select “Run as Administrator”, in Windows 8.1 you can press the Win + X keys and select the desired item, and in Windows 7 Find Command Prompt in the Start menu, right-click on it and select Run as Administrator.
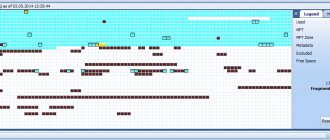
After that, enter the following commands in order, pressing Enter after each of them (the screenshot below the list of commands shows the entire process of performing the task of removing partitions from USB):
- diskpart
- list disk
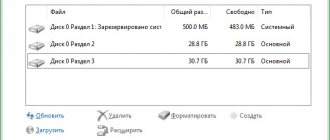
- Find your flash drive in the list of disks, we will need its number N. Do not confuse it with other drives (as a result of the described actions, the data will be deleted).
- select disk N (where N is the flash drive number)
- clean (the command will delete all partitions on the flash drive. You can delete them one by one using list partition, select partition and delete partition).
- From now on, there are no partitions on the USB, and you can format it using standard Windows tools, resulting in one main partition. But you can continue to use DISKPART, all the commands below create one active partition and format it in FAT32.
- create partition primary
- select partition 1
- active
- format fs=fat32 quick
- assign
- exit
At this point, all steps for deleting partitions on the flash drive are completed, one partition has been created and a letter has been assigned to the drive - you can use the full amount of memory available on the USB.
Finally, there is a video instruction if anything is not clear.
And maybe this will be interesting:
Why not subscribe?
Distribution of new, sometimes interesting and useful, materials from the site remontka.pro. No advertising and free computer help for subscribers from the author. Other subscription methods (VK, Odnoklassniki, Telegram, Facebook, Twitter, Youtube, Yandex.Zen)
01/05/2019 at 22:31
Thanks a lot! It helped!
01/27/2019 at 20:23
When I try to delete partitions, it says that it was successfully formatted, but the partitions remain. What to do?
01/28/2019 at 12:55
Does the flash drive work properly? Is there no way to delete partitions in Disk Management? (right click - delete volume)
01/28/2019 at 18:02
I tried through the command line. Before this I used a flash drive as internal storage on my tablet.
02/07/2019 at 20:09
same problem + in cmd it says volume is unusable
01/28/2019 at 21:13
Thank you very much, Author! Only your advice helped... and I tried the flash drive and Acronis, and through disk management... and a bunch of different programs... I was already ready to throw it away... And here everything is intelligible and point by point... with trembling hands I drove it into the CDD and got back 15GB of dead space! Be happy)
02/08/2019 at 11:25
On the command line I get to the command clear. That's it, it says the section is not selected. Although before this, when entering the corresponding command, it was written that the section was selected. How to get out of this situation.
02/09/2019 at 08:00
Do I understand correctly that up to the 6th step everything goes well, but the error occurs on the 9th? If so, then you can stop at 6 and try formatting using Windows.
03/05/2019 at 16:28
Thank you very much! I'm a complete computer novice, but using your instructions I got a flash drive with one partition!
03/19/2019 at 14:42
Thank you very much! Everything is very well explained, thanks again!
03/20/2019 at 12:12
Thank you for a very useful and understandable article, and the whole site is super! I often find the information I need here.
03/27/2019 at 07:44
After selecting a disk or volume (flash drive), the clean command responds: DISKPART> clean Virtual disk service error: No media in the device.
Attempting to format: Volume 4 selected. DISKPART> format fs=fat32 Virtual Disk Service error: Volume cannot be formatted.
Disk properties (flash drive): DISKPART> detail disk
U167CONTROLLER USB Device Disk ID: 00000000 Type: USB State: No Media Path: 0 Target: 0 LUN ID: 0 Location Path: UNAVAILABLE Current Read-Only Status: No Read-Only: No Boot Disk: No Page File Disk: No Hibernate File Disk: No Crash Dump Disk: No Cluster Disk: No No Volumes
Editing files
We are interested in the ID of our flash drive; you can find it in the device manager by calling the context menu and selecting “Properties”. Next, you need to go to the “Details” tab and find the “Equipment ID” line in the drop-down menu. We need the very first line, copy it and save it in any text editor, for example, Notepad. We minimize both the text editor and the device manager.
We need a driver for Hitachi Microdrive external drives. It will help the system recognize the USB drive as a hard drive, then we can delete partitions and create new ones like on a regular hard drive. The archive is freely available on the Internet, available for both 32-bit and 64-bit systems.
So, we downloaded the archive, unpack it, open the folder. We are interested in a file with the extension “.inf”, call up the context menu, select “Open with” and in the window that appears we find any text editor, for example, “Notepad”.
We need to edit one line in the section which is shown in the screenshot.
After the line [cfadisk_device] there are three grouped lines, we need the last one. Open a notepad with the saved ID and copy part of the line after the expression “USBSTOR\”, paste this phrase into our text file after the expression “DISK&VEN_”. It is impossible to give clear instructions here, because everyone has their own USB drive ID, so everyone will insert it differently. To make it clearer, below are screenshots of “How it was” and “How it became.” Don't make a mistake, otherwise nothing will work. Save the edited file.
How to partition a flash drive using WinSetupFromUSB?
This is interesting:
How to create a bootable USB flash drive for Windows 10 using the WinSetupFromUSB programMulti-boot flash drive for different versions of Windows
The next method also leads to erasing files; be sure to save them to another drive. We launch the WinSetupFromUSB utility and make sure that the flash drive is selected and not another drive.
Click on the “Bootice” button, after which the following window opens.
The “Destination Disk” section must contain a flash drive, not an HDD. Now click on the “Parts Manage” item.
We get to the window where we click on the “Active” button, so the flash drive will have the opportunity to be divided into sections. Now click on the “RePartitioning” item.
Next, put a checkbox next to the “USB-HDD mode (Multi-Partitions)” section and select a flash drive from the drop-down menu. This option will allow you to reprogram the controller drivers so that the system considers it a hard drive. Now click “OK”.
Next, we arrange the sizes of each section. As you can see, you can create up to 4 partitions. We indicate the required volume. In the “Vol Label” item you must indicate a label consisting of any Latin letters.
Click OK.
Great, we made as many partitions as we wanted, but Windows sees only one of them, which means that in the “Partitions Management” window opposite the desired section, click the “Activate” button, after which the letter “A” will appear in the “Act” column. True, in Windows 10 all partitions will be visible without this.
To assemble a flash drive, click ReFormat USB Disk and select the same Multi-Partitions item.
For those sections where the volume was set, enter 0 and remove the marks. Click OK.
We put zeros in all sections to assemble a flash drive
An unallocated partition will appear in the window, about which there is no information. Then click on the “Format this part” option. The usual Windows format window will open, where you do a quick format with the desired file system and label. Although in Windows 10 this action is not necessary, everything is done automatically, and also if you have the latest version of the utility.
You can make sure that the flash drive has regained its original capacity and will again be recognized as a USB drive.
Update the device driver
Go to the device manager again. We find our device, right-click on it and select “Update drivers”. Select the following interface elements:
- Perform a search on this computer;
- Select from the list of already installed drivers;
- Install from disk;
Click the “Browse” button and find our driver with the file that we just edited. Confirm your choice and click the “Next” button. We will be warned twice about the danger of what is happening, we ignore the warnings, click “Yes” and “Install this driver anyway.” After a short wait, the driver finishes installation, close the window and restart the computer.
How to split a flash drive into 2 disks? Now our computer sees the USB drive as a local drive. Therefore, we can divide it into several sections. Open the Disk Management snap-in. The disk was removable, but became the main one. Next is the standard procedure for dividing the drive into volumes. Right-click on the desired volume and select “Shrink Volume”, specify the desired size, and free up space. We mark out this space: right-click on the unmarked area and select “Create a new volume”, follow the instructions of the wizard. If you have a desire to return everything back, then we transfer everything that we managed to save on the second partition to another place, for example, to one of the hard drive partitions. We delete the volume and connect the area to the first section of the flash drive.
Now we can use the first partition as a multi-boot partition, and on the second, for example, store music. Both parts are autonomous and do not interfere with each other.
The natural question is how to get everything back? Very simple. Open Device Manager, find our flash drive, right-click and select “Properties”. Next, go to the “Driver” tab and click the “Roll Back” button. After such manipulations, the drive will return to its original state.
Performing other operations to format a USB storage device
To split a flash drive into several partitions, you can use the standard Windows utility through Disk Management. When creating a volume, you must specify the required number of partitions.
If the flash drive is split into two disks, you can combine the disk partitions using the tools in the same Disk Management block or special software. For example, Acronis Disk Director will help you not only merge partitions on a flash drive, but also create and delete volumes, as well as create a bootable flash drive. Disadvantages: the program is paid, English interface. To combine partitions of a flash drive, you can use analogs of Partition Magic and Gparted, but their level of reliability is much lower.
How to partition a flash drive using the command line
Other methods have arrived. Now I'll show you how to do this on the command line. True, the drive will lose the files, so they need to be transferred to another drive.
Launch an elevated command prompt and enter the following commands:
- diskpart – launch the Diskpart utility;
- list disk – display existing partitions;
- select disk 1 – select partition number 1, yours may be different;
- clean – cleaning the flash drive;
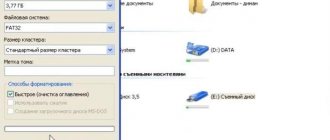
- create partition primary size=5000 – divide the flash drive into a 5 GB partition;
- format fs=fat32 quick – formatting in FAT32;
- create partition primary – create a primary partition;
- format fs=fat32 quick – formatting in FAT32;
- assign letter=e – assign a letter to the section.
Approximately the same can be done using third-party utilities, for example, AOMEI Partition Assistant.
Disk Management tool in Windows 10
In fact, until the Windows 10 Anniversary Update, you couldn't fully use Disk Management.
to create partitions on USB flash drives or SD cards.
You had to use command line functions, and even then only one partition would appear in the File Explorer
because
Windows
didn't support multiple partitions on USB drives and SD cards.
Creators Update
corrected both of these shortcomings.
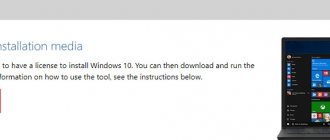
Next, we'll show you how you can partition a USB flash drive or SD card using Disk Management
in
Windows 10
.