Familiarize yourself with the disk structure and typical problems
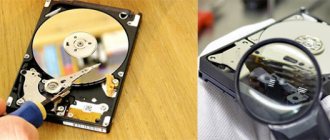
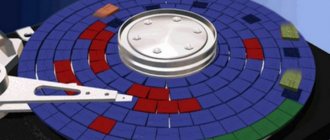
Any hard drive consists of several standard components.
A controller board is attached to the bottom, which controls the operation of the drive. Inside the sealed case there are metal or glass plates on which information is stored. They rotate on a spindle, and above them there is a block of magnetic heads (BMG), which reads and writes information. YouTube channel "Andrey Moseenkov"
From prolonged use, the plates begin to crumble, making some of the data inaccessible. Impacts and shaking lead to jamming of the BMG or spindle, and the control controller burns out due to voltage surges and a low-quality power supply.
If any element fails, the disk stops working. Almost all hardware faults cannot be fixed at home without special equipment and skills. The only exceptions are broken sectors and oxidation of the controller contacts.
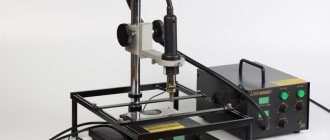
Restoring a laptop hard drive in Storelab
Restoring a hard drive yourself is quite risky - the damage can be critical, and incorrect user actions will lead to the loss of all data and the inability to bring the hard drive back to life. Storelab specialists have extensive experience in restoring damaged hard drives and have the necessary equipment for this (there is a clean room for diagnostics). To make sure that data can be recovered, a free diagnostic is carried out. It gives a complete picture of the current state. You can contact us even if other companies have failed to help.
The price is announced after diagnosis. Only the result of the restoration is paid, so customers who contact the service center do not risk anything. The terms are minimal. If you don’t have time to visit the laboratory, you can arrange delivery by courier. The necessary documents are drawn up (transfer and acceptance certificate, accompanying sheet). The signed agreement guarantees data confidentiality.
Check the disk
If you hear clicks, crunching and other extraneous sounds while the drive is operating, it is better to immediately seek the help of specialists. Do not disassemble the disk under any circumstances! It will be almost impossible to recover data on your own.
If nothing like this is observed, check the disk in all three ways.
Make sure the device is recognized in the BIOS
YouTube channel “Alexey Vinogradov”
Turn on your computer and immediately after starting, press the Delete or F2 key several times. In some cases, other keys are used, which ones are always written on the screen. After opening the menu, go to Boot → Hard Disk Drives. If the disk appears in the list, then there is a chance of recovery.
Connect the drive to another computer
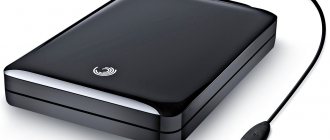
This is necessary to exclude malfunctions of the motherboard. Simply connect the external hard drive with a USB cable to another computer or laptop and check its functionality.
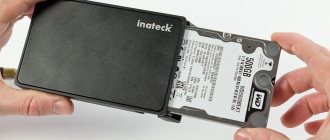
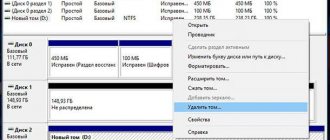
First remove the internal drive from the system unit by first turning off the computer or removing the laptop battery. To do this, remove the cover, disconnect the power and SATA cables, then unscrew the fastening screws and carefully remove the disk. In the same way, connect it to another computer and check if the disk is available on the system. You can also use a special pocket to turn the internal drive into an external one and connect it with a USB cable.
If everything works on another computer, then the problem is not with the disk, but with the motherboard or other PC hardware.
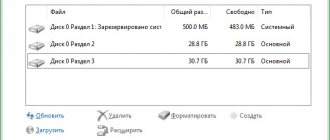
Check the disk using special utilities
For a more detailed check, test using disc manufacturer applications or universal tools like Victoria and HD Tune. The results will show how serious the damage is.
How to prevent the problem?
Unfortunately, the possibility of failure cannot be completely excluded. However, if you follow a few rules, the hard drive in your laptop can last much longer than the warranty period.
How to protect your hard drive and information on it:
- Try not to drop the laptop. It sounds trivial, but HDDs are sensitive to mechanical damage.
- Install a good antivirus.
- Check the operation of the cooling system. Overheating is bad for storage.
- Create backups on other media or in the cloud.
- Protect your laptop from power surges by connecting a UPS.
- Periodically defragment the drive.
Instructions: How to connect a hard drive to a TV - 2 methods for two types of HDD
Recovering data from a hard drive is difficult, but it is possible. However, it’s even easier to take preventative measures: make a copy of files, do not download unlicensed software so as not to pick up a virus on your laptop, and regularly check the media for errors. If a failure does occur, the article will tell you how to return the information.
Try recovering the disk yourself
If the files and documents are not vital, you can try to repair the disk yourself. The chances of success in this case are not so great, but they are there.
You must first restore the information stored on the drive. There are many free and paid utilities for this.
They all work on a similar principle. You need to select a drive, scan it, and then specify which of the found files need to be recovered. The drive will have to be connected with a USB cable or installed in another computer on which to run the recovery software.
Then you can start resuscitating the disk itself.
Method 1: Clear contacts
Like any other electrical contacts, the connection between the controller board and the hard drive oxidizes over time. This leads to incorrect operation and errors. To fix the problem, the contacts must be cleaned with a paper eraser or pure ethyl alcohol.
YouTube channel "Shelezyak"
- Unscrew all the screws around the perimeter of the board and carefully remove it from its place.
- Clean the gold-plated contacts thoroughly with an eraser.
- Wipe with a cotton swab soaked in alcohol. It is not recommended to use vodka and other alcohol-containing liquids.
- After cleaning, reassemble everything in reverse order, connect the drive and check its functionality.
Method 2: Remove bad sectors
If preliminary checks show the presence of Bad blocks on the disk, you can try to remove them using the Victoria utility.
- Connect the problematic drive to another computer.
- Download and run the Victoria program.
- Select the desired drive on the right side of the Standard tab.
- Go to the Tests tab and select the Remap option on the right side of the window.
- Click the Start button and wait for the process to complete.
Method 3: Freeze the disc in the refrigerator
An ambiguous option that allows you to briefly revive your hard drive. Most often used as a last chance. And even if you manage to copy the data, the drive itself will most likely die forever.
- Place the disc in a sealed bag and place in the freezer. Additionally, you can put several packs of silica gel inside.
- Take it out after 5-6 hours and immediately connect it to your computer.
- If the drive starts, copy the data as quickly as possible.
Symptoms of a damaged laptop hard drive
The main “symptoms” that the laptop’s hard drive will have to be restored:
- an increase in the number of damaged blocks (bad sector, bad block) - unreliable or unreadable sectors;
- very slow response (in order not to subsequently restore data, it is recommended to create a backup copy);
- Previously saved files cannot be opened or cannot be found;
- HDD is not formatted;
- The laptop often reboots spontaneously;
- extraneous noise is heard when the hard drive is operating;
- A “screen of death” (BSOD) appears, signaling the need to restore the laptop’s HDD.
How to use Windows recovery tools?
After you have succeeded in restoring bad sectors on your hard drive using a third-party program, it is useful to check the hard drive using Windows. Your operating system has its own program for working with HDDs - CHKDSK. It checks for file system faults, corrects errors, marks bad blocks, and moves data to safe disk partitions.
To run CHKDSK, press the Win+R key combination. In the “Run” window, type “cmd” using the symbol combination and press the Enter button. A console window will appear in which you need to write: chkdsk D:/F/R. Just instead of “D” type the letter of your hard drive partition. The /R command starts a search for bad sectors, and /F corrects errors in system files. After entering the text, press Enter.
After checking, you will receive complete information about the damaged segments on your HDD.
FAQ - Questions and answers
How many bad sectors can there be on a hard drive?
If Bad sectors appear on the new disk, then it must be returned under warranty.
The number of sectors may vary, but it is important that new ones do not appear. If the system considers a sector to be bad, it will simply stop writing data to it, but if the number of bad sectors increases, this may mean that the HDD has begun to “crumble” and will soon fail completely. How can I remove bad sectors myself?
The best programs for this are Victoria or MHDD.
They replace the address of the sector with a bad block with the reserve ones. If the hard drive has been cured of bad blocks, can it be used as before?
If the treatment was carried out using Remap, then yes. But in any case, the hard drive needs to be checked periodically for a bad block, in the same programs, for example Victoria.
R-Studio
An equally popular and equally high-quality program that allows you to recover information from a damaged disk is the R-Studio program. This utility is very good because it allows you to see data that the OS does not notice. Likewise, if for one reason or another you cannot see your external hard drive, feel free to use this program, it will allow you to see the damaged information.
It is best to recover data using R-Studio if the drive is damaged due to a logical error, but from a physical point of view it is completely intact. If the disk is physically damaged, in this case this program may not help, and then it is much better to seek help from professionals in the matter of data recovery.
An equally important point when working with this software solution is to use the fastest possible interface. Many modern USB drives have additional interfaces, such as eSATA. Such interfaces usually work faster even than USB 3.0, so their use in this case is quite rational, as it allows you to recover lost information faster and sometimes with better quality. This is especially important if you have a 2 TB or larger external hard drive.
In addition to using faster interfaces, before starting the data recovery process, you need to check the availability of free space that will be used to save the recovered files. An important point is that to obtain the necessary functionality of R-Studio, you do not need to buy the full version of the program; even the demo version of this utility can provide the user with many of the necessary functions for high-quality file recovery.
When everything has been selected, checked and prepared as correctly as possible, you can safely begin the process of restoring information on the damaged disk. Therefore, we launch the program and perform the following actions:
- Open R-Studio and identify the damaged disk. Most often, the file system for the damaged disk is not specified.
- We scan the damaged disk. To do this, you need to right-click on the disk with the damaged data, and select Scan from the context menu that appears. After this operation, a dialog box should open in which you should set important parameters. The main ones:
Scan area
It is best to choose scanning the entire disk, since damaged information may be hidden in all its partitions.
File system
If you do not know the file system used on the disk before the damage, then select NTFS for Windows, Ext2/Ext3/Ext4 for Linux, HFS for MAC.
Search for known file types
Check the box next to this item. If you check this box, additional file search and recovery algorithms will be activated, which can increase the efficiency of the process of recovering lost information.
Scan type
If you choose the simple scanning method, the speed will only be affected if you are using an old computer. In all other cases, this will not affect the scanning speed at all, so we leave it as default.
After selecting all the necessary parameters and settings, feel free to click on the scan button and R-Studio immediately begins scanning the damaged disk and searching for those files that can be recovered.
- We look at the scan results using the R-Studio program. The utility should show recognized partitions in different colors, which depend on the found partition elements. On all found partitions, you can search and restore files, and they are not virtual objects.
- Double-click on the detected sections to view their contents.
- In the list of files and folders that opens, you need to mark those objects that you want to restore. To do this, you need to check special boxes next to the required files in the Contents panel.
- Recovering marked files. For these purposes, you must use only the registered version of the R-Studio program.
This is how you can restore an external hard drive quite simply and quickly. And it doesn’t matter what size it is, whether it’s a 1 TB external hard drive or a 500 GB external hard drive, if you follow all the steps correctly, the likelihood of recovering information will significantly increase.