Possible problems
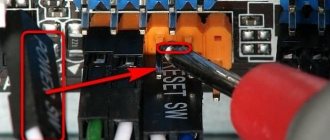
The motherboard has an indication of the PC status. If the flashing diodes change, the computer tries to start. We are considering the case when the computer does not turn on, the screen is black, the coolers are working.
It is often possible to launch the start page after several restarts. Users get lost when the picture disappears completely. In such situations, difficulties arise even for experienced electronics engineers.
The easiest way out is to take the system unit to professionals. But what if the PC is old, and its cost is much less than the cost of repair? Then you will have to figure it out on your own, consistently following the advice of experts. Information can be obtained from more experienced users, but you should not completely trust it. Even children write comments; there is no way to check the adviser’s competence.
Problem 7: Power Supply
The last malfunction that we will consider today concerns the power supply.
Power supply failure is a common occurrence. All the symptoms listed above can also apply to the power supply when it fails. He also has a fan that can make noise and fail. There are electronic components that fail over time.
If you have completed all the above steps, installed everything in place, and the computer still does not start, check the power supply. I do this by connecting a working unit to the motherboard (not necessary to other devices yet). I don't remove the old block yet. If the computer starts successfully, I replace it with a new unit, of the same power and with the same number of connectors (there are different numbers, this must be taken into account).
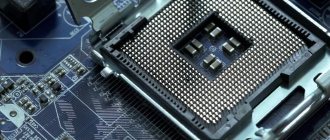
The power supply is very easy to change. After you have completely disconnected its connectors from all devices, unscrew several screws on the case:
...we install a new block, fix it with screws and that’s it.
Warning! If you plan to install more powerful equipment on the board - (for example, an additional video card or additional hard drives), the power of the new block should be higher than that on the old block. The higher the better!
After we've finished everything, we carefully put all the devices in place - first the processor cooler, the new power supply; then RAM, then video card; connect the power supply to the motherboard. We put all other devices in the slots. Connect the monitor.
Don't forget to put the coin cell battery back in place.
After everything has been checked, we connect the power. The computer should start with a short, triumphant squeak. There is no noise. A picture appeared on the monitor. Hooray!
Turn it off, replace the cover from the system unit, and secure it with screws.
So, wait, what kind of detail is this?
Oh, this is from another TV! :):):):):):)
We connect all the wires in their places. That's it, our “patient” came to life and recovered.
In this article, I have consistently tried to acquaint you with the process of self-diagnosis and troubleshooting - from beginning to end, but you can start, for example, right away with the power supply if you are sure that the problem is in it. This is a matter of a specific case. The principle “Don’t interfere with the machine’s work” must also be observed.