Friday, October 21, 2020
If MHDD and Victoria HDD do not see the laptop hard drive
Short
Sometimes MHDD and Victoria HDD, loaded from a flash drive or boot disk, do not see the hard drive of a laptop (netbook). In this case, you need to boot from a boot disk/flash drive with the HDD Regenerator program. This program sees screws that the mentioned MHDD and Victoria HDD do not notice.
It also happens that when launched from Windows, the Victoria HDD program does not want to check the hard drive and writes “Drive not ready!” or “Get drive passport: Drive error!” . In this case, you need to use the Victoria HDD program version 4.3 and check the “API” box.
My ironclad rule is: before any reinstallation of Windows on a computer or laptop, you should always check the hardware. But on some laptops, the MHDD and Victoria HDD programs for checking the surface of the hard drive, launched from a boot disk or flash drive, do not see the laptop hard drive. By the way, it also happens that the Memtest86 program for checking RAM does not work on laptops. In such cases, my iron rule cracks and I, bursting into tears, install Windows without checking.
Well, they brought me a Packard Bell PAV80 netbook to clean and reinstall Windows. Cleaned it and reinstalled it. Everything is ok, but it was not possible to check the hard drive - the boot MHDD did not see the screw, and Victoria HDD from Windows did not want to check the surface and wrote “Get drive passport: Drive error!” .
A month later, the client contacted us again: the system on the netbook would not start. Of course, in a month it would be quite possible to kill an obviously working laptop using software methods. But I was wary - after all, I had not checked the hard drive. This time it was necessary to get checked at all costs.
So, boot MHDD and Victoria did not see the hard drive on the Packard Bell PAV80 netbook. From under Windows Victoria HDD v.4.47 wrote “Get drive passport: Drive error!” .
I poked around online, read the recommendations, downloaded Victoria HDD version 4.3, which is rumored to be more reliable. I launch it, it doesn’t check either, but it says something else: “Drive not ready!” .
Then I switched to “API” mode instead of “PIO” and ran the test. The check has begun!
A bunch of bad things were immediately found. But somewhere after the third hundred bad blocks were found on the screw, the laptop rebooted. That is, the verification of the hard drive never reached the end. I suspect that Victoria was stunned by the number of bad things discovered.
The situation returned to where it started: in order to fully scan and treat (Remap) all bad problems from the hard drive, it was necessary to boot into some special program.
A colleague came to the rescue and threw in a megabootable flash drive, on which the HDD Regenerator program was found. This Regenerator just saw the hard drive and was able to check it to the very end, without going crazy from the colossal number of bad things, like Victoria.
The regenerator found and put out of operation (Remap) no less than 1779 sectors.
What to do when a hard drive that has not yet been used does not start?
So, you turn on the new hard drive for the first time, but it does not open:
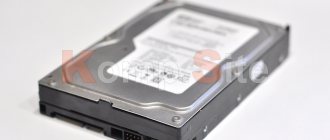
If everything is in order with the software, Windows, cables and USB, but the hard drive does not start, then you need to find a breakdown of the device itself. Winchester consists of:
a)
printed circuit board
(green part at the bottom of the disk, consisting of many electronic controllers). The board's task is to convert codes into commands accessible to the computer;
b)
“pancakes” (magnetic disks)
, all computer information is stored on these thin glass or metal magnetic plates. The maximum number of revolutions per minute of such plates is 7200, the minimum is 5900;
c)
a set of magnetic heads
, on each side of the “pancake” of the hard drive there is one magnetic head, that is, two heads per “pancake”. The heads do not contact the surface of the “pancake”, but upon impact, the heads come into contact with the disk, and the information on the drive is destroyed;
d)
firmware
, which provides control over the processing of incoming information. If the problem is in the firmware, then the data from the disk will not be available. The firmware on a computer's hard drive cannot be updated, like, for example, on a telephone.
If the hard drive does not boot, then the problem is in the circuit board (99% of all cases). Modern hard drives have their own unique microcode, so replacing the board, unfortunately, will give you practically nothing; on the contrary, if you try to replace the board yourself, you risk losing all the information from the disk.
The printed circuit board deteriorates due to changes in electrical voltage, when semiconductor devices (TVS diodes) on it burn out, protecting the board from overvoltage.
The board has one diode for 5 Volts, the second for 12 Volts.
You can check the serviceability of the diodes with a multimeter; if the device shows zero ohms, then the diodes have burned out. In this case, you can replace them, and the board will work normally.
When replacing diodes, keep in mind that without these devices the hard drive is completely defenseless against power surges.
If the semiconductor devices did not burn out, then, unfortunately, the printed circuit board itself failed. You can try to replace it. To do this, unsolder or disconnect the permanent memory unit with a unique code and solder it to the new board. Check the connectors for the magnetic heads; if there is corrosion on them, remove it with an eraser. Corrosion may be the reason why your hard drive won't boot.
How to rid a laptop hard drive of bad blocks in the Victoria program
- There are several bad blocks on my laptop, I installed the Victoria program in the operating system, but in a running Windows program the program cannot do anything with these “bad blocks”. I made a bootable USB flash drive with the Victoria program and booted the laptop from it. I pressed “P” on the keyboard to select my hard drive, then selected “Ext. PCI ATA/PATA”, pressed Enter and the following message came out: “ PCI ATA controllers not found!”
" What to do?
Hello, the Victoria program does not see any of my hard drives and gives the error “ DRSC+DRDY is missing or the screw does not remove BUSY. work is impossible
". What can be done in such cases?
- Hello admin, I created a flash drive with the Victoria program, but for some reason I can’t boot a laptop with a UEFI BIOS from it, my flash drive is simply not in the boot menu of the laptop, as well as in the BIOS.
Settings problems
Events such as sudden power outages often lead to significant operational disruptions. In this case, the operating system shuts down in abnormal mode and this leads to a failure in the settings of not only Windows, but also the BIOS.
- If the laptop does not see the hard drive, most likely the operating system will not boot.
- If you try to start the computer, tests will appear, you can enter the CMOS settings, you first need to see if the device is detected by the Bios. It is possible that it was accidentally disabled at the BIOS level. Then you just need to change disabled to enabled.
- The reason for invisibility may also be its incorrect configuration in the BIOS.
If this does not help, you need to try resetting the BIOS settings, then restart the computer. If the problem was with the Bios, the hard drive will appear and Windows will start loading.
For deeper violations, reinstalling the operating system may help solve the problem. Modern models sometimes have the option to return the system to factory settings. If not, use the installation DVD or bootable USB flash drive.
A bootable USB flash drive can also be created in advance using a special function and stored just in case, because a Windows boot disk may not be included with the laptop.
Sometimes the reason for the invisibility of the hard drive can be in the device manager. In this case, you need to disconnect the hard drive connector. Then turn on the laptop and clear the device manager of all memory drives. Then reconnect the hard drive and wait until the system detects it itself. After this, you just need to confirm the connection of the new equipment. If after disconnecting and connecting the device is not detected, you need to force it to be found by updating the shoe configuration.
How to rid a laptop hard drive of bad blocks in the Victoria program
- How to download and run the Victoria program directly on a running Windows. What is SMART or how to determine the health status of your hard drive or SSD in a couple of seconds.
- How to test a hard drive or SSD for bad sectors (bad blocks) in the Victoria program for Windows. How to cure a hard drive.
- How to create a bootable USB flash drive with the Victoria program and how to get rid of bad sectors (bad blocks) in DOS mode.
- How to set the exact address of the bad sector in the Victoria program.
- How to match the ownership of a bad sector (bad block) to a specific file in Windows?
Is it possible to save a hard drive using Victoria?
Using software, you can replace up to 10% of bad sectors and correct the poor performance of any sector in the active volume if this occurred due to system failures.
Victoria does not repair physical damage.
But if you restore repairable sectors and rewrite the rest to the reserve area, then such treatment will allow you to use even a dilapidated hard drive. In this case, it is installed as an additional device. And Windows must be on a good disk.
If you are too lazy to read the article, then at the end there is a video where you can see and hear everything.
With the advent of computers and laptops running UEFI (Unified Extensible Firmware Interface), problems arose with testing the hard drive surface and remapping damaged clusters in the usual way.
In any case, I was never able to see the hard drive using programs such as Victoria and MHDD, which I tried to run under DOS on one of the laptops with a UEFI BIOS.
On a desktop, if you have two separate hard drives, you can check a drive that is not occupied by the current operating system directly from under the running OS. Although, the same Victoria already conflicts with 64-bit systems.
Well, in a laptop there is no such option in any case, since it only has one hard drive, and checking and reassigning clusters on the disk from which the current OS is running is tantamount to Baron Munchausen’s experiments.
Of course, I knew that you can get to the computer hardware using a truncated version of Windows, which is loaded into RAM from removable media. But when, many years ago, I did this using a WinPE Live CD, the boot process took a lot of time, and the entire system barely moved.
But, there was nowhere to go, and I decided to return to this technology again, with the only difference that I chose a flash card as a removable storage device, and a modern OS image based on Windows 7 SP1 called “Omega Live USB 2013” as a bootable system. "
The 1.2GB image can be downloaded from here rutracker.org/forum/viewtopic.php?t=4539810 (registration required).
A link to direct download of a stripped-down version of 300MB in size is at the end of the article (to reduce the weight of the file, large applications have been removed).
To create a bootable flash drive using any of these archives, you need to do only three simple operations:
How to recover data from a faulty drive
Thus, you tried troubleshooting, and you were finally convinced that the main problem was a damaged disk. If the drive is malfunctioning, but not yet completely unusable, you will want to immediately save any important data that you have not yet copied to a working drive. You may, as we mentioned above, need to use Windows or Linux installation discs. Using a backup system, you can try to save important files from your drive. This solution may allow you to recover files even if you cannot boot your operating system from your hard drive without crashing.
You can also try removing your hard drive and connecting it to another working computer. If the disk is partially damaged, then you can copy several important files from it. You can also use data recovery software like Recuva, which promises "recovery from damaged drives"
. If this doesn't work, then your drive probably really needs repairs.
Please be aware that if the media drive is faulty, turning it on may result in failure or permanent damage. If you have critical data stored on your disk, and you are willing to spend a sufficient amount of money to restore it, then it is best to stop any work with the disk and contact a professional data recovery service center.
Step by step, in pictures.
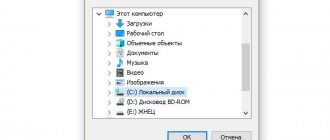
It is better to format a flash drive to NTFS in the portable program “HP USB Disk Storage Format Tool”. It does this more correctly than the built-in Windows utility. Download link at the end of the article.
Please be careful not to confuse your flash drive with another flash drive or USB HDD. You can recognize the device by its drive letter by checking in Explorer. If the flash drive is not visible, run the program with administrator rights.
Then you need to unpack the archive directly onto the flash card. This can be done using the WinRAR program.
Now all that remains is to run the grubinst_gui file and press the “Enter” button.
But in order to now boot from this flash drive, you will have to go into the BIOS settings and change a couple of options in the same way as you did to boot from a CD or DVD.
First, you need to tell the BIOS to first try to boot from an external drive connected to the USB port.
Although, in some BIOSes, the boot priority can be selected immediately after switching on using hotkeys. Sometimes this key is F8.
Secondly, you will have to disable the computer's UEFI boot mode.
On my laptop, this option is located in System Configuration: Advanced > System Configuration.
Find the Boot Mode option and set the mode to CSM or Legacy. The name of the option may vary depending on the interface of a particular BIOS, but the abbreviation UEFI or EFI must be present.
It should be noted here that in order to subsequently boot Windows 8, you will need to return this option to its previous state.
Before exiting the BIOS settings, insert our flash drive into the USB socket.
Exit the BIOS settings and save the changes.
After this we should see the main Live USB boot window. You don't have to choose anything here. After a few seconds the download will continue.
And in a minute, we will get a completely self-sufficient OS based on Windows 7 SP1. We will also get access to several dozen programs for restoring the OS and working with computer hardware. If necessary, you can add your programs to the Programs folder.
If IP addresses and DNSs are distributed automatically on your network, then the operating system will even connect to the Internet itself.
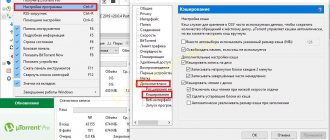
To test the hard drive, run the Victoria program.
Select the SMART tab to assess the condition of the hard drive.
Now you can go to the Test tab and check the surface of the hard drive drives. If necessary, you can reassign unreadable clusters (Bad Blocks).
Hard drive diagnostics
If the hard drive does not load the operating system or displays a read error, you need to find out the cause:
- if the disk shows signs of physical malfunction, or it cannot be connected to the computer’s BIOS, this means a physical failure of the disk;
- If the drive is detected in the BIOS and shows no signs of physical failure, there is most likely a logical hard drive read error.
Reference! BIOS is a computer boot system that controls its internal devices.
Step 1. If the PC does not boot, look at its boot menu. If there is a message in the menu with the words “Disc Boot Failure...”, this indicates a system hard drive error.
A message with the words “Disc Boot Failure...” in the boot menu indicates a system hard drive error
Important! Troubleshooting system disk errors is discussed below. Errors in additional drives connected to the PC can be resolved using the same method.
Step 2. Check the disk for noise by bringing your ear close to the PC system unit. If you hear extraneous noise, clicking or buzzing sounds from the unit, this is a clear sign of a physical problem with the drive.
When diagnosing disk noise, it is necessary to distinguish it from the noise of PC coolers (fans), as well as from the quiet, rhythmic noise of the heads in some models of hard drives.
Reference! Booting a PC from a noisy hard drive can put serious stress on the drive and ultimately cause it to fail. In this case, it is better to remove the drive and place it in an external enclosure to copy the data.
If the hard drive does not make any extraneous noise, another reason for its malfunction may be the lack of rotation of the spindle, associated with a problem with the drive drive or a simple waste of the power cable.
To check the rotation of the spindle you will need a Phillips screwdriver.
A Phillips screwdriver is necessary to determine the operation of the spindle on the hard drive
Step 3. Disconnect your computer from the network.
Disconnecting the computer from the network
Step 4. Unscrew the fastening screws of the right side panel at the back of the PC system unit (viewed from the connectors) or release the latch at the rear of the panel. The screws may be able to be removed by hand.
Unscrew the fastening screws of the right side panel at the back of the PC system unit
Step 5: Remove the panel by pulling it along the chassis towards the back of the PC and then sliding it sideways out of the connectors.
Remove the panel by pulling it along the case towards the back of the PC, then move it to the side and pull it out
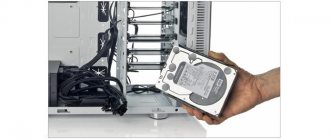
Step 6. The hard drive has a rectangular shape and is placed in a special compartment of the computer. It is usually connected to the PC using two cables - power and data. Gently but forcefully press the cables into the hard drive connectors, eliminating possible lack of contact.
Carefully press the cables in the hard drive connectors, eliminating possible lack of contact
Step 7. Do the same steps on the other side of the cables on the PC motherboard side.
We press the cables on the other side connected to the PC motherboard
Step 8. Start the PC, and by touching the disk from the sides or top, check if there is a slight vibration on its case, indicating that the disk spindle is rotating.
We start the PC, and by touching the disk from the sides or top, we check whether there is vibration in it
Step 9. If the hard drive spindle does not rotate, disconnect the PC from the network, connect another power cable to the drive, and start the PC again to check.
Step 10. If the disk still does not start, check the computer documentation to see if the PC power supply provides the power required to start.
Reference! If the listed parameters are in order, but the disk spindle does not rotate, you can try connecting the disk to an external enclosure.
Comments (76)
Pages: « 1 2 3 4 5 6 7 [8] Show all
Thank you all, I could write for those who did not want to watch the video)
what is the password for the archive if you downloaded it from a mirror?
The password is indicated next to the links.
What could happen if, when starting from a flash drive, it says “cannot find GRLDR”
Alexey , it means the computer cannot find the bootloader, which should be on the flash drive.
Hello. There's a problem. I do everything as indicated in the video, but when I run the grubinst program and select a disk, I don’t see a single disk. The program does not offer to select a flash drive for installation. What can you recommend? thank you in advance.
Hello, Alexander! On new hardware, this version of Live USB may not start, even if you do everything correctly. And the newer version of Live USB could not pass the anti-virus scan. So I abandoned this recovery disk in favor of Win PE10. There are no special differences from Live USB, but the software is clean and updated when I downloaded it. On my flash drive it says 2016-10. Apparently this is the date. I took it from a root tracker.
Pages: « 1 2 3 4 5 6 7 [8] Show all
Victoria HDD program for 64 bit Windows
All versions, starting with the fourth for Victoria HDD on 64 bit Windows, feel great.
However, in the case of an x64 system, their functionality will be somewhat reduced. Thus, the Victoria program in a 64-bit environment does not have a PIO mode. But the loss is not great; this mode is used in the presence of malfunctions of the drive under test for particularly accurate measurements of the disk characteristics.
But what else you cannot do in a 64-bit system is put a password on the disk. The security manager is disabled in API mode.
Incorrect BIOS settings
Sometimes the computer does not see the external or internal hard drive due to incorrect BIOS settings, and Windows may not even start. What to do - start the computer, at the beginning of booting, enter the BIOS by pressing Del or F2.
In the system, check:
- Boot priority – the “Device priority” property in the “Boot” tab or the “First Boot Device” item on the main page. Place the HDD in first place.
- SATA mode - look for the “Onboard Device Configuration” item in the “Advanced” tab or the “Integrated Peripherals” subsection. Change the lines with SATA or IDE signatures to “Enabled”.
Save the settings and try to boot the system.
If your HDD is basically missing from the BIOS, try resetting the settings completely. The reset is done in one of the following ways, after first disconnecting the PC from the network:
- On the motherboard, move the jumper to pins 2-3. Wait 15 seconds, return the jumper to 1-2.
- Remove the coin cell battery from the motherboard for 30 seconds.
Turn on your computer and check whether your devices are accessible.
List of main problems and ways to eliminate them
What you should pay attention to if the removable hard drive is not detected by the PC:
Lack of nutrition
The power supply has a power limit, and if you connect too many components to the computer, it simply may not cope with the load and not provide enough power to the HDD. To start, the hard drive can request up to 50 Watts, and then drop to 10. To test the theory of power shortage, disconnect devices that are not critical for starting the system (for example, a second hard drive, discrete video card or DVD drive).
Wrong format
If the system still sees the disk, but refuses to read or write from it, you need to format it and install a different format. This can be done using standard Windows tools. Right-click on the disk, select “Format” , set the partition to NTFS and start.
If the drive doesn't show up in Explorer, format it in Disk Management. If this is a system disk, then formatting can be done via a bootable flash drive (disk) or using the Victoria HDD utility.
BIOS Settings
If loading Windows is unsuccessful, and on a black background you see the message “DISK BOOT FAILURE. INSERT SYSTEM DISK AND PRESS ENTER" , check the boot options in UEFI. Follow the chain:
- Exit/Advanced Mode.
- Advanced Mode.
- Boot – Hard Drive BBS Priorities.
- Boot Option No. 1 – installation of the desired disk.
- Exit – Save Changes vs Reset.
This eliminates the chain of all polled devices, and the disk with the operating system becomes the first in it.
Damaged connectors or cables
- Checking the motherboard and power supply. First try moving the cables to other SATA and Molex connectors on the motherboard and power supply.
- Checking cables. If there is a replacement, connect through other power and date cables.
- Checking hard drive ports. If there is another working hard drive, connect it with these patch cords to the same ports of the motherboard and power supply.
Device incompatibility
- The problem of incompatibility in general is possible in two cases: An old IDE hard drive is connected to a new computer.
- A new hard drive with SATA3 is connected to the old power supply with IDE-SATA cables.
In both cases, an adapter is required, like a bidirectional IDE-SATA converter. There are Chinese fakes that only work in one direction or not at all.
Read more: How to connect an old IDE HDD to a new SATA connector
Wrong tire version
Older versions of Windows may not support detection of devices connected via a SATA interface. If the BIOS sees the HDD, but Windows does not, it is recommended to update the system to a later version (at least to Windows 7). If this is not possible, you will still have to reinstall Windows, but with drivers integrated into the system to support SATA.
Operating system settings
If the Windows system is newer and does not see the second terabyte hard drive, but everything is OK in the BIOS:
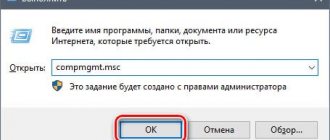
- Press Win+R and run the command diskmgmt.msc .
- The size of the unallocated disk area will be indicated below.
- Click on it and select Change Drive Letter .
- Set it from the available list and click “Apply” .
Open Explorer and check. The disk should appear.
Third party programs to help
The utilities built into Windows do not always provide complete information about system devices. Use one of the applications aimed at deep HDD testing.
Victoria HDD
The utility checks drives at a low level, through the connectors. Tests controllers, checks disk surface and mechanical performance. Low-level formatting is available to eliminate a number of defects. Displays complete technical information about the disk.
AOMEI Partition Assistant
It has advanced capabilities for managing sections - activation, creation, changing labels, formatting. There are functions for recovery, copying content, and support for multiple file systems.
Victoria HDD for Windows 7/8/10
The developer reports that Victoria can be used normally starting with Windows 2000/XP. We used Windows 7 and Windows 10 for the Victoria HDD 4.47 4.68b program. We also conducted Victoria HDD tests in dos.
It should be said that Victoria can function in two modes: API and PIO.
API is work through the Windows programming interface. Allows you to gain direct access, including to the system disk, without disrupting the operation of the system itself.
In API mode, it is possible to test any connected disks, be it: HDD, SDD, FDD (floppy disks), CDs, flash drives. SCSI, USB, FireWire interfaces are supported.
PIO mode allows you to work with IDE and SATA drives directly through the controller ports, bypassing Windows and even the BIOS.
It is strictly not recommended to use Victoria HDD for Windows in PIO if you have little understanding of what you are going to do. Since you can ruin a hard drive in this state with a couple of clicks.
We would also like to note that for the Victoria HDD program to work correctly in Windows 7, we turned off all third-party programs. And in Windows 10, Victoria HDD required additional configuration of the energy saving mode. More details about this in the section “working with Victoria”.
Why else does the computer not see the disk?
If, after all the manipulations, Windows 10 still does not see the hard drive, let’s check the physical reasons:
- Remove the cover of the system unit and inspect the connection to the motherboard. The cables must be tightly inserted into the connectors.
- The device may not have enough power. If clicking sounds appear while writing and reading files, or disk partitions periodically disappear, disconnect all non-essential components. If the problem disappears, you need to buy a more powerful power supply.
- When the PC overheats, some components also become undetectable, this is especially noticeable on laptops. Replace the cooler or install a cooling system.
- Breaking. After a fall or impact, the HDD may simply break - try connecting it to another PC. If this does not help, look for a repair service or buy a new device.
Driver problems
Another problem for many users is missing or incorrectly installed drivers that are responsible for the operation of both the installed on the motherboard and the external hard drive.
If the user has a driver disk, which must be included with the purchase, there is no problem. We just install (or reinstall) the drivers. If you don't have such a disk, you can use a freely distributed directory or install a program like Driver Booster, which, when scanning, will identify missing, damaged or updated drivers and automatically integrate them into the system.
How to use Victoria HDD 4.47 and other versions?
We will try to create instructions for use for the Victoria HDD program. Actually, all the actions that the Victoria program is capable of performing can be divided into two groups:
- This is collecting information about the media, that is, it is checking the hard drive with the Victoria program, analysis, testing the disk with Victoria, call it what you want.
- And the second group is Victoria’s actual restoration of the hard drive, treatment of bad sectors, remap, trimming.
Important point! You can work with the Victoria program from Windows 7,8,10 only if you have administrator rights.
We launch Victoria HDD as administrator, in the dialog box we allow Victoria to make changes on the computer.
Figure 1 (Running the Victoria hard drive test program)
You will have a picture like in Figure 1. At the top, a little to the right, the Victoria program will show a list of media (hard drives, SSDs, CDs, floppy and flash drives). In my case, there is only a 320 GB hard drive and an empty CD drive, I have highlighted them with a red oval.
It happens that Victoria does not see some hard drive, what should I do in this case?
Older versions cannot work with controllers in AHCI mode, so the Victoria program does not see the hard drive; you need to specify ATA or IDE mode in the BIOS settings.
Since my Victoria HDD is running on 64 bit Windows 10, some of the functionality is disabled, which we can read about in the notification window below. The functions from the PIO mode and the “security manager” do not work (Fig. 2). In fact, this is not so important, because Windows puts the hard drive into the FreezeLock state so that viruses cannot set a password.
Figure 2 (Reduced functionality of Victoria HDD in 64 bit Windows)
We need to select our hard drive by left-clicking on “320 Gb Hitachi HTS”. Next, we should go to the SMART tab, and then click the “Get SMART” button (Fig. 3).
Figure 3 (How to display SMART in the Victoria program)
Then Victioria HDD will display the SMART of the disk, as in (Fig. 4).
Figure 4 (How to use Victoria HDD)