A computer video card is a very complex device. It consists of several elements: graphics core, video memory, RAMDAC, cooling system, etc. Its overall operation depends on the settings of these elements and the order of their interaction with each other. The functioning algorithms of the video card elements are determined by its BIOS (basic input-output system), stored in a special chip called video ROM or Video ROM. In most cases, the video card works successfully with its “native” BIOS throughout its entire operation. However, in some cases it may be advisable to change the BIOS (reflash). This can eliminate the incompatibility of the video card with other computer hardware or software, and also allows you to solve other problems (overclocking, downlocking, etc.). We will talk about how to update the BIOS here. For clarity, the article uses images of the process of flashing the BIOS of a Geforce GTS 450 video card. But this can be done in exactly the same way with any other Geforce or Radeon series video card.
Important.
The process of flashing the BIOS involves many risks and can result in serious consequences. You need to understand that if it is unsuccessful, the video card may become inoperable and to “revive” it you will have to contact a specialized service. DO NOT UPDATE BIOS without good reason. The vast majority of problems can be solved in another way.
If the video card fails, the chaynikam.info website is not responsible for what happened. You perform all the actions listed below at your own peril and risk.
Other warnings
1
.
The information below does not apply to laptops or computers using integrated graphics chips. Their video adapters, with rare exceptions, do not have an independent BIOS. Their operating parameters can only be changed by flashing the main BIOS of the computer. 2
.
If the system simultaneously uses several discrete video cards, during the firmware update you need to leave in the computer only the video card whose BIOS needs to be updated, connecting it to the main (the one closest to the processor) PCI-Express connector of the motherboard. 3
. The recommendations presented on this page are suitable for flashing the BIOS of video cards with a single GPU. This is the vast majority of video cards installed in home and office computers. But still, before using the instructions, make sure that your video card is also single-processor. Otherwise, as a result of the actions below, it will most likely become inoperative. You can find out the number of GPUs of a particular video card model by studying its specifications on the manufacturer’s website. A clear sign of the presence of two processors is the presence of the “X2” mark in the name of the video card model. You can also check the number of GPUs using the flashing utility immediately before flashing (see below).
How NVFlash works - instructions
The NVFlash program interacts with the video card at a low hardware level. The utility accesses the graphics adapter's firmware, giving the user access to control various firmware functions.
Currently (and unlikely to happen in the future) the NVFlash utility does not have a GUI. Interaction with the program is carried out through the Windows console (command line). At the same time, developers strictly recommend not to use the program in a Windows working environment (although this is possible), because in this case, data exchange between the NVFlash utility and the video card firmware will be carried out not directly, but through the software shell. In addition, the video card driver itself and all sorts of running applications can interfere with “clean” data exchange.
The easiest way to use NVFlash is to create a bootable disk or flash drive with program files on board.
Flashing stages
I. Preparation:
1
.
If possible, make sure your computer's power supply is stable before updating the BIOS. It is advisable to connect it not directly to the mains, but through an uninterruptible power supply device. Flashing takes a few seconds, but if the power goes out during this time, the performance of the video card may be impaired. 2
.
Find out the model and other characteristics of the video card, as well as the current version of its BIOS. For this purpose, it is convenient to use the GPU-Z utility. GPU-Z
:
⇒
Having launched GPU-Z on your computer, you need to find out the following data (see image below): • name of the video card model (Name); • current BIOS version (BIOS Version); • video card manufacturer (Subvendor) • device identifier (Device ID); • video memory type (Memory Type); • video memory size (Memory Size); • video memory bus width (Bus Width); • frequencies of the graphics core (GPU Clock) and video memory (Memory Clock).
3
. Make a backup copy of your current BIOS version. In the future, it can be used to return the video card to its previous state if the flashing process ends unsuccessfully (for more details, see the end of this article). You can make a copy of the BIOS using the same GPU-Z utility mentioned in the previous paragraph. To do this, you need to launch GPU-Z and left-click once on the small icon located to the right of the field displaying the BIOS version (in the form of a chip with an arrow, see image). A menu will appear in which you need to click on the “Save to file” item.
After a short time, the “Save As” window will appear, in which you need to select a location to save, specify the name of the file into which the BIOS will be copied, and click the “Save” button.
You can specify any file name. The main thing is that it is not too long and is well remembered. For example, the file could be called oldbios.rom
.
This will make it clear that this is an old BIOS version. 4
. Download the new BIOS version (firmware file). It is advisable to download it from reputable sites, for example, from this one - www.techpowerup.com. You need to select the BIOS on the specified site based on the video card parameters obtained using the GPU-Z utility (see above in paragraph 2). In this case, you need to find a BIOS designed for a video card with exactly the same identifier (Device ID). To find out the Device ID of a video card whose BIOS is offered for download on techpowerup.com, you need to click on the “Details” link next to it (see image). In addition to the device identifier, the type and amount of video memory must match, and the frequency of the graphics core and memory in the downloaded BIOS file does not differ much from the current one.
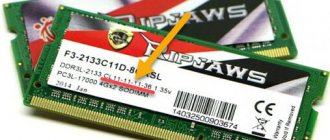
As a result of the download, you should receive a firmware file with a .rom extension. It can be called whatever you want. But if its name is difficult to remember, it is better to rename it to something simpler and more memorable, for example, newbios.rom. If the purpose of flashing is to change the frequencies of the graphics core and/or video card memory, there is no need to download a new BIOS version from the Internet. It is better to adjust the “native” BIOS of the video card accordingly, having previously made a backup copy of it. How to save it to a firmware file was discussed in the previous paragraph. You can correct the firmware file using special utilities. To edit the BIOS of GeForce GT400 series and higher video cards, you need the Fermi BIOS Editor program. For older GeForce models, use the NiBiTor program. The BIOS of Radeon video cards is edited using the Radeon Bios Editor program. For clarity, when preparing this article, we used a GeForce GTS 450 manufactured by Point of Viev (seen in the screenshots above). By flashing the BIOS, I decided to “turn” it into a GeForce GTS 450 video card manufactured by PNY with the video core and memory frequencies reduced below standard. The card almost “died” from old age and constant experiments. It was decided to depower it in order to normalize work, since it would freeze and then send the computer to the blue screen of death. It was even impossible to watch some films on it. For this purpose, I downloaded the BIOS firmware for the GeForce GTS 450 from PNY with the appropriate parameters and then adjusted it with the Fermi BIOS Editor program. At the same time, to reduce the speed of the graphics core, I changed the frequency of the shader units from 1566 to 1200 MHz. The memory frequency has been reduced from 1804 to 1600 MHz (see image).
5
.
Download the utility for flashing the BIOS. For NVidia (Geforce) video cards you need the NVFlash
.
It consists of two files: NVFLASH.exe
and
CWSDPMI.EXE
.
To download an archive with these files, click here. ATI/AMD (Radeon) video cards require the ATIFlash
.
It consists of one file atiflash.exe
.
To download the archive with this file, click here. 6
.
Create a bootable USB flash drive with DOS. Any flash drive will be suitable for this purpose, but all data on it will be destroyed. After flashing the flash drive, you can format it and use it as before. The process of creating a bootable USB flash drive with DOS is described in detail here. 7
. Copy the following files to the bootable USB flash drive: • old BIOS version (oldbios.rom file, see above in paragraph 3). • a new version of BIOS or a corrected old BIOS that you would like to flash instead of the one currently in use (file newbios.rom or whatever you called it, see above in paragraph 4); • utility files for BIOS firmware. If the GeForce video card is being flashed, this is the NVFlash utility (NVFLASH.exe and CWSDPMI.EXE files), if the Radeon video card is being flashed, the ATIFlash utility (atiflash.exe file), see above in paragraph 5. The listed files must be copied to the root directory of the flash drive (there is no need to place them in a separate folder). At the same time, do not change those files and folders that are already on the flash drive (they were created during the process of converting it from regular to bootable).
Flashing BIOS:
1
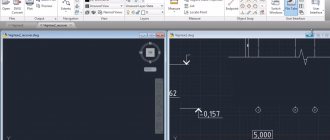
. Boot the computer from the flash drive created in the previous step. For detailed instructions on how to boot your computer from a flash drive, see here. When the computer boots into DOS, you will not see the usual system windows or other graphical interface elements. On the screen, on a black background, several lines of white characters will be displayed. You can know that the computer has booted when a prompt appears to enter the commands “C:\>” (see image).
2
.
Make sure that the video card is single-processor. To do this, immediately after the “C:\>” prompt, you must enter one of the following commands: • for a GeForce
: nvflash -list • for a
Radeon
: atiflash -i Then press the Enter key. After some time, the required information will be displayed on the screen and the prompt for entering the commands “C:\>” will appear again (see image).
If your computer has one video card installed, but after entering the above command, the monitor displays information about the presence of two video cards, then your video card is dual-processor.
You cannot reflash it using the method described below. Look for suitable instructions on the Internet. 3
.
In many cases, GeForce video cards need to disable BIOS tamper protection. To do this, after the “C:\>” prompt, you must enter the nvflash -protectoff command, press the Enter key and wait for the “C:\>” prompt to appear. If the computer asks you to confirm your intentions, press the appropriate key (Y or Enter). For Radeon video cards, it is usually not necessary to disable protection and you can skip this step. 4
.
Reflash the old BIOS, replacing it with a new one. For this purpose, after the “C:\>” prompt, you must enter one of the following commands: • for GeForce
: nvflash -4 -5 -6 newbios.rom • for
Radeon
: atiflash –p –f 0 newbios.rom In the specified commands newbios.rom is the name of the file with the new BIOS. In your case, this element may be different, depending on how you named this file at the preparation stage (see above).
After entering the command, you need to press the Enter key and wait a little until the “C:\>” prompt appears again.
Its appearance indicates the completion of the flashing process. If the computer requires confirmation of your intentions, press the appropriate key (Y or Enter, depending on the situation). 5
. After flashing, restart the computer in normal mode. To reboot, you can press the Ctrl+Alt+Delete key combination on the keyboard or the Reset button on the computer system unit. Usually after flashing you need to reinstall the video card driver. More information on how to do this can be found here. As a result of flashing, my experimental GeForce GTS 450 received lower graphics core and video memory frequencies (see image). With them, it “came to life” and now works stably under any load.
If flashing the BIOS was unsuccessful
If after flashing artifacts appear on the screen, the video card does not work or is not stable, you can return it to its previous state by flashing back the previous BIOS version (oldbios.rom file). Procedure: 1
.
If the video card does not work at all (when you try to turn on the computer, nothing is displayed on the monitor), you need to disconnect the monitor cord from the video card and connect it to the video output of the motherboard. Thus, information will be output to the monitor by a video adapter integrated into the processor or motherboard chipset. If your computer does not have an integrated video adapter, you will have to look for another computer that has such an adapter. 2
.
Boot the computer from the flash drive that was used to flash the BIOS; 3
.
After loading DOS and the “C:\>” prompt appears on the monitor, enter one of the following commands: • for GeForce
: nvflash -4 -5 -6 oldbios.rom • for
Radeon
: atiflash -p -f 0 oldbios.rom B in the specified commands oldbios.rom is the name of the file with a backup copy of the old BIOS and in your case this element may be different.
After entering the command, you need to press the Enter key and wait for the “C:\>” prompt to appear. If during the process the computer requires confirmation of your intentions, press the appropriate key (Y or Enter, depending on the situation). 4 . Restart the computer, first reconnecting the monitor cord to the video card connector.
Self-firmware BIOS firmware from NVIDIA
NVIDIA video adapters have a BIOS system that controls the operation of the device. It stores settings, manages the core, cooling and other important elements. And the performance of the graphics card depends on its firmware. You can update the BIOS software, but do this only as a last resort. If the software installation is unsuccessful, the video adapter will stop functioning. And when you turn on the computer, you will see a black screen. Firmware for an NVIDIA video card is needed if the device does not work well (simply “glitches”) or there are configuration conflicts. Or it lacks some important functions that are present in another BIOS version.
Let's figure out how to flash the BIOS of an NVIDIA video card
Some users download new Firmware to “overclock” the video adapter and independently set the frequency they need. But you shouldn't rearrange software without a reason. After all, in case of failure, you will have to take the graphics card to a service center or even buy a new one.