When preparing for the exam, even if you know the subject well, it won’t hurt to learn how to make spurs in Word, to be on the safe side and gain additional confidence in your abilities.
And, if earlier they used a pen for this, filling out sheets of paper with small handwriting, now modern technologies come to the rescue.
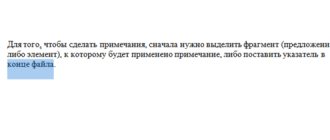
The main task of preparing a cheat sheet for an exam is to place as much text as possible on the minimum area of the sheet.
This means that working in Word will mean reducing the font, margins and indents, as well as reducing information and making it easier to find.
The first thing to change is the size and position of the text. As a result, one cheat sheet will contain more information than any manually created one.
Moreover, during the preparation process it will also be possible to edit the text, which is impossible with an ordinary manual spur.
Changing the font size
The easiest way to increase the compactness of information is to reduce the text format.
To do this, follow these steps:
- Select the desired text with the mouse (if you need to reduce all the text, it is easier to use the hot keys “Ctrl” + “A”);
- Select the “Format” menu and the “Font” tab (you can also do this faster by pressing “Ctrl” + “D”);
- In the corresponding font size field of Word 2013 (however, the function is supported by any versions), you should set the font size manually - for example, 6, 5 or even 5.5;
Setting a small font size
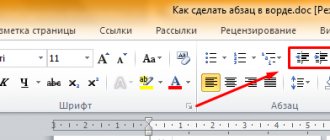
- To reduce the distance between characters (so more information will fit on paper, and you won’t have to deal with a huge pack of spurs), on the “Spacing” tab, select “Compacted” by 0.1 points.
Condensing text
We recommend about
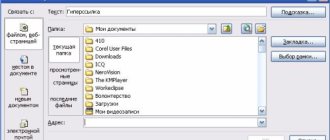
Hyphenation
In order for the cheat sheets to be as compact as possible, hyphens should be set. Otherwise, words will be completely wrapped onto new lines, leaving too much extra space.
Sometimes text wraps automatically.
If this does not happen, select the “Tools” / “Language” / “Hyphenation” menu and check the box next to the automatic hyphenation item:
Choosing hyphens in text words for Word 2003
Now long words are automatically divided into two parts, without taking up space in the cheat sheet. But sometimes the transfer still doesn’t happen, especially if the text was not created by you.
It is possible that it contains a ban on transfers and in Word 1997/2000/2003 you will need to perform the following steps:
- Open the “Format” menu, the “Paragraph” submenu and select the “Page Position” tab;
- Uncheck the box next to prohibit transfer.
Cancel transfer ban
For Word from 2007 to newer versions, all actions are performed even easier, since the automatic hyphenation command is already included in the “Page Layout” menu, the “Page Options” tab.
Here you should select “Auto” and the transfers will appear automatically.
How to make columns in Word?
It is worth noting that if you use small font for a large amount of information, then the usual page layout simply will not suit you. The best way out of this situation would be to arrange the text like in newspapers - in the form of small columns. To do this, you again need to select all the text on the page, select the “Format” section and the “Columns” tab in it. In this section you can configure column parameters. Five or 6 columns can easily fit on an A4 page, with the ideal gap between them being approximately two millimeters - you can easily read everything.
In addition to columns, some people like to use tables - this method is no worse, and perhaps even better, allows you to fill a sheet with text. The only difference is that it can be more complex. You should practice and decide which of these options works best for you.
Automatic word shortening
Sometimes the text contains a lot of information that you can understand even in abbreviated form.
Advice! Simplify your task of preparing a cheat sheet and shorten frequently repeated and understandable phrases such as “state”, “constitutional”, “socio-political”, etc. (for example, to “state”, “const” and “general-political”).
Such abbreviations are often found in ordinary notes - they will not interfere with understanding what is written in the spur.
Making a shortcut manually will take a lot of time, but Word 1997/2000/2003/2010 has a convenient and fast method for replacing the same text.
For this you will need:
- Open the edit menu (on the panel or using the “Ctrl” + “H” keys);
- Go to the “Replace” tab;
- Enter the word that is abbreviated and the already abbreviated version.
Replacing text with a shortened version
- Select "Replace All".
The result will be good spurs without unnecessary information with minimal time spent.
Although in order to replace not parts of words, but only complete word forms and phrases, Word 2007, 2003 or 2013 requires additional clarification - selecting the “More” item in the same menu, after which new items open.
The checkbox is placed opposite “Whole word only”.
This helps, for example, when replacing the word form “society” with “obsch-ve”, do not affect “public”, changing it to “obsch-venny” (if the word occurs frequently, “obsh-ny” is better suited).
Clarifying replacement parameters
Reducing margins
In addition to working with text, it is worth paying attention to other elements of the text. For example, on the fields and sizes of columns in which text is placed for ease of finding the necessary information.
To fit more text on a page, you need to reduce the padding.
Small fields are configured on the Page Setup tab:
- For older versions of the editor - in the “File” menu;
- For new ones – on the “Page Layout” tab;
- Double-click on a free section of the ruler.
The location where double-clicking opens the Page Setup menu
Selecting margin sizes
It is advisable to specify a value within 0.5–0.7 cm for each field parameter. It is possible that a message will appear indicating that the selected value does not match the printer settings.
But when printing miniature spurs, this does not matter - unless, of course, margins of 0.1–0.2 mm are selected.
Advice! In order to get double-sided spurs that coincide when cutting them into separate parts, it is necessary to ensure that the margins of the sheet on each side are the same.
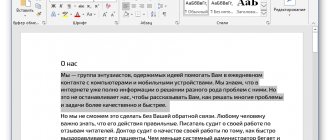
How to make cheat sheets using Microsoft Word
Creating a cheat sheet in Word
There is nothing complicated here, we take questions from the teacher and type in answers to each question, or we take ready-made answers from an upper-class student or (less commonly) from a classmate. The format is not important here, the main thing is to follow the structure: title (question) and text (answer). It is important that they are in different fonts.
Reducing the font size
Method 1. Select all the text with the left mouse button or using the keyboard (place the mouse cursor at the beginning of the desired fragment and press three keys - ctrl, shift, end), and then open the “HOME” tab (most often it is open by default). In this tab at the top, select the font and its size for the text as shown in the screenshot:
Setting the font
In this option, the minimum font size is 8 point, so using the numeric keypad we type the required size and press “Enter”. As a rule, the optimal font for cheat sheets is 6-6.5 point.
Method 2. The second method is even simpler. To select a font, select the text as described in the first method. Then right-click on any selected fragment and a menu will open where you need to find the “Font” button.
Font selection
When you click the font button, a dialog box opens where you can set the font name and text style. Here you select the font, style and size, as shown in the figure. As a rule, Times New Roman is ideal for cheat sheets; it is best to choose the “Normal” style, since bold or italics take up a lot of space, which is not very good for cheat sheets:
Installing the Times New Roman font
Once you have installed the desired font, click the “OK” button, which is located in the lower right corner. If you click cancel, then all your work will be lost and you will have to re-set the necessary parameters:
Installing the Times New Roman font
After clicking the “OK” button, you will have the font installed as you wanted. See what the text looks like in the end.
Finished Fine Print
Interval
We started to figure out how to make a cheat sheet, but without spacing and other parameters it will be difficult to achieve the desired results.
To fit more information on the page, you need to set the desired spacing. You need to do the same procedure as before: select all the text, right-click on any selected fragment, click the “Font” button and again go to the dialog box, where there are two tabs: “Font” and “Advanced”. We need a second tab: “Advanced”.
There are 3 types of intervals:
- Ordinary.
- Sparse.
- Compacted.
We select the third type - “compacted” and in the same window, opposite the word “Interval”, select 0.1 point, which is needed so that the text is as dense as possible and then even more information will fit on the page. Look at the sample where the places where you need to press are highlighted.
Setting the interval
Now you can click OK again and your selected text will become denser.
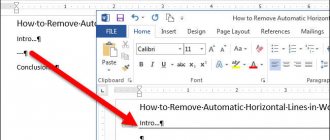
Hyphenation
The text can be made even denser, because when you start making cheat sheets, you will notice that the words are completely transferred to a new line and as a result there is a lot of free space left. To create hyphens, you need to select the required text and click on the “PAGE LAYOUT” tab, where there will be a “Hyphenation” button:
Hyphenation
After clicking “Hyphenation”, a window will open where you need to click “Hyphenation Options”. A window will open where you need to check the box next to the “Automatic hyphenation” offer:
Automatic hyphenation
Now you can make sure that long words are automatically divided into two parts and the entire page area is occupied.
Automatic word shortening
As a rule, you often come across words that are well understood in abbreviated form. Therefore, you can shorten frequently repeated words throughout the text. To shorten all the words manually, you need to spend a lot of time, but for a quick correction you can use a good method - autocorrect.
To autocorrect, you can use one of two methods:
Important!
If you are not sure that you can handle the job yourself, contact a professional. We will deliver the work ahead of schedule or return 100% of the moneyCost and terms
Method 1
Press Ctrl + H and a dialog box will open.
Method 2
Open the “HOME” tab and in the upper right corner click the “Replace” button and a dialog box will also open:
How to replace text
Now a window has opened, where opposite “Find” we write the word that we want to shorten. Below it says: "Replace with" and here you need to write the abbreviated word. This is what it looks like:
Abbreviation of words
Now click the “Replace All” button and then you can click the “Close” button. After this procedure, throughout the document the specified word will change to an abbreviated one. This way you can shorten as many words as you like, but don’t overdo it, because you need to make cheat sheets so that you can copy them successfully.
Reducing margins
In addition to text, it is worth paying attention to other parameters, for example, margins or column sizes. They can be configured in three ways:
On the old version of Word, there is a "File" menu, and there are Page Options. In the new version of the editor, you need to go to the “Page Layout” menu, where you will find “Margins” in the left corner, and under them an arrow that you need to click:
Page layout
After clicking the arrow, a menu will appear where you need to select “Custom Fields” at the very bottom. A dialog box will open:
Setting up fields
Here you need to select page parameters for all four sides and it is advisable to specify a value from 0.5 to 0.7 cm. Sometimes a message may appear that the selected value does not correspond to the printer settings, but, as a rule, this does not affect the print quality if, Of course you didn't choose 0.2 or 0.3 cm.
Important! If you need double-sided printing so that when cutting the cheat sheets the columns match, you need to make sure that all the fields on both sides of the sheet are identical.
Setting up narrow columns
If the cheat sheet is only in one column, then the text size will be larger than you need. Therefore, it is advisable to make from 3 to 6 columns.
If you have Word 2003, then open the “FORMAT” menu and the “Columns” submenu, and in the 2013 version, open the “PAGE LAYOUT” menu and in the upper left corner click “Columns”, and here select the number of columns:
Speaker selection
Unfortunately, you can select no more than three columns in this way, so you need to click the “Other Columns” button and you will see a window where you can select the number of columns:
Set the number of columns
You can write the number of columns using the numeric keypad, or you can use the arrows to select from 1 to 12 columns. The default interval here is 1.27 cm, but it is advisable to set it to 0.2 cm.
Set the number of columns
In the same box, you need to check the box next to the word “Separator”, since then it is more convenient to cut out the cheat sheet:
Setting a separator
After all the above procedures, we will have these convenient cheat sheets that we just have to cut and successfully hide from the stern eyes of the teacher:
Ready cheat sheet
Set up narrow speakers
The size of the text may increase if it is not placed in one column, but divided into several columns.
To reduce margins when dividing, in Word 2003, select the Format menu and the Columns submenu.
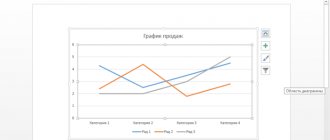
Dividing text into columns (columns)
Instead of the standard 1.25 cm, an interval of 0.2 mm is set. And now your text will be placed compactly without losing its information content.
Interesting material on this topic:
- All methods: How to make a landscape page in Word
- How to delete a page in Word - 6 ways
- How to make a book page in Word: Several original ways.
Setting up the sheet before printing the spurs
Before printing the spur, you need to prepare it properly. In particular, you need to reduce the margins from the edges of the sheet. This will save some more space. To do this, go to the “Page Layout” tab, click on the “Margins” button and select “Custom Margins”.
Then in the window that opens, set the size of the margins at the top, bottom and sides of the sheet. For example, you can set all sheet margins to 1 centimeter. This will be enough for the printer to print your spur without any problems.
After this, you need to configure the cheat sheet format. Most often, spurs are printed in the form of several columns, and then the sheet is folded like an accordion. To make cheat sheets in exactly this format, go to the “Page Layout” tab, click on the “Columns” button and select the “Other Columns” option.
As a result, a window will open in which you can configure all the parameters related to dividing text into columns. First, set the number of columns. For example, you can make a cheat sheet with 3 or 4 columns; if you divide the page into more columns, the text will be difficult to read.
Once you've chosen the number of columns for your spur, it's a good idea to reduce the spacing between those columns. For example, you can set the value to "0.5". This will save some more space on the sheet.
That's all, the spur is ready. If possible, it is advisable to print a test page before printing the entire document. This will allow you to detect and correct possible problems with font size or indentation in advance.
Despite the rapid development of information technology and the emergence of various gadgets associated with them, the main assistants for students during exams are still the good old cheat sheets, or as the students themselves jokingly call them “spurs.” These small, finely written strips of paper have stood the test of time and are still used by many students during exam periods.
Where modern technologies can come to the rescue is in the process of preparing cheat sheets. Typewritten text typed in the Word editor will allow you to obtain the maximum density of information per unit of sheet area, while previously you had to write spurs by hand in small handwriting.
Let's take a step-by-step look at one of the possible options for composing spurs in the Word text editor, the tools, functions and settings used for this.
- As mentioned above, in the process of creating cheat sheets, it is necessary to use the area of paper in the greatest possible way. This means that one A4 sheet should include several columns of text information, which will then be cut into appropriate strips. Therefore, the first thing you need to start with is to establish the general formatting of the page and divide the sheet into several columns.
- Set the left and right margins on the sheet of paper to be equal to 0.5-1.0 cm. They must be made equal in size so that during double-sided printing the columns do not shift, and the sheet of paper after drawing up the spur can be cut without affecting the text itself. To do this, go to the Page Layout
and click on the arrow in the lower right corner in the
Page Setup
.
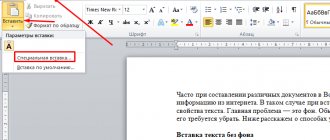
Additional revision
You can get convenient cheat sheets by using other methods of reducing space and optimizing the time of searching for the necessary information:
- Replacing em dashes with em dashes and regular quotation marks “” with the abbreviated version ““ (using the “Replace” menu). This won't make the text much smaller, but it will still make it possible to reduce the size of the spurs.
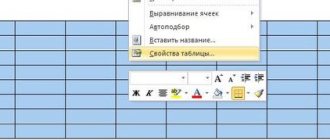
- By making the answers to exam questions a table by ticket numbers (first a table is created, then the text is copied into it one by one. At the same time, attention is paid to the boundaries of the cells, which should also be as small as possible).
Selecting margin options for table cells
- By placing some of the information alphabetically using the sorting function (by setting the necessary parameters - ascending or descending).
Setting text sorting options in the “Table” / “Sorting” menu in Word 2003
Step-by-step creation of a cheat sheet in Word
Instructions - How to make spurs in Word
If you have Telegram, you can now download any software or game through our bot, just follow the link and try it!
« Previous entry