How to make changes and save the hosts file
To change the hosts file in Windows 10, you need to open it first and here's how to do it:
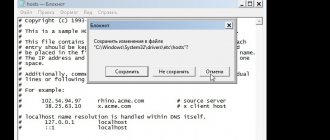
- Open Notepad (as administrator) and then click "file" and "open"
- Go to the folder with the document we need
- When selecting the document type, select “all files”
- Choose the hosts that does not have any extension
How to change the hosts file
Editing the hosts file may be necessary to install or remove any restrictions. To do this, you will need to launch Notepad with administrator rights, open the hosts file in it and write/erase the necessary lines.
How to run Notepad with administrator rights
There are several ways to do this, and some only work on Windows 10. If some instructions do not work for you, use the following.
How to run Notepad with administrator rights through search
- Press Win + S.
- Type Notepad .
- Right-click on the found program and select Run as administrator .
How to run Notepad with administrator rights through the command line
- Press Win + S.
- Type Command Prompt in the search bar.
- Right-click on the found program and select Run as administrator .
- Type notepad and press Enter .
How to run Notepad with administrator rights through an executable file
This method will also work for third-party applications like Notepad++.
- Open File Explorer .
- Go to the C:\Windows\system32 .
- Find the notepad.exe , right-click on it and select Run as administrator .
How to open the hosts file
Once you have Notepad open, do the following:
- Click File - Open .
- Go to the folder where the hosts .
- In the drop-down list to the right of the file name, replace Text documents (*.txt) with All files (*.*) .
- Select the hosts .
How to edit the hosts file
The structure of the hosts file is quite simple. Each line contains some data, and the system considers each line separately. There are two types of strings:
- There is a hash (#) at the beginning of the line. In this case, this line is recognized as a comment, and the system does nothing with it.
- The line contains the IP address, followed by a website. In this case, when you open this site in any browser or other program, the system will automatically redirect you to this IP address.
By default, the hosts file contains about two dozen commented lines. There may be cases when the file is completely empty.
How to remove restrictions in the hosts file
If your system administrator or any software (including malware) left any lines without a hash (#) in the hosts file, then when you try to visit the sites specified in them, you will be redirected to the corresponding IP addresses. System administrators most often use the address 127.0.0.1 - this is a redirect to itself, that is, the site simply will not open. Malicious programs can redirect to any advertising resources.
To remove a restriction, simply erase the line with it. If you want to get rid of all restrictions, press Ctrl + A followed by Delete . Don't forget to save the file after editing. To do this, press Ctrl + S or click on File - Save .
How to add restrictions to the hosts file
To directly disable the ability to visit a site, you need to use redirection to IP address 127.0.0.1. If you want, for example, some site to redirect you to the router settings page, you will need to enter a different IP.
- On a new line, enter the IP address .
- Press Spacebar one or more times.
- Enter the website address to which requests will be redirected.
- Save your changes. To do this, press Ctrl + S or click on File - Save .
As an example, we will show a hosts file that will block several social networks and also redirect the user from router.com to the settings of his router:
A few notes about additional requirements for the hosts file in Windows 10:
- The file must not contain empty lines. If you want to add some indentation, be sure to add a hash mark (#) at the beginning of a blank line. An example of such indentation can be seen in the screenshot above.
- The IP address must be at the very beginning of the line, without spaces before it.
- Multiple spaces or multiple tabs should be used as a separator between the IP address and the site. They should not be mixed.
- If you block any site like xyz.com , then you must separately block the site www.xyz.com .
- The original comments left by the system can be deleted - they do not affect anything.
How to restore and where to download the hosts file for Windows 10
File recovery can be done in two ways:
Method 1:
- Create a text document on your desktop and then remove the txt extension. Call the document itself hosts. If the extension is not visible, click “Control Panel”, and then “Explorer Options” in the “View” tab. The fact that the file may not open (the computer will tell you this when you decide to change the name of the electronic document) is normal.
- Copy or download the original hosts electronic document. Its contents are in this article just above. Or just go back to Windows/System32/drivers/etc on drive C:/
Method 2:
You can simply return to the “How to edit” item and in this mode rewrite everything to the original version.
By the way, you can on our website.
Where is the Hosts file located in Windows 10?
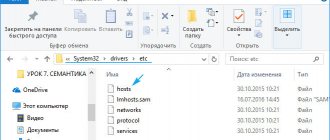
Many users are often interested in where the hosts file is located in Windows 10. The hosts file is located in the “etc” folder, which is located at “Windows”, “System32”, “drivers”.
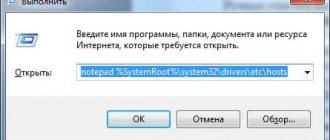
You can also view the hosts file on Windows 10 using the “Run” line. To do this, press “Win + R” and enter the full address “C:\Windows\System32\drivers\etc”.
Next, to open or change hosts, you should go to the address and use notepad.
No access to hosts on Windows 10
In general, changes in hosts should take effect without any additional actions (without restarting the computer, for example). But what to do if this does not happen or you are denied access when working with this document?
- First of all, you need to check whether you are working with it as an administrator or not. Any actions with the hosts file are possible only if the first option is followed. You can also open a command line (again as an administrator), enter ipconfig/flushdns and confirm with Enter.
- The correct operation of file hosts may be prevented by the use of a proxy server. In Control Panel, go to Network and Internet > Internet Options, then Connections and then Network Settings. Next you just need to remove everything about class=”aligncenter” width=”828″ height=”396″|fcw3qayjh5a| src=”https://windows10x.ru/wp-content/uploads/2017/02/hosts7.jpg” class=”aligncenter” width=”407″ height=”569″|fcw3qayjh5a| src=”https://windows10x.ru/wp-content/uploads/2017/02/hosts8.jpg” class=”aligncenter” width=”378″ height=”335″[/img]
- Another reason why file hosts does not work is incorrect input of lines when editing it. Pay attention to extra spaces (at the beginning of a line, between entries, in empty lines). And the hosts encoding can be ANSI or UTF-8 (notepad will save the first option by default).
We recommend that you read these articles on our website:
- What is a page file in Windows 10
- Error dpc watchdog violation Windows 10
- System won't start after Windows 10 update
How to open the Hosts file in Windows 10?
To open the hosts file, you need to follow a few simple steps. Here is a standard method for changing the hosts file in Windows 10.
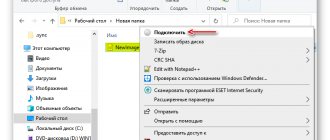
- Go to the above address in the “etc” folder and right-click on the desired file. Select “Open with...”.
- Select “Notepad” from the list. A text document will open. Make sure that only 127.0.0.1 is in the list of IP addresses.
You can also open or edit a system file on Windows 10 through the command line. To do this, you should perform the following steps:
- Press “Win+R” and enter “cmd”. The console will open. You need to add the command “notepad C:\Windows\System32\drivers\etc\hosts”.
- The file will open.
For those who are interested in what the hosts file should look like, here is an example:
- If you need to restore the hosts file, we recommend copying its contents from the official Microsoft website.
After you have managed to make changes to the hosts file, you should click the “Save” button rather than “Save As...” and restart the computer.