Author: admin | 12/16/2019
No comments yet
On laptops from ASUS, problems with the functioning of the webcam quite often occur. The essence of the problem is that the image appears upside down. It is caused only by incorrect driver operation, but there are three ways to solve it. In this article we will look at all the methods. We recommend starting the fix with the first one, moving on to the next options if it does not bring results.
Flipping the camera on an ASUS laptop
As mentioned above, the problem appears due to an incorrect webcam driver. The most logical option would be to reinstall it, but this is not always effective. However, let's look at everything in order.
Method 1: Reinstalling the driver
Some users install software for components using third-party software or download inappropriate, old versions located on the official website of the equipment manufacturer. Therefore, first of all, we advise you to remove the old software and install the correct, fresh files. Let's do the uninstallation first:
- Open Control Panel through the Start menu.
Go to the "Device Manager" section.
Expand the “Sound, video and gaming devices” category, find the camera there, right-click on it and select “Delete”.
This completes the removal of equipment. All that remains is to find the program and install it again. Our other article at the link below will help you with this. In it you will find a detailed description of all available ways to find and download software for a laptop webcam from ASUS.
Method 2: Manually changing the driver
If the first option did not bring any results and the image from the camera is still upside down, before installing the driver, you will need to manually set certain parameters for the files to solve this problem. You can do this as follows:
- First, uninstall the old software and download the new archive from the official website. All these actions are described in detail above.
- Now you need to lower the security level of your accounts so that there is no conflict with drivers in the future. Open Start and go to Control Panel.
Navigate to the "Change User Account Control Settings" menu.
Drag the slider down and save your changes.
Open the downloaded directory through any convenient archiver, find and run the only INF file. Depending on the laptop model and the specified operating system, the name may change, but the format remains the same.
In Notepad, expand the Edit menu and select Find Next.
Enter flip in the line and click on “Find Next”.
There will be a line in which you need to change the last number to 1 or 0, depending on what was set by default. Click “Find Next” again to find the remaining lines with the same parameter, repeat the same action in them.
Once you've finished editing, be sure to save the file and refresh the archive before closing. After that, open it again and install it.
Method 3: ManyCam
The only solution if the previous methods fail is to use third-party software that is suitable for Skype and other similar communication services. This software can independently flip the webcam image. You will find detailed instructions for working in it in our other article at the link below.
Today we tried to talk as clearly as possible about fixing the problem with the upside down camera on an ASUS laptop. We hope that this material was useful to the owners of the above-mentioned devices and the process of fixing the problem itself was successful.
Thank the author and share the article on social networks.
A common and widespread problem for many users is an upside-down image of a laptop webcam (and a regular USB webcam) in Skype and other programs after reinstalling Windows or updating any drivers. Let's look at how to fix this problem.
In this case, three solutions will be offered: by installing official drivers, by changing the webcam settings, and also, if nothing else helps, by using a third-party program (So if you have tried everything, you can go straight to the third method) .
Option 2: On mobile Zoom
In the mobile version of Zoom, upside-down images are rare. The error may be related to:
- the option to automatically detect display orientation is disabled;
- error in the application;
- An outdated version of Zoom is installed.
You won't be able to flip the screen in Zoom mobile using the settings. First of all, pick up the phone and wait for the orientation and rotation of the picture to be automatically determined. If this does not happen, turn on the accelerometer using the “Orientation” button, which is located on the retractable curtain of the smartphone.
If the setting does not help, check for updates through the Play Market store or the mobile version of Zoom, and restart your phone. You can also remove the old version of the service and install a new one.
If the site continues to malfunction and the camera image is upside down, you should submit a bug report so that the developers can see the problem and begin working on it. How to do it:
- Go to “Settings”, click on the “About” .
- Tap on the line “Send a problem report” .
- Select a product, click Next .
- Select the issue type "Other" and describe the error in detail.
- Click on the "Submit Problem Report" .
Important. Additionally, contact Zoom support via the form on the official website and describe the problem. The specialist may not answer right away, but this is the only way to solve the problem if you cannot turn the camera over on your own.
Video settings in Zoom
In the Zoom settings for your computer, you can select a background image and mirror the video. To configure, follow the steps:
- Open Zoom options and select the Virtual Background .
- In the window that opens, you can change the background; preset options and a button for adding your own image are available.
- To mirror the video, check the box next to the appropriate option.
- At the top of the window there is a test image from the connected camera; in the corner on the right there is a 90-degree rotation button.
Note. In the mobile version of Zoom, camera and background image settings are not available. To go to your settings, you need to log in to your personal account.
No picture, what to do
What to do if the video is upside down and how to set up the camera is now known. How to select a connected camera if it is not detected automatically? The option is located in the "Video" . To select the necessary equipment, just click on the drop-down list and click on the connected camera. If the hardware is not detected, check that the drivers are installed correctly.
Zoom has built-in help, which is useful if there is no video. To access the instructions, open the “Video” section, scroll down the list of options and click on the “Troubleshooting” . Follow the advice, if all else fails, contact support.
How to flip the camera in Zoom? In the computer version, use the built-in menu. On a mobile phone, activate the screen position sensor, restart the phone and check for updates.
Drivers
The most common way the situation arises is on Skype, although other options are possible. The most common reason that the video from the camera is upside down is the drivers (or, more accurately, the wrong drivers).
In cases where drivers are the cause of an upside-down image, this occurs when:
- The drivers were installed automatically when you installed Windows. (Or the so-called assembly “where all the drivers are”).
- The drivers were installed using some kind of driver pack (for example, Driver Pack Solution).
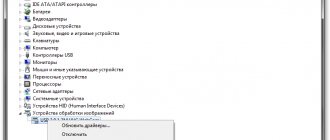
To find out what driver is installed for your webcam, open Device Manager (type "Device Manager" in the search box in the Start menu in Windows 7 or on the Windows 8 Start screen), then find your webcam that Usually located in the “Imaging devices” item, right-click on the camera and select “Properties”.
In the device properties dialog box, open the Driver tab and note the driver vendor and development date. If you see that the supplier is Microsoft, and the date is far from current, then the reason for the inverted image is almost certainly in the drivers - your computer is using a standard driver, and not one that is specifically designed for your webcam.
In order to install the correct drivers, go to the official website of the manufacturer of the device or your laptop, where all the necessary drivers can be downloaded completely free of charge. You can read more about where to find drivers specifically for your laptop in the article: How to install drivers on a laptop (opens in a new tab).
Why does the Skype camera show upside down?
The Skype program is popular among a fairly large number of users, as it allows you to communicate with people from different countries completely free of charge and even see them using just an Internet connection and a webcam on a computer, laptop, tablet or smartphone. It is noteworthy that the program also allows you to call users’ mobile numbers, but for this you need to top up your account.
The camera shows upside down: reasons
However, it often happens that when you launch Skype, for some reason the camera starts showing upside down. Of course, an inverted image will not please many users very much, and the question of how to fix this problem will torment them for quite a long time. So, if you have problems with the Skype program, or rather, with the correct operation of the webcam, then it is quite possible that your problem is completely solvable and is as follows:
- Skype may have incorrect image display settings by default or as a result of incorrect user actions.
- The absence of a webcam driver on the computer or its incorrect version.
All these problems are completely solvable, and then you will learn how to restore the normal operation of your webcam and enjoy communicating with friends and family who are very far from you.
Fixing the problem by changing Skype settings
If you are trying to solve the problem of correctly displaying the image of your webcam yourself, then try going into the Skype program settings and see if everything is configured correctly.
To do this you should:
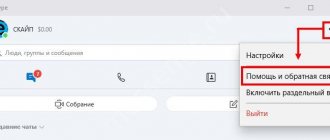
- In the top menu of the program, you must select “Tools”, and in the drop-down list click on “Settings”, as shown in the image.
- Next, in the left menu you should select “Video Settings”, then in the main window click on “Webcam Settings”. In the settings themselves, uncheck the boxes next to “Image Mirror Flip” and “Image Vertical Flip”, and then click on the “Save” button.
https://okak.org/kamera-v-skype-vverh-nogami/ okak.org
Next, restart Skype or try restarting your computer and see if the changes take effect. If after this the image still does not display correctly or you have unchecked the boxes by default, then you should pay attention to another way to solve the problem.
Installing a new video camera driver or changing settings
In some cases, the items “Image Mirror Flip” and “Image Vertical Flip”, which are responsible for mirror and vertical display of the image, respectively, can be found in the system settings. In order to access the settings, you must:
- On the desktop or start menu, right-click next to the “My Computer” icon, and then select “Properties” (you will go to “System”).
- In the window that opens, select “Device Manager” in the left menu.
- Next, double-click on “Image Processing Devices”, right-click on the drop-down name of the webcam and select “Property”, where you can uncheck the following: “Image Mirror Flip” and “Image Vertical Flip”.
If this does not help, then instead of the “Properties” item in the latter case, you need to select “Update driver” or copy the name of your webcam and try to search for the driver for it yourself on the manufacturer’s website or directly by entering a search query in Google, Yandex or another search engine.
After downloading the driver, you should install it. There is no need to be afraid of this procedure, as it happens in exactly the same way as installing any other program. After completing the installation procedure, the system may require you to restart your computer. Once you do this, your camera will surely work correctly.
Listed above are the most common ways to fix problems with user cameras, which are effective in 99% of cases. Try it, and then you will succeed!
If something is unclear, use the comments.
Share (save):
okak.org
Webcam settings
Sometimes it can happen that even though the drivers for the webcam in Windows are installed specifically for use with this camera, the image in Skype and in other programs that use its image still remains upside down. In this case, you can look for options to return the image to normal in the settings of the device itself.
The easiest and fastest way for a novice user to get into the Webcam settings is to launch Skype, select “Tools” - “Settings” - “Video Settings” in the menu, then, under your inverted image, click “Webcam Settings” - a dialog box will open , which will look different for different camera models.
For example, I do not have the ability to rotate the image. However, most cameras have this option. In the English version, this property can be called Flip Vertical (flip vertically) or Rotate (rotate) - in the latter case, you need to set the rotation to 180 degrees.
As I already said, this is a simple and quick way to get into the settings, since almost everyone has Skype, but the camera may not be displayed in the control panel or devices. Another simple option is to use a program to control your camera, which, most likely, was installed along with the drivers when you completed the first point of this guide: the necessary capabilities for image rotation may also be present there.
Camera control program from the laptop manufacturer
Option 1: In the computer version
Why is the image upside down in Zoom? The problem lies in incorrectly defined hardware or a driver error. If there is no picture, you can select the connected equipment in the menu yourself and configure it at any time.
How to rotate the camera in Zoom to the correct position:
- Launch the computer version of Zoom and log in to the system.
- Click on the gear in the top right to go to the main menu.
- Select the "Video" .
- In the window that opens, camera settings are available, and the image for verification is automatically launched.
- Click on the "Rotate 90" to select the correct video position.
- Additionally, select the aspect ratio (usually 16:9), enable HD mode (a connection speed of at least 1.2 Mbps is required).
- Go to advanced settings.
- Enable hardware acceleration and automatic noise reduction.
Important. Typically the settings are saved and image adjustments are no longer required. If the video appears upside down on subsequent launches, follow the step-by-step instructions above to turn it upside down.
You can also go to the video settings during the broadcast. For this:
- Click on the arrow on the “Stop video” , which is located on the panel below.
- Select the line "Video Settings" .
- A menu will open in which you can not only adjust the image angle, but also enable HD mode and activate the face smoothing option.
If the option is not available, update Zoom to the latest version. Additional parameters are available in the menu; their number also depends on the version of the service used.
How to fix an upside-down webcam image using third-party programs
If none of the above helps, it is still possible to flip the camera video so that it displays normally. One of the best and almost guaranteed to work is ManyCam, which you can download for free here (opens in a new window).
Installing the program is not particularly difficult, I just recommend not installing Ask Toolbar and Driver Updater, which the program will try to install along with itself - you don’t need this garbage (you need to click Cancel and Decline where they are offered to you). The program supports Russian language.
After launching ManyCam, do the following:
- Open the Video – Sources tab and click the “Flip Vertical” button (see picture)
Method 1
In the upper right corner, in the search box, enter the letters indicating the model of your laptop and press the “Enter” key. How to find out your laptop model – read our blog.
From the list of models that appears, select your laptop model. And after loading the next page, open the “Drivers and Utilities” tab.
Specify the bitness of your laptop, which can be checked in its properties, and select the Windows version. If the Windows version is not specified, select any of the proposed ones. The main thing is the bit depth that matches the parameters of your laptop.
In the window that appears, you will see the entire list of drivers for your computer model. We need drivers that are responsible only for the webcam, so click on “-” next to the line called “Camera”.
We are looking for the driver we are interested in, after which we click on the floppy disk icon below to download the file.
Once the download is complete, install the driver according to the standard procedure.
Reboot your laptop and check the camera. The image should be normalized.
Contact a professional ASUS laptop repair service center if this method does not help you. There is also a second option.
Installing original drivers
Why
Is the camera image upside down?
Most often, an upside-down camera
on an
ASUS
(
possibly on others
) occurs due to
the automatic installation
of a camera driver from Microsoft.
This usually happens when reinstalling Windows
.
To solve the problem, just download the original drivers
for laptop.
Technical support site
ASUS can be found at the link:
www.asus.com/ru/support (for other brands, go to their support site)
There you need to enter the name of your laptop model and after finding it in the database, click the “Drivers and Utilities”
.
Select your version of
Windows from the list (
how to determine whether
your system is
32 or 64bit .
Find “Camera”
and expand it.
If there are several camera options in the list, then by device ID,
select the appropriate
driver
.
This can be done in “Device Manager”
in “Computer Management”.
After downloading and installing the original driver
the image should become normal.
Method 2
If you were unable to find the necessary drivers on the manufacturer’s official website, then simply download the program to search for official drivers, which is completely free. It's easy to find in a search engine.
After downloading and running this program, find the tab called “Notebooks” (or “Laptops”) and fill out all the fields to search for the drivers we need. Having found the necessary drivers, download and install them. The installation process may take some time, and once completed, you will need to restart your laptop.
If none of the methods help you, contact a service center, where they will probably determine the cause of the problem.
We hope this problem will not bother you again.
You can contact the masters from our service center by calling or writing your question on the feedback form.
Your message has been sent.
Thank you for your request.
Author:
You might also be interested in