If you have a webcam as a separate device and have not yet connected it to your computer, be sure to do so before starting setup. The whole process consists of just five simple steps, which can be found at the link below.
Read more: Connecting a webcam to a computer
macOS
Let's talk about the cameras of the Apple corporation. This corporation has always followed its own path, and even a simple camera is called iSight. Remember this word.
Step 1. We need the isight disabler script. By this name, typed into any search engine, you can find the script you are looking for.
Find the isight disabler script
Step 2. After running the script, you will see a small window with two buttons - turn on the webcam and turn it off.
Click the second button “Disable webcam”
Press the second button. All! The camera turned off.
Camera turned off
Note! If any application using the camera was running at the time of disconnection, simply terminate it by selecting the advising item in the application's context menu in the Dock. Then the process of shutting down and turning off the camera will end. That's it.
Checking settings in the application
How to enable Wi-Fi on a Lenovo laptop: with Windows 7
Learning how to set up a webcam in Windows 10 isn't the only thing you need to do to communicate online. The device can only be used through the app. One of the most common is Skype. With its help, you can not only communicate online, but also make a recording for your interlocutors if the PC user is engaged in training of various types.
Settings in the application
To learn about all the features of the presented application and start communicating, you must follow the following sequence:
- Download the application and install it on the system disk of your laptop or PC. You can also take advantage of other modern software with improved sound and picture quality, as well as advanced features.
- Open Skype after installation. Immediately under the application name header there is a field in which you can find three dots. Click on them - this is the “Settings” tab. Some versions contain the inscription "Settings".
- Several sections will open in the left panel, where the necessary parameters are checked. To learn how to check a webcam on Windows 10, just refer to the “Sound and Video” section.
- An automatic check of the installed device will start. The user will see his own image in the window. This is the quality the interlocutors will have on the screen during online conversations. If the image quality is poor, this should be noted.
- Additionally, it is suggested to check the camera microphone. Below you can see a scale with a slider. It is installed in a location indicating satisfactory sound quality. To check it, the user needs to say a few words. It is better to speak quietly at first, then raise your voice. If the scale reaches the slider, then the microphone is working and recognizes the speech of the laptop owner.
Checking audio and video
Note! In the presented “Settings” tab, you can find other parameters: check the box under the words “Third interlocutors can be included during a conversation”, etc.
Installing webcam software through parameters
It is possible that for the webcam to work properly, you need special software for Windows 10. It is also possible that it is already installed, but is not compatible with the current OS (if the problem arose after upgrading to Windows 10).
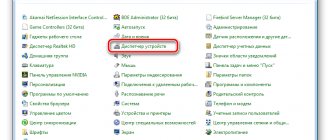
To begin, go to the Control Panel (Right-click on “Start” and select “Control Panel.” In the “View” box at the top right, select “Icons”) and open “Programs and Features.” If there is anything in the list of installed programs that is related to your webcam, remove this program (select it and click “Uninstall/Change”.
After removal, go to “Start” - “Settings” - “Devices” - “Connected devices”, find your webcam in the list, click on it and click the “Get application” button. Wait for it to download.
How to connect and configure the device
The Windows system has settings that allow you to easily and quickly configure all elements responsible for sound, image and video. To open the camera in the Windows 10 operating system, you must:
- Click on the “Start” button.
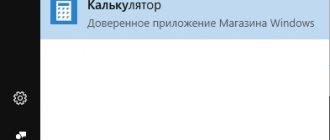
- In the general list of applications, find the “Camera” service and click on it. All applications in the system are sorted alphabetically, which allows you to quickly search.
- If the settings are correct, detailed information about the application will appear, it will be activated, and as a result you will be able to view the image from it.
After these steps, you can perform all necessary operations with the device.
Camera activation buttons on various laptops
Many Asus, Acer, MSI, Samsung, Lenovo laptops, especially older models, are designed with special buttons for turning on or switching video cameras. They are usually located near the laptop start buttons. On Lenovo laptops, such camera controls may be located in the area of the USB ports. If the recording devices on your laptop are not working, you should definitely check these buttons.
Another option for controlling the video camera is to use the function keys on the keyboard. You should carefully review all the keys to find the one with the video device icon. On many laptops, you can enable or disable the video camera using the Fn+V combination. On Lenovo laptop computers, the combination Fn+ F5 or Fn+Esc is often responsible for this function. But in general, each laptop owner needs to look at their computer individually to find the required function keys.
Setting up a camera in Windows 10
All laptops released in the last 5-8 years are equipped with web cameras. Many computer owners who need a camera to play games, work, or communicate via the Internet equip their PCs with this USB gadget. But with the transition to Windows 10, problems with the functioning of these devices begin. Today we’ll look at where these problems come from and how they can be solved on their own.
The instructions are written for users whose devices do not have defects at the physical level.
If the camera does not function in Windows 10, first of all we take the following steps.
- We check whether the device is connected to the PC, whether the plug is securely inserted into the USB socket, and just in case, reconnect it to an adjacent port.
- Make sure that the camera is not disabled by hardware.
We will use a combination of hot keys, one of which is usually called Fn, and the second (usually Esc or one of the function row F) is indicated by the corresponding icon. Instead of a combination, some laptops have a special button that allows you to quickly turn on/off the webcam.
Removing and re-detecting the webcam in Device Manager
In about half of the cases, in order for the webcam to work after upgrading to Windows 10, all you need to do is follow these simple steps.
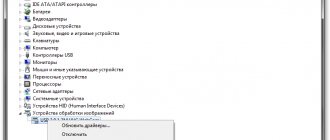
- Go to the device manager (right click on the “Start” button - select the desired item from the menu).
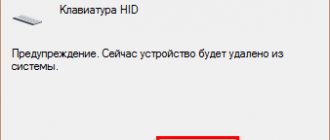
- In the “Imaging Devices” section, right-click on your webcam (if it is not there, then this method is not for you), select “Delete”. If you are also offered to remove drivers (if there is such a mark), agree.
- After deleting the camera in Device Manager, select “Action” - “Update hardware configuration” from the top menu. The camera must be installed again. You may need to restart your computer.
Done - check if your webcam is now working. You may not need to follow any further steps in this tutorial.
At the same time, I recommend checking it using the built-in Windows 10 “Camera” application (it’s easy to launch it through a search in the taskbar).
If it turns out that the webcam works in this application, but, for example, in Skype or another program it does not, then the problem is probably in the settings of the program itself, and not in the drivers.
Method 4: Allow or block camera access for this device
This option is available starting with Windows 10 build 17063.
- You must be logged in as an administrator to use this option.
- Open "Settings" , go to the "Privacy" .
- Open the “Camera” , click on the “Change” on the right side, and select whether your device can access the webcam. If you want to disable, move the switch to the “Open” , if you want to allow “On” . (see screenshots below)
We open access to applications to work with the camera
Often the camera does not work in some programs, which may result in limited access. It is very easy to remove it, to do this we do the following:
- Go to “Options”;
- Section “Confidentiality”;
- Select the applications that you want to grant access to and move the switch opposite them to the “On” position.
We hope that our text and screenshots helped you connect and configure the webcam correctly.
source
Possible driver problems
If you do not find your webcam in the “Device Manager” or it is indicated as unidentified equipment, then for its normal functioning you will need to download drivers. This can be done using the capabilities of Windows 10 OS - the system will find them in its database and automatically download them to the computer. To do this, right-click on the hardware and select “Update drivers.” We select the automatic search method if you have not previously downloaded drivers to your computer. Next, they will be automatically downloaded from the Internet and installed on your computer. There is another way - visit the device manufacturer’s website and download the latest version of drivers from there.