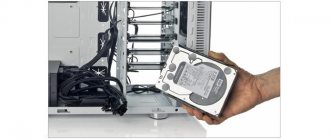
Removing the hard drive from the computer
We tell you how to remove a hard drive from a computer or laptop.
The need to remove the hard drive from the laptop may arise at any time:
- When it starts making strange sounds and requires diagnostics.
- When it fails.
- Well, or when you want to change to a faster and larger option.
Therefore, you will probably find the instructions described below useful for removing the HDD drive from the case of laptops and desktop systems. And you won't want to spend money on a specialist when you find out how easy it is to do and how little time it takes.
DIY laptop hard drive repair
Oxidation of contacts
Contact oxidation is the most common cause of hard drive failure. This problem is easily fixable and does not require special skills or time to eliminate:
- We take out the hard drive and unscrew the external hard drive board.
- We find the data transfer interface contacts on the board; they are usually located on the side of the board and are arranged in two rows.
- We inspect the contacts for damage, darkening of oxides, carbon deposits
- Using a regular office eraser, with light friction we get rid of carbon deposits and oxides on the contacts
- We treat the contacts with cotton wool moistened with an alcohol solution
We take out the disk from the laptop
It is logical to say that different laptop models have cases designed differently. Therefore, it will not be possible to create the most universal instructions for disassembling a computer and removing a disk from it. However, all laptops are similar in one way or another.
- First, of course, you need to turn off the computer and wait until all components stop any activity.
- Then turn the laptop upside down.
- There will be several bolts on the cover that hold it in place. Unscrew them with a suitable screwdriver.
Some manufacturers (for example, Apple) use bolts that can only be unscrewed with a special star screwdriver. Please take this into account before starting work.
New laptops have this additional cover. Only replaceable components are hidden behind it. Usually we are talking about RAM memory and HDD drives
- Half the battle is done, now you need to get the disk itself. By the way, it looks like a massive plate with a piece of a microcircuit on the wall and a magnetic mechanism inside. Depending on the design and model, it may be held in the housing using several bolts or using plastic latches. The bolts must be unscrewed and the latch must be moved or removed.
There is a lot of space for additional disks, but we came to get them, not add them. Our goal is below right
- Then you need to carefully pull the disk out of the connector and put it aside so as not to bend or break anything.
You can see at least a few holes for the bolts, you will definitely notice them
That's all. As you can see, this is a fairly trivial procedure that does not require any special skills.
Removing a disk from an all-in-one PC is generally similar to removing a disk from a laptop. There will also be a separate cover for memory. It can also be removed by unscrewing the bolts, and the disk is placed in a similar mount. There is definitely no space for components, as in a standard system unit, in an all-in-one. That's why its insides are so similar to the structure of laptop components.
Disassembling a laptop hard drive
So, you have removed the drive from the computer, acquired the necessary tools, and located all the screws. How to disassemble a laptop hard drive? This operation must begin by removing the controller. A controller is an element in a drive that controls the drive and transfers data. Technically, the controller is implemented in the form of a printed circuit board, which is connected via a cable to the mechanical part of the HDD. Unscrew the screws holding the controller to the case, then carefully - so as not to damage the cable - turn it over. After this, you can disconnect the cable from the board. On modern devices, very often the cable is adjacent to the board using contact pads, i.e. not attached to it. However, it is not recommended to abruptly remove the controller to avoid damage to the cable.
The next step is to disassemble the mechanical part of the laptop HDD itself. It should begin by unscrewing the screws holding the cover. Sometimes, in addition to them, manufacturers resort to various latches - this is where a utility knife may be needed.
After removing the casing, you gain access to the internal mechanisms of the drive. The next step is to unscrew the screw that holds the plates (“pancakes”) on the spindle. By removing them, you can also easily remove other structural elements: magnets, a parking space for the head, a block that moves the reading head. All these elements are secured with screws. It is worth noting that the magnets of the linear motor, which ensure the movement of the head, have extremely high induction - because of this, they are extremely difficult to separate from the body, even in the absence of any additional fasteners.
Disassembling a laptop drive should not cause any difficulties, provided that you have the appropriate tools and are careful when disassembling it. The main rule when working with such equipment is attentiveness. Do not make sudden movements or use excessive force: if you cannot detach a part, make sure that you have unscrewed all the screws, that the element is not held in place by a latch, and so on.
We take out the disk from the system unit
It's almost the same story with the system unit.
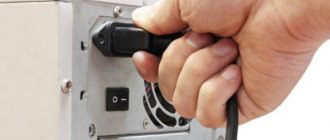
- First, turn off the computer.
- Then press the red power button on the back of the computer.
Let's turn off the power to the computer for its safety and ours.
- We look for the bolts on the back and sides that hold the body assembled.
- Unscrew the bolts one by one.
- Then we move the cover to the side and remove it.
For some models, the lid may not move sideways, but only move up
- After this, carefully disconnect all the wires that are connected to the hard drive. Usually there is one cable going to the motherboard.
Here is the IDE connection interface for connecting motherboard and disk
- Then we unscrew the bolts that hold the disk suspended in a special section for HDD drives and other components.
Some models use special rigid terminals instead of bolts. In this case, you just need to pull them and pull out the disk.
How to choose HDD and SSHD
Interface
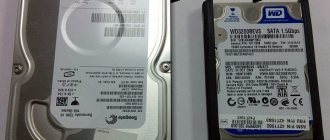
The connection interfaces for the new and old drives should ideally be the same.
Almost all laptops released in the last ten years support connecting drives via the SATA interface. The exception is some ultrabooks and netbooks with integrated flash memory - like on smartphones and tablets, or with support only for thin SSD standards mSATA and M.2, but we won’t talk about them now.
This is what the SATA connector looks like:
If your old drive has the same one, finding a replacement will not be a problem.
On ancient machines made before the advent of SATA, drives are connected via a wide cable via the IDE (PATA) interface:
Finding a new hard drive of this format today is almost impossible, so most likely you will have to connect a SATA drive instead via an adapter. For example, something like this:
But keep in mind that such a replacement is only relevant if the original hard drive breaks down. The new one, no matter how fast it is, will transmit and receive data at the same speed as the old one.
Generation SATA
The SATA interface generation (1, 2, 3) characterizes the throughput or theoretically achievable data exchange rate between the drive and the motherboard.
The current generation of SATA, the third, supports transfer speeds of 6 Gbit/s. The previous – second – 3 Gbit/s, and the first – 1.5 Gbit/s. Boards and drives of different generations are compatible, but the exchange between them will occur at the speed of the slower device. For example, if the laptop platform belongs to the SATA-2 generation, and the hard drive belongs to SATA-3, data will be transferred no faster than 3 Gbit/s. However, even if the computer is old, it’s not worth buying SATA-1 and 2 hard drives. After all, you may someday want to move the disk to another machine, and it will be its weak point.
Form factor and thickness (height)
The size of the hard drive determines whether it will fit inside the computer.
Standard hard drives for laptops are available in two form factors - 2.5" (regular) and 1.8" (small - for netbooks and ultrabooks). 2.5-inch rims come in 9.5mm, 7mm and 5mm heights. The latter are rare.
A disk of a similar form factor and the same or less thickness will be suitable to replace the old one. But in the latter case, you will have to put seals under it, otherwise it will dangle.
Capacity
The capacity (capacity) of the new hard drive can be anything, the main thing is that it is enough for you.
However, for older generation laptops - based on BIOS (i.e. without UEFI support) there is no point in buying disks with a capacity larger than 2 TB, since the system will not see anything larger than that. This is interesting: Low-level formatting of a hard drive: what, why and how
Speed characteristics of the disk itself: spindle rotation, buffer volume, IOPS
Standard mobile hard drives rotate at 5400 or 7200 RpM (revolutions per minute).
The higher the speed, the faster access to data, but high-speed drives get hotter and make louder noise. In addition, large heat production with insufficient cooling in a cramped laptop case can lead to the sudden death of the hard drive, so devices with a speed of 7200 RpM are less reliable. The capacity of the memory buffer , where information read from the plates is temporarily stored, cannot be too much. The bigger, the better. Hybrid hard drives - SSHD, as I already said, have another buffer - flash, like an SSD. When choosing, its volume (larger) and type are important: optimally - MLC, as durable, fast and inexpensive.
IOPS . This indicator determines the speed of random (random) reading and writing in blocks of 4-8 Kb - the main type of disk operation during normal computer use. This is the most informative indicator of a drive's performance, but, unfortunately, it is not always indicated in the specifications. The higher it is, the better.
Manufacturer
What you shouldn’t do is choose a hard drive based on brand recognition.
I advise you not to take it into account at all, since today all hard drive manufacturers have taken a course not on quality, but on flooding the market with their products. It is more profitable for them to return money for defective devices after sale than to reject them in production. Objectively, no brand of HDD can be considered more reliable than others. Saying otherwise is simply someone's personal opinion.
Guarantee
Unfortunately, none of the parameters of the hard drive allows you to predict how long it will last, so be sure to look at its warranty period. Those whose warranty is less than 3 years are definitely not worth buying.
How to remove a hard drive from a laptop
If the hard drive in a laptop begins to fail, then this is a signal to repair it or replace it with a new, possibly more powerful hard drive. You can take your laptop to professionals who will complete the task in a few minutes. Or you can remove the hard drive yourself, thereby only increasing your technical knowledge and self-esteem.
Before you begin, turn off your computer and remove the battery. To disassemble the laptop and remove the hard drive, you can use a set of small screwdrivers. The arrangement of the bolts connecting the lower case to the upper case is different for each laptop model. Study it carefully and only then unscrew the bolts.
Removing the cover must be done carefully, making sure that there are no fasteners. In some laptop models, for example, Sony, the case should be pryed off with a fingernail or a flat-head screwdriver and slowly lifted up. In others, for example, Asus, the cover is removed by sliding it parallel to the laptop to the rear.
The location of the hard drive is also different for each model. In this case, access to the hard drive may be blocked by other functional components of the laptop, for example, a USB port. If there are devices that make it difficult to remove the hard drive, carefully unscrew the fasteners and remove or move them to the side.
Having direct access to the hard drive, carefully inspect it. In earlier versions of laptops, the hard drive itself was secured with bolts. To remove the hard drive from the slots, you need to pull the special tape located on the drive mount. It is forbidden to pull the hard drive sideways or upwards, as there is a risk of damage to the contacts. You need to pull parallel to the laptop to the side. If you are confused about which way to remove the hard drive, take the disk tape in your hand and gently pull it; if directed correctly, the tape will fit comfortably in your palm without lifting.
When replacing a hard drive with a more advanced one, remember that a laptop can be equipped with a hard drive with a maximum memory of 20-30 GB and a speed of 4200. More powerful hard drives threaten the failure of other outdated but working parts.
How to disassemble a laptop hard drive - tools and simple techniques
Sometimes a user needs to disassemble the HDD of his laptop:
for example, for repairs, “donating” spare parts, or in order to turn a non-working device into some kind of decorative element. We will now tell you more about the analysis process in an accessible way and in Russian. Before you disassemble the hard drive from your laptop, you need to remove it. To do this, you need to remove the back cover of the portable personal computer, unscrew the screws holding the device at the ends, and carefully pull out the drive so as to disconnect the connectors. Only after completing these operations can you remove the HDD.
How to remove a disk from a drive if it does not open?
You entrusted the disk to the computer, but then it didn’t want to give it back? This happens quite often.
First, let's try to persuade him in an amicable way.
Open “My Computer” by double-clicking, in the window that opens, right-click the drive icon and in the context menu, left-click on the “Eject” button.
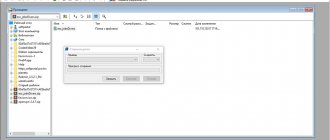
If even now the tray does not come out, then there is an assumption that some file related to the process is blocked. To check this assumption, use the “Unlocker” utility
To unlock the files, click on the “Unlock All” button and try to remove the disk again. If even now the computer does not want to give up the disk, we proceed to a more radical method.
Take and straighten a regular paper clip and find a small hole on the drive panel. Holding the paperclip strictly horizontally, insert it into the hole and apply pressure. This way you will loosen the tray lock and it will slide out slightly. Help it open all the way with your fingers.
The computer does not see the hard drive
There can be many reasons why the computer does not see the hard drive. Below are the causes and solutions to the problem:
- Disk failure. Try connecting the part to another PC or take it for diagnostics
- If you are trying to install Windows XP or an earlier version and a message appears about no disk, the BIOS may not have a hard drive mode compatible with this OS enabled - IDE
- If this is the first time you installed this drive in your PC, you may have connected it incorrectly
- The hard drive is enabled in the BIOS settings. In the Storage Configuration/Drive/similar name sections, make sure that the desired hard drive is activated
- Outdated drivers. Download the latest drivers from the manufacturer's website
- Presence of viruses in the system
How to remove a hard drive from a laptop? - Management
You bought your laptop a long time ago and actively used it. And after many years of flawless operation, it began to freeze, and malfunctions appeared in its operation. Then it’s best to change the hard drive on your laptop, and our article will tell you how to do this.
But how can you remove the hard drive from a laptop and replace it with a new drive so that the system detects it and you can start working on the computer without interference?
If you are not a computer genius, then you can take your laptop to a computer service center and pay a lot of money for it. But you can remove the disk from the laptop yourself and save that money.
Where to start when removing a hard drive?
Disconnect the laptop from the power supply and remove the battery. Turn it over so that the back wall is at the top. We will be disassembling the back wall. All the bolts in the laptop are small, and it is best to use the same screwdrivers. We proceed to removing the cover only when you are sure that all the bolts are unscrewed. In different laptop models it is removed in different ways; in some cases you just need to pry it off, and in others you need to move it.
Then you need to remove the computer keyboard, do this carefully until it is removed.
You need to disconnect all power and USB slots from the side panels, and if your laptop runs on a SIM card, it is usually located behind the power panel, then it must be removed from the computer.
Now you can remove the hard drive from the laptop, and again, its location can also be different, sometimes in order to get to it, you need to remove the USB port, or other important components of the computer. In this case, you need to carefully unscrew all the parts that block access to the hard drive and put them separately, having previously remembered their location.
Now you can carefully examine the location of the drive and see how it is connected to the motherboard.
In older models it was secured with bolts, but in new models it is secured using a high-tech tape, so you need to pull it, and the disk will be released. You cannot pull it in any direction or upward, otherwise all contacts can be damaged. If you have any doubts about how to remove the hard drive from your laptop, simply pull the tape to release it from its contacts with the board. If you do everything correctly, the tape will fit freely on your hand, without kinks.
It is important to remember that when reinstalling the hard drive in a laptop to a more advanced one, its memory should not exceed 30 GB, and the read speed should be about 4200 rpm. More powerful drives can damage an outdated motherboard, and the computer will not be able to work properly; you will have to replace it with a new one.
Now you know how to remove a hard drive from a laptop, there is nothing difficult about it, but your old laptop will get a new life if you follow all the above tips.
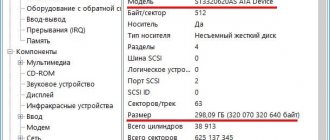
Causes of malfunction
The user must understand what the hard drive consists of, which can be seen in the screenshot below. One of the main components are the disks and the head, with which it is possible to read the available information. They wear out very quickly, since their rotation speed is 720 revolutions in 60 seconds. If the user launches any programs or applications, the load increases even more.
Hard drive values
You need to listen to the signals from your equipment in order to fix the problem in time. It is worth considering the most common situations that users encounter:
- Clicking noises are heard from time to time. This problem is common, and it indicates that the disk is damaged. This can happen due to excessive dust or other objects that should not be in the hard drive. This is especially common if the laptop has been dropped and damaged. Users who have been using the device for no more than three years also often encounter this situation. In this case, it is enough to disassemble the laptop and, if necessary, clean it from dust;
- an intermittent hum is heard. This problem is also common, and it indicates that the reading head is already worn out;
- but if the BIOS does not see the disk the user needs, then this is an indicator of the presence of various operational problems, various types of damage that led to failure.
BIOS does not see the disk the user needs
It is quite possible that the hard drive does not have any damage, but the problem is the jumpers that are installed incorrectly. Or there is a possibility that the cable that leads to the motherboard is faulty. By disassembling your laptop and looking for any damage, you can verify this.
Removing the hard drive from the computer
We tell you how to remove a hard drive from a computer or laptop.
The need to remove the hard drive from the laptop may arise at any time:
- When it starts making strange sounds and requires diagnostics.
- When it fails.
- Well, or when you want to change to a faster and larger option.
Therefore, you will probably find the instructions described below useful for removing the HDD drive from the case of laptops and desktop systems. And you won't want to spend money on a specialist when you find out how easy it is to do and how little time it takes.
Removing the hard drive
The location of the hard drive is different for each model. Look carefully to see if other parts or functional components of the laptop are blocking access to the hard drive. If any are found during inspection, they should be unscrewed and removed as carefully as possible. Maybe they can even be simply moved to the side so as not to interfere, after first unscrewing them. After completing all the previous manipulations, the hero of the occasion, the memory drive, should appear in free access. But be careful, in earlier versions of laptops, it was also secured with bolts. Conduct an inspection to see if there are any. If they are, then unscrew them. After you have ensured that the hard drive is safely removed, proceed to dismantle it, so to speak.
In order to remove the hard drive from its grooves in which it is installed, you should pull the tape specially attached to it. It is located on the memory storage mount itself. One very important point should be noted when removing the hard drive. It cannot be pulled up or to the sides. And you should only remove it parallel to the computer itself, that is, pull the disk along the case and not otherwise. Otherwise, with a high degree of probability, the contacts will be damaged, and further actions will not make any sense. If you have difficulty understanding which way to pull the hard drive. Then, pay special attention to the same tape for dismantling the hard drive. Then we take out the battery. It should fit very comfortably directly into the palm, in the direction of its extraction. This will give you a hint about the right direction to remove it.
If you decide to replace your hard drive with a new one. To increase your memory, you should remember the following. If a more advanced, modern hard drive is installed, then it should have a memory capacity of no more than 20 - 30 GB and have a speed of 4200. Otherwise, there is a risk of failure of other slightly outdated parts that could still serve. Be careful when choosing more powerful hard drives. And we have already learned how to replace them ourselves. If the problem is easily fixable, then there is no point in spending money on the services of expensive repair specialists.
We take out the disk from the laptop
It is logical to say that different laptop models have cases designed differently. Therefore, it will not be possible to create the most universal instructions for disassembling a computer and removing a disk from it. However, all laptops are similar in one way or another.
- First, of course, you need to turn off the computer and wait until all components stop any activity.
- Then turn the laptop upside down.
- There will be several bolts on the cover that hold it in place. Unscrew them with a suitable screwdriver.
Some manufacturers (for example, Apple) use bolts that can only be unscrewed with a special star screwdriver. Please take this into account before starting work.
New laptops have this additional cover. Only replaceable components are hidden behind it. Usually we are talking about RAM memory and HDD drives
- Half the battle is done, now you need to get the disk itself. By the way, it looks like a massive plate with a piece of a microcircuit on the wall and a magnetic mechanism inside. Depending on the design and model, it may be held in the housing using several bolts or using plastic latches. The bolts must be unscrewed and the latch must be moved or removed.
There is a lot of space for additional disks, but we came to get them, not add them. Our goal is below right
- Then you need to carefully pull the disk out of the connector and put it aside so as not to bend or break anything.
You can see at least a few holes for the bolts, you will definitely notice them
That's all. As you can see, this is a fairly trivial procedure that does not require any special skills.
Removing a disk from an all-in-one PC is generally similar to removing a disk from a laptop. There will also be a separate cover for memory. It can also be removed by unscrewing the bolts, and the disk is placed in a similar mount. There is definitely no space for components, as in a standard system unit, in an all-in-one. That's why its insides are so similar to the structure of laptop components.
Preparing the hard drive for repair
The advantage of all laptops is the ease of access and replacement of all computer components, so even those who are not particularly “friendly” with technology can remove the hard drive and prepare it for repair.
This rule applies to replacing the hard drive. We will not give a plan for removing the HDD from a laptop; there is a sufficient amount of such information on the Internet and they differ depending on the laptop manufacturer. The greatest difficulties can arise in HP Pavilion laptops, where you need to remove the keyboard to get to the hard drive.
Note: Removing hard drive components, such as the circuit board or cover, yourself will void your computer's warranty.
We take out the disk from the system unit
It's almost the same story with the system unit.
- First, turn off the computer.
- Then press the red power button on the back of the computer.
Let's turn off the power to the computer for its safety and ours.
- We look for the bolts on the back and sides that hold the body assembled.
- Unscrew the bolts one by one.
- Then we move the cover to the side and remove it.
For some models, the lid may not move sideways, but only move up
- After this, carefully disconnect all the wires that are connected to the hard drive. Usually there is one cable going to the motherboard.
Removing the hard drive
The location of the hard drive is different for each model. Look carefully to see if other parts or functional components of the laptop are blocking access to the hard drive. If any are found during inspection, they should be unscrewed and removed as carefully as possible. Maybe they can even be simply moved to the side so as not to interfere, after first unscrewing them. After completing all the previous manipulations, the hero of the occasion, the memory drive, should appear in free access. But be careful, in earlier versions of laptops, it was also secured with bolts. Conduct an inspection to see if there are any. If they are, then unscrew them. After you have ensured that the hard drive is safely removed, proceed to dismantle it, so to speak.
In order to remove the hard drive from its grooves in which it is installed, you should pull the tape specially attached to it. It is located on the memory storage mount itself. One very important point should be noted when removing the hard drive. It cannot be pulled up or to the sides. And you should only remove it parallel to the computer itself, that is, pull the disk along the case and not otherwise. Otherwise, with a high degree of probability, the contacts will be damaged, and further actions will not make any sense. If you have difficulty understanding which way to pull the hard drive. Then, pay special attention to the same tape for dismantling the hard drive. Then we take out the battery. It should fit very comfortably directly into the palm, in the direction of its extraction. This will give you a hint about the right direction to remove it.
If you decide to replace your hard drive with a new one. To increase your memory, you should remember the following. If a more advanced, modern hard drive is installed, then it should have a memory capacity of no more than 20 - 30 GB and have a speed of 4200. Otherwise, there is a risk of failure of other slightly outdated parts that could still serve. Be careful when choosing more powerful hard drives. And we have already learned how to replace them ourselves. If the problem is easily fixable, then there is no point in spending money on the services of expensive repair specialists.
Remove Hard Drive from Computer
Let's get straight to the topic of the lesson.
Turn off the computer, unplug it and remove all cables from the back of the system unit. Now unscrew the two screws from the back and move the side cover to the side.
Let's give a brief description of each type of storage medium and then compare the advantages and disadvantages of each technology in a table. We start with hard drives, which are the traditional storage media on personal computers and laptops.
Update process, general idea
Hard drives have dishes inside them that spin at a certain speed and on which small needles write data. However, we emphasize that the 2.5-inch format is currently the most popular. At this point we want to give a general point of view, since every laptop and every manufacturer has a hard drive installed on a different site. This is why we cannot claim to be a universal guide, but to show the path of what we want to do.
We immediately pay attention to the lower right part of the system unit. The hard drive bays are located here. There we will see one or more hard drives.
This is what the disk looks like closer:
It already depends on the use that each of them will give to the equipment and the budget that should choose a unit with a larger capacity. The update process is simple. If you prefer to start from scratch, the recommended option is that you can start by installing the operating system and changing the unit directly.
This box will serve us later as a place to install the internal hard drive, turning it into an external hard drive and convertible. Be that as it may, you will have to prepare a screwdriver and be patient and order to remove all the screws, the cover and enter the hard drive bay.
We see that it is connected using two cables. First of all, we remove them. If the connector has a latch, then when removing the wire you need to press it and then pull it to the side.
For the next step we will need a Phillips screwdriver. We use it to unscrew two bolts on one side and two on the other.
Once the lid is lifted we will see the components and we will need to find the hard drive. As you can see in the following picture below, as indicated by the icon on the cover. There are also laptops with a bay attached to the hard drive. After this, we recommend that you relax, because the most difficult moment has passed. Now you just need to get started and enjoy your “new” laptop.
You will notice a difference in performance as soon as you start your computer, you will notice that you get to the desktop faster and programs open faster and everything feels more fluid. Who was going to tell you that with so little money you could get your laptop so good?
Previously, we did not remove the second side cover, so we are doing it now and unscrewing two more bolts.
Now we carefully take the hard drive and move it to the side until we pull it out of the compartment.
Test result, excellent performance improvement
Here we must make a cut to explain what we mean by action, as this may lead to misunderstanding. The improvement is mainly achieved by three factors. Startup and shutdown time Program and game loading time Copying files and installing software. We did some tests before and after the change and we will show them in a table to give you an idea of the improvement, we took the average between several rounded measurements and after the table you have the actual catches.
We have successfully removed the hard drive from the computer!
In order not to get confused when connecting the drive to the computer (we can connect a hard drive from a laptop), I recommend watching my video tutorial.
Hello, dear friends!
We quickly explained the concepts of the tests performed and show the data. The performance improvements are noticeable after the first boot and you will be surprised to see how your computer can run so freely by simply changing the hard drive and spending less than 100 euros.
Obviously, we all know that a clean installation from scratch makes our system thinner, but we assure you that the difference in the user experience is very terrible. The difference that the user perceives between before and after is “as if it were a different computer,” a much newer one.
Want to know how you can remove the hard drive from your laptop yourself? But, you are probably wondering “why”? Well, situations are different. For example, do you know how much it costs to install a new hard drive in your laptop? Moreover, you already bought the disk and brought it to the service along with the laptop and all that’s left is to install a new HDD instead of the old HDD? So, friends: for this procedure you will be charged the same as for a good computer repair! Question: are you ready to pay a lot of money to “Uncle Petya” for 30 minutes of his work? No? Then learn to change the hard drives in your laptops yourself: especially since it is very, very simple. (From the author: many users are terrified of poking their nose into the bowels of their laptops: like, “what if I break something there?! I’ll have to buy a new one.” But “to be afraid of wolves, it’s better not to bend down”: how can you learn something , if you shake with fear?). So, open the laptop and take out the hard drive!
Disassembling the HP external hard drive pocket
At first glance, a simple and convenient case with nothing superfluous.
As I already said, not seeing any cover or part that could be easily and effortlessly removed, I began to look for where the picks would catch. After turning it in my hands for a few minutes, I saw two slightly visible holes on the top of the case.
The place where we will start has been found. Having picked up the mediator (you can use a simple plastic card, but do not use screwdrivers or other metal objects, otherwise you will damage the case), we try to disconnect the fastenings.
By prying and passing along the entire length of the upper part of the body, the lid should lift slightly.
Having finished with the upper part in a similar way, we use a pick on both sides of the case, our external hard drive. You may need to apply some force in some places, but be careful not to overdo it or break the plastic latches.
Having removed the top part of the cover, all that remains is to remove the hard drive itself from the case and remove the rubber stands, which serve to ensure that the drive does not create unnecessary noise during operation.
In order to get the HDD, we simply lift it up. There are no more fastenings, so he can safely take it out.
This is how it should look disassembled. On the upper part of the case, which is on the right in the screenshot, you can see nine latches that held our case so tightly.
As I said earlier, the USB port is soldered onto the board itself, but there is no standard SATA.
As you understand, it was not possible to connect the drive and check it, so I had to send it for service. Also, I want to say that you should not unnecessarily disassemble your external hard drive from the company. In any case, even if you do everything carefully, after disassembly, small cracks and small scratches may appear on the case itself.
This is a small guide for disassembling external hard drives from HP. If something doesn't work out, leave a comment and I'll try to help you. Also, do not forget to subscribe to RSS or Email to follow updates on.
Disassembling the HP pd500a external hard drive
Our little Drone got his hands on a 1 TB hard drive from Western Digital (WD10EARS). There are already hundreds of hard drive tests on the Internet, but few people disassemble a hard drive down to the smallest screw. Let's take a look at our own copy?)
We were unable to unscrew the screws with a hex screwdriver, so we had to resort to brute force and... a power tool! In fact, I didn't have a suitable hexagon at hand.
The screws didn’t want to give up so easily without a fight...
And we managed to unscrew the last screw by bending the protective cover.
That didn't stop our little Drone!
There is a silicone (it looks like) seal along the edge of the top protective cover. It was glued very well and could not be torn off.
Here they are... hard drives with a mirror surface. Unfortunately, as soon as we removed the lid, the entire surface was covered with small dust particles...
The reading heads are located in a special holder in grooves. This placement prevents damage to the plates during transportation, as well as when the hard drive is simply turned off.
A very heavy hard drive...
Remove the board from the back of the hard drive. Between the hard drive and the back of the case there is a special sponge gasket that dampens vibrations.
The engine is controlled by 4 contacts, and the working heads are controlled by a whole contact group. The contacts interface is very thoughtful.
Motor control
Control contacts of working heads
PCB component base
This is apparently a hard drive cache memory made by hynix
Full payment
We notice the branding, manufactured by Foxconn!
Back view
The working head mechanism is located between two magnets. Apparently, the magnets are neodymium and have sufficient strength.
Coil of working heads. Using this coil, an electromagnetic field is generated, which allows the head mechanism to move in the magnetic field of static magnets.
Excellent engineering, beautiful shapes and lines... a perfectly polished surface.
Electronics of working heads. Look at the size of the contacts and the chip itself, imagine what the accuracy must be during the production process.
Coil power wires
Parking slots. Please note that a 1 TB hard drive uses only 2 disks and 4 working heads. The discs have an ordinary thickness, up to 3 mm. The recording density is very high. Damage to even the smallest section of a disk will result in the loss of tens or hundreds of megabytes of data.
Bottom magnet
The magnetic field is so strong that holding a magnet that is not screwed on can lift the entire hard drive.