Reason #1: Cache and cookie full
As you know, while browsing the Internet, the browser writes hundreds of temporary files to your hard drive. This helps speed up loading sites and “remember” what you did on different resources. However, if you do not periodically clear the memory, over time the program begins to slow down and work incorrectly, which sometimes leads to images not being displayed in the browser.
Solution:
It is necessary to delete cache files and cookies that have accumulated over time. To do this, open the history of visited pages (via the menu or the hot combination Ctrl+H), click the “Clear” button and select the appropriate items. Finally, it is recommended to restart the program.
How to solve the problem with images not displaying on web pages
The solution to the problem with displaying pictures depends on the reason that is causing the problem. In the most advanced cases, when no actions help, you may need to completely remove the browser and reinstall it.
Full cache and cookies
Full cache and cookie stores can have a detrimental effect on your overall browser experience. Therefore, it is recommended to periodically delete the contents of temporary files.
How to clear cache and cookies
For browsers based on the Chromium engine (Opera, Google Chrome, Yandex.Browser, Orbitum, etc.), the history is cleared in the same way:
- Press the key combination Ctrl+H, and then the “Clear history” button.
Press the key combination Ctrl+H, and then the “Clear history” button
Mark the required file types and click “Clear browsing history”
In the Mozilla Firefox browser, deleting the cache works a little differently:
- Open a new tab and click the gear icon in the upper right corner.
Go to settings by clicking on the gear icon in the upper right corner
On the “Privacy and Security” tab, click the “Delete history” button
Mark the data that needs to be cleared and click the “Delete Now” button
In the Microsoft Edge browser, clearing history follows the principle of Chromium browsers:
- Press the key combination Ctrl+H, then in the dialog box that opens, click “Clear log”.
Press the key combination Ctrl+H and the “Clear log” button
Select the required categories and click on the “Clear” button
In Internet Explorer, temporary files are deleted through the browser settings:
- In the upper right corner, click the gear icon and select “Internet Options” from the drop-down menu.
Select “Internet Options” in the settings menu
Go to the “General” tab and select delete browser history
Check the boxes for cache and cookies and click “Delete”
Clearing the DNS cache
Problems with DNS often arise after changing the provider or type of Internet connection. Although sometimes they can happen “out of the blue”, without any reason. Since cleaning literally takes place in one command, it is recommended to carry out this operation immediately if strange things occur in the operation of browsers.
- Press the Win+R key combination, enter ipconfig /flushdns in the window that opens and press the OK button.
In the command line, enter ipconfig /flushdns and click OK
Video: How to Clear DNS Cache
How to enable or disable Turbo mode in different browsers
The so-called “Turbo Mode” in browsers is nothing more than the provision of a VPN service from browser manufacturers. At the moment, only two browsers have such built-in functions - Opera and Yandex.Browser. At the same time, the acceleration of page loading is very conditional, however, the VPN service can both unblock the user’s access to pictures and block it if the site creator considers that using the ability to bypass blocking harms his resource. Therefore, using Turbo mode is a double-edged sword.
In the Opera browser, this mode is enabled as follows:
- Press the key combination Alt+P.
- Go to the “Browser” tab, then scroll down the settings and check the “Enable Opera Turbo” box.
In the “Browser” tab, check the box next to “Enable Opera Turbo”
In Yandex.Browser, this is done even easier: in the top panel, next to the “Collapse” button, click on the icon with three horizontal lines and select “Enable turbo” in the drop-down menu.
Click on the icon with three horizontal lines and select “Enable turbo” in the drop-down menu
VPN services can be installed for other browsers as extensions. However, you will need to choose between free and quality products.
Video: how to enable Turbo mode in Yandex Browser
Managing page element display exceptions
In addition to the above, browsers have a setting that allows you to disable some page components, for example, images. In addition, there is the possibility of exceptions, i.e., creating conditions like “Display everywhere except this site” or, conversely, “Disable images everywhere except this site.”
In the Opera browser, exceptions are handled as follows:
- Open the settings and go to the “Sites” tab. In the “Images” column about.
In the “Images” column of the “Sites” tab, set the switch to “Show all images”
Click “Manage exceptions” and configure the display of images on individual resources
Click on the exception and on the right click on the cross icon that appears
In the Google Chrome browser, the image exclusion settings are located slightly differently:
- In the upper right corner, click the icon with three vertical dots and select “Settings”.
In the upper right corner, click the icon with three vertical dots and select “Settings”
In the “Advanced” section, select “Content Settings”
Click on the link labeled “Pictures”
Switch the toggle switch next to “Show all” to the right
Images do not allow ad blockers to display
Images may be blocked by some browser internal features or extensions, such as ad blockers. These functions act as filters through which site traffic passes, and in the case where the image contains advertising and is added from another source, there is a high probability that it will be blocked.
To correctly display all site content, you will need to disable the blocker, but it is worth remembering that these utilities, in addition to removing advertising, protect against possible hidden threats that may be contained in the same pictures. Technologies have reached the point where even opening an image in a separate tab can lead to targeted installation of utilities on your computer that will put your personal data at risk. Not to mention virus infection. That is why I do not remove protection from browsers under any circumstances and advise doing this only in the most extreme cases.
In the Opera browser:
- In the settings, on the “Basic” tab, uncheck the “Block ads” option, then reload the page of interest.
In the “General” tab, uncheck the “Block ads” option, then restart the browser
In Google Chrome settings, disabling the blocker occurs in a similar way:
- Open “Content Settings”, as shown above, go to the “Advertising” section.
In the “Content Settings” menu, go to the “Advertising” section
To disable the utility, move the “Blocked on sites” toggle switch to the left
In the Yandex Browser settings, the ad blocking function is located in the settings, on the Settings tab. It is enough to uncheck the “Blocking inappropriate advertising” checkbox for the program to stop filtering content.
In the “Settings” tab, uncheck the “Blocking inappropriate advertising” option
There is no single setting in the Mozilla browser that controls advertising. This option is divided into two parts:
- in the settings, on the “Privacy and Security” tab, uncheck the “Block pop-up windows” option;
- in the “Protection” column, uncheck all the boxes.
Uncheck the “Block pop-up windows” box and the entire “Protection” column
How to reset your browser to factory settings
In addition to the settings described above, there is often a button inside the browser that allows you to reset all user changes. This was created in case a person accidentally disrupts the operation of the browser by setting incorrect settings and is unable to return them to their original position on their own.
In the Opera browser you need to do the following:
- Go to the settings, go to the “Browser” tab, and click the “Reset browser settings” button, then confirm by clicking “Reset” in the window that appears.
In the “Browser” tab, click the “Reset browser settings” button and confirm the changes
In Yandex.Browser, open “Advanced settings”, as shown in the example above, scroll to the bottom of the page and click “Reset settings”.
In the additional settings of Yandex.Browser, click “Reset settings”
In Chrome, settings are reset in a similar way: open additional settings, click “Restore default settings,” then click “Reset settings.”
In additional settings, click “Restore default settings”, then click “Reset settings”
For Internet Explorer, the reset function is also provided: in Internet properties, go to the “Advanced” tab, click “Restore advanced settings”, then “Reset”. We agree when the system prompts you to confirm the action, and restart the computer.
In IE settings, in the “Advanced” tab, click “Restore advanced settings”, and then “Reset”
Incorrect antivirus settings
In addition to the internal browser settings, there are also system settings that are regulated by the antivirus program. For example, standard Defender has scanned settings for downloaded content.
- Open the built-in Windows 10 antivirus and go to the “Application/Browser Management” tab.
- We move all the toggle switches from the “Block” position to “Turn off” so that Defender no longer interferes with the operation of programs.
In the “Application/Browser Management” tab, we move all the toggle switches from the “Block” position to “Turn off”
PC is infected with viruses
There is a small chance that the pictures are not displayed due to a virus infection on your computer. Direct interference by pest programs in the display of images on web pages is unlikely, but worms and Trojans can directly affect browsers, and this already entails a variety of consequences.
Viruses must be combated in a comprehensive manner, namely:
- Step-by-step use of checking two or three anti-virus programs from different manufacturers with up-to-date databases;
- restart the computer and repeat the search and treatment procedure.
What to do if nothing helps
If none of the above returns the browser to correctly display the content, the last option to correct the situation is to completely reinstall the browser, since there is a high probability that the program files have been damaged and are not working correctly.
- Right-click on the Windows icon and select the “Applications and Features” item.
Select "Applications and Features" from the Start menu
In the list of programs we find the browser that we want to uninstall, click on it and click “Delete” twice.
In Windows search, enter %appdata% and click on the best match
Select the folder with the name of the browser, press the key combination Shift+Delete and confirm the action in the window that appears
This completes the removal of the browser. Next, reboot the computer and install the browser on the system again. It is best to use the most current versions of the program, which have already corrected errors from previous versions.
Video: how to completely remove the browser from your computer
Restoring the display of images on web pages is very simple. You just need to follow the instructions to fix this problem, then the information in the browser will be presented correctly and consistently.
Scientists have long found out that information is perceived much better if text or speech is supported by images and illustrations. This helps the brain form an associative picture of the event. Therefore, the absence of images on web pages or their incorrect display can cause confusion in the perception of information. Moreover, the problem often lies directly in the browser.
Reason #2: Turbo mode
Almost all modern browsers have a special mode designed to speed up page loading at low Internet speeds. Depending on the settings, it may turn on automatically or require confirmation. In this mode, multimedia content is not loaded at all, including the content of sliders and videos, and sometimes because of this, images are not displayed in the browser.
Solution:
In web browsers that support this function, there is a “Turbo mode” icon in the status bar or right next to the address bar (for example, in Yandex.Browser it is a miniature spaceship). If the button is active, click and disable accelerated page loading.
Why don't images load in Yandex Browser?
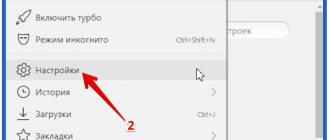
Why don't pictures load in the Yandex Browser? In the Yandex browser, click “Menu” in the upper right corner and go to “Settings”.
At the bottom of the list, click “Show advanced settings.”
Next, in the “Personal Data Protection” section, go to the “Content Settings” menu,
in the “Pictures” subsection, check the “Show all (recommended)” menu and click “OK” Fig. 5.
A larger number of network users give their preference to this particular browser due to the presence of a “Turbo” mode, which loads videos and pictures much faster.
Reason #3: Image display is disabled
It is also possible that the display of images is blocked in the program settings. In this case, the browser does not display images on all sites.
Solution:
Go to the advanced (additional) options of your web browser and find the “Content Settings” or “Content Settings” option. Check the box next to “Always show pictures”, apply the changes and restart the program.
Reason #4: Using the AdBlock extension
Despite the fact that ad blockers make life much easier, sometimes they lead to the content of sites being displayed incorrectly - for example, images are not displayed in the browser. Why is this happening? The fact is that such extensions hide code fragments typical for ad units, focusing on their databases. Sometimes, in addition to various advertisements, ordinary pictures also come under attack.
Solution:
Try disabling AdBlock and restarting your browser. If images appear, you need to change your settings or download an alternative ad blocking extension.
Images are not loading
It is quite difficult to immediately determine the reason for the white background in the place where the picture should be. Therefore, we use an integrated approach that will ensure our success.
For ease of understanding, we will divide the further narration into several logical blocks.
Make sure that the problem with missing images is only in Chrome. If this is relevant for several browsers, contact your Internet provider to clarify all the nuances.
Checking settings for sites
Although the display of images is enabled by default in Chrome, it will be useful to check whether this functionality is deactivated. For this:
- Open Google Chrome and go to system settings by clicking on the button in the upper right corner.
- Next, scroll the page to the “Advanced ” item, find the “Site settings” .
- Next, we move the cursor over the “Pictures” , a new window opens.
- Here we check whether the slider next to the item “Show all” .
- If not, then we do it (the indication should be blue).
- Save the changes and restart the browser.
Additionally, check whether the problematic site is included in the block list in the same settings. If yes, remove it from there.
If the system has not crashed and all settings are working as normal, we move on.
Checking in incognito mode
It’s worth checking whether the pictures are loaded in incognito mode (more details about the mode are described here). If the images load normally, go to the next step, if not, skip it and follow further instructions.
Cleaning up trash
Often problems with displaying pictures arise due to the banal overload of the system with garbage and temporary files. Therefore, the next item on our list is clearing your browsing history and cache. To do this, the following step-by-step instructions are provided:
- Open Chrome and click on the main button (ellipsis) in the upper right corner of the screen.
- Next, move the cursor to the “History” (or use the keyboard shortcut Ctrl + H).
- On the left side of the user window, select “Clear” .
- A system window consisting of several parts appears automatically. Here we select the time range for cleaning, the types of files to be deleted.
- We confirm the seriousness of our intentions with the appropriate button and wait for the procedure to complete.
After some time has passed, restart the browser and check whether the graphic material is displayed. If the result is still zero, then let's move on.
Unreliable extension
In some cases, the NoImages extension is placed in the body of the Chrome search engine, by the name of which you can understand what its main purpose is.
So, to solve a problem of this nature it is enough:
- Open the browser and click on the system button in the upper right corner of the screen.
- In the window that opens, hover the cursor over “Additional tools” and select “Extensions” .
- In the window that opens, look for the above add-on and click on the “Delete” after detection.
- We confirm the seriousness of our intentions and check that the images are displayed correctly.
In this simple way you can solve the problem with displaying graphic objects.
It would be a good idea to try disabling other extensions as well; perhaps they are blocking the loading of pictures. Go through and disable each installed extension one by one.
Enable JavaScript support
It would be a good idea to check if Java Script support is enabled in your browser. How to do this is described in detail in this article.
Reason #5: Antivirus settings
Everyone has probably encountered overly “paranoid” software. Most modern antiviruses monitor browser activity in order to promptly monitor and block potential threats. However, sometimes due to Internet traffic caching settings, content on sites partially stops being displayed.
Solution:
Go to the settings of your antivirus and set a lower level of protection, or disable caching. After that, restart the browser and see if the pictures appear.
Reason #6: Viruses
Although most often malware “clogs” your computer with intrusive advertising, sometimes the opposite happens and images are not displayed in the browser due to viruses. As a rule, errors and malfunctions in the rest of the system appear simultaneously, the computer slows down, does not want to open some files, etc.
Solution:
Full PC scan using antivirus programs. There are subtleties here. Firstly, it is best to scan in Windows Safe Mode - this way the antivirus can find more dangerous files. Secondly, in addition to checking with a standard antivirus (Kaspersky Anti-Virus, Avast, NOD32, etc.), it is recommended to install and use special scanner programs such as Dr.Web, McAfee and GridinSoft Anti-Malware.
How to solve the problem with images not displaying on web pages
The solution to the problem with displaying pictures depends on the reason that is causing the problem. In the most advanced cases, when no actions help, you may need to completely remove the browser and reinstall it.
Full cache and cookies
Full cache and cookie stores can have a detrimental effect on your overall browser experience. Therefore, it is recommended to periodically delete the contents of temporary files.
How to clear cache and cookies
For browsers based on the Chromium engine (Opera, Google Chrome, Yandex.Browser, Orbitum, etc.), the history is cleared in the same way:
- Press the key combination Ctrl+H, and then the “Clear history” button.
Press the key combination Ctrl+H, and then the “Clear history” button
Mark the required file types and click “Clear browsing history”
In the Mozilla Firefox browser, deleting the cache works a little differently:
- Open a new tab and click the gear icon in the upper right corner.
Go to settings by clicking on the gear icon in the upper right corner
On the “Privacy and Security” tab, click the “Delete history” button
Mark the data that needs to be cleared and click the “Delete Now” button
In the Microsoft Edge browser, clearing history follows the principle of Chromium browsers:
- Press the key combination Ctrl+H, then in the dialog box that opens, click “Clear log”.
Press the key combination Ctrl+H and the “Clear log” button
Select the required categories and click on the “Clear” button
In Internet Explorer, temporary files are deleted through the browser settings:
- In the upper right corner, click the gear icon and select “Internet Options” from the drop-down menu.
Select “Internet Options” in the settings menu
Go to the “General” tab and select delete browser history
Check the boxes for cache and cookies and click “Delete”
Clearing the DNS cache
Problems with DNS often arise after changing the provider or type of Internet connection. Although sometimes they can happen “out of the blue”, without any reason. Since cleaning literally takes place in one command, it is recommended to carry out this operation immediately if strange things occur in the operation of browsers.
- Press the Win+R key combination, enter ipconfig /flushdns in the window that opens and press the OK button.
In the command line, enter ipconfig /flushdns and click OK
Video: How to Clear DNS Cache
How to enable or disable Turbo mode in different browsers
The so-called “Turbo Mode” in browsers is nothing more than the provision of a VPN service from browser manufacturers. At the moment, only two browsers have such built-in functions - Opera and Yandex.Browser. At the same time, the acceleration of page loading is very conditional, however, the VPN service can both unblock the user’s access to pictures and block it if the site creator considers that using the ability to bypass blocking harms his resource. Therefore, using Turbo mode is a double-edged sword.
In the Opera browser, this mode is enabled as follows:
- Press the key combination Alt+P.
- Go to the “Browser” tab, then scroll down the settings and check the “Enable Opera Turbo” box.
In the “Browser” tab, check the box next to “Enable Opera Turbo”
In Yandex.Browser, this is done even easier: in the top panel, next to the “Collapse” button, click on the icon with three horizontal lines and select “Enable turbo” in the drop-down menu.
Click on the icon with three horizontal lines and select “Enable turbo” in the drop-down menu
VPN services can be installed for other browsers as extensions. However, you will need to choose between free and quality products.
Video: how to enable Turbo mode in Yandex Browser
Managing page element display exceptions
In addition to the above, browsers have a setting that allows you to disable some page components, for example, images. In addition, there is the possibility of exceptions, i.e., creating conditions like “Display everywhere except this site” or, conversely, “Disable images everywhere except this site.”
In the Opera browser, exceptions are handled as follows:
- Open the settings and go to the “Sites” tab. In the “Images” column about.
In the “Images” column of the “Sites” tab, set the switch to “Show all images”
Click “Manage exceptions” and configure the display of images on individual resources
Click on the exception and on the right click on the cross icon that appears
In the Google Chrome browser, the image exclusion settings are located slightly differently:
- In the upper right corner, click the icon with three vertical dots and select “Settings”.
In the upper right corner, click the icon with three vertical dots and select “Settings”
In the “Advanced” section, select “Content Settings”
Click on the link labeled “Pictures”
Switch the toggle switch next to “Show all” to the right
Images do not allow ad blockers to display
Images may be blocked by some browser internal features or extensions, such as ad blockers. These functions act as filters through which site traffic passes, and in the case where the image contains advertising and is added from another source, there is a high probability that it will be blocked.
To correctly display all site content, you will need to disable the blocker, but it is worth remembering that these utilities, in addition to removing advertising, protect against possible hidden threats that may be contained in the same pictures. Technologies have reached the point where even opening an image in a separate tab can lead to targeted installation of utilities on your computer that will put your personal data at risk. Not to mention virus infection. That is why I do not remove protection from browsers under any circumstances and advise doing this only in the most extreme cases.
In the Opera browser:
- In the settings, on the “Basic” tab, uncheck the “Block ads” option, then reload the page of interest.
In the “General” tab, uncheck the “Block ads” option, then restart the browser
In Google Chrome settings, disabling the blocker occurs in a similar way:
- Open “Content Settings”, as shown above, go to the “Advertising” section.
In the “Content Settings” menu, go to the “Advertising” section
To disable the utility, move the “Blocked on sites” toggle switch to the left
In the Yandex Browser settings, the ad blocking function is located in the settings, on the Settings tab. It is enough to uncheck the “Blocking inappropriate advertising” checkbox for the program to stop filtering content.
In the “Settings” tab, uncheck the “Blocking inappropriate advertising” option
There is no single setting in the Mozilla browser that controls advertising. This option is divided into two parts:
- in the settings, on the “Privacy and Security” tab, uncheck the “Block pop-up windows” option;
- in the “Protection” column, uncheck all the boxes.
Uncheck the “Block pop-up windows” box and the entire “Protection” column
How to reset your browser to factory settings
In addition to the settings described above, there is often a button inside the browser that allows you to reset all user changes. This was created in case a person accidentally disrupts the operation of the browser by setting incorrect settings and is unable to return them to their original position on their own.
In the Opera browser you need to do the following:
- Go to the settings, go to the “Browser” tab, and click the “Reset browser settings” button, then confirm by clicking “Reset” in the window that appears.
In the “Browser” tab, click the “Reset browser settings” button and confirm the changes
In Yandex.Browser, open “Advanced settings”, as shown in the example above, scroll to the bottom of the page and click “Reset settings”.
In the additional settings of Yandex.Browser, click “Reset settings”
In Chrome, settings are reset in a similar way: open additional settings, click “Restore default settings,” then click “Reset settings.”
In additional settings, click “Restore default settings”, then click “Reset settings”
For Internet Explorer, the reset function is also provided: in Internet properties, go to the “Advanced” tab, click “Restore advanced settings”, then “Reset”. We agree when the system prompts you to confirm the action, and restart the computer.
In IE settings, in the “Advanced” tab, click “Restore advanced settings”, and then “Reset”
Incorrect antivirus settings
In addition to the internal browser settings, there are also system settings that are regulated by the antivirus program. For example, standard Defender has scanned settings for downloaded content.
- Open the built-in Windows 10 antivirus and go to the “Application/Browser Management” tab.
- We move all the toggle switches from the “Block” position to “Turn off” so that Defender no longer interferes with the operation of programs.
In the “Application/Browser Management” tab, we move all the toggle switches from the “Block” position to “Turn off”
PC is infected with viruses
There is a small chance that the pictures are not displayed due to a virus infection on your computer. Direct interference by pest programs in the display of images on web pages is unlikely, but worms and Trojans can directly affect browsers, and this already entails a variety of consequences.
Viruses must be combated in a comprehensive manner, namely:
- Step-by-step use of checking two or three anti-virus programs from different manufacturers with up-to-date databases;
- restart the computer and repeat the search and treatment procedure.
What to do if nothing helps
If none of the above returns the browser to correctly display the content, the last option to correct the situation is to completely reinstall the browser, since there is a high probability that the program files have been damaged and are not working correctly.
- Right-click on the Windows icon and select the “Applications and Features” item.
Select "Applications and Features" from the Start menu
In the list of programs we find the browser that we want to uninstall, click on it and click “Delete” twice.
In Windows search, enter %appdata% and click on the best match
Select the folder with the name of the browser, press the key combination Shift+Delete and confirm the action in the window that appears
This completes the removal of the browser. Next, reboot the computer and install the browser on the system again. It is best to use the most current versions of the program, which have already corrected errors from previous versions.
Video: how to completely remove the browser from your computer
Restoring the display of images on web pages is very simple. You just need to follow the instructions to fix this problem, then the information in the browser will be presented correctly and consistently.
In this life hack we will tell you why images do not open in the Yandex browser
and
how to enable
them in settings.
First, let's look at why pictures are not displayed in the Yandex browser
.
Firstly, this may be due to updates that are released periodically. Secondly, installing third-party software may affect the settings. Thirdly, viruses and other malware. As we can see, there can be many reasons why pictures disappeared in the Yandex browser
(
do not load
) and they are not limited to those listed.
How to understand that the Yandex browser is not loading images, because there can be many other reasons, from trivial problems on the site itself to the same viruses. If the browser is to blame for this, then in the address bar, on the right you will see this icon. So what to do if the Yandex browser does not load pictures
?
What to do if nothing helps?
There are only 2 possible options here. The first is that you accidentally changed something in the browser configuration. If Mozilla does not display pictures for this reason, you need to enter “about:config” in the address bar and return to the standard configuration (“Reset” button). In addition, you can try to reinstall the browser, first erasing all data about the program.
However, these are already radical measures. If everything is fine with other sites, then most likely the problem is on the server side, and therefore you should just wait for the site owner to take action.
Separate image reload
In many browsers, the settings prohibit loading images for sites to speed up the loading of web pages.
Instead of reloading the page, you can turn on displaying images again:
- In Mozilla Firefox, to the left of the web page address, click on “Show information” and the arrow. Then select "More details". A window will appear in which the user will need to go to the “Permissions” tab and specify the “Allow” function in the “Upload images” column.
- In Google Chrome you need to perform similar actions. Launch Chrome and click on the “Site Information” icon next to the address. Next, follow the “Site Settings” link and in the tab that appears, find the “Pictures” section. Select "Show all".
- In the Opera web browser, actions are carried out differently. First click on “Menu”, “Settings”. Then go to the “Sites” section and in the “Images” item check the o.
- In Yandex Browser, proceed in the same way. First, open the website, click on the “Connection” icon next to the address. In the resulting frame, click “Details”. Find the “Pictures” item and select the “Default” option.
You can simply right-click and “Copy image URL”, then enter it into the address bar.