Hi all!
Today I want to share my experience with you.
Yesterday I agreed to talk with my mother and sister on Skype. Mom has now arrived in Moscow to visit my sister Rimma and her husband Kamil.
Rimma gave birth to her first child, a boy, two months ago. They named him Karim.
I have an idea: whoever guesses first why they named him Karim will receive a prize of 50 rubles for a WebMoney wmr wallet.
So. We called yesterday, and my Skype image is upside down!
It was not possible to fix this problem in a couple of minutes, so we decided that we could communicate this way
We talked - everything is great! But I couldn’t just leave it like that and decided to correct this BLOOP. Initially I thought that I would solve this problem in a couple of minutes, but in the end I spent more than an hour fiddling around.
So, in this article I will tell you how to flip the webcam image in Skype.
Settings in Skype itself
This is the simplest option. Even during a conversation on Skype, I tried to flip the image in exactly this way.
What do we have to do:
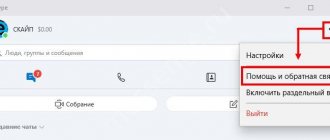
- Go to Tools then Settings
- Click on Video Settings
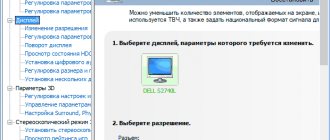
- You see the image from the web camera, it is upside down. Click on Webcam Settings
- Perhaps you have a parameter responsible for rotating the camera, but I don’t have one.
You might have better luck. And you, by checking one box, will solve the problem. But I was unlucky.
Experts on the Internet say that it depends on the webcam model or driver.
Maybe it's the camera settings
If after reinstalling the drivers the problem does not disappear, then it should be solved in a different way.
In the case where the camera transmits an inverted image, you can fix the problem by adjusting the settings. To do this, you need to perform the following manipulations:
- Go to the main menu of the program and open the “Tools” tab.
- Now go to the settings section. A window with various sections will open in front of you.
- Select the first tab “Basic”.
- A window will open with several types of settings.
- You need to select the “Video Settings” tab. A camera icon and two buttons will appear in front of you: “Change avatar”, “Webcam settings”.
- Open the camera settings tab.
- In the window that opens, click on the “Camera Control” tab. There will be a couple of sliders shown here, some of them can be moved up and down. This will allow you to change the settings you need.
- You need to find the slider with the inscription “U-turn”.
- If the icon is active, it will look bright, try moving it from side to side. This can be done using the right mouse button. If everything is done correctly, the camera image will rotate in parallel with the operation of the slider. When rotating the image to the correct position, leave the slider in the desired position.
- It is worth focusing attention on certain inscriptions: “Image mirror flip”, “Image vertical flip” - this is the mirror and vertical position of the “image”, which is shown by the computer camera. If necessary, you will need to put a mark or a tick opposite the desired inscription so that the image acquires its normal position.
- In the event that this slider is not in the active state, you need to look for another problem.
If everything is done correctly, then problems with an inverted image will disappear. If you cannot solve the problem yourself, contact a specialist and he will help you solve it.
Installing the driver from the official website
This option is also quite simple, but it requires a little more time and there are several nuances.
You first need to know the Pid for your camera. To find it out:
- go to device manager
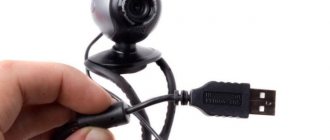
- right-click on your webcam
- go to the details tab
- There you can see this Pid. Remember it or write it down, or better yet, copy it
And one more thing: remove the old driver through the device manager.
Instructions:
For example, I have an ASUS laptop.
- I go to the official website of ASUS.
- I indicate my laptop model N50Vc
- I indicate the operating system (Windows 7, for some reason Windows 10 is not in the list)
- Opening the tab with drivers for the webcam
- I am looking for the required driver by Pid identifier (I use the keyboard shortcut Ctrl + F to search)
- I download it and install it
- Rebooting the computer
That's all. This will help someone, but it didn't help me...
Drivers
Very often, the reason for the appearance of an inverted image in Skype is the incompatibility of the installed drivers with the device, that is, the wrong drivers for the web camera were installed. This happens when:
- automatic installation of drivers along with the installation of the operating system (i.e. the drivers were included with the OS).
- The drivers were installed using a utility, the so-called driver pack.
To find out whether the drivers are to blame for the problem, you should understand the version of the driver installed on your computer. To do this, follow these steps:
- In the search bar “ Start
” you need to enter “
Device Manager
”, as a result a list will be displayed from which we launch the program of the same name. - In the window that appears, you need to find the web camera you are using. It is located in the " Imaging Devices
" section. - Right-click and open the Properties
. - In the Properties
, you need to open the
Driver
. As a result, you will be provided with information about the installed device driver. If your driver is from Microsoft and its release date is much behind the real one, then your driver cannot be called up-to-date and the reason for the inverted image lies precisely in this.
To fix it, you just need to update the drivers to more current versions for this device. You can find them on the official website of the manufacturer of your laptop or web camera.
Editing the registry (RegEdit)
This method is already more interesting, at least for me, because I don’t like to mess around in the registry and in general I’m not very good at it. But I found the instructions on YouTube, everything is simple and clear there.
You will need the RegEdit application. This is a standard application. You can run it either through the Run command or through search.
By the way, this is what I like about my Windows 10: through the search next to the “Start” button you can quickly find any application.
Here are the instructions:
- Let's go to the RegEdit application.
- Go to the Edit menu, then Search
- We are looking for the word Flip (we need to find the parameter autoflip, flip_horizontal, flip_vertical or something like that)
- Click on the found parameter
- Change the value from 1 to 0 or from 0 to 1
- Ready
But I could not change this parameter, an error was thrown. I don't know what the reason is. I ran RegEdit as an administrator. It didn’t work out, so let’s move on
Fixing the problem by changing Skype settings
If you are trying to solve the problem of correctly displaying the image of your webcam yourself, then try going into the Skype program settings and see if everything is configured correctly.
To do this you should:
Next, restart Skype or try restarting your computer and see if the changes take effect. If after this the image still does not display correctly or you have unchecked the checkboxes by default
, then you should pay attention to
another way
to solve the problem.
Editing a file with the .inf extension in the driver folder
I would call this method a hybrid of the previous two.
Here is his algorithm:
- download the driver from the official website
- unpack the archive
- find a file with the extension .inf in the folder and open it
- search for the word “flip”
- replace values from 1 to 0 or from 0 to 1
- save changes
- remove the old driver
- We install the new driver
- Reboot the computer
But that didn't help me either :-(
I had to turn to the last method, which I initially specifically tried to avoid.
Where to get a driver for a webcam
Usually all drivers are downloaded from the manufacturer's official website. You can also rummage through your drawers and look for the disk that came with the laptop with drivers.
While we have agreed to devote more time to ASUS laptops, let me show you where on the site and how you can quickly find drivers for the model you need.
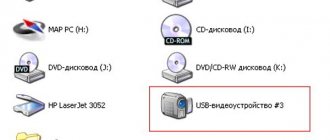
Follow the link https://www.asus.com/ru/support/. In the search box we enter the required model of our laptop:
Our laptop is in the database, go to the “Drivers and Utilities” tab and download the driver we need.
Also, if you don’t know where else you can find and install drivers for the operating system, so as not to create a bunch of text here, I’m adding a few videos for you, take a look, it will come in handy.
ManyCam program
I just downloaded this program on the Internet, I didn’t find any official website.
Readers, I remind you to be careful when downloading anything from the Internet. Be sure to use antiviruses with updated databases.
By the way, my Windows 10 did not trust this ManyCam program, I had to take responsibility and install it anyway.
Then everything is very simple:
- Launch ManyCam
- Rotate the video from the webcam the way you need
- Return to Skype in video settings
- Select the ManyCam virtual web camera from the list
- Ready!
This method helped me.
Now this miracle program hangs in my tray.
Flip camera using third party apps
If you still do not find the camera flip function either in the Skype settings or in the standard program for this camera, then you can install a special third-party application that has this function. One of the best programs in this area is ManyCam. Installing this application will not cause any difficulties for anyone, since it is standard for all similar programs and is intuitive.
After installation, launch the ManyCam application. At the bottom is the Rotate & Flip settings block. The very last button in this settings block is “Flip Vertical”. We click on it. As you can see, the image is upside down.
Now we return to the already familiar video settings in Skype. In the upper part of the window, opposite the inscription “Select a webcam,” select the ManyCam camera.
Now in Skype we have an inverted image.
Solution
So, your image in Skype is upside down. How can I fix the problem and get the camera to show you in the correct position?
When the camera is to blame
The root of the situation, as a rule, is an incorrectly working webcam driver. Most often this happens with built-in laptop cameras, but it also occurs with USB models.
We must pay tribute to the developers of cameras and software for them: they correct such errors in updates. However, if you installed drivers from dubious sources, you will have to correct the orientation of the image manually.
Even if the manufacturer no longer produces the webcam you have installed, the drivers should still be present on the site - for example, in the “Archive” section.
When Skype is to blame
If the instructions from the previous section did not help you, then you should look for the reason in the . Some editions of Skype Classic have their own image management tools.
Enter the "Tools"
, then to
“Settings”
and to
“Video Settings”
.
There, open the webcam menu. Let us note right away that the presence of the video rotation function depends on the device model. For many budget positions there is no such item. Sometimes the menu may only be available in English. In this case, you need to select the Flip Vertical
.
The Taiwanese manufacturer has the following question: “How to turn the camera on an ASUS laptop to its normal position?” This article will show you step by step how to solve this problem. Moreover, coping with this task is not particularly difficult, and even a novice user can do it.