What is GPT?
Before you try to figure out what to do with a GPT disk, you need to understand what it even is. So, GPT is a standard for placing partitions on a hard drive. This standard uses an interface called EFI, which was developed by Intel. EFI replaced BIOS.
So, as we found out, the system cannot work with GPT. Why then was another partition table created - GPT? It's actually simple. The fact is that GPT is more technologically advanced in the quality of its work. It allows you to create partitions that can reach 9.4 zettabytes in size, as opposed to MBR, which has a limit of 2.2 terabytes. However, this is where such obvious differences end.
Based on this, it still does not become clear why when trying to open a partition, as we have already found out, GPT, an annoying error appears?
Conversion with loss of data and hard disk structure
Converting inside Windows
If you convert from one layout style to another, then you need not the storage medium on which Windows is installed, but another one connected to the computer, while there is no need to save the structure and data of such a disk; this can be done in system disk management. Using the system search or the “ Run ” cmdlet, run: diskmgmt.msc .
We delete all partitions on the disk.
Next, call up the context menu on the disk and click “ Convert to MBR disk ” if it was originally with the GPT style.
Or " Convert to GPT " if the disk is originally MBR.
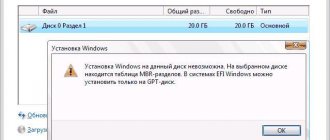
Windows cannot be installed on this disk.
Converting from one markup style to another may be necessary during the process of reinstalling Windows, when we encounter an error installing the system on a disk with a particular markup style. And it is formulated as:
- “The selected disk has a GPT partition style”;
- “The selected disk contains an MVR partition table.”
If the disk layout style is unimportant, but the data stored on non-system partitions is important, you can adjust the remaining nuances of Windows installation. In the first case, we need to set the UEFI mode in the BIOS, perhaps recreate the bootable USB flash drive so that it is a UEFI flash drive, and boot from it correctly. In the second, accordingly, set the BIOS Legacy mode and create a bootable Legacy flash drive. How to properly create UEFI and Legacy bootable flash drives, read here.
But if the layout style is of fundamental importance, and the structure and data on the disk are unimportant, then we simply delete the partitions. We delete it directly in the Windows installation location selection window.
Then we install Windows on the unallocated space.
The necessary partition styles will be generated automatically during the installation process: if BIOS UEFI is active, the disk will be initialized as GPT, if BIOS Legacy mode is active, as MBR.
What does it mean: protected by GPT?
We've learned a lot about partitions created using GPT technology, but it still doesn't make sense why they can't be opened. Now we’ll talk about this.
The fact is that EFI, and accordingly GPT, are relatively recent technologies, so modern operating systems work perfectly with them. If we go into details, then by modern we mean 64-bit systems. That is, if you use them, then there is no question of any “GPT-protected disk” error. But the problems start on 32-bit. By the way, this is why Windows XP users suffer from this problem, because the version of this operating system is only 32-bit.
As you might guess, in order to open access to hard drive partitions, you just need to format it by specifying a new partition table, or, to be more precise, an MBR. Further in the text, we will do just that - we will format it within the Windows XP operating system.
Setting up BIOS UEFI
The next time you start your computer, you must immediately enter the BIOS to set the UEFI operating mode. In the BIOS of the Asus motherboard, this is done as follows. In the main menu, press either the “Advanced settings” button or the F7 key.
By clicking “Ok” we confirm entering the advanced mode. Go to the “Download” tab, then select the “CSM” section (it must be enabled, that is, the value “Enabled” should appear opposite it). In the “Boot device parameters” column, set the value to “UEFI and Legacy UpROM” - a compatibility mode that allows booting in both UEFI and Legacy modes. Then use the “Back” button to exit the section settings.
If you are installing Windows 7 on your computer, you must also disable Secure Boot - go to the “Secure Boot” section and in the “OS Type” column set the value to “Other OS”. And go up a level with the “Back” button.
Next, go down to the “Boot priority” section and click the device list button.
In the list of boot devices, select the UEFI bootable USB flash drive.
We save the changes made to the BIOS: press the F10 key and select “Yes”.
In the BIOS of other motherboards, the settings will be different. But their essence will be the same as described for the Asus motherboard:
- Setting the UEFI operating mode (or compatibility mode, if supported, as in the example discussed);
- Disable secure boot for operating systems that do not comply with UEFI standard certificates;
- Setting boot priority from a UEFI flash drive;
- Saving settings.
How to open a GPT protected partition
Having understood the whole theory, you can proceed directly to explaining how to change GPT to MBR so that the hard drive can be opened within a 32-bit system. Looking ahead, let's say that there are two ways. The first involves using the command line, and therefore most people may not like it, because working in a graphical interface is much more convenient and clearer. That is why the second method is for such people. It already implies the use of a special program. But first things first.
Method 1: Format
Perhaps, this method of formatting a GPT disk is faster than the one that will go further in the text, but, as already mentioned, it does not involve the use of a graphical interface, which complicates the work of a simple user.
But let’s move on directly to the instructions, although before starting it it’s worth saying that if you have only one hard drive installed, then you won’t be able to execute it from under the system, but, logically speaking, you won’t even be able to install the system. That is why first burn a bootable USB flash drive with some Windows distribution, and then start the computer from it. After that do the following:
- Press SHIFT+F10 to bring up Command Prompt.
- Launch the diskpart utility by typing its name and pressing Enter.
- Check the list of disks by running the "disk list" command.
- Having found out the number of the one you need, select it by entering “select disk <disk number>”.
- Clean it by running "clean".
- Now you need to create a new partition on it. To do this, run the command “create partition primary”.
- Exit the diskpart utility by typing "exit" and pressing Enter.
- Close the Command Prompt by typing "exit" and pressing Enter.
After this, you can restart your computer and install a new operating system on it if you only have one hard drive.
Converting a disk from MBR to GPT
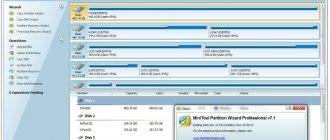
Having carried out all the steps listed above and prepared the necessary tools, launch AOMEI Partition Assistant. In our case, in the program window we will see two computer hard drives: one of them has already successfully completed the conversion procedure from MBR to GPT, and the other, an MBR disk, has yet to undergo it.
On the MBR disk, call up the context menu, select the “Convert to GPT disk” command, then in the confirmation window for starting the operation, click “OK”.
A software window will appear with advice before starting the operation to make sure that the motherboard supports the BIOS UEFI operating mode. This window also informs you that if the converted disk is bootable and has an operating system installed on it, the latter will no longer be able to boot after the operation is completed. That is why it is important to take the preparatory stage of the operation seriously and carry out all the actions recommended in the previous paragraph of the article. Click “Yes”.
At the top left of the window, click the “Apply” button.
Next, there will be a couple more steps before directly launching the conversion operation: in the window with a description of the actions to be launched, click “Go” at the bottom and confirm the start by clicking “Yes”.
Clicking “Yes” is the point of no return, the current Windows will no longer be able to boot as the hard drive will be converted to GPT upon completion of the operation. The completion of the operation will be notified by such a program window, in which the only possible action will be to click “Ok”.
Before clicking “Ok”, check whether the UEFI bootable USB flash drive with the Windows installation process is connected. After clicking “Ok” the computer will reboot.
Method 2: Convert using MiniTool Partition Wizard
As mentioned earlier, a protected GPT disk can also be fixed using programs that have a graphical interface. One of such programs is MiniTool Partition Wizard, which is what we will talk about now. This method is perfect if you have only one hard drive on which you cannot install Windows due to problems with GPT.
- Download the program on another computer and write it to a flash drive, thereby creating a bootable drive.
- Start your computer from the flash drive.
- The program interface will appear. In it, you need to detect and select the disk that needs to be converted to MBR. It is worth focusing on the fact that it is necessary to select the disk, and not its partition.
- Having done this, on the left side of the program, click on the item “Convert GPT Disk to MBR Disk”.
- On the top panel of the program, then click on the “Apply” button to confirm your actions.
The process of converting the partition table from GPT to MBR will start. After it is completed, you can restart your computer and install a new operating system on it.
How to convert GPT to MBR from Disk Management
Directly from the operating system, you can change GPT to MBR from the Disk Management snap-in. To do this, follow these step-by-step steps:
- Press the “Win” + “R” keyboard keys at the same time.
- In the “Run” window, in the “Open” field, enter the command: “diskmgmt.msc” (without quotes), click “OK”.
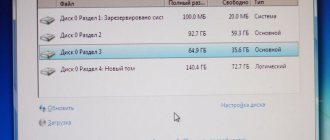
- In the “Disk Management” window, right-click on the disk name, in the place where the names of the local disks are located: “Disk 0”, “Disk 1”, etc.
- If there is data on the disk, the context menu item “Convert to MBR disk” will be inactive. To activate the conversion feature, you must delete data from the disk.
- Right-click on the disk location and select “Delete Volume...”.
- After cleaning the disk, click on the disk name and select “Convert to MBR disk.”
- Complete the necessary steps.
Once the GPT to MBR conversion is completed, you will have a hard drive that supports the Master Boot Record (MBR). Now you can install Windows of any capacity on this disk.
Method 3: Convert using Paragon Hard Disk Manager
If you have a problem with the second hard drive in a computer that does not have an operating system installed, then you don’t have to write the distribution image to a flash drive, but do everything directly within your system.
To do this, you will need to download and install a program called Paragon Hard Disk Manager. Having done this, you can begin converting the hard drive.
- Launch the program.
- Select a partition in it that has GPT markup.
- Right-click on it and select the “Convert from GPT to MBR” option from the menu that appears.
- Click the button to confirm your chosen actions and give your consent to make the change.
After this, the conversion process will start. In some cases, it may require you to restart your computer. In any case, in the end your disk will have the correct partitioning, and you will be able to use it without any problems. By the way, this way you can fix an external hard drive protected by GPT.
How to install Windows 10
We connect the bootable USB flash drive to the laptop and reboot, enter the BIOS, here we immediately disable UEFI and enable Legacy (I created a normal bootable flash drive with the Paragon program, not UEFI),
reboot and enter the laptop boot menu, select the flash drive with the Paragon Hard Disk Manager 15 program to boot
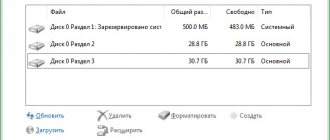
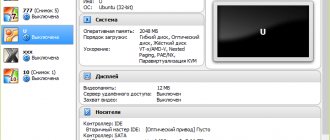
In the main program window we see the laptop’s hard drive, all partitions are visible, including hidden ones (the third hidden partition MSR 128 MB, required for GPT disks, is now visible). Click on the small arrow to display disks and partitions in a more convenient list.
To avoid creating an Additional partition with logical drives on your hard drive, we delete all hidden partitions on the laptop (you don’t have to delete anything at all, read the information at the end of the article), leaving only the partition with Windows 8.1 installed, to which the program assigned the letter (E:) ( the former C:) and the section with our files, to which the program assigned the letter (F:) (former D:).
Right-click on the first hidden section and select “Delete”
Check the box “Do not request a volume label next time” and click on the “Yes” button.
The first hidden section has been removed.
Right-click on the second hidden section and select “Delete”
Click on the “Yes” button.
“You are about to destroy the system partition. The system may not boot. Do you really want to perform the operation?"
Click “Yes”.
The second hidden section has been removed.
Right-click on the third hidden section and select “Delete”
Click on the “Yes” button.
“You are about to destroy the system partition. The system may not boot. Do you really want to perform the operation?"
Click “Yes”.
The third hidden section has been removed.
Right-click on the fourth hidden section and select “Delete”. This section contains the factory settings of the laptop.
"Yes"
It's time to convert GPT to MBR without losing data
.
Right-click on the laptop’s hard drive and select “Convert Basic GPT to Basic MBR Disk”.
Click “Convert”
"Yes"
Paragon Hard Disk Manager 15 works in deferred operation mode, click “Apply” and the program will begin to carry out all the operations we have specified.
GPT to MBR conversion without data loss completed successfully!
Create a hidden System Reserved partition (Reserved by the system, volume 300 MB) with Windows 8.1 download files and make it active
Friends, now all we have to do is create a hidden active System Reserved partition in the program (Reserved by the system, volume 300 MB) with Windows 8.1 download files. By the way, you can do this in the command line by booting from the Windows 8.1 installation disk, but in this article we are working with the Paragon Hard Disk Manager 15 program.
Right-click on the unallocated area of the hard drive and select “Create partition.”
The program shows the unallocated space from which we can create a partition.
We take the delimiter from the right edge and compress the unallocated space, creating a 300 MB partition at the very beginning of the hard drive. The file system is NTFS
.
Click “Yes”
Making the section active
.
Right-click on the newly created partition (F:) and select “Make partition active.”
“Are you sure you want to make this section active?”
"Yes"
Click “Apply”
Click “Yes” and the program starts working.
Close.
An active hidden System Reserved partition has been created on the laptop’s hard drive (Reserved by the system, volume 300 MB) and now we will copy the Windows 8.1 download files to it.
Creating a boot configuration for Windows 8.1
Boot from the Windows 8.1 installation flash drive.
In the initial system installation window, open the command line using the keyboard shortcut Shift+F10
.
Enter the following commands on the command line:
diskpart
lis vol (displays all partitions of the hard drive)
exit
We see that the recovery environment has assigned a drive letter (F:) to the partition with Windows 8.1 installed, so we enter the following command
bcdboot F:\Windows (create a boot configuration for Windows 8.1)
Reboot and enter Windows 8.1
Windows 8.1 booted fine on the MBR drive. Nothing happened with activation. All programs work.
Disk properties. The hard drive has a Master Boot Record (MBR).
Disk Management
You can connect the unallocated space to the drive (C:) and (D:) using the AOMEI Partition Assistant Standard Edition program, but I advise you to do this if you are determined to leave the hard drive in the MBR style. If you change your mind, you can convert the hard drive back from MBR to GPT, but we'll talk about that in the next article.
What will happen if, when converting a hard drive from GPT to MBR, you do not delete the hidden partitions of the laptop?
Halfway through the article, I noticed that when converting GPT to MBR, you don't have to delete hidden partitions on your laptop.
If you have more than four partitions on your laptop, then in this case, when converting from GPT to MBR, an Additional partition with logical drives will be created, in principle there is nothing wrong with that, you can work like that.
For those interested, read our next article on how to do the opposite and convert MBR to GPT without losing data!
Related article: How to convert a GPT hard drive to MBR with Windows 10 installed using the free AOMEI Partition Assistant program. At first glance, this is impossible, because in this case you need a professional version of the program - AOMEI Partition Assistant Professional