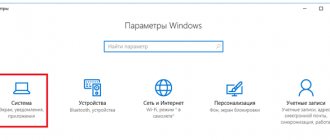
Let's see how to move the Documents, Downloads, Desktop folders to another computer drive in Windows using different methods. In the Windows operating system, system user folders are located on the drive on which the system is installed (usually the “C:” drive), and they are used to operate the computer.
Some system folders are hidden from the user by default. In a normal situation, the user has no need to access hidden folders, including for security purposes. Incorrect actions by an inexperienced user can cause Windows to malfunction, which will require you to perform a system restore.
Other system folders: “Documents” (My Documents), “Downloads”, “Desktop”, etc., on the contrary, are open because they are necessary for everyday use on the computer. These folders are located in the computer user profile. If there are several users on a PC, then each user has their own system user folders.
The Documents folder (My Documents) is used to store saved documents and files. Files of many programs are saved in this folder (browser profiles, settings and program files, etc.), unless a different location for saving data is selected in the settings of a particular application. Here, with default settings, computer games are saved.
The “Downloads” folder stores files downloaded from the Internet until the user transfers them to another location on his computer.
The “Desktop” folder is where work begins in the Windows operating system. Here the user performs everyday work: launches applications, accesses the Internet, etc., from here the computer is controlled, after going to the system settings.
When you need to move system folders to another disk or disk partition
The folders “Desktop, “Downloads,” “Documents,” “Images,” “Videos,” “Music,” etc., by default, are located on the system drive on which the Windows operating system is installed. In most cases, this is justified and convenient; this state of affairs often completely satisfies the user.
In some cases, it becomes necessary to transfer system folders to another computer drive. Possible reasons for moving user folders to another drive (disk partition):
- There is not enough space on the system disk.
- Saving important data in case of system reinstallation.
- The system is installed on an SSD disk (solid state drive).
Many users divide the disk into two or more partitions for convenient storage of information on the computer. Typically, the system partition of a hard drive is made relatively small in size compared to the partition for storing files.
If the user actively works with programs, saves certain data, or plays games on the computer, a large volume of files accumulates in the Documents folder. Over time, the space on the system disk becomes less and less, so user data must be moved to another location.
In the event of Windows failure, or exposure to viruses, the user will have to reinstall the operating system on the computer. No one is immune from problems caused by various reasons. In this case, the user will lose all of his data that is located in user folders (usually on the system drive “C:”). If this data were on another disk (disk partition), then it would not be lost.
Please note the following circumstance: after reinstalling Windows, the following folders will be created on the system disk: “Desktop”, “Documents”, “Downloads”, etc. Therefore, these folders will have to be moved again to another disk or disk partition.
Many computers (laptops) use a high-speed SSD drive on which the operating system is installed. On such computers, the hard drive (HDD) is used to store files. In addition to all its advantages, a solid-state drive has one weak point: an SSD drive has a limited data write/rewrite cycle.
If the user constantly works with programs or plays games, then a huge amount of new data is constantly written, overwritten and erased on the disk, which negatively affects the service life of the solid-state drive (SSD). You can correct the situation as follows: you need to move the system folders (Documents, Desktop, Downloads, Videos, Pictures, Music, etc.) to another drive (hard drive) of the computer.
In the article I will tell you how to move system folders in Windows (Windows 10, Windows 8.1, Windows 8, Windows 7) using the “Documents”, “Desktop” and “Downloads” folders as an example. We will look at 3 ways to transfer system folders to another local disk (volume): using folder properties, moving in Explorer, using registry changes in Registry Editor.
Method two - the “Scissors” program
This program is available in Windows 7, 8, 8.1, 10.
How to do
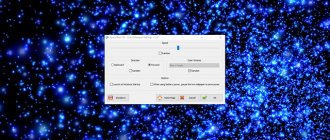
Click Start > All Programs > Accessories > Snipping Tool.
The program will start and a cross will appear instead of the mouse cursor. Select the desired portion of the screen.
The screenshot will be saved to the clipboard. Now you can paste it into a letter, photo editor or Word (press the “Ctrl” and “V” buttons simultaneously). You can also write or draw something on the screenshot (pencil and felt-tip pen icons).
How to save a screenshot as a separate file
Click on the floppy disk icon.
A window for saving will appear. Write a name for the file and select a location to save it. The file type is better to use JPEG.
How to transfer “Documents” to another drive (method 1)
First, let's see how to move the Documents folder to another drive using the first method. Other folders from the user profile are moved in the same way.
To transfer “Documents” to another computer drive, follow these steps:
- On another local drive on your computer (usually the “D:” drive), create a folder named “Documents”.
- If there are several users on the computer, first create folders with user names on another local drive, and then create folders in the user folders (Desktop, Documents, Downloads, etc.) to transfer system folders.
- If the newly created folder on another drive has a different name than the system name, the folder will still be renamed. This folder will be named after the corresponding system folder.
- Log in to your computer user profile using the following path:
C:\Users\User (C:\Users\Username)
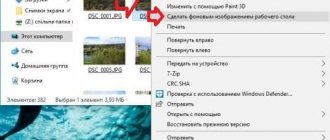
- Right-click on the “Documents” folder and click “Properties” in the context menu.
- In the “Properties: Documents” window, open the “Location” tab, click on the “Move...” button.
- In the Select Destination Folder window, select a folder. In our case, the “Documents” folder was created on drive “D”. Click on the "Select folder" button.
- The Documents folder properties window will open again. Here you will see the new location of the folder, on a different drive. Click on the "Apply" button.
- In the “Move Folder” window, agree to the new folder location and click on the “Yes” button.
- Wait until the files are copied. Open Explorer, go to another drive, there you will see the “Documents” system folder.
Log in to the user profile on the system drive (“C:”) to make sure that the “Documents” folder is no longer there.
Don't forget to change paths!
Now that all the main system folders for storing various types of information are on a new disk , each of them has acquired a new path . And if the “ Documents ” folder is automatically accepted by all applications and games to use the settings saved in it, then folders such as “ Downloads ”, “ Music ”, “ Images ”, etc., will have to be specified independently in the settings of the programs used. For example, if previously all files downloaded through the browser were saved in your “ C:\Users\Your name\Downloads ” folder, then you need to check whether the path has been updated. And if not, then change it yourself . How? Opera browser as an example .
- Open the browser.
- Click on the button with the letter “ O ” in the upper left corner, which is the button to open the control menu.
- Select the item “ Settings ”.
- When the settings tab opens, in the left column click “ Advanced - Browser ”.
- Now scroll down the list of settings to the “ Download ” section and click the “ Change ” button.
- Using “ Explorer ” we find a new download folder that is not located on the “C” drive and click “ Select folder ”. If the saving path is initially correct, then nothing needs to be changed.
The same settings are available in every program that is designed to download files from the Internet or create them, for example audio and video editors. Therefore, if necessary, change them in the sections related to loading or saving files . If you cannot find such settings in your application, then write about it in the comments .
How to move the desktop to another disk (method 2)
Let's look at how to move the Desktop to another disk in a different way. The “Desktop” folder is located in the user profile on the system drive. Many users store folders and files on their desktop that take up a lot of space; there is a possibility of losing this data if the system is reinstalled. Therefore, it makes sense to move the “Desktop” folder to another drive on your PC.
Now we will move the Desktop folder to another drive using Registry Editor:
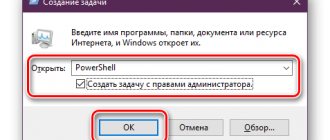
- Press the keyboard keys “Win” + “R”, in the “Run” window enter the command: “regedit” (without quotes).
- In the Registry Editor window, go to the following path:
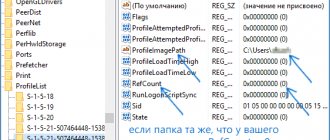
HKEY_CURRENT_USER\Software\Microsoft\Windows\CurrentVersion\Explorer\User Shell Folders
- Select the “Desktop” parameter in the registry branch (names of parameters related to folders, here in English), right-click on it, click “Change...”.
- In the "Change String Parameter" window, in the "Value" field, enter the path to another local drive, and then click the "OK" button.
- Close Registry Editor. Restart your computer.
After the reboot, the Desktop will be on another computer drive.
How to move “Downloads” to another drive (3rd method)
Now, let's see how to move the “Downloads” folder to another computer drive.
You may also be interested in:
- How to Move Windows Download Folder - 3 Methods
Moving the “Downloads” folder to another disk or disk partition is quite simple:
- Open an Explorer window and create a “Downloads” folder on another drive on your computer.
- In another Explorer window, go to the user profile on the system drive:
C:\Users\User (C:\Users\Username)
- Press the "Shift" key on your keyboard.
- Left-click and drag the “Downloads” folder into an open Explorer window onto another drive. Under the folder being moved, the message “Move to “Local Disk (D:)” will be displayed. In your case, the drive letter may be different. You can select multiple folders at once, and then move the selected folders using drag and drop.
After the file transfer process is completed, the “Download” folder will be on another local drive of the computer.
The first method is the “Print Screen” button
Any keyboard has a special button for taking screenshots. It is called "Print Screen", and sometimes "PrntScrn", "PrtScn", "PrtScr" or "PrtSc".
How to do
If you have a computer , click the "Print Screen" button.
If you have a laptop , press two buttons at the same time: “Print Screen” and “Fn”.
If you want to take a screenshot of only the active window (program) , press “Alt” and “Print Screen” on the computer at the same time; “Alt”, “Print Screen” and “Fn” - on a laptop.
The screenshot will be saved to the clipboard. Now you can paste it into a letter, photo editor or Word (press the “Ctrl” and “V” buttons simultaneously).
How to save a screenshot as a separate file
After taking a screenshot, click the Start button > All Programs > Accessories > Paint.
Press two buttons at the same time: “Ctrl” and “V”. Your screenshot will appear on the screen.
Press two buttons at the same time: “Ctrl” and “S”.
A window for saving will appear. Write a name for the file and select a location to save it. The file type is better to use JPEG.