Content:
- Preparing the disk for partitioning.
- How to partition a hard drive with Windows installed?
- Disk partitioning during a clean Windows installation.
- How to merge hard drive partitions?
Dividing your hard drive into different partitions is a convenient feature that most users use. This is due to the fact that just one HDD or SSD can be divided into two parts, one of which will be used to store files and operate the operating system ( system drive C ), and the second to store personal information, applications, games and other data (usually , this partition is called “Disk D” ). This separation improves the operation and performance of the system, and also allows you not to look for the necessary data among the whole mass of system folders necessary for the operation of Windows.
How to partition a disk during system installation
You can partition a physical disk with a clean installation of Windows 10. But then you will have to lose all the data. This option is suitable for those who bought a new computer or laptop and want to install the OS on it, or for those who have securely stored their files in another location. One way or another, let's proceed to the instructions for partitioning disks when installing the system.
- The Windows 10 installation process itself is discussed in detail in one of the articles on our website. We are specifically interested in the moment of working with disks. Once the installation reaches the desired stage, you will see the following window.
- Let's say we need to increase the size of the first partition and reduce the second. Our disks are called “2” and “3”, you may have other names. All of them are located on physical device “0”. Let's start partitioning the disk. Initially, you need to delete both partitions. To do this, select each of them in turn and click “Delete”.
- As a result, we should end up with unallocated space. Select it and click on the “Create” button.
- Specify the size of the new logical disk and click “Apply”. We set it to 40,000 MB, which is equal to 40 GB. You have the right to choose the volume you need - the figure given is only an example. For normal operation of Windows 10 you need to allocate 80 GB or more.
- The system will warn us that for proper operation it is necessary to create an additional partition. It will store drivers and other important Windows components. We agree and click “OK”.
- As a result, we received one system partition with a size of 500 MB, a disk for the system with the size that we specified (we have 40 GB), and unallocated space. This is what we will use to create a section for user data. Select free space and click on “Create”.
Preparing the disk for partitioning
To effectively divide a disk into partitions, you should prepare the drive, which involves defragmenting it. This function will allow you to compress the current disk as much as possible to free up space for a new volume.
To perform defragmentation , you must:
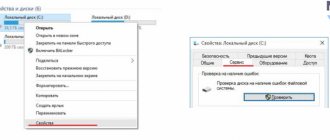
Step 1. Go to the “This PC” and right-click on the desired volume , then select “Properties” .
Step 2. In the menu that opens, go to the “Service” and click on the “Optimize” .
Once the disk optimization process is complete, you can begin creating new volumes and partitioning the disk. It is worth noting that to work with media, you must have administrator rights .
How to partition a hard drive with Windows installed
If the user's computer already has the Windows operating system installed, the process of dividing the hard drive into partitions can be performed directly from the running OS, without resorting to the use of third-party software.
To carry out the division , you must follow the steps:
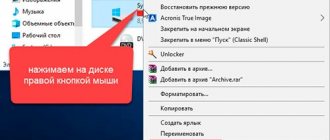
Step 1. Right- on the “Start” and select “Disk Management” .
Step 2. In the “Disk Management” , find the disk that needs to be divided and right . In the list of functions that opens, select “Compress volume...” .
Step 3. The system will begin to determine the possible volume for compression, after which a window will appear with compression parameters for the logical partition.
Partition HDD or SSD into partitions in Windows 10
Surely every person with at least a little knowledge of computers has asked this question.
In Windows 10, as in its predecessors, it is possible to partition the hard drive into parts of a certain size, that is, into partitions. For example, C and D, so that everyone understands.
In this article we will talk about how to make additional bays on the Hard Disk Driver in the Windows 10 operating system. We hope that everything works out for you!
What is all this for?
Before we start working on dividing the hard drive into volumes, let's figure out why this might even be needed?
Firstly, this is an excellent opportunity to separate all system files and user documents.
Doing this is quite useful, because, firstly, it will be more convenient to work, and secondly, when cleaning you are guaranteed not to delete any system files that support the stable operation of the computer.
Secondly, this can be done if you need to reinstall the operating system while saving some files.
Let's say you need to put a new ten, but you don't want to lose any photos, audio recordings or anything else. You can, of course, use physical media in the form of a flash drive or hard drive, but it will be easier, faster and more efficient to split the HDD into volumes.
Amount of memory and disk space required to install Windows 10
Hard disk division
What is recommended to do before starting work.
Before you begin, make sure that the volume that will be divided does not contain any unnecessary information.
Once the volume is cleared, run the defragmentation process (This is a required step).
Do not forget !
Without additional software you will not create more than four partitions. That is, in addition to the two existing ones (By default, C and D), you can have only two partitions.
Do you need additional partitions on the Hard disk driver?
Is it worth dividing the hdd into partitions? This question has been replete with computer forums for several years now, but there has never been a clear answer to it.
But, at the moment, most professionals believe that the fewer sections, the better.
Previously, in the days of previous operating systems, people believed that dividing into volumes speeds up the system as a whole, but later professionals realized that this process was simply useless. It does not speed up the OS in any way.
Its only advantage is the psychological convenience of the user.
Yes, it is usually more convenient for users to store personal information on another, separate volume. But we are in 2020, now it is easier to buy an additional HDD, or even an SSD, which will speed up the process of exchanging and processing information several times.
Using two HDDs or an HDD and an SSD (Solid State Drive) will most likely improve the overall performance of your computer. But two volumes on one HDD will most likely, on the contrary, worsen the situation with the speed of the computer.
These thoughts may convince some users to refuse to partition their hard drive, but if you are still determined to partition your hard drive, then below there will be step-by-step instructions that will most likely help you.
Limited features in non-licensed version of Windows 10
Begin!
To split your hard drive into several volumes, you do not need additional software. The Windows 10 operating system has built-in special tools that will allow you to complete this process in the best possible way.
To launch it, right-click on (1) Start menu.
In the small directory that appears, select item (2) “Disk Management”.
This program, as you can see, shows not only all the media that are currently connected to the computer, but also all the partitions or volumes that are created on each of them. This greatly simplifies the situation, because the tool becomes much easier to work with.
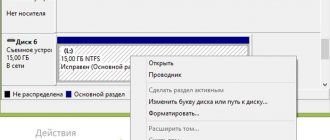
So, click (3) on the section you need with the right mouse button.
In the directory that appears, select item (4) “Compress volume”. After a few seconds, a window will pop up with item (5) “Size of compressed space MB”.
Lightweight free antivirus for Windows 10
In it, specify the size (in megabytes) of the new volume. The amount you specify will be subtracted from the large section you are currently working with (Which you clicked at the very beginning).
Remember that 1GB = 1024MB and 100GB = 102400MB.
After you have decided on the size of the future partition and entered the required number, click on the “Shrink” button (6). This means that you will reduce the size of the partition you are currently working with.
It will not be possible to shorten the section by more than the maximum value proposed by the system.
If you need a volume larger than what the Disk Management utility suggests, use some third-party programs offered on the Internet. We will look at one of them below.
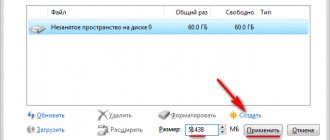
So, when the compression process is completed, some changes will occur in the structure of the disks. First, (7) “Unallocated space” will appear. It will be highlighted with a black stripe. This space can be used for one or more disks.
For this:
1.Click on it with the right mouse button (7)
List of the best free antiviruses for Windows 10
2.In the directory that appears, find and select item (8) “Create a simple volume”
3.Click (9) “next”
4.Specify the size of the created hard disk volume in megabytes (10)
5.Click “next” (11)
6.If desired, change the drive letter (12)
7.Click “next” (13)
8.Repeat step seven (14)
9.At the final stage of creating the partition, click (15) “Finish”
10.In Disk Management, check if a new volume has appeared (16). If yes, then the process is completed.
If after this process you still have unallocated space, you can create another partition. Or add this place to one of the existing ones.
To do this, right-click on volume D and, in the directory that appears, select “Extend volume”.
Keep in mind that using standard Windows 10 tools, only the partition on the left, next to the unallocated space, can be expanded.
To be able to expand any section, use a specific program. Read about it below.
List of the best free antiviruses for Windows 10
AOMEI Partition Assistant Standard
This free utility helps in cases where the operating system's factory tools do not cope with the task assigned to them.
Let's say Disk Management doesn't allow you to expand a certain partition because it's one partition away from the unallocated space.
With the help of the AOMEI Partition Assistant Standart utility we are considering, this problem can be resolved.
Let's look at the principle of its operation using a specific example.
Let's imagine that we need to add unallocated space to a partition that is located in the opposite corner from the "Unallocated" block.
So let's get started:
1.First of all, move the cursor to volume C and right-click
2.In the menu that appears, select “Merge Partitions”
Lightweight free antivirus for Windows 10
3. Check the boxes next to the blocks that you want to combine into one
4.Click "OK"
5.After the above points are completed, move on to the main thing. Click on the green “Apply” checkbox. If you are using the English version, the button will be called “Apply”. Clicking on it will apply all changes.
6.Then you will need to confirm the action using the “Go” button. If you are using a different version of the program, it will be called "Continue".
7.Check whether the process has produced results. If the volumes have merged, congratulations, everything was done correctly.
In addition to merging partitions, this utility allows you to split volumes, merge them, and perform various other operations on them.
Please note that the program will require a computer restart to complete some of the actions you request.
The program will execute them while the computer is rebooting, that is, in PreOS mode.
Thanks to this program, you will be able to perform a large number of actions that the Disk Management utility does not allow you to do.
Ps If you have any questions about using the program, feel free to contact technical support and contact the developer. Or search for information on the Internet to figure out the problem yourself.
Amount of memory and disk space required to install Windows 10
Conclusion
Drawing a line over everything said above, it becomes clear that all routine operations with disks in the Windows 10 operating system can be done without additional software. However, the built-in tools have the most meager range of capabilities, which is why programs similar to AOMEI Partition Assistant Standart are gaining more and more popularity.
We do not encourage you to use this particular utility; it serves only as an example for this article. Also, before dividing the Hard disk driver into partitions, think about whether you need to do this. We talked above about why this should not be done.
Consider purchasing an additional hard drive or solid state drive. This will not only help you store different information in different places, but will also significantly speed up the speed of information exchange and processing.
If you decide to share your hard drive, follow the instructions carefully so as not to do anything unnecessary. This may have a negative impact on the future performance of the computer.
We wish you good luck and all the best!
Up
Disk partitioning during a clean Windows installation
Disk partitioning can be done during a clean installation of the operating system. To do this, after the Windows activation window, select “Custom installation” , as shown in the screenshot.
After this, the disk settings window will be shown, where you can mark the HDD. The new media will have only one disk with unallocated space, from which several volumes can be created. If the disk has already been used, it may contain a different number of volumes. To return the disk to its current state, you must remove partitions , merging the disk into one whole unallocated space. Now select a disk with unallocated space and click on the “Create” .