⇡#Introduction
“Hackintosh” is an ironic name for Mac OS X, installed not on an Apple computer, but on a regular PC. This phenomenon became possible when the Cupertino company began migrating its machines from the PowerPC platform to x86 in 2005, and Macs began to be equipped with the same processors and Intel chipsets that are used in personal computers. Since its initial modest victories, the so-called OSx86 project has grown from a hobby of a few enthusiasts into a mass movement with a growing user base. Today, when Apple officially released a new version of its operating system, Lion, it’s time to tell everyone who doesn’t have a Mac, but has an interest in Mac OS X and a desire to experiment, about Hackintosh.
The first questions a person asks when he sees a Mac operating system on a PC: “Is it difficult to install?” and “Is everything working fine?” The answer to both is no. Installation has now been simplified to the extreme, so you can play with Mac OS X on almost any modern computer, but the full functionality is not available to everyone - for a fair share of users, hardware graphics acceleration will either not work, or the network, sound, or something else will fail. Hackintoshes also have big problems with sleep mode. All these difficulties can be overcome, but you will probably have to spend a few sleepless nights. In general, the situation completely copies what happened with desktop Linux distributions a few years ago. However, this is a very flattering comparison both for the hacker community and for Apple itself: given that no one has ever prepared Mac OS X to work with non-native hardware, everything could have been much worse. Yes, some hardware will never run under Mac OS, others will require dancing with a tambourine and a hare's foot. But at the same time, a huge fleet of components either works out of the box or starts after simple manipulations. And software for Mac OS in all cases installs and works exactly the same as on a real Mac. It turns out that he’s not so scary, this Hackintosh.
For those who are concerned about the legal side of the phenomenon: of course, Mac OS X can only be legally installed on an Apple-branded computer, and any other options violate the license agreement. It is also prohibited to modify OS components, not to mention using pirated distributions from “torrents”. However, Apple does not persecute the OSx86 community in any way (although it is suing companies that make money from Hackintoshes), and the means of protection against unauthorized use are in their infancy, and ways to overcome them have long been found. Mac OS X doesn't even require a license key or online activation. After all, hackintosh people advertise this OS for free and secretly dream of buying a real Mac. And the most devoted red-eyed experimenters, who fundamentally prefer Hackintosh, are still lost as potential buyers.
If there is no difference, then why pay more? Or is there?
So, if a small crime doesn’t bother you, and technical difficulties only cause healthy excitement, let’s try installing Mac OS X on a PC together. In this article we will describe two simple ways to install the previous, but still popular version of the OS, Snow Leopard (10.6), and one method for the new one, Lion (10.7). There is no point in installing Leopard (10.5), much less Tiger (10.4). If you like the result, then these instructions will become the starting point for mastering Hackintosh yourself. The last section provides links to popular OSx86 community resources where you can learn from other users' experiences and find solutions to specific problems.
how to install mac os on a regular pc
Thank you for the interesting question! Our IT outsourcing specialists will be happy to tell you about the features of the Mac OS operating system and how it can be installed on a regular PC. Historically, most people who would like to work with the Mac OS X operating system are exposed to a number of myths about both the operating system itself and the Macintoshes themselves. Before we talk directly about installation, let's dispel the most common myths.
1. Mac OS X can only be installed on computers with compatible processors and chipsets from Intel and video cards from NVidia, and most of the peripherals will not work.
Yes, it was once like this. But progress is an unstable thing in a good way. More and more new drivers are constantly being released, and the amount of hardware compatible with Mac OS X is constantly growing. Now Mac OS X can easily be installed on a computer whose processor only supports SSE2 (preferably SSE3), for example, AMD or Intel. Almost all new video cards support various types of hardware acceleration (GL, Quartz Extreme, Quartz 2d, Core Image, 2). That is, I think it is clear that too unaffordable demands will not be placed on your computer.
2. Installing Mac OS X is very difficult
In fact, everything is somewhat different. Installing Mac OS X is no more difficult than Windows if you choose the right texts and fixes.
3. Mac OS X will not be able to function on the same physical disk with Windows.
How could it? There are 2 options: - Windows bootloader + chain0 - Acronis OS Selector
So let's get down to business.
Step 1. Preparation.
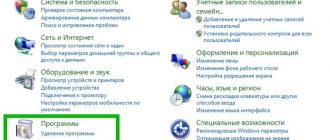
First, you need to check your computer to make sure it meets Mac OS X requirements.
The minimum requirement is to have a processor that supports SSE2. This matter can be determined using the CPU-Z program. It can be easily downloaded from the Internet.
RAM must be at least 256 MB and the more the better.
The video card should not be very ancient - AGP or PCI-E starting from GF4
Next we “check” ourselves.
You must clearly understand what and why you are going to do.
Be prepared for your first installation of Mac OS X to take 4-6 hours of your time.
Many people recommend downloading and burning Hiren's Boot CD. If there are partitions in NTFS format on the same disk where you are going to install Mac OS, then it will be better if you convert them to FAT32, since when creating a partition an error may occur and the file system will become unreadable. There is an alternative option - to transfer the data to another physical disk or even to a flash drive.
In general, print this text before installation to be sure that you have not forgotten anything.
Step 2. Download the installation disk image.
First of all, you need to decide on the version of Mac OS X: at the moment the latest is 10.5. Since our task is to familiarize ourselves with the system, it is advisable to install version 10.4.6 or 10.4.7, since they install with less difficulty. Then you can update the system using combo-update. Next, go to rutracker.org and write something like this in the search bar: Mac OS X 10.4.6. Find the installation disk image.
If the file is in ISO format, you can easily burn it to disk, but if it is in DMG format, you will also have to download the DMG2ISO program and convert the file to ISO.
Step 3. Burn the image to disk
To create a bootable disk, you will need a blank disk and Nero or Alcohol 120%. We think you can handle the recording process on your own. After burning, if you open the disk on a Windows computer and see that it is empty or contains only a couple of small documents, do not be alarmed, this is how it should be.
Step 4. Installation.
We insert the disk into the drive and reboot, naturally before setting boot from the optical drive as priority in the BIOS. When you see a message about starting installation from disk, press F8, or wait a couple of seconds and enter the “-v” parameter. If you do not do this, the graphical installation mode will start. Of course, this is beautiful, but we need text mode, since only in it can we see installation errors.
There are two most common mistakes:
“system config file '/com.apple.Boot.plist' not found” – the Mac OS X distribution turned out to be “crooked” and you will have to download another one;
“Still waiting for root device” – there is probably a problem with the hardware, possibly incompatibility.
If the preload went smoothly, you will see a blue display with a cursor in front of you. You will be prompted to select a language. Choose which one you like from those offered. Click on the arrow and a menu appears at the top. In it, select Utilities -> Disk Utility and format the partition in which we will install the operating system, of course in the Mac OS Extended journaled format.
It sometimes happens that Disk Utility cannot format or mount a partition. No problem - this can be done with Acronis. How exactly? We select manual mode for working with partitions in Acronis Disk Director Suite and create a FAT32 partition. Next, in the partition context menu, change the partition type to 0xAFh (Shag OS Swap). Acronis will worry that all data will be destroyed. We reassure him, since we don’t have any data there anyway. Apply and reboot.
After successful formatting, click “continue”. A license agreement will appear, after which we select the previously prepared partition for installation. Click “continue”. Click “Settings” (Customize) and select components to install. Particular attention should be paid to kexts and patches, namely, you need to install only those patches that are needed specifically for your system. You don't need anything extra. Under no circumstances install patches for SSE2 and SSE3 at the same time. You only need the one that suits your processor. Click “continue”. The preparation and verification of the disk will begin. Once the installation is complete, the computer will automatically reboot.
Step 5: Complete installation.
After a reboot, there are two possible outcomes - good and bad. If good, the system will boot normally (especially if you are using Acronis OS Selector). In the worst case scenario, you will see a b0 error message. In this case, we boot from Hiren's boot CD and, using Acronis Disk Director, make the partition with the freshly installed operating system active. Let's reboot.
The system will boot and prompt you to enter various information - dutifully enter everything except the Mac ID, leave it blank, otherwise the system may start to freeze.
If you did everything correctly, the desktop will load. Hooray!
⇡#Preparing Hackintosh
Actually, why can’t Mac OS X just work on a PC and how to overcome these obstacles? Reason number one is that in Macs, not the good old BIOS, but EFI is used as a layer between the OS and hardware firmware, and in order for Mac OS to start, EFI is emulated at the level of a special “hacker” bootloader (by the way , we owe this achievement to a Russian hacker under the nickname Netkas). The most popular and rapidly developing loader today is Chameleon and its derivatives, for example Chimera.
The second reason: Mac OS X has a kext (from kernel extension, remember this term) called Dont Steal Mac OS X. It is required to decrypt the applications that make up what looks like an operating system to the user (Dock, Finder, loginwindow, SystemUIServer and others), based on keys from the SMC chip, which is only available on real Macs. Well, if “there are no legs, then there are no cartoons.” The FakeSMC kext comes to the rescue, which successfully emulates an SMC Device, for which, again, thanks to Netkas. A special bootloader and FakeSMC.kext are all that is needed to boot Mac OS X, if the hardware of the computer is not very different from real Macs.
And this is precisely the third reason. There are no drivers for unsupported hardware under Mac OS X, or there are built-in drivers, but the system cannot use them because it does not recognize hardware with unfamiliar identifiers.
The hardware requirements for Hackintoshes are the same - you need a processor that supports SSE2 instructions, best of all - Intel Core 2 Duo and older. AMD users will have to replace the OS kernel with a “hacked” version, and as a result, there will be problems updating the system from the Apple server. The same applies to netbooks on the Atom platform. Support for AHCI mode on the part of the SATA controller is highly desirable. To install Mac OS X Lion you need 2 GB of RAM, for Snow Leopard one is enough. The first rule for selecting hardware: the more the computer resembles real Macs, the fewer problems. Second rule: the newest and most advanced devices may not work no matter how hard you try, because... hardware support depends primarily on the Mac OS itself (hardware drivers are not written for Hackintosh), and Apple is in no hurry. The site wiki.osx86project.org, which contains HLC (Hardware Compatibility Lists) for different versions of Mac OS X, will help you assess your chances of success.
For installation, it is best to use a separate drive with a SATA interface, and, out of harm’s way, turn off the Windows drive. If you are not afraid to conduct experiments on one HDD with a working operating system, then you will have to create a new partition on it using some disk utility (10 GB is enough for pure Mac OS X). Just keep in mind that during the installation process, the Hackintosh bootloader will be written to the HDD, and then you will only be able to get into Windows through it. There is no threat to your existing data, but a backup won’t hurt either. The disk must be connected to the south bridge port of the motherboard; the SATA controller in the BIOS must be set to AHCI mode. It is recommended to remove overclocking, remove all expansion cards except the graphics adapter in the top PCI-E slot, disconnect peripherals other than the keyboard and mouse, and reduce the RAM volume to 4 GB (if more is installed). If the installation with minimal functionality is successful, then all this can be returned step by step. Too many conditions? Then you can practice on cats, that is, in a virtual machine. There are even ready-made images for various hypervisors on the Internet, although using them will not bring you experience in creating Hackintosh.
We warn readers: although Hackintosh is a completely harmless entertainment that will not break your computer and is unlikely to spoil any data, all manipulations described in the article are done at your own peril and risk. In addition, you need to be familiar with the computer and know what the bootloader, OS kernel and hard drive partitioning scheme are. Well, when you master Hackintosh perfectly, do not agree under any circumstances if your friends ask you to install it on your PC, otherwise you, as an honest person, will have to get married in order to keep this miracle working.
Where to download Mac OS
The official version of the system can only be downloaded for Intel processors. For AMD you will have to use third-party assemblies.
Attention! Since there are no official versions of Mac OS for AMD, there is a high probability of downloading assemblies that are already initially infected with viruses.
The operating system for Intel processors can be downloaded from the official games and application store as follows:
- Go to the iTunes Store and log in.
- Go to the page with the OS and download the necessary .
- Wait for the download to finish .
What is Silent Installation and how to use it
After this, you can start creating a boot disk. It is worth remembering in advance where exactly the file was downloaded from the Mac OS.
⇡#Installing Snow Leopard from iATKOS 10.6.3 v2
The simplest and most universal option is to install Mac OS X with a specially modified distribution. Since the release of Snow Leopard, such hacker builds have given way to a more elegant solution - installation from a copy of a proprietary disk using a separate boot CD, and this is described below. But users of CPUs from AMD or Intel Atom cannot do without assembly, because... the original Mac OS X kernel (which our English-speaking friends call the vanilla kernel) only supports Intel processors with Core architecture and older, and the build allows you to immediately select the “patched” version during the installation process. And after you have entered the world of Hackintosh through assembly and gained some knowledge, you can create a clean installation, the components of which you have complete control over.
iATKOS 10.6.3 v2 is one of the latest builds released, and despite the rather old version of the OS (Snow Leopard has already been updated to 10.6.8), all the “hacker” software on it is quite modern. After downloading the image (we won’t tell you where from), write it to a disc. Boot from the iATKOS disk and wait until the “hacker” bootloader works and the OS starts.
This process takes several minutes, but if it suddenly takes longer than reasonable limits or displays an error message, it means that something went wrong.
In this case, you need to boot from the DVD again, but on the bootloader screen with the green chameleon, press F8, highlight the optical drive, enter “–x” from the keyboard and press Enter. This is the so-called safe mode, but if you have no luck with it, then you need to boot with the “–v” argument, which will allow you to observe the boot log. At the moment where the process is stuck or the phrase Kernel Panic appears, you can take a photo of the screen and then, in a calm environment, try to understand what is happening, using thematic sites, Google and advice from experienced “hackers”.
The appearance of a window with a choice of language indicates that the download was successful and your system is able to run Mac OS X. We recommend, if possible, choosing the Shakespeare language, since most instructions and problem analyzes on the Internet are written in it.
Scroll through the pages of the installer until the disk selection window appears.
Open the Utilities section in the menu and launch Disk Utility. If you have given a blank disk to Hackintosh, then using this program you need to “partition” it (the Partition tab). To install on a partition adjacent to Windows, the partition is simply formatted in the HFS+ file system (Erase tab). For reliability, it is better to choose the HFS+ Journaled option, and most users will not need the Case Sensitive option.
Once the HDD is prepared for installation, you can close Disk Utility and specify the partition in the installer window. And now the important point is the choice of drivers and settings that allow Mac OS X to fully work on your hardware. The list is opened by the Customize button. All users are advised to look into the Bootloader thread and select the Chameleon v2 RC5 option instead of the default option. Owners of AMD and Intel Atom processors must select a modified kernel in the Patches, Modified Kernels section.
You should not select any “drivers” for the graphics adapter in the Drivers, VGA section. It is better to check the box next to the Graphics Enabler option in the Bootloader Options section - in this case, the bootloader itself will try to activate hardware acceleration. Be that as it may, the OS almost always boots in 2D mode, and if the Graphics Enabler method does not work, then you can try your luck with separate “drivers”. By the way, these are not drivers, but only injectors that allow drivers built into Mac OS X to work with unfamiliar video cards, which is why they are put in quotes.
Select the appropriate package for your network card in the Drivers, Network section - there is a good collection there. For a laptop, the contents of the Drivers, Laptop Hardware section will be useful. You can take some driver for CPU power-saving functions from the Drivers, Main Hardware, CPU Power Management section. The “native” kernel extension called AppleIntelCPUPowerManagement.kext, which carries this function, is prudently blocked in the assembly, because it is only suitable for Intel processors, and even then not for all, and in case of errors it does not allow the system to boot.
Do not check Sleep Enabler in the Patches section - if you need sleep mode, then after updating the OS this extension will still have to be replaced.
The Language Translations section came to iATKOS from the official distribution and contains OS interface localization packages, including Russian.
It is advisable to write down a list of the options that you have chosen, in case the newly installed OS does not start and you have to look for the culprit. Once your selection is made, you can click OK and then Install. Go!
At the end of the installation, the computer will reboot. You can remove the iATKOS disk and boot from the hard drive that we've loaded Mac OS X onto. While the Chameleon boot loader is counting down the seconds until the OS starts by default, you can press any key and see a list of partitions that can boot from. If at first there was already Windows on the hard drive, then it starts from a service partition called System Reserved, or directly from its root partition, if the service partition is missing for some reason.
But we can't wait to see Mac OS, right? In this case, we just wait, and if the options were selected correctly during installation, a registration window will appear on the screen, and if the Graphics Enabler option worked, a welcome video will also be shown.
What to do if the operating system gets stuck at the loading stage or displays an error message? The first tip in this case is to boot up and view the log. To do this, you need to stop the bootloader while it counts down the time until the OS starts, select the partition with it, enter the “–v” argument and press Enter. Based on the messages on the screen, you can find the component causing the failure. Then you can try to boot into safe mode with the “-x” argument, and if this is successful, then it is likely that the problem is some kind of kext - a driver or device injector that you checked in the Customize menu of the installation disk, and it needs to be replaced. How to work with kexts is described in a special section of the article.
⇡#Installing Snow Leopard from a proprietary distribution
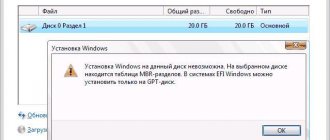
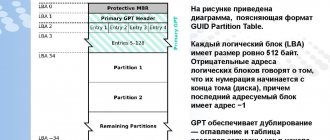
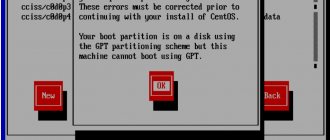
A “Hackintosh” can also be created using the “native” image of Snow Leopard, which you can even buy to ease your conscience. At the same time, all the software that makes Mac OS X compatible with PC is recorded on a separate disk. But this method is only suitable for owners of Intel CPUs, because... both the distribution disk and the copy of the OS that will be installed from it use the original kernel without AMD support. In addition, the unmodified Snow Leopard installer will not allow you to roll the system onto a hard drive partitioned using MBR, and only supports the GUID partitioning scheme. Therefore, the disk with the MBR will have to be repartitioned.
If Windows is already installed there and you are not ready to say goodbye to the most popular operating system forever, then there is a non-obvious solution: using Disk Utility, first partition the disk with a GUID, create its own partition for “windows” and install Windows, and then on the second partition - Snow Leopard. The key word here is Disk Utility. This program, which, as you already know, also runs from the Mac OS X installation disk, creates a hybrid partition with synchronized GUID and MBR. And the MBR is required to install Windows.
So, first we need an iBoot boot disk image and a MultiBeast driver package - the latest versions of both are posted on the website www.tonymacx86.com/viewforum.php?f=125 (registration is required to download). We burn the iBoot ISO image to a disc and boot from it. When a window appears asking you to select a partition to boot, you need to replace iBoot in the drive with the “native” distribution with Mac OS X, press F5, highlight the DVD and press Enter.
The further procedure is completely similar to what is written about assembling iATKOS, only in the Customize menu there are no “left-handed” drivers, but only standard Snow Leopard packages - interface localizations, fonts, etc.
But once the installation is complete, you won’t be able to boot directly from the hard drive, because... the copy of the OS is pristine and no different from what is on real Macs. Therefore, you need to boot from the iBoot disk again and select the partition with Snow Leopad.
If an error occurs, you already know what to do: boot with the “-v” argument and run diagnostics, then try to start the OS in safe mode with the “-x” argument. The tonymacx86 site also recommends the PCIRootUID=1 argument, which can be combined with "-x" and "-v".
If Mac OS X showed a registration window, then it’s time to accustom it to the PC. You need to launch MultiBeast from the archive that we downloaded in advance, and scroll through all the installer pages right down to the component selection menu. Here, all users must check the EasyBeast Install item - which specifies the installation of a minimum set of kexts. To enable support for specific hardware, you should look at the individual branches of the list and select the necessary extensions. At the end of the procedure, the computer will reboot and you can safely boot from the HDD.
In addition to kexts, the Chimera bootloader will be installed on the disk, and if Windows was previously installed, it is loaded by selecting the appropriate partition.
⇡#Installing Lion
Here's the tastiest thing - the latest version of Mac OS X. So far only Intel users can appreciate it. At the time of writing, Apple has not yet released the source code for the Lion kernel, which means there are no modified kernels. But most kexts written for Snow Leopard work with Lion.
To install Lion, we will need a working Snow Leopard version no lower than 10.6.6, a free partition on a 5 GB hard drive to accommodate the installer files, the Lion distribution (available for $29.99 in the App Store and you know where for free), xMove utility and the already familiar MultiBeast package.
The Install Mac OS X Lion program is launched directly from the running operating system, and as the partition for installation you need to select exactly the one from which Snow Leopard is running, which will not affect the OS in any way. Once the files are copied, you can agree to reboot and log back into Snow Leopard.
Now it's up to the xMove utility. Having launched it, you need to mark the empty partition that we prepared in advance for Lion, and xMove will transfer the files unpacked by the Install Mac OS X Lion program there. If Snow Leopard is installed using the iBoot + MultiBeast method, then just boot from the hard drive and select the partition with “Lion” in the Chimera bootloader menu. If iATKOS or another solution was used for installation, but the bootloader and kexts are also not the latest, then you will have to boot from the iBoot disk. The further procedure completely repeats the process of installing Snow Leopard from a proprietary distribution. Moreover, as a target, you can select a partition with an already running Mac OS X, and then it will be updated painlessly.
A collection of nuances/methods for solving errors
- When installing systems 10.13, 10.14, 10.15, the apfs.efi driver in the Drivers64UEFI folder is required. If it is missing, then after completing the first stage of installation, you will not be able to continue it - Clover will not see the disk with the system.
- Be sure to use text mode boot (the -v argument) until you are sure the system is working properly.
- It is better not to check boxes next to unknown parameters in Clover.
- The error I encountered is the following: when installing the hack itself on the hard drive, the system freezes with a few minutes left before completion. I struggled with this for a long time until I tried using an older version of Clover.
- It is not necessary to install a hack on an SSD; the system works very quickly on 7200 rpm regular hard drives.
With this, your humble servant takes his leave.
If there were any inaccuracies in the article, please write about it in the comments. Thank you! All information is presented for informational purposes only and does not encourage anyone to take action.
⇡#Installing and removing kexts
How can I remove a problematic driver, injector, or add support for devices that did not start after the initial installation? The storage for kexts (kernel extensions) in Mac OS X is the /System/Library/Extensions directory, and they are loaded from a single cache at /System/Library/Caches/com.apple.kext.caches/Startup/Extensions.mkext, where the OS puts only the necessary extensions. But modern Hackintosh loaders (already familiar to us Chameleon and Chimera) can load additional kexts from the /Extra/Extensions directory, and from them their own small cache /Extra/Extensions.mkext is formed. MultiBeast and iATKOS use exactly this scheme, only in the latter case the /Extra directory is hidden. Showing hidden files is enabled using a command in the terminal.
defaults write com.apple.finder AppleShowAllFiles TRUE killall Finder
To install many kexts, just copy them to /Extra/Extensions. But some will not be able to resolve dependencies (there are no necessary extensions in the /S/L/C/c/S/Extensions.mlext cache), and you will have to create a single cache of all “native” and “third-party” extensions in the /Extra directory. which the OS will not be able to remake. The following command does this:
sudo kextcache -m /Extra/Extensions.mkext - /System/Library/Extensions /Extra/Extensions
Before these files in /Extra/Extensions need to be assigned the necessary permissions. Teams:
sudo chown -R 0:0 /Extra/Extensions
sudo chmod -R 755 /Extra/Extensions
And one more nuance: if, even with the correct permissions, the kext is not included in the cache and is not loaded, you need to open it using the Show Package Contents option in the file’s context menu and view the Info.plist file in the Contents directory. This is an xml file, and at the end, before the closing tags, there should be the following entry:
OSBundleRequired
Root
Otherwise, it needs to be added or changed.
Things are a little different in Mac OS X 10.7. Lion uses a different cache format - prelinked kernel. By default, Chameleon does not read it and scans the entire contents of the /Extra/Extensions directory, which slows down loading. The only thing that can be done for now is to create a shared cache in the system directory /System/Library/Caches/com.apple.kext.caches/Startup. Team:
sudo kextcache -c /System/Library/Caches/com.apple.kext.caches/Startup/kernelcache -v -t -K /mach_kernel — /System/Library/Extensions /Extra/Extensions
And in order for the bootloader to pick up kernelcache, you need to use the “UseKernelCache=Yes” argument at startup. But unlike the contents of /Extra, this file is subject to the operating system, and from time to time it will update it, forgetting, of course, about our “hacker” extensions. A solution to the problem is to move the kexts from /Extra to the /System/Library/Extensions directory and give them the necessary permissions with the commands:
sudo chown -R 0:0 /System/Library/Extensions
sudo chmod -R 755 /System/Library/Extensions
⇡#OS update
Hackintosh can be updated from the Apple server using the built-in Software Update utility. But at the same time, you need to be prepared for the fact that after the update some kexts will stop working or start causing crashes and you will have to find a replacement for them. Fortunately, developers of popular extensions quickly respond to the release of new versions of Mac OS X. In addition, after the update, you need to rebuild the kext cache by first loading the system with the “-f” argument. Users of AMD processors should make sure that the latest version of the modified kernel is available before updating the OS, or you can leave the old one.
Creating a bootable USB flash drive
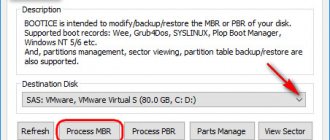
A utility that will allow us to format a flash drive (from 8 GB) and write a bootloader to it (something that will allow our system to boot) is called BootDiskUtility.
It is also good because it allows you to download the so-called “Recovery HD”, mini-images that allow you to restore the system if something bad happens. They weigh approximately 500MB, so when downloading from them, the system itself is downloaded from Apple servers. This method is only suitable for us if we have a native network card, which immediately starts itself. I have not encountered such cases, but you can search on the Internet to see which network cards do not require a separate factory. In any case, all Recovery HD can be downloaded by clicking on “DL Center” in the BDU main menu.
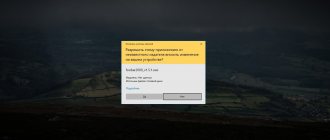
Download it from the official website: at random (be careful, there is a lot of advertising), connect our flash drive to the computer, select it in the list and click “Format Disk”.
Now our flash drive should be formatted and split into 2 sections. In the settings of this utility, you can select the size of the partition for Clover, its version and some other parameters. 200 MB and the latest version of the bootloader will be best. We also put drivers for the wifi adapter in the section with Clover. Kexts (from the Latin kernel extensions = kernel extensions) are unique drivers for MacOS that make things work that, in theory, should not work, for example, a sound card or network drive.
Next, download and put the following set of quests into the clover/kexts/other folder (we don’t count FakeSMC, it’s there initially):
- Lilu is a system process patch for other kexts.
- WhateverGreen is a graphics factory.
- USBInjectAll - USB factory.
- AppleALC - sound factory.
Other kexts are placed at your discretion.
A short list of other kexts and why they are needed:
- FakePCIID is a family of kexts that replace driver identifiers to ensure correct operation of hardware devices. On the machines that I used for Hackintosh, these kexts were not required, but if you install them, it won’t be any worse.
- HDMIAudio - for transmitting audio via HDMI.
- ACPIBatteryManager - fixes battery display in MacOS.
The last stage of preparing a flash drive is actually flashing the MacOS image onto it in a file in .hfs format. This is done as follows:
- Download the system image from here or here. My machine runs MacOS 10.14 Mojave, and I recommend using it if your processor is Sandy Bridge generation or newer. If not, 10.13 High Sierra is for you. It doesn't really matter where you get the image from, as long as it's in .hfs format.
- Open the BDU again, select the second (largest) partition of our flash drive, click “Restore partition”, in the window that opens click on our image and flash it.
- That's it, the flash drive is ready.
⇡#Setting up the bootloader
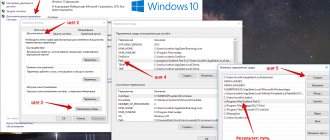
The operation of the Chameleon bootloader or its analogues is controlled by the file com.apple.boot.plist in the /Extra folder. It can be modified manually, but there is also a special GUI utility - Lizard, which can be downloaded from darwinx86.net/software/darwinx86_software.html. It is advisable to enter the screen resolution, loading arguments (for example, the aforementioned “UseKernelCache=Yes”) into the configuration, and for owners of “non-standard” processors the name of the modified kernel file. In iATKOS this is the custom file (look, it is in the root partition of the disk). Also check Graphics Injection if this option helped you enable 3D acceleration.
The 32bit Compatibility Mode option will force the kernel to boot in 32-bit mode, which may be necessary for some kexts. At the same time, support for large amounts of RAM is maintained, and applications can run in 64-bit mode regardless of the kernel. A similar command line argument is “-x32”.
The argument list may also contain special options for individual kexts.
The program automatically opens the file /Extra/com.apple.boot.plist, and if it is missing, it will create it when you try to save changes. This is exactly what will happen with iATKOS, because... This assembly by default stores the bootloader configuration in the system file of the same name /Library/Preferences/SystemConfiguration/com.apple.boot.plist. This is not correct, so it is best to clear the system file after creating the file in /Extra, leaving only those lines that are shown in the screenshot.
Another Lizard feature is editing the /Extra/SMBIOS.plist file. It contains information about the computer model and installed hardware and helps to present the computer as some kind of Macintosh in the System Information program.
⇡#Peripherals from Apple
A question that worries many people, but they don’t want to spend money on an experiment: do Mac devices like Apple Cinema Display, Magic Mouse and Magic Trackpad work with Hackintosh? So, the monitor is compatible with any video card equipped with DisplayPort (DP Mini or a full-format version of the port with an adapter is suitable), and both the light sensor and brightness adjustment in System Preferences work. The mouse and touchpad require a Bluetooth USB adapter - some work right out of the box without any additional kexts, and the connection process is again no different from that on real Macs.
⇡#Free swimming
Now that you know how to change kexts and configure the bootloader, the Hackintosh configuration is completely in your hands. After the initial installation of Mac OS X, there are probably some rough edges left: something either doesn’t work or works poorly. Knowledge from web resources dedicated to OSx86 will help you bring the system to life.
- www.insanelymac.com is a well structured forum with a friendly audience. There is a Russian-language section;
- wiki.osx86project.org - the above-mentioned encyclopedia with a database of compatible hardware;
- www.hackintosh.com - a site with installation guides and useful links;
- tonymacx86.blogspot.com - manuals and software for Hackintosh;
- www.projectosx.com - a forum similar to InsanelyMac, contains more in-depth technical information on some topics;
- www.kexts.com - a database of original and third-party kexts for Mac OS X.
Can I make a Hackintosh out of my laptop?
Those who don't take risks don't use Hackintosh. There is always a risk that you will lose all your important data if you install MacOS unsuccessfully, or install it “crookedly”, earning a bunch of bugs. The best approach is to first assemble a custom build for a PC or laptop from hardware that maximally imitates the architecture of the original Apple device. But you can try and simply install Mac OS on your PC or laptop if you are sure that it is powerful enough for this operating system.