10/23/2018 windows | data recovery | for beginners | programs
This guide describes step-by-step 5 ways to backup Windows 10, both using built-in tools and using free third-party programs. Plus how in the future, if problems arise, use the backup to restore Windows 10. See also: Backup Windows 10 drivers
The backup copy in this case is a complete image of Windows 10 with all currently installed programs, users, settings, etc. (i.e., these are not Windows 10 Restore Points, which contain only information about changes to system files). Thus, when using a backup to restore a computer or laptop, you get the state of the OS and programs that was at the time the copy was created.
What is it for? - primarily for quickly returning the system to a previously saved state if necessary. Restoring from a backup takes much less time than reinstalling Windows 10 and setting up the system and devices. In addition, it is easier for a novice user. It is recommended to create such system images immediately after a clean installation and initial setup (installation of device drivers) - this way the copy takes up less space, is created faster and used when necessary. You may also be interested in: Storing backup copies of files using Windows 10 File History.
How to backup Windows 10 using built-in OS tools
Windows 10 includes several options for creating system backups. The easiest to understand and use, yet fully functional method is to create a system image using the backup and restore functions of the Control Panel.
To find these features, you can go to the Windows 10 Control Panel (Start typing "Control Panel" in the search box on the taskbar. After opening the Control Panel, in the View box at the top right, set to "Icons") - File History, and then at the bottom left corner, select “System Image Backup”.
The next steps are quite simple.
- In the window that opens, on the left, click “Create a system image.”
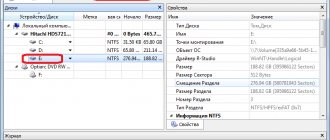
- Specify where you want to save the system image. This must be either a separate hard drive (external, separate physical HDD on the computer), or DVD drives, or a network folder.
- Specify which drives will be backed up. By default, the reserved and system partition (drive C) are always backed up.
- Click "Archive" and wait for the procedure to complete. On a clean system it does not take very long, within 20 minutes.
- Once complete, you will be prompted to create a system repair disk. If you don't have a flash drive or disk with Windows 10, and access to other computers with Windows 10 where you can quickly create one if necessary, I recommend creating such a disk. It will be useful in order to use the created backup copy of the system in the future.
That's all. You now have a Windows 10 backup to restore your system.
Macrium Reflect Free
The developer offers two versions of the program:
- free - minimal set of functions;
- paid - more advanced capabilities (incremental copying, that is, adding new data to a previously created copy, working on a local network, and others).
But even the capabilities of Macrium Reflect Free are quite wide:
- To get started, click Actions and select the first menu item Image this partition only....
To start creating a backup copy of Windows 10, you need to select the Image this partition only... item in the Actions menu
- In the Disk Image window, check the box next to the PC drive on which the system is installed. If you have a laptop, then it is recommended to add system-reserved space to the image.
- In the Folder field, specify the location where the duplicate data will be saved. If desired, you can check the CD/DVD Burner item to burn the image to a disc or flash drive.
- To use the program's advanced features, click Advanced Options in the lower left corner of the window.
In the Disk Image window, all the basic parameters for creating a system image are set
- It is recommended to check it for errors immediately after creating the image. To do this, in the left part of the Advanced Options window that opens, select Auto Verify Image, and in the right side, check the Verify image or backup file directly after creation box. after creation"). Click OK.
The Advanced Options window specifies additional parameters for creating a system image
- Everything is ready to create a duplicate of the system. Click the Finish button in the Disk Image window.
- Before copying, Macrium Reflect Free displays the Backup Save Options dialog box. It has two checkboxes: the first (Run this backup now) starts creating the image, and the second (Save backup and schedules as an XLM Backup Definition File) is responsible for creating an XML file that will allow you to perform backups in one click in the future. Click OK.
To quickly start creating a system backup in the future, leave the Save backup and schedules as an XML Backup Definition File checkbox
- Wait until the program finishes and click the Close button. Then close the program.
You need to wait until the system image is created
The only drawback of Macrium Reflect Free is the lack of a Russian interface. But even despite this, the program is intuitive and easy to use. The functionality of the free version is quite sufficient for home use, and reviews of Macrium Reflect Free are mostly positive.
When booting from WinPE, the partition letters are not shuffled, it has its own PE Explorer, so you can view the contents of partitions or run portable applications, Reboot or Shutdown button. The history of backups is kept logically and informatively. Images from Windows Explorer cannot be easily deleted; deletion is only possible through the interface of the program itself. Indeed a worthy product.
shadow_member
https://forum.ru-board.com/topic.cgi?forum=5&topic=49531
Video: Macrium Reflect Free for system backup and recovery
Restoring Windows 10 from a backup
Recovery takes place in the Windows 10 recovery environment, which can be accessed either from a working installed OS (in this case, you will need to be a system administrator), or from a recovery disk (pre-created using system tools. See Creating a Windows 10 recovery disk) or a bootable flash drive ( disk) with Windows 10. I will describe each option.
- From the working OS - go to Start - Settings. Select “Update and Security” - “Recovery and Security”. Then, under Special Boot Options, click the Restart Now button. If there is no such section (which is possible), there is a second option: log out and on the lock screen, press the power button at the bottom right. Then, while holding Shift, click Reboot.
- From a Windows 10 installation disk or flash drive - boot from this drive, for example, using the Boot Menu. In the next window after selecting the language, click “System Restore” at the bottom left.
- When you boot your computer or laptop from the recovery disk, the recovery environment immediately opens.
In the recovery environment, in order, select the following items: “Troubleshooting” - “Advanced options” - “System image recovery”.
If the system finds a system image on a connected hard drive or DVD, it will immediately offer to restore from it. You can also specify the system image manually.
At the second stage, depending on the configuration of the disks and partitions, you will or will not be prompted to select partitions on the disk that will be overwritten with data from the Windows 10 backup. Moreover, if you only made an image of drive C and have not changed the partition structure since then , you should not worry about the safety of data on D and other drives.
After confirming the system recovery operation from the image, the recovery process itself will begin. At the end, if everything went well, set the BIOS to boot from the computer’s hard drive (if changed), and boot into Windows 10 in the state in which it was saved in the backup copy.
Method 2: Creating an OS image using Windows
To backup data in Windows 10, in addition to the function described above, you can use the system image creation tool. This type of backup may be necessary when restoring data during and after eliminating critical errors in the operation of the OS and/or the impossibility of loading it, returning damaged and deleted important system files to their proper state, and in many other situations.
- Go to Windows Control Panel.
Read more: Opening Control Panel on a Windows 10 computer - Open the "Backup and Restore" section.
- Click “Create a system image” in the list of options on the left of the window that appears.
- By changing the position of the radio button and selecting an item in one of the available drop-down lists, determine “Where will the archive be stored?”, that is, the backup of the operating system that will be created next. Click "Next".
- If necessary, include data from local drives that are not system drives in the generated Windows 10 image. To do this, check the checkboxes located next to the storage names. When you have finished selecting what you want to back up, click Next.
- Everything is ready to create an image of the operating system; to start this procedure, click “Archive”.
- Wait for the OS backup to complete. During the procedure, you can continue to use the PC to solve other problems.
- Once the Windows 10 image has been created and saved in the location of your choice, a message will appear asking you to create a system repair disk. Although you will need this tool to deploy the OS backup obtained from the steps above, click “No” in the window that appears.
You can create a recovery disk later by following one of the instructions suggested in the following material:
Read more: Create a Windows 10 recovery disk
- At this point, the creation of an image of Windows 10 by means integrated into the OS itself is considered complete. Click “Close” in the window showing the “Archiving completed successfully” notification.
Creating a Windows 10 image using DISM.exe
Your system comes with the DISM command line utility by default, which allows you to both create an image of Windows 10 and restore from a backup. Also, as in the previous case, the result of the steps described below will be a complete copy of the OS and the contents of the system partition in its current state.
First of all, in order to make a backup using DISM.exe, you will need to boot into the Windows 10 recovery environment (how to do this is described in the previous section, in the description of the recovery process), but run not “System Image Restore”, but the item "Command line".
At the command prompt, enter the following commands in order (and do the following):
- diskpart
- list volume (as a result of executing this command, remember the letter of the system drive; in the recovery environment it may not be C; you can determine the desired disk by its size or disk label). There, pay attention to the drive letter where you will save the image.
- exit
- dism /Capture-Image /ImageFile:D:\Win10Image.wim /CaptureDir:E:\ /Name:”Windows 10”
In the above command, drive D: is the one where the system backup is saved with the name Win10Image.wim, and the system itself is located on drive E. After running the command, you will have to wait for a while until the backup is ready, as a result you will see a message about that “The operation was completed successfully.” You can now exit the recovery environment and continue using the OS.
How to run a system rollback
When the system is running
If your system is working, go to settings via Start, then click on the “Update and Security” shortcut,
Next, “Recovery”, and “Restart now”.
In addition, to enter “Advanced options” you can simply press Shift and “Restart computer”.
After reboot, click on “Troubleshooting”
go to “Advanced options” and “System image recovery”.
Then we show which disk you need to start recovery from.
Click “Next” and restore the system.
After recovery, the program will ask you to restart your computer.
When the system is not working
We start the computer by connecting the USB flash drive (don’t forget about it in the BIOS). Next, we go through the path as if the system was running.
As you can see, creating an OS image is quite simple. Let me remind you that it needs to be done after reinstalling Windows and preferably once every two or three months (more often if possible). Good luck!
Sincerely, Andrey Zimin 06/20/2018
Recovering from an image created with DISM.exe
Using the backup created in DISM.exe also happens in the Windows 10 Recovery Environment (in the command line). However, depending on the situation when you are faced with the need to restore the system, the actions may differ slightly. In all cases, the system partition of the disk will be pre-formatted (so take care of the safety of the data on it).
The first scenario is if the partition structure on the hard drive is preserved (there is drive C, a partition reserved by the system, and possibly other partitions). Run the following commands on the command line:
- diskpart
- list volume - after executing this command, pay attention to the letters of the partitions where the recovery image is stored, the “reserved” partition and its file system (NTFS or FAT32), the letter of the system partition.
- select volume N - in this command N is the volume number corresponding to the system partition.
- format fs=ntfs quick (the partition is being formatted).
- If there is reason to believe that the Windows 10 bootloader is damaged, then also run the commands under steps 6-8. If you just want to roll back a malfunctioning OS from a backup, you can skip these steps.
- select volume M - where M is the “reserved” volume number.
- format fs=FS quick - where FS is the current partition file system (FAT32 or NTFS).
- assign letter=Z (we assign the letter Z to the section, it will be needed later).
- exit
- dism /apply-image /imagefile:D:\Win10Image.wim /index:1 /ApplyDir:E:\ - in this command, the system image Win10Image.wim is located on partition D, and the system partition (where we restore the OS) is E.
After the backup is deployed to the system partition of the disk, provided there is no damage or changes to the bootloader (see point 5), you can simply exit the recovery environment and boot into the restored OS. If you followed steps 6 to 8, then additionally run the following commands:
- bcdboot E:\Windows /s Z: - Here E is the system partition and Z is the Reserved partition.
- diskpart
- select volume M (reserved volume number, which we learned earlier).
- remove letter=Z (remove the letter of the reserved partition).
- exit
We exit the recovery environment and restart the computer - Windows 10 should boot in the previously saved state. There is another option: you do not have a partition with a bootloader on the disk, in which case first create it using diskpart (about 300 MB in size, in FAT32 for UEFI and GPT, in NTFS for MBR and BIOS).
Using Dism++ to Backup and Restore
The steps described above for creating a backup copy can be performed easier: using the graphical interface in the free Dism++ program.
The steps will be as follows:
- In the main program window, select Tools - Advanced - System Backup.
- Specify the location to save the image. It is not necessary to change other parameters.
- Wait until the system image is saved (this may take a long time).
As a result, you will receive a .wim image of your system with all settings, users, and installed programs.
In the future, you can recover from it using the command line, as described above, or still using Dism++, but to do this you will have to load it from a flash drive (or in a recovery environment; in any case, the program should not be on the same disk whose contents are being restored) . This can be done like this:
- Create a bootable USB flash drive with Windows and copy the system image file and the folder with Dism++ to it.
- Boot from this flash drive and press Shift+F10, the command line will open. At the command line, enter the path to the Dism++ file.
- When you launch Dism++ from the recovery environment, a simplified version of the program window will be launched, where you just need to click “Recovery” and specify the path to the system image file.
- Please note that during recovery the contents of the system partition will be deleted.
Read more about the program, its capabilities and where to download: Setting up, cleaning and restoring Windows 10 in Dism++
What is a system backup image?
A Windows 10 backup is the best way to protect your system files and your personal information. The first thing you need to do after adding important information to your PC or reinstalling the OS is to create a working copy of user data and system settings . Windows 10 has a built-in backup utility that allows you to create and download a system image. (An OS image is a complete copy of the system disk, by default it is Drive “C”. That is, all personal files and programs installed only on the system disk will be saved in the image).
Before creating a backup!
If your hard drive is split into two or more, then copy the files you need to save to the system drive.
Macrium Reflect Free is another free program for creating system backups
I already wrote about Macrium Reflect in a separate article about transferring Windows 10 to an SSD in Macium Reflect Free - an excellent, free and relatively simple program for backup, creating images of hard drives and similar tasks. Supports the creation of incremental and differential backups, including automatically on a schedule.
You can recover from the image either using the program itself or a bootable flash drive or disk created in it, which is created in the menu item “Other Tasks” - “Create Rescue Media”. By default, the drive is created based on Windows 10, and the files for it are downloaded from the Internet (about 500 MB, while you are offered to download data during installation, and create such a drive at the first launch).
Macrium Reflect has a significant number of settings and options, but for basic Windows 10 backups for a novice user, the default settings are fine. Learn more about using Macrium Reflect and where to download the program in a separate instruction Backup Windows 10 to Macrium Reflect.
Backup: what is it and what is it for?
This is a kind of duplicate file. In the case of the operating system, saving Windows 10 for later recovery. The backup copy contains all installed programs, configured settings, and created accounts. The difference from recovery points is that the latter contain only system settings, and not all files.
Accordingly, backup copies are needed to save the Windows 10 OS along with system and third-party files. This is similar to a duplicate of regular programs: the user adds the software to the archive. The process is different, but the essence is similar.
Why do you need OS Windows 10 backups?
A backup is designed to restore the system in case of an error. All information is returned to the state at the time the files were loaded onto the drive. Using a duplicate of the “tens” takes much less time than a complete reinstallation, configuration, downloading drivers and other information. In addition, the process is much simpler.
Useful information: To make the backup copy take up less space, it is recommended to create a backup of the newly installed and configured OS. For important files, there are other methods: cloud storage, flash drives, disks, external hard drives and others.
Backup Windows 10 to Aomei Backupper Standard
Another option for creating system backups is the simple free program Aomei Backupper Standard. Its use will probably be the easiest option for many users. If you are interested in a more complex, but also more advanced free option, I recommend that you read the instructions: Backups using Veeam Agent For Microsoft Windows Free.
After launching the program, go to the “Backup” tab and select what type of backup you want to create. For the purposes of this instruction, this will be a system image - System Backup (an image of the partition with the bootloader and an image of the system partition of the disk are created).
Specify the name of the backup, as well as the location where the image will be saved (in Step 2) - this can be any folder, drive or network location. Also, if you wish, you can set the options in the “Backup Options” item, but for a novice user the default settings are completely suitable. Click the "Start Backup" button and wait until the system image creation procedure is completed.
You can later restore your computer to a saved state directly from the program interface, but it is better to first create a bootable disk or flash drive with Aomei Backupper, so that in case of problems starting the OS, you can boot from them and restore the system from the existing image. The creation of such a drive is carried out using the program item “Utilities” - “Create Bootable Media” (in this case, the drive can be created both based on WinPE and Linux).
When booting from a bootable USB or CD of Aomei Backupper Standard, you will see the usual program window. On the “Restore” tab, in the “Path” item, specify the path to the saved backup copy (if the location is not determined automatically), select it in the list and click “Next”.
Make sure that Windows 10 will be restored to the desired locations and click the “Start Restore” button to begin applying the system backup.
You can download Aomei Backupper Standard for free from the official page https://www.ubackup.com/ (The SmartScreen filter in Microsoft Edge for some reason blocks the program when loading. Virustotal.com does not show detection of anything malicious.) A similar program from another developer - EaseUS Todo Backup Free.
When is it necessary to create a copy?
It is better to archive the disk image with the installed operating system immediately after a clean installation of the OS and main drivers. If there is enough space to store copies, then you can back up data after each update, installation of applications and games.
This method has many advantages. Firstly, all information is securely stored in the archive and can be restored at any time. Secondly, this procedure is very simple and does not require special skills.
Now I suggest you move on to practice!
We use built-in Windows tools for data backup
- First, we need to open the backup tool. You can use the search function, as shown in the following screenshot:
But sometimes this does not work if the search has been disabled in the system. Then you should right-click (hereinafter referred to as RMB) on the “Start” button and select “Control Panel” from the menu.
- Among the many icons, we find “File History” and launch this utility.
- In the window that opens, click on the “Backup…” link, which is located at the bottom left:
I assure you, the instructions are very simple. If you do not delve into other items and settings, then going through all the steps will take you no more than 5 minutes. Time yourself!
- Now we proceed directly to creating a system image by clicking on the inscription with the appropriate name:
- At this stage you will need to specify the storage location for your image. I recommend using a flash drive of appropriate capacity or an external hard drive. To do this, select the very first option (as in the screenshot):
But, also, you can specify other locations for storing archives. If you select DVD, all data will be divided into 4.7 GB disks. Accordingly, the copying and recording process will take longer.
Alternatively, you can place backups in a network folder or even in the cloud, specifying the appropriate path to local storage, which will be synchronized with Dropbox, Google or ondrive (Microsoft server). Again, the speed of copying will depend on the characteristics of the network and other indicators.
I highly recommend using an external drive. As a last resort, choose a non-system hard drive partition, if available. But remember that if the storage device gets damaged, all backups will be lost.
- Now you need to specify what data will be reserved. If you don’t change anything, the C drive and some hidden data area will be archived. The approximate “weight” of the copy in gigabytes will also be calculated here.
- All that remains is to click on the treasured “Archive” button. The entire process can last from 5 minutes to 20 minutes.
I almost forgot to say that you will be offered to create a disk for subsequent recovery (if such a need arises). I have a separate article on this topic on my website. I advise you to read and get a “saving” flash drive that can be created at this stage.
- You won't believe it, but that's all. The backup is ready!
We were able to create it without any problems, but now it’s important to figure out how to use it.