BitLocker: what is BitLocker, why is this service needed
If you look at it, BitLocker is a universal and fully automated means of encrypting data stored on a hard drive. What is BitLocker on a hard drive? Yes, just a service that protects files and folders without user intervention by encrypting them and creating a special text key that provides access to documents.
When a user works in the system under his own account, he may not even realize that the data is encrypted, because the information is displayed in readable form, and access to files and folders is not blocked. In other words, such a protection tool is designed only for those situations when unauthorized access is made to the computer terminal, for example, when attempting to intervene from the outside (Internet attack).
Encrypt all drives
You must enable BitLocker on all storage drives, both internal and external. Simply repeat the steps above for each drive you have on your computer.
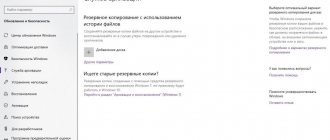
External storage devices include any USB drives, flash drives, SD cards, etc. We do not recommend using them because even after encryption, these devices run the risk of being stolen and unlocked. There is no guarantee that any such disk will not be accidentally decrypted or that you will remember the password or recovery key.
Disk encryption
On a note! Instead, consider using free and reliable cloud storage.
If you need an external drive to back up your files, then enable BitLocker. For convenience, you can set automatic unlocking when connecting to a specific computer. This way, you won't have to constantly enter your password to unlock the drive. However, always have either your password or recovery key with you. Therefore, save them in a safe place (for example, in your Microsoft account).
Passwords and cryptography issues
However, if we talk about what BitLocker is in Windows 7 or systems of a higher rank, it is worth noting the unpleasant fact that if they lose their login password, many users not only cannot log into the system, but also perform some browsing actions documents previously available for copying, moving, etc.
But that's not all. If you look at the question of what BitLocker Windows 8 or 10 is, then there are no significant differences, except that they have more advanced cryptography technology. The problem here is clearly different. The fact is that the service itself is capable of operating in two modes, storing decryption keys either on a hard drive or on a removable USB drive.
This suggests the simplest conclusion: if the key is saved on the hard drive, the user gets access to all the information stored on it without problems. But when the key is saved on a flash drive, the problem is much more serious. In principle, you can see an encrypted disk or partition, but you can’t read the information.
In addition, if we talk about what BitLocker is in Windows 10 or earlier systems, we cannot help but note the fact that the service is integrated into any type of right-click context menu, which is simply annoying for many users. But let’s not get ahead of ourselves, but consider all the main aspects related to the operation of this component and the advisability of its use or deactivation.
How BitLocker works
The reliability of BitLocker should not be judged by the reputation of AES. A popular encryption standard may not have obvious weaknesses, but its implementations in specific cryptographic products are often replete with them. Microsoft does not disclose the full code of BitLocker technology. It is only known that in different versions of Windows it was based on different schemes, and the changes were not commented on in any way. Moreover, in build 10586 of Windows 10 it simply disappeared, and two builds later it reappeared. However, first things first.
The first version of BitLocker used ciphertext block chaining (CBC) mode. Even then, its shortcomings were obvious: the ease of attacking a known text, weak resistance to attacks such as substitution, and so on. Therefore, Microsoft immediately decided to strengthen protection. Already in Vista, the Elephant Diffuser algorithm was added to the AES-CBC scheme, making it difficult to directly compare ciphertext blocks. With it, the same contents of two sectors gave completely different results after encryption with one key, which complicated the calculation of the overall pattern. However, the key itself was short by default - 128 bits. Through administrative policies it can be extended to 256 bits, but is it worth doing?
For users, after changing the key, nothing will change externally - neither the length of the entered passwords, nor the subjective speed of performing operations. Like most full-disk encryption systems, BitLocker uses multiple keys... and none of them are visible to users. Here's a schematic diagram of BitLocker.
- When BitLocker is activated, a master bit sequence is created using a pseudo-random number generator. This is the volume encryption key - FVEK (full volume encryption key). It is with this that the contents of each sector are now encrypted.
- In turn, FVEK is encrypted using another key - VMK (volume master key) - and is stored in encrypted form among the volume metadata.
- VMK itself is also encrypted, but in different ways at the user’s discretion.
- On new motherboards, the VMK key is encrypted by default using the SRK key (storage root key), which is stored in a separate crypto processor - a trusted platform module (TPM). The user does not have access to the TPM content, and it is unique to each computer.
- If there is no separate TPM chip on the board, then instead of SRK, a user-entered PIN code or an on-demand USB flash drive with key information pre-recorded on it is used to encrypt the VMK key.
- In addition to the TPM or flash drive, you can protect the VMK key with a password.
This general pattern of BitLocker operation has continued through subsequent releases of Windows up to the present day. However, BitLocker's key generation methods and encryption modes have changed. So, in October 2014, Microsoft quietly removed the additional Elephant Diffuser algorithm, leaving only the AES-CBC scheme with its known shortcomings. At first, no official statements were made about this. People were simply given a weakened encryption technology with the same name under the guise of an update. Vague explanations for this step followed after independent researchers noticed simplifications in BitLocker.
Formally, the abandonment of Elephant Diffuser was required to ensure Windows compliance with the requirements of the US Federal Information Processing Standards (FIPS), but one argument refutes this version: Vista and Windows 7, which used Elephant Diffuser, were sold without problems in America.
Another imaginary reason for abandoning the additional algorithm is the lack of hardware acceleration for Elephant Diffuser and the loss in speed when using it. However, in previous years, when processors were slower, the encryption speed was somehow satisfactory. And the same AES was widely used even before separate instruction sets and specialized chips appeared to accelerate it. Over time, it was possible to make hardware acceleration for Elephant Diffuser, or at least give customers a choice between speed and security.
Another, unofficial version looks more realistic. The "elephant" interfered with NSA employees who wanted to spend less effort decrypting the next disk, and Microsoft willingly cooperates with authorities even in cases where their requests are not entirely legal. Indirectly confirms the conspiracy theory is the fact that before Windows 8, when creating encryption keys in BitLocker, the pseudo-random number generator built into Windows was used. In many (if not all) releases of Windows, this was Dual_EC_DRBG - a “cryptographically strong PRNG” developed by the US National Security Agency and containing a number of inherent vulnerabilities.
Of course, secretly weakening the built-in encryption caused a powerful wave of criticism. Under her pressure, Microsoft rewrote BitLocker again, replacing the PRNG with CTR_DRBG in new releases of Windows. Additionally, in Windows 10 (starting with build 1511), the default encryption scheme is AES-XTS, which is immune to manipulation of ciphertext blocks. In the latest builds of the “tens”, other known shortcomings of BitLocker were also fixed, but the main problem still remained. It is so absurd that it makes other innovations meaningless. We are talking about the principles of key management.
Los Alamos principle
The task of decrypting BitLocker drives is also simplified by the fact that Microsoft is actively promoting an alternative method of restoring access to data through the Data Recovery Agent.
The point of the “Agent” is that it encrypts the encryption keys of all drives within the enterprise network with a single access key. Once you have it, you can decrypt any key, and therefore any disk used by the same company. Comfortable? Yes, especially for hacking. The idea of using one key for all locks has already been compromised many times, but it continues to be returned in one form or another for the sake of convenience. Here's how Ralph Layton wrote Richard Feynman's memories of one characteristic episode of his work on the Manhattan Project at the Los Alamos Laboratory: “... I opened three safes - and all three with the same combination. <…> I finished them all: I opened the safes with all the secrets of the atomic bomb - the technology for producing plutonium, a description of the purification process, information about how much material is needed, how the bomb works, how neutrons are obtained, how the bomb works, what its dimensions are - in a word, everything they knew about in Los Alamos, the whole kitchen!”
BitLocker is somewhat reminiscent of the safe design described in another fragment of the book You're Surely Joking, Mr. Feynman! The most impressive safe in a top-secret laboratory had the same vulnerability as a simple filing cabinet. “...This was a colonel, and he had a much more sophisticated, two-door safe with large handles that pulled four three-quarter-inch thick steel rods out of the frame. <...> I examined the back of one of the impressive bronze doors and discovered that the number dial was connected to a small lock that looked exactly like the lock on my Los Alamos closet. <…> It was obvious that the lever system depended on the same small rod that locked the filing cabinets. <…>. Pretending some kind of activity, I began to turn the dial at random. <…> Two minutes later - click! — the safe opened. <…> When the safe door or the top drawer of the filing cabinet is open, it is very easy to find the combination. This is exactly what I did when you read my report, just to demonstrate to you the danger.”
BitLocker crypto containers themselves are quite secure. If they bring you a flash drive that came from nowhere, encrypted with BitLocker To Go, then you are unlikely to decrypt it in an acceptable time. However, the real-life scenario of using encrypted drives and removable media is full of vulnerabilities that can be easily exploited to bypass BitLocker.
Method of encrypting disks and removable media
The strangest thing is that on different systems and their modifications, the BitLocker service can be in both active and passive mode by default. In the "seven" it is enabled by default; in the eighth and tenth versions, manual activation is sometimes required.
As for encryption, nothing particularly new has been invented here. As a rule, the same public key-based AES technology is used, which is most often used in corporate networks. Therefore, if your computer terminal with the appropriate operating system on board is connected to the local network, you can be sure that the applicable security and data protection policy implies the activation of this service. Without administrator rights (even if you start changing settings as an administrator), you will not be able to change anything.
Enable BitLocker if the service is disabled
Before addressing the issue related to BitLocker (how to disable the service, how to remove its commands from the context menu), let’s look at enabling and configuring, especially since the deactivation steps will need to be done in reverse order.
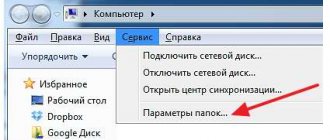
Enabling encryption in the simplest way is done from the “Control Panel” by selecting the disk encryption section. This method is applicable only if the key should not be saved to removable media.
If the locked device is a non-removable drive, you will have to find the answer to another question about the BitLocker service: how to disable this component on a flash drive? This is done quite simply.
Provided that the key is located on removable media, to decrypt disks and disk partitions, you first need to insert it into the appropriate port (connector), and then go to the security system section of the Control Panel. After that, we find the BitLocker encryption item, and then look at the drives and media on which the protection is installed. At the very bottom you will see a hyperlink to disable encryption, which you need to click on. If the key is recognized, the decryption process is activated. All that remains is to wait for its completion.
How to enable BitLocker if your computer does not have a TPM
To do this, follow these steps:
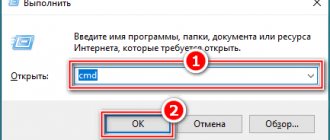
Step 1. To open the “Local Group Policy Editor” (not all versions of the system have it), use the key combination “Windows + R”. Type "gpedit.msc" and press Enter.
After pressing the “Windows + R” keys, enter “gpedit.msc” in the “Open” field and press “Enter”
Step 2: Under Computer Configuration, expand Administrative Templates.
In the “Computer Configuration” section, open “Administrative Templates”
Step 3: After that, expand “Windows Components”.
Double-click with the left mouse button on “Windows Components”
Step 4: Now open BitLocker Drive Encryption and select Operating System Drives.
Open “BitLocker Drive Encryption”, select “Operating System Drives”
Step 5 . On the right side, double-click on the option highlighted in the screenshot.
Double-click with the left mouse button on the parameter “This parameter allows you to configure the additional requirement”
Step 6: Select Enabled.
Step 7. Now check the box next to the appropriate option as in the screenshot below. Click OK.
Click on “Enabled”, check the “Allow BitLocker” option, click “Apply”, then “OK”
Step 8: Close the editor.
Video - Encrypting system drive C with BitLocker in Windows 10, activating TRM
Problems configuring ransomware components
As for the setup, you can’t do without a headache. Firstly, the system offers to reserve at least 1.5 GB for your needs. Secondly, you need to adjust the permissions of the NTFS file system, reduce the volume size, etc. To avoid doing such things, it is better to immediately disable this component, because most users simply do not need it. Even all those who have this service enabled in their default settings also do not always know what to do with it, or whether it is needed at all. But in vain. You can use it to protect data on your local computer even if you don’t have anti-virus software.
Potential vulnerabilities
You've probably noticed that you have to wait a long time when you activate BitLocker for the first time. This is not surprising - the process of sector-by-sector encryption can take several hours, because even reading all the blocks of a terabyte HDD is not possible faster. However, disabling BitLocker is almost instantaneous - how can that be?
The fact is that when disabled, BitLocker does not decrypt data. All sectors will remain encrypted with the FVEK key. Simply, access to this key will no longer be limited in any way. All checks will be disabled, and the VMK will remain recorded among the metadata in clear text. Every time you turn on the computer, the OS bootloader will read the VMK (without checking the TPM, asking for a key on a flash drive or a password), automatically decrypt FVEK with it, and then all files as they are accessed. For the user, everything will look like a complete lack of encryption, but the most attentive may notice a slight decrease in the performance of the disk subsystem. More precisely, there is no increase in speed after disabling encryption.
There is something else interesting about this scheme. Despite the name (full-disk encryption technology), some data still remains unencrypted when using BitLocker. The MBR and BS remain open (unless the disk was initialized in GPT), damaged sectors and metadata. An open bootloader gives room for imagination. Pseudo-bad sectors are convenient for hiding rootkits and other malware, and the metadata contains a lot of interesting things, including copies of keys. If BitLocker is active, then they will be encrypted (but weaker than FVEK encrypts the contents of sectors), and if deactivated, they will simply lie in the clear. These are all potential attack vectors. They are potential because, in addition to them, there are much simpler and more universal ones.
Recovery key
In addition to FVEK, VMK, and SRK, BitLocker uses another type of key that is created “just in case.”
These are recovery keys, which are another popular attack vector. Users are afraid of forgetting their password and losing access to the system, and Windows itself recommends that they make an emergency login. To do this, the BitLocker encryption wizard prompts you to create a recovery key at the last step. It is not possible to refuse its creation. You can only choose one of the key export options, each of which is very vulnerable. In the default settings, the key is exported as a simple text file with a recognizable name: “BitLocker Recovery Key #”, where the computer ID is written instead of # (yes, right in the file name!). The key itself looks like this.
Emergency login to BitLocker
If you forgot (or never knew) the password you set in BitLocker, then simply look for the file with the recovery key. Surely it will be saved among the current user’s documents or on his flash drive. Maybe it's even printed on a piece of paper, as Microsoft recommends. Just wait until your colleague goes on a break (forgetting to lock his computer, as always) and start searching.
Login with recovery key
To quickly locate a recovery key, it is convenient to limit the search by extension (txt), creation date (if you can imagine when BitLocker could have been turned on) and file size (1388 bytes if the file was not edited). Once you find the recovery key, copy it. With it, you can bypass standard authorization in BitLocker at any time. To do this, just press Esc and enter the recovery key. You will log in without any problems and can even change your BitLocker password to a custom one without specifying the old one! This is already reminiscent of tricks from the “Western Construction” section.
Changing your password without entering the current one
BitLocker: how to disable. First stage
Again, use the previously specified item in the “Control Panel”. Depending on the system modification, the names of the service disabling fields may change. The selected drive may have a line to suspend protection or a direct indication to disable BitLocker.
That's not the point. Here it is worth paying attention to the fact that you will need to completely disable updating the BIOS and boot files of the computer system. Otherwise, the decryption process may take quite a long time.
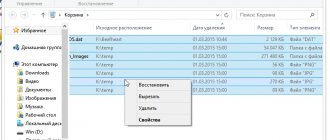
How to find a lost recovery key
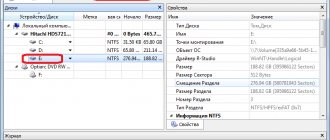
A recovery key is created the first time you use BitLocker for each selected drive. It provides access to hidden data. The key can also be used to unlock files and folders encrypted on a removable device (such as an external hard drive or USB drive) with BitLocker To Go if for some reason you forget the password or your computer can't access the drive.
The .BEK file can be stored on a flash drive or on a computer, in the place where we saved it when encrypting the disk
The Bitlocker recovery key looks like this (it is stored in a .BEK file named Bitlocker+Recovery+Key+4C2392DC-60A8-4B98-95AA-6A91D2191EB4.BEK).
Bitlocker recovery key
To ensure that the recovery key is correct, compare the beginning of the above identifier with the value of a similar one in the encrypted Bitlocker volume.
How/Where to find lost Bitlocker recovery key?
How you recover your lost key depends on your configured login settings:
1. If you are using a local account, then log in as an administrator.
2. Microsoft account users should check the following places:
- Microsoft account online. To get the recovery key, go to your account and get it from there;
- a saved copy of the recovery key. Perhaps you store it as a file, on a flash drive, or in paper form.
Context menu
This is just one side of the BitLocker coin. What BitLocker is is probably already clear. But the flip side is to isolate additional menus from the presence of links to this service in them.
To do this, let's look again at BitLocker. How to remove all links to a service from the context menu? Elementary! In Explorer, when you select the desired file or folder, use the service section and edit the corresponding context menu, go to the settings, then use the command settings and organize them.
Next, specify the “Control Panel” value, find the corresponding elements of panels and commands in the list, select the required command and simply delete it.
After this, in the registry editor, enter the HKCR branch, where we find the ROOTDirectoryShell section, expand it and delete the desired element by pressing the Del key or the delete command from the right-click menu. Actually, that's the last thing about the BitLocker component. How to disable it, I think, is already clear. But don't delude yourself. All the same, this service will work in the background (just in case), whether you want it or not.