Disable the Windows Update service ( #1 )
This method will work on all editions of the dozens.
The reliability of this method is not very high; the service responsible for updating turns on independently after some time. But in combination with other actions, this decision will definitely not be superfluous. The purpose of this method is to disable the Windows Update service (wuauserv), which is responsible for updating the system.
Changing the operation of the “Service”
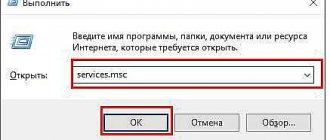
On the keyboard, press the key combination Win + R , the “ Run ” window will open, enter the command services.msc and click “ OK ”.
A window will open with a list of all installed system services. Find the line named “ Windows Update ”.
Double-click the left mouse button on the service.
In the service properties window, you need to make the following changes: Startup type – set the value to “ Disabled ” Status – click the “ Stop ” button so that the service status changes to “Stopped”
Click “ OK ”, the changes will be applied instantly, no restarting the computer is required.
That's all, the service is disabled Windows Update should not be downloaded/installed.
Important! After this method, the Windows event log will show warnings with error code 0x80070422, you can ignore them.
To return the
Windows Update to a working state, you need to change the Startup type Automatic ” and click the “ Run ” button.
On the Internet, many authors call this method a 100% option to disable updates, but I would not say so boldly about it. I often hear from users of this method that the service can turn on itself after a few days.
The trick with the bat file
To really protect yourself, you can do a clever trick. Let's create a bat file with the following content:
::Change the service startup type to “Disabled” sc config “wuauserv” start= disabled :: Stop the service net stop wuauserv exit
We place this file through
the task scheduler , running in hidden mode, for example, every 10 minutes.
If the service is quietly started, no later than 10 minutes later, our task will stop it. I won’t reload the article with information on how to create a task in the scheduler. Soon I will prepare a separate article, which describes in detail all the stages of preparing such tasks for automating processes.
Along with disabling the service, we recommend that you additionally configure the operating system using other methods from this article.
How to disable automatic updates in Windows 10 (1 method)
Windows 10 tools automatically detect, download and install updates on your computer.
On Win 10, you can disable updates in a way that disables the Windows Update service. This method works on all versions of Windows 10 and ensures that Windows updates are disabled forever.
Enter Administrative Tools from the Control Panel, or an easier way: in the Windows Search field, enter the expression: “administration” (without quotes), and then open the Administrative Tools window.
In the “Administration” window, double-right-click on the “Services” shortcut.
In the “Services” window that opens, in the “Services (Local)” section, find the Windows Update service.
Next, right-click on the Windows Update service, and select “Properties” from the drop-down context menu.
In the “Properties: Windows Update (Local Computer)” window, in the “General” tab, change the “Startup type” setting to “Disabled”.
In the “Status” setting, click on the “Stop” button to stop the Windows 10 update service.
After this, Windows 10 updates will stop coming to your computer.
To enable automatic updates, in the Properties: Windows Update (Local Computer) window, select your preferred startup type: Automatic (Delayed Start), Automatic, or Manual.
Disabling updates using Group Policy ( #2 )
This method will only work on Windows 10 Pro (Professional) or Enterprise editions; this method does not work on the Home edition.
Launch the Local Group Policy Editor .
On the keyboard, press the Win + R in the “ Run ” window, enter the command gpedit.msc and click “ OK ”.
In the “ Local Group Policy Editor ” window that opens, go to the section “ Computer Configuration ” - “ Administrative Templates ” - “ Windows Components ” - “ Windows Update ” and find the item “ Configure automatic updates ”.
Double-click on our item with the left mouse button, the “
Setting up automatic updates ” window will open, select the “ Disabled ” item.
Apply the changes by clicking the “ OK ” button.
Automatic verification, downloading and installation will be disabled immediately; restarting the computer is not required.
To cancel our actions, just select the “ Not specified ” option in the policy.
This method is considered very reliable, but be careful if you work in a domain environment, the domain administrator can override your local policy and configure this item at his own discretion. If you work from home, then there is nothing to fear, the policy will not change on its own.
What is Group Policy
The main reason why the message “Some settings are controlled by your organization” appears is because group policies are set on system capabilities. With the advent of this option in the new Windows, corporations whose machines are connected by a local network began to increasingly resort to developing and installing their own group policy. Why are they doing that? The reason is simple - security and unification. When all computers are configured in the same way, it is easier for the system administrator to monitor their operation and fix them, and most importantly, prevent malfunctions. Another advantage is that the employee will not use options that he should not use. Combined with a not so obvious solution to the problem, this is a good level of overall organization even for confident and experienced PC users. But what about a home computer? We'll talk about this further.
Disable via registry fix (#3)
This method works on any edition of the Win10 operating system.
Information! Be careful, if you followed the recommendations from Method #2 on your computer, then the following actions in the registry will already be carried out.
You can check and skip this method if you have a Pro or Enterprise OS edition and have configured Group Policy, but for Home edition users, be sure to read these instructions.
The registry is a storehouse of useful information for fine-tuning any Microsoft operating system. In this method, I will show you how to prevent Windows 10 from updating by changing one parameter.
Launch “ Registry Editor ”. On the keyboard press the key combination Win + R , in the “ Run ” window we write the command regedit .
Click “ OK ” and the “ Registry Editor ” window will open. Go to the next section HKEY_LOCAL_MACHINE\SOFTWARE\Policies\Microsoft\Windows
Our task is to create in this folder two new subsections and one string parameter. We create the first partition named WindowsUpdate and in it another partition AU .
As a result, we should have a new partition structure that looks like this: HKEY_LOCAL_MACHINE\SOFTWARE\Policies\Microsoft\Windows\WindowsUpdate\AU
Let’s create a new parameter “
DWORD Value (32 bits) ”
With the name NoAutoUpdate and assign it the Hexadecimal value 1 , click “ OK ”.
As a result, we should get something like this in the registry:
To cancel our changes, the NoAutoUpdate needs to be set to 0 .
This method is considered reliable, and what’s most useful is that it works on the Home edition.
Disable Windows 10 update in Registry Editor (3rd method)
The third way to disable Windows 10 updates is to make changes to the Registry Editor. This method works in all versions of Windows 10.
In Windows Search, type "regedit" (without the quotes), and then run the command.
In the Registry Editor window, follow the path:
HKEY_LOCAL_MACHINESOFTWAREPoliciesMicrosoftWindowsWindowsUpdateAU
In the Registry Editor window, right-click on the free space. From the context menu, select New and then DWORD Value (32-bit). Give the parameter a name: “NoAutoUpdate” (without quotes).
Right-click on the “NoAutoUpdate” parameter and select “Change...” in the context menu.
Enter the parameter “1” (without quotes) in the “Value” field and click the “OK” button.
To enable updating in Windows 10, you need to change the value of the parameter to “0” (without quotes), or simply delete the “NoAutoUpdate” parameter from the registry.
Setting up a metered connection ( #4 )
Suitable for all releases of the Windows 10 operating system.
In the spring update for April 2020, the Windows 10 operating system received a small change; it became possible to set the wireless connection as a limited connection, which should reduce Internet traffic consumption and partially disable OS updates.
After reading the Internet, many authors write that this is a 100% way to disable updates. But I’ll tell you the truth, the method is considered not reliable, because... the operating system will still download the most critical OS patches that it needs for stable operation.
For example! The OS considers the transition to the next major release critical and this method will not work. There will be a forced download and installation of updates, and this will amount to several gigabytes of incoming traffic and a huge bunch of different settings.
In this method, I will show you a publicly available configuration option and a small undocumented trick with a wired connection, by default it cannot be made limited, but we will do it with you.
Editing WiFi connection
Press the key combination Win + I to open the “ Settings ” window, go to the “ Network and Internet ” section.
Select the “ Wi-Fi ” section.
Click on the name of the wireless network to which we are connected and activate the “ Set as metered connection ” item.
If you connect to different WiFi networks, you need to make this setup for each network.
Editing a wired connection
And now I will show you an undocumented way to assign a limited connection on a wired connection.
We launch the Registry Editor, press Win + R , enter the command regedit , click “ OK ”. Go to the section HKEY_LOCAL_MACHINE\SOFTWARE\Microsoft\Windows NT\CurrentVersion\NetworkList\DefaultMediaCost We must Ethernet to 2 , then the wired connection will be considered limited , and appropriate rules will be imposed on it to limit Internet traffic.
But there is a small problem, we cannot simply change the parameter, due to restrictions on rights to this registry section.
When we try to make changes to a parameter, we will receive the message: “Error when changing parameter - Failed to change “Ethernet”. Error when writing a new parameter value."To overcome this error, we must give ourselves full rights to the registry branch and become its owner.
DefaultMediaCost registry key and select “ Permissions... ” from the context menu.
In the window that opens, click on the “
Advanced ” button.
In the Owner line, click the “ Change ” link.
In the window that opens, enter the name of our user, under which we logged in, and click the “ Check names ” button, the user name should be determined correctly (it will be underlined), click “ OK ”.
In the Advanced Security Settings window, activate the “ Replace owner of subcontainers and objects ” option and click “ OK ”.
In the “ Group Permissions ” window, select the “ Administrators ” group and grant this group full rights by selecting the appropriate checkbox and clicking “ OK ”.
Now we have the rights to change the “ Ethernet ” parameter and set it to Value 2 .
After these changes, the wired connection will be considered limited and Internet traffic will be spent more economically and Windows Update will partially be suspended.
Disabling updates using special software products ( #5 )
The method works on all releases of the Windows 10 operating system.
I present this method here for completeness; I recommend using it as a last resort.
Important! These programs are created by third-party developers, the program code is closed, we do not know what other changes the program will make to the operation of our system.
Before starting the program, I recommend checking the distribution using a reliable antivirus, or through the VirusTotal website.
Windows Updates Disable
The first program is Win Updates Disable - developer site https://www.site2unblock.com
The program is simple, multilingual, Russian is also present. The program can be downloaded as an installer for periodic use or as a Portable version for use without installation.
The program has bits, pay attention to this when starting.
In the program window we are interested in only one item, on the “ Disable ” tab, activate the “ Windows Updates ” item and click the “ Apply Now ” button.
The program will notify us that the settings have been successfully applied and will prompt you to restart the computer.
To cancel the changes, you need to go to the “ Enable ” tab and activate the “ Turn on Windows updates ” item, apply the settings and restart the computer.
Windows Update Blocker
The second program is Windows Update Blocker - developer website https://www.sordum.org
The program simply disables the service, as we wrote about in Method #1. We launch the program, select the “ Disable Service ” item and click the “ Apply Now ” button. The “ Windoiws Update Center ” service will be disabled.
The program developer recommends activating the “ Protect Service Settings ” item to prevent uncontrolled changes in the operation of the service, but there are no details about what exactly this item does.
Windows 10 Update Disabler
The third program is Windows 10 Update Disabler - https://winaero.com/download.php?view.1932
The most sophisticated program that I have found on the Internet.
Download the archive with the program. From the directory with the program, launch a command line with administrator rights, enter the UpdaterDisabler –install and press Enter . The program installs a new service that is constantly running and blocks work with system updates, using some undocumented method using system calls of the operating system.
Additionally, the program blocks the launch of all tasks from the task scheduler that are responsible for updating the operating system. What we will write about in Method #8.
UpdaterDisabler –remove on the command line
Show hidden updates
The fourth program was released back at the start of the ten, when Microsoft allowed you to hide the update. Go to the official Microsoft website for the program distribution - https://support.microsoft.com/ru-ru/kb/3073930
Launch the program (file with diagcab extension), click “ Next ” to start scanning.
At the end of the scan, click “ Hide updates ”
Select from the list the updates that you want to hide and not install, click “ Next ”.
The diagnostics are completed and a list of updates will be displayed that will no longer appear in the list of updates to install.
In order to return hidden positions.
We launch the program, after scanning, select the “ Show hidden updates ” item, a list of all hidden updates will be displayed, uncheck the updates that we plan to install in the future, click “ Next ”
We receive confirmation of our actions and close the window.
Winaero Tweaker
The last software product on our list is Winaero Tweaker - developer website https://winaero.com
When you start the program, you can install it or unpack the Portable version. The program itself has a lot of settings; we are interested in the “ Windows Update Settings ” section.
Click one by one on the buttons “ Set WIndows Update to notify only ” to receive only notifications about updates and “ Disable Windows Update service ” to disable the update center service.
Setting up Windows Update ( #6 )
This method will only work on the Pro and Enterprise editions; the method does not work on the Home edition.
The following procedure will allow us to configure the update to suit our tasks; this method is not suitable if we want to completely disable updates. But limiting the automatic activity of the operating system to install updates will help, unfortunately only for a short period of time.
For example, you are going on vacation and you need stable computer operation far from home. Critical changes to the operating system, as we all know, can affect the stable operation of the operating system, so as not to experience unnecessary problems with the computer, we recommend additionally following the instructions from this method.
Launch “
Settings the Win + I key combination on your keyboard and go to the “ Update and Security ” section.
Go to the “ Advanced Settings ” section.
Information! Each release of the Microsoft operating system makes small changes in settings items, so do not be surprised if certain parameters are not available on your version of the OS. I tried to describe the variation of settings, based on all existing releases of the operating system.
We block the installation of patches for third-party products
Uncheck the box “ When you update Windows, provide updates for other Microsoft products .” To avoid receiving updates for various products, such as Office, Xbox, Skype, etc.
Pause updates, configure the section
Previously in releases it was possible to check the box “ Postpone updates ”, now in the latest release it has been renamed to “ Pause updates ”; activating this item will allow you to pause updates for a maximum of 35 days. After the period has expired, you will need to start checking and installing updates, and only then will you be able to activate this item again for 35 days.
Choosing when to install the update
In the latest OS release, it became possible to choose when to install updates. We select the “ Current Branch for Business ” item; changes for business arrive later than on home computers with more thorough error checking. Additionally, we are postponing the installation of component updates for a maximum period of 365 days . And security enhancement fixes for a maximum period of 30 days .
Configuration via GPO
The last point of this method can be done through the local Group Policy Editor.
In the “ Run ” window, write the command gpedit.msc , in the “ Local Group Policy Editor ” window that opens, go to the section “ Computer Configuration ” - “ Administrative Templates ” - “ Windows Components ” - “ Windows Update ” - “ Defer Windows Updates ”.
Select the property of the item “ Choose when to receive Windows 10 feature updates .”
We activate the policy by selecting “
Enabled ”, set the branch readiness level to “ Current Branch for Business ” and defer it for 365 days .
Blocking P2P distribution of updates
The top ten has added Windows Update Delivery Optimization (WUDO) technology, which works on the principle of the BitTorrent P2P protocol - after downloading update files, the computer allows them to be downloaded by other Internet users, which relieves Microsoft servers and makes the update process decentralized.
To avoid accidentally wasting extra internet traffic, go to “ Choose how and when to receive updates ”
Update from Multiple Locations option must be turned off.
We prohibit restarting the computer
Let's go back to the main Windows Update and go to the Restart Options .
We activate the “ Show more notifications ” item, thereby preventing the operating system from automatically restarting the computer after installing updates.
Deactivating auto-update
There are many ways to prevent the system from downloading and installing updates without your consent. Some of them allow you to disable some updates, and some allow you to disable absolutely everything. First, the simplest and most accessible methods will be described, and then those that should be resorted to only if the first for some reason did not help.
By disabling the service
- Press the Win+R combination to launch the Run window. Write and send the services.msc command for execution.
Execute the command services.msc
- The list that appears will display all the services available in the system. Find the update center process among them and double-click on it with the left mouse button.
Open the update center service
- Set the startup type to Disabled and stop the service. Save your changes. Done, since the service responsible for checking and downloading new versions is now inactive, auto-update will not be enabled.
Set the value to “Disabled” and stop the service
If you want to start receiving updates again in the future, go back to the service above, start it and set the Startup Type to Automatic.
Via Power Shell
- Launch the Power Shell program with administrator rights.
Open Power Shell with administrator rights
- Run the command stop-service wuauserv; Set-Service wuauserv —StartupType Disabled. It will create a task for the system for you, which will allow you to block the update center.
Execute the command stop-service wuauserv; Set-Service wuauserv -StartupType Disabled
If in the future you want to start receiving updates again, go to the task scheduler (how to open it and work with it is described in the subsection “Through creating a task”) and delete the task created by the above command.
Via Group Policy
The peculiarity of this method is that it is available exclusively to users with Windows 10 Enterprise and Pro. Owners of the “Home” edition will not be able to use this method, since this version of the system does not have a Group Policy Editor.
- Use the system search bar to find the Local Policy Editor and open it, or use the gpedit.msc command.
Execute the command gpedit.msc
- Go to the “Computer Configuration” folder, and then to the subfolder “Administrative Templates” - “Windows Components” - “Windows Update”. When you reach the final section, open the “Setting up automatic updates” file.
Open the file “Setting up automatic updates”
- Set the value to “Disabled”, thereby preventing the computer from using auto-update. Save all changes you have made.
Set the value to “Disabled”
If you want to start receiving updates again in the future, go back to the file and set it to Enabled. This will be enough to return the Update Center settings to their original position.
Via the registry
The method described below is similar to the previous one, so it is also not suitable for owners of Windows “Home”, despite the fact that the registry is available in it. We will change the file parameter described in the sub-item “Through Group Policy” through the registry. The result will be the same, but the steps are different:
- Using the Run window, run the regedit command to get into the registry.
Run the regedit command
- Using the tree located on the left side of the registry, open the HKEY_LOCAL_MACHINE\ SOFTWARE\ Policies\ Microsoft\ Windows\ WindowsUpdate\ AU section. Once in the destination folder, create a DWORD file with a value of 1 and the name NoAutoUpdate.
Create a NoAutoUpdate file with the value 1
If in the future you want to start receiving updates again, delete the created file or set its value to 0 (zero), thereby disabling it. Please note that you can only delete it; changing any other files will lead to system failure.
By installing a metered connection
This method is relevant for all editions of Windows, but it does not limit all updates. New versions that improve security will still be downloaded. If you are satisfied with this condition, follow these steps:
- Expand PC settings.
Open computer settings
- Going to the “Network and Internet” block, select the Wi-Fi sub-item and expand additional parameters.
Open additional Wi-Fi settings
- Activate the “Limited connection” function. Done, most updates will now be ignored.
Activating a metered connection
If you want to start receiving updates again in the future, go back to advanced settings and deactivate the feature.
Disabling certain versions through a third-party program
There are several programs available to make managing updates easier. One of them is Show or Hide Updates from Microsoft. Using it, you can prevent the installation of certain updates, and not all at once. It is worth downloading from the official website, where it is distributed free of charge and weighs only a few megabytes.
- After launching the application, select the “Hide updates” option.
Select the Hide Update function
- Wait until the diagnostics and search for uninstalled updates are completed. In the list provided, find the updates that you do not want to install, mark them and start blocking.
Specify which updates need to be hidden
If you want to allow the installation of hidden updates, return to the beginning of the program and select the “Show updates” option. The app will show you which updates are hidden, and you can make them visible again.
Via Win Updates Disabler
You can prevent the installation of updates using the free, simple utility Win Updates Disabler. It is enough to download it from the manufacturer’s official website, check the Disable Windows Update checkbox and start execution. You can enable disabled functions in the Enable tab.
Activate the Windows Updates Disable feature
Via Windows Update Blocker
A program similar to the previous one, but with one difference – you will have to pay for it. Having purchased a product on the official development website, you can download the application, open it, check one box and start the blocking procedure. Using it you can also turn on auto-update again.
Activate the Disable Service function
Via Winaero Tweaker
A more functional program, and it is free. Using Winaero Tweaker, you can change the appearance of the system and configure the operation of many services, including the update center. After launching the program, go to the Windows update setting sub-item and click on the Disable Windows Update Service button. Done, auto-update will be disabled. You can enable it by resetting the update center settings - the Reset to defaults button.
Go to the Windows Update Setting section and click the Disable Windows Udpate Service button
Through the update center settings
- While in the computer settings, select the “Update and Security” block.
Select the “Update and Security” block
- Without switching the “Update Center” sub-item, expand additional options.
Click on the line “Advanced options”
- Prevent downloading updates for other Microsoft products. By disabling this feature, you will prevent the system from downloading updates for applications from the Microsoft Store. Proceed to select how you want to receive updates.
Uncheck the option “When updating Windows, provide…”
- Activate the “Delay updates” feature. It does not disable auto-updates, but only delays the download of released updates for several weeks or months. It is needed primarily for those who are concerned about the security of their system and want other users to test the updates on themselves first. However, versions responsible for improving security will not be delayed. Click on the line “Choose how and when to receive updates” again.
Enable the “Delayed updates” feature
- Disable receiving files from multiple locations. This will help you save traffic, since from now on you will not distribute downloaded updates.
Disable the “Allow downloads from other sources” feature
Video: Disabling Windows Auto-Update
Disable automatic correction of device drivers in the Windows 10 operating system ( #7 )
The method will work on all versions of the Windows 10 operating system.
Ten allows you to search for updates for many devices on your computer in a semi-automatic mode. To avoid this, we need to disable automatic updates of new driver versions in the device installation settings.
Using the key combination Win + R , open the “ Run ” window and write the following command rundll32 newdev.dll,DeviceInternetSettingUi click “ OK ”
In the “ Device installation settings ” window that opens, answer the question:
“Automatically download manufacturer apps and custom icons available for your devices?”
Select the item “
No (the device may not work properly ” and click the “ Save ” button.
In earlier OS releases, this window looks a little different, select “ No, give me choice ”, and “ Never install drivers from Windows Update ”. Apply the settings by clicking the “ Save ”
This setting prevents contacting Microsoft servers to check for updates for device drivers.
Disable checking for updates in Windows 10
If all else fails, turn off checking for updates in Windows 10. If automatic checking does not work, it means that updates will not be downloaded to your computer.
To disable checking for updates, follow these steps:
- Run Command Prompt as Administrator. In the command line interpreter window, enter the command and then press the Enter key:
takeown /fc:windowssystem32usoclient.exe /a
- Go to the path: C:WindowsSystem32, find the file “UsoClient.exe”.
- Right-click on the “UsoClient.exe” file and select “Properties” from the context menu.
- In the "Properties: UsoClient" window, open the "Security" tab.
- Under the “Groups or Users” section, click on the “Edit” button.
- In the “Permissions for the “UsoClient” group” window, remove all permissions for each group or user one by one. Don't forget to click on the "OK" button.
After this, restart your computer.
To restore the permissions of the "UsoClient.exe" file, run Command Prompt as an administrator, and then run the command:
icacls c:windowssystem32usoclient.exe" /reset
Restart your computer.
If necessary, you can manually check for and install updates from Windows Update.
You may also be interested in:
- How to disable updates in Windows 7 - 3 methods
- How to disable updates in Windows 8.1 (Windows

Disable checking for updates via Task Scheduler ( #8 )
In the Windows operating system, automation of many processes is most often carried out through the task scheduler (Sheduler Task) and it would be very strange if Microsoft did not use it for operating system updates.
The following method will show you how to disable four scheduler tasks associated with an OS update.
We launch the Task Scheduler , press the Win + R , in the “ Run ” window we write the command taskschd.msc and click “ OK ”.
In the scheduler window that opens, go to the section: “ Task Scheduler Library ” - “ Microsoft ” - “ Windows ” - “ Windows Update ”.
On the right side of the window we see four tasks:
- Automatic App Update - automatically updates the user's Windows Store applications.;
- Scheduled Start - This task is used to start the Windows Update service when scheduled operations, such as scans, need to be performed.;
- sih - This daily task runs the SIH client, which detects and repairs system components that are important to automatically update the Windows operating system and Microsoft software installed on your computer.
- sihboot - performs the same actions as the previous task.
Our task is to disable them all so that processes related to the update do not start.
On each task one by one, right-click and select “ Disable ” so that the status of all four tasks changes to “ Disabled ”.
After these steps, applications in the Windows Store will stop updating, and the Update Center service will stop starting when it needs to carry out scheduled operations. Tasks that detect and repair system components that are important for automatic updates will no longer run.
Block installation using PowerShell ( #9 )
To work with updates via PS, we need the PSWindowsUpdate (Windows Update PowerShell Module) which can be downloaded from the Microsoft repository - https://gallery.technet.microsoft.com/
Download the archive and unpack it into any of the following directories:
- %USERPROFILE%\Documents\WindowsPowerShell\Modules
- %WINDIR%\System32\WindowsPowerShell\v1.0\Modules
Launch the PowerShell console with administrator rights and import the module using the Import-Module PSWindowsUpdate . To work with updates, we will use the following commands:
- Get-WUList — get a list of available updates;
- Hide-WUUpdate - hide positions according to certain criteria, name, KB number or type;
- Get-WUinstall - starts checking and installing updates (except hidden ones).