Most often, the operating system does not load correctly if the files that launch Windows have been damaged. The reasons for such damage can be different: loss of files, damage to the boot sector, viruses, incorrectly working drivers, and others.
Unfortunately, this problem cannot be resolved quickly.
To prevent such a situation from creating problems and malfunctions, we recommend creating and keeping a boot disk in reserve. The fact is that the Windows operating system was designed in such a way that it could be launched not only from a hard drive, but also from a CD. Moreover, in this case, Windows is not reinstalled; we are talking about loading the system itself.
What is required to create a boot disk?
To create a boot disk we need:
- blank CD/DVD disc;
- image with Windows XP. This refers to a CD/DVD disc containing the Windows XP operating system;
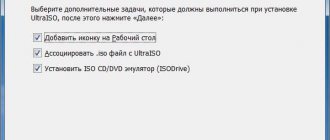
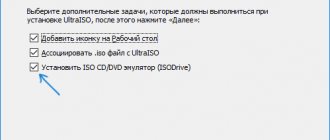
- a program for creating and working with images. For example, Nero, DAEMON Tools, Ultraiso. Beta versions of these programs can be downloaded from the official websites of the developer (www.nero.com, www.daemon-tools.cc, www.ezbsystems.com/ultraiso).
If you are convinced that you have everything you need, then you can get down to business.
Since the procedures for working with programs for creating images are somewhat different, we will write a step-by-step guide for each of them.
How to make a reliable boot disk for Windows XP
Another very pressing question is how to properly make a boot or installation disk with Windows version XP, let's figure it out. Despite the fact that Windows XP is already obsolete, it is quite suitable for weak computers and laptops.
Windows XP is not much different in terms of functions needed by a home user from, for example, the new Windows 7, 8, 10 (here is how to install them on a computer). This suggests that Windows XP is a completely normal and modern operating system that supports almost all the same functions as, for example, Windows 7.
How to create a bootable disk using Nero?
Step 1.
To get started, take a boot disk with Windows XP and run it using the CD-ROM, launch the Nero program. Depending on the disc type - CD or DVD - run the appropriate project. In the list of project types, find the “Image creation” item. Please note that the project name may vary depending on the program version. In any case, the project name will contain either the word "image" or the abbreviation ISO.
Advice: use discs with the largest capacity for recording, since the entire array of information may not fit on a standard disc with a capacity of up to 700 MB.
Step 2.
In the list of information sources, you should select an optical drive; the information receiver will be the hard drive. Click the “Next” button.
Step 3.
A copy window will pop up on the screen, followed by a window where you need to select the path to save the image.
Tip: to make the folder with the image easier to find, we recommend saving it on your desktop.
Step 4.
After clicking the “Save” button, the image creation process will begin. At this stage, all you need is patience - wait until the process is completed and the “Burning Complete” notification appears on the screen.
Step 5.
Now you can remove the boot disk with Windows XP, and instead insert a blank disk of the same size - CD or DVD.
Step 6.
You should select the “Burn image to disk” project. A window will pop up again in which you should determine the path to the image created the day before. Now you can start the burning process.
Step 7
The process will be considered complete when the message “Burn Complete” appears on the screen.
Burn an installation disc with Windows 7, 8, XP from an image.
There are many ways to create a Windows image, each option is good in its own way.
There are a lot of programs for this. One of them is the UltraISO program, which has a simple interface and is very easy to use. Many users prefer it. But you don’t have to install additional programs, since the Windows 7 and Windows 8 and 8.1 OS packages initially include the ability to create disk images. There are important differences between burning a regular disc and a bootable one.
When downloading a disk image, we receive a file in iso format. If this file is simply written to a disk, like we record movies and music, the installation of the operating system from such a disk will not begin, even if you start booting from the disk through the BIOS. The trouble is that the disc was not recorded correctly.
Therefore, in order to avoid such problems in the future, it is best to once again, step by step, study the process of creating a Windows installation disk. A lot of articles have been written on this topic on the Internet. Especially those explaining how to install an operating system from an image recorded on disk. How to burn a Windows 7 image to disk?
The size of the disc for recording a Windows XP disk image differs from the size of the disk required for recording Windows Vista, Windows 7, Windows 8. XP takes up very little space, so the capacity of a CD-R or RW disk is sufficient for it. The image of this system will take only 700 MB, but this is if the image is not an assembly where, in addition to the operating system image, there are additional programs for installation. In this case, the disk size is clearly not enough. For all other Windows operating systems, the images of which are much more massive than the small XP, a DVD disc is optimal. For example, the seven requires about 3 GB for its recording.
Burn a Windows image to disk using UltraISO.
The UltraISO program is one of the most popular programs today, so it is best to learn how to burn bootable discs with its help, since understanding the interface of the similar program Nero is much more difficult. In addition, finding and installing UltraISO on the Internet is not a problem.
After installation, all files on the computer with the .iso extension will be opened by this program.
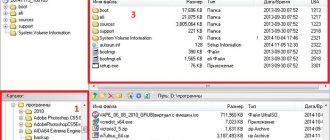
1. Select the Window disk image and double-click to open it.
2. If the file is selected correctly, the UltraISO program starts,
3. The operating system image is ready for recording.
4. Insert the empty disc into the drive.
5. Give the command to record
6. Then confirm by clicking Record
7. Wait until the program finishes recording
8. The disk is ready and you can begin installing the new Windows operating system.
When starting to record, you should remember a few things in the UltraISO settings; it is best to set the recording speed lower, then the quality of the disc will be better. If the write speed is high, errors may occur during the installation of the OS on the hard drive. In this case, the entire recording process will have to start over.
Creating a boot disk using DAEMON Tools?
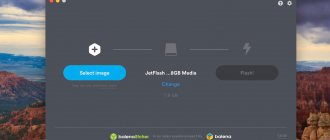
- ШTo create a new image in the DAEMON Tools application window, select the “Burn image” button (located on the top panel).
- In the window that appears, select the DVD drive. In the “Write Speed” drop-down list, select the highest value – “4.0”. In the “Path to image file” field, enter the path to the Windows XP installation disk image.
- After completing all the steps, click the “Start” button.
- DAEMON Tools will take some time to burn the image to CD.
The third option for user actions with DAEMON Tools Pro
It involves the use of another very popular application called DAEMON Tools Pro. As usual, the first step is to download this product, install it and launch it.
Further actions:
- In the open program window, select the “Burn image” option at the top. Naturally, the data storage device must already be located in the drive, which must be specified in the next step.
- The third stage is choosing the speed and indicating the location of the source for the planned procedure.
- Completion of the preparatory process is by clicking on the “Start” button.
This is all that is required from a simple user who always wants to have such a tool with him, which often saves the situation with a problematic OS.
How to create a bootable disk using Ultraiso?
Step 1.
Launch the Ultraiso program. It is important that this action is performed with administrator rights. To do this, when you click on the program shortcut in the window that appears, select the “Run as administrator” option. Next, the program will prompt you to complete the registration procedure. When using a trial version, click on the corresponding “Trial period” button and move on.
Step 2.
On the left side of the program, select the “File” tab. As a result, Explorer will open. In it you should select a file with the extension *.iso, which contains the image of Windows XP.
Step 3.
In the main menu of the program, select the “Tools” tab. In the menu that “drops down” at the top, click on the “Burn image” button.
Step 4.
Next, a new dialog box will appear in which the drive is selected, recording will be made to it, and the recording speed is set to 4x, which corresponds to a speed of 600Kb/s.
Here are the main methods for creating a bootable Windows XP disk. However, we cannot help but mention another method - the “Dosov” method. Despite its relative complexity and some obsolescence compared to the previous ones, it also has a right to exist.
A little about installation disks.
Boot disks for Windows 7 - 10, XP are always different types of assemblies, i.e. software packages from Microsoft or other than them. Non-standard assemblies are carried out by different craftsmen and not always out of idle curiosity or noble motives. Trojans are often inserted into assemblies. Personally, I came across several on cheap, unlicensed discs purchased at the store. After installing the OS from such a disk, the computer may become infected and perform functions unknown to us. You may use such discs at your own risk. If you use an infected disk not only for yourself, other people may also suffer. This is quite possible.
To avoid such troubles, I suggest you create a boot disk for Windows 7 - 10, XP yourself. Believe me, it is not at all difficult and much cheaper than buying a ready-made disk, it is absolutely safe, and most importantly, you will make yourself boot disks of exactly the versions of Windows that you need. You probably already know exactly what you will install.
I suggest starting this issue by creating a bootable Windows XP disk. Perhaps you will say: “Why do I need it, I have the newest, coolest computer.” But take your time.
Firstly, the process of creating a boot disk does not depend in any way on the version of Windows and is performed absolutely the same. This means it doesn’t matter which version of Windows you use. The main thing is to understand the principle.
Secondly, there is no guarantee that tomorrow you personally or someone you know will not need this same Windows XP, which still works reliably on millions of old computers or weak laptops, and works great on all new ones. By the way, many beeches don’t have anything else because of their configuration, often you can’t install anything else.
How to create a boot disk using the DOS method?
- We create a folder on the hard drive in which we will enter all the necessary data. First of all, you should add a file manager adapted for DOS: Norton Commander, FAR or Volkov Commander.
- To make it convenient to launch a file manager (for example, Volkov Commander), we create a bat file. It’s very simple: open notepad and enter:
cd vc
vc.com
Let me explain a little. The first line is a command to replace the directory with Volkov Commander. The second line is a command to run the file called "vc.com".
Save the notepad file under the name “vc.bat”. The presence of a file under this name makes it possible to enable Volkov Commander using the letter combination on the command line: vс. And confirm everything with the Enter key.
- Later, when you use the boot disk, you will need to select the exact drive letter that corresponds to the CD drive. This is done as follows: in the command line, write first D:, then E:, and so on until the notification “The disk is not specified correctly” pops up. The most recent disk in existence will most likely be your CD drive.
However, this should be checked. To do this, enter the command “dir” in the command line. This command will display all files and folders contained on the disk. In this simple way, you can make sure that the disk is selected correctly and continue.
- Next we will use the Partition Magic program, namely its DOS version. This software product is designed to work with hard drives: formatting, dividing the hard drive into partitions, converting file system types and much more.
- In the folder where we collect everything necessary for the boot disk, we create an additional directory called “PQ” with program files. Similarly, with Volkov Commander we create a launching notepad file with the following content:
cd PQ
pqmagic.exe
Let's call it "pq.bat".
Next, install the disk with Windows XP into the drive and create a bat file that starts the installation:
cd i386
winnt.exe
We give it the name “xp.bat”.
Thus, everything necessary for the boot disk has been created.
- Launch Nero (or any other imaging program described above). In the menu that opens, select “Create a bootable data disk.”
- Click the “Add” button and enter into the window all the folders and files that should be written to the installation disk. Then click the “Next” button.
- At this stage, you may be prompted to insert a boot floppy disk, ignore this requirement and select “Next” again.
- Now directly select the “Record” button.
Advice: we do not recommend recording at a speed of more than 4, because it is impossible to accurately predict what type of CD-ROM this disc will subsequently be used on.
If you dont know DOS,
you dont know Windows...
Universal Boot Floppy Windows XP, 2003, 2000, 98SE, ME
Functions
1. Launch Windows OS
2.MS-DOS command line
3.Run OS Installation
Windows
Implementation of all three functions on one floppy disk Universal Windows Multi Boot Disk for all versions of the two main families of Windows NT5x: 2000, XP, 2003 server and Windows 9x: 95, 95 OSR2, 98, 98SE, ME-Millennium Edition of Windows 98 v. 4.90.3000
A universal floppy disk is not only a boot disk (Boot Disk), but also a starting disk (Startup Disk), i.e.
You can directly launch Windows OS from it, as well as an emergency (Emergensy Disk) - the ability to restore (repair) boot. You can also install MS-DOS 8.0 on your hard drive in a FAT32 partition, i.e. system
diskette A universal multiboot diskette is a 2-in-1 combination: a boot diskette MS-DOS version 8.0 of Windows XP or Windows Vista and a boot diskette for accessing NTFS or FAT partitions using the system files NTLDR, NTDETECT.COM, BOOT. INI.
Note: the line in boot.ini C:\bootsector.dos="WINDOWS 98SE/ME" in the case of a floppy means launching the DOS boot sector (bootsector) from the root directory of the floppy disk - property of the ntldr file
Boot floppy MSDOS 8.00 Windows ME/XP/Vista/ 7 Russian version Start boot diskette Windows 7, Windows Vista
to run Windows 7 OS.
The definition of the purpose and functions of the Windows universal boot floppy follows from information from the original source - the Microsoft knowledge base:
Creating a boot floppy to access NTFS or FAT partitions in Microsoft Windows XP
Using system files to create a boot floppy to prevent the Windows XP failure to start problem
"
The Windows XP boot floppy disk allows you to boot the operating system on a computer running Windows XP.
«
«
1. Format the floppy disk using the Windows XP format program.
For example, place a floppy disk in the drive, type format a: at the command prompt, and press ENTER. 2. Copy the Ntldr and Ntdetect.com files to a floppy disk, which may be located in the I386 folder of the Windows XP CD, on the Windows XP installation diskette, or on a computer running the same version of Windows XP as the computer on which you will run boot from this floppy disk. 3. Create a Boot.ini file (or copy it from a Windows XP computer), and then modify it to match your system settings. “
This boot diskette for accessing NTFS or FAT partitions contains the files Ntldr, Ntdetect.com and Boot.ini and is designed to run Windows.
Download
Boot.ini download…
ALL comment lines MUST be located ABOVE 1ST [section] !
timeout=-1 default=multi(0)disk(0)rdisk(0)partition(1)\WINDOWS multi(0)disk(0)rdisk(0)partition(1)\WINDOWS="First harddisk, first partition" /sos multi(0)disk(0)rdisk(0)partition(2)\WINDOWS=”First harddisk, second partition” /sos multi(0)disk(0)rdisk(0)partition(3)\WINDOWS=” First harddisk, third partition" /sos multi(0)disk(0)rdisk(0)partition(4)\WINDOWS="First harddisk, fourth partition" /sos multi(0)disk(0)rdisk(1)partition( 1)\WINDOWS="Second harddisk, first partition" /sos multi(0)disk(0)rdisk(1)partition(2)\WINDOWS="Second harddisk, second partition" /sos multi(0)disk(0) rdisk(1)partition(3)\WINDOWS="Second harddisk, third partition" /sos multi(0)disk(0)rdisk(1)partition(4)\WINDOWS="Second harddisk, fourth partition" /sos
Boot.ini for
Windows 7 - >> Boot menu configuration file Boot.ini
Creating a boot floppy disk for a partition with the NTFS or FAT file system on a computer running the Windows Server 2003 operating system
"The Windows XP boot diskette is the first in a set of
6 Windows XP Professional installation diskettes"
How to obtain installation diskettes for Windows XP
«
Boot floppies to install Windows XP must be downloaded from the Microsoft Web site.
They are designed to run the installer
on computers that do not support booting from a CD.
“
This set of six installation diskettes is used for computers whose BIOS does not support booting from a CD-ROM to run the installer in Windows Native Mode.
An article, as well as excerpts from it, with incorrect information about Windows XP boot floppy disks with the MS-DOS command line are widely distributed on the RuNet.
Lincoln Spector. Boot floppy disk for Windows 2000 and XP 05/19/2003 PC World Magazine, #05, 2003 // Open Systems Publishing House https://www.osp.ru/pcworld/2003/05/165746/
:"Windows XP does not have the ability to create a boot floppy disk, which was available in earlier versions of Windows. How to create such a floppy disk?
Brian Cramp, pc. Utah
The Windows 9x and Me operating systems allowed you to create an emergency floppy disk that could be used to start the system when something went wrong with the hard drive. This boot floppy launched MS-DOS
and contained various tools for diagnosing and troubleshooting. Windows 2000 and XP take a different approach to booting a PC in emergency situations than 9x and Me. "
It was impossible to start Windows directly from the Emergency boot floppy disk of Windows 9x; the Installable File System driver (ifshlp.sys) was missing, i.e. it was not the Startup Disk.
Creating a bootable MS-DOS disk in Windows XP
Known as TheStarman, Wikipedia User Daniel B. Sedory wrote:
"This is " Windows XP Startup Disk
"Only just a DOS (ME; v.8.0) boot floppy disk. It has nothing to do with NTFS partitions or Win XP OS.
I can only guess that someone at Microsoft decided that there was a need for Win XP users to be able to boot simply into the MS-DOS command line
."
Microsoft recommends using the Windows XP MS-DOS startup floppy disk to update the BIOS.
Microsoft's concept can be found in the article What is a boot disk (startup disk) and why is it needed?
| > | Rogers' Double Paradox - The Internet is Harmful for Fools. They become dumb from it. — Fools are harmful to the Internet. They make him dumb. | ||
| About copyright: Consistent with 17 USC Title 107, fair use of copyrighted works, the materials on this site are distributed without profit to those who have expressed an interest in receiving the information for purposes such as criticism, comment, news, education, or research, not is a violation of copyright. | |||
Sitemap - Sitemap
Download page
Files are the most valuable thing for visitors to this site!
For those who know exactly what they are doing... V. Ashumov
[email protected]
ashumov.vagif
rambler.ru
MultiBoot.Ru 2007-20 20
Creating a multiboot Windows XP disk
Unlike a boot disk, a multiboot disk can contain not only operating system files, but also other necessary programs. For example, text and graphic editors, social applications, and so on. At its core, the procedure for creating a multiboot disk is not too different from that described above. The files of all necessary programs are accumulated in one folder, and then the image is recorded.
But let's take a closer look.
What do we need
As before, you need:
- image creation program;
- Windows XP system files.
In addition, we will need the xpboot.bin file, as well as files of some program.
Guide to creating a multiboot disk.
- We launch the program to create the image. Let's look at Nero as an example. In the new project, select the CD-ROM or DVD position.
- In the “Load” menu, select the “Image file” item, in which you should select the boot file xpboot.bin. Since the file of this extension type is not initially displayed in the window, in the corresponding tab select the “All file types” item, and the xpboot.bin file will be displayed.
- We set the number of boot sectors to 4.
- Click on the “New” button. The implication is that we want to create a new image.
- Next, an explorer will open to us, into which we need to transfer all the Windows XP system files, as well as other necessary programs.
- Now we start the image creation process by clicking on the “Burn” button. There is a possibility that the disc will not be readable. To fix the problem, you need to set the speed lower.
In conclusion, we note that it is easy to check whether a boot/multi-boot disk is working. To do this, immediately after burning, return the recorded disc back to the CD-ROM. If it starts automatically and the “Run Autorun” window appears on the screen, congratulations, you succeeded.
We’ll also give you one last piece of advice: you may not be able to create a boot disk the first time, so we recommend rehearsing it on RW disks.
Recording with Nero
Nero isn't cheap. Fortunately, the developers allow you to use the program for 15 days for free. The download file is located on the publisher's website. After installation, you should run the program as an administrator and select the trial version.
In Nero, you should open the DVD-ROM/CD-ROM (Boot) project. The choice depends on the size of the data being written and the type of disc. Below is how to create a bootable CD.
In Nero, click on the Downloads tab. Here, next to the Image File, there is a Browse button. Click and specify the path to the nt5boot.bin or xpboot.bin files. Check the box for Additional settings.
You cannot change anything in the ISO tab (shown below)! The main thing is that all the checkboxes are as shown in the picture. Then the formation of the boot disk will be successful.
The next tab where you can make changes is: Recording. Here, if we want the disk not to be changed later, check the finalize box.
Click on the New button and a window appears with data selection. The main thing is the presence of three selected files. It is thanks to them that the installation of Windows XP will be successful. Drag and drop the selected required data. At the bottom there is a disk full bar. If desired, you can create a folder on the matrix with drivers or additional software - graphic editors, antiviruses, etc. Next is the final stage of preparation for creating bootable media.
Click on Record. A window will appear – in it click on Burn. We wait for the Windows XP bootable media to be created, not forgetting to check the box to check the recorded data.
The result is a boot disk. When writing files, it is not recommended to use high speeds, as this increases the likelihood of errors. To check the functionality of the Windows XP installation, reboot the computer and set the priority in the BIOS to DVD-ROM.