Basic connection options
To set up a bridge between two routers, we will use two methods. Each of them has certain advantages and disadvantages that it is advisable to know before starting the operation:
- Connecting equipment via Wi-Fi network. To connect two routers into a common network, you need to use WDS or “bridge” mode, which essentially means the same thing. In this scenario, you can place two routers quite a distance apart and still have good (not great) connectivity. The main advantage of the method: there is no need to lay cables around the room. But one cannot help but note the disadvantage of this method: after connecting two routers via Wi-Fi, the connection may be unstable, since the speed of the wireless network will decrease. This method is usually used by people who do not want to run unnecessary wires in the house. It should be taken into account that not every router has WDS support, especially for older units.
- Using a network cable. This is an outdated but more reliable option. The only inconvenience is that to connect two routers you will have to lay an additional cable in the house, and quite a long one if the two devices are in different rooms. Usually a suitable cable is included in the kit, but it is very short, and therefore you will have to additionally purchase a longer version to complete the operation.
The choice of connection method depends solely on the user's needs. Having made your choice, you can consider each method in detail.
Preparatory activities for organizing WDS
Before starting setup, it is recommended to perform several preliminary steps:
- Check that all devices in Wi-Fi networks are able to exchange information with their routers (usually this analysis is performed by connecting the routers to the Internet via WAN ports with a cable);
- Register a static IP for each router. It is important that these IPs are excluded from the DHCP range, otherwise duplication may occur, which will cause network failure. It should also be noted that a large amount of time is spent on dynamic IP assignment;
- It is recommended to set the same channel in all routers used. When using the 802.11b and 11g standards, it is advisable to use channels numbered 1, 6, 11. The main thing is that the channel is not occupied by any neighboring network;
- Assign different names to the access points you use. They operate based on MAC identification, and the connection occurs without regard to the specified SSID. And to connect clients to access points, it is better that they have names that differ from each other. It should be noted that any device connected to a specific wireless access point, even at a considerable distance from it, will be connected only to it, despite the very weak strength of the signal that fades with distance, and will not connect to another without completely losing connection with the first. This, of course, leads to a loss in data transfer speed. In the case when different names are pre-specified for different points, the client can easily track which point it is advisable to reconnect to.
- Be sure to determine in advance the optimal locations for installing access points. The speed of a wireless network is especially strongly influenced by signal strength. Moreover, each additional bridge reduces its strength. However, clients located at the edges of access point coverage will also lose connection speed. Based on experience using the technology, it is recommended to locate repeaters in places where the speed for the 11b standard has not yet fallen below 5 - 6 Mbit/s, and for 11a and 11g it is advisable not to drop this figure below 23 - 25 Mbit/s. In fact, it turns out that somewhere halfway until the signal attenuates;
- To eliminate possible failures and speed losses as much as possible, it is necessary to use equipment of the same model and manufacturer. The use of access points of different standards will, at best, result in a reduction in speed, and at worst, will lead to complete inoperability of the infrastructure.
Setting up a bridge via Wi-Fi or WDS
To understand how to connect multiple devices via a Wi-Fi network, it is advisable to use routers from the most popular manufacturers as an example: Asus, TP-Link, which we will do in the future.
Important condition: you need a functioning main router from which the Wi-Fi network comes. It is to this that you need to connect additional equipment. In this case, you should not worry about the fact that the two equipment were purchased from different manufacturers, although it is advisable to do just that if possible.
It is important to remember that the most stable connection can be created by using compatible devices from the same manufacturer. This is especially true with Asus devices.
The first thing you need to take care of is changing the settings of the main device. To connect additional devices to the main equipment, you need to install a statistical wireless network channel. If this is not done, problems with both devices may occur.
It is necessary to change channel settings so that when you turn on the device, it automatically selects the appropriate channel. This means that when activated, the device automatically occupies a free or less loaded channel. Connection problems begin precisely at the moment when several devices connect to this channel, on which there are already many devices. The fact is that in an apartment building there are many Wi-Fi points that are trying to occupy a more profitable “target”. The more devices on one channel, the less stable the connection.
Therefore, to avoid connection problems, you need to select free channels that are least used.
To understand why the Wi-Fi channel is so important, you need to understand the basics. Now all devices transmit data via a wireless network at 2.4 or 5 GHz. The second option is rarer, and the newest devices work with it without interference. As a rule, the first option is preferred, since few people will want to spend extra money to buy a new 5 GHz router.
Consider the frequency of 2.4 GHz. In the Russian Federation you can use channels from 1 to 13. This is even more than in some other countries. Therefore, you should not buy modems from America, since they simply will not be able to work on channels above 11.
It is within the designated area that we need to work to connect the two routers. As you can see, there are enough options, because most users do not configure channels, because the modem does it automatically. Therefore, we have a higher chance of taking the most suitable option.
To go to channel settings, you need to take just a few steps:
- Connect to the modem.
- Open browser.
- Enter the following combination into the address bar: 192.168.1.1.
- Next you need to specify a username and password, by default it is “admin” and “admin” or “admin” and “1234”.
- Now you need to find the line with channels and change the automatic search to your option.
- Once the operation is completed, you must apply all the settings by pressing the appropriate key.
These are all the preliminary operations that have to be carried out before connecting two devices.
When to use the WDS function
Firstly, WDS technology is worth trying if you are unable to set up signal relay in the “Universal Repeater” mode. For example, the network is unstable (the repeater is disconnected from the main router’s network).
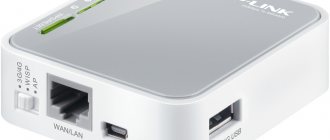
Secondly, the Universal Repeater feature is usually only available on access points, while WDS mode is very often supported on regular routers. In particular, WDS is included in the factory firmware of the mega-popular TP-Link TL-WR841ND router. Therefore, if you have a second router lying around, you do not need to buy an access point with Universal Repeater mode. I hope I chewed it.
Cons of WDS
- When using WDS, the Wi-Fi data transfer speed between the main router and the secondary router is reduced by approximately 2 times.
- The main router must use a permanent wireless channel. If you select AUTO, the remote router will lose contact with it when the channel changes.
Setting up a bridge on TP-Link
You need to open the settings of the device you are using to change the IP address and configure the WDS mode.
Detailed instructions:
- The first thing you need to check is that the main router is working, that is, it distributes a Wi-Fi network and with the help of this equipment you can access the Internet.
- Now you need to work with an additional router in the settings, where the IP address must be changed so that there are no identical devices on the network. For example, if the IPs are the same on two devices, then an address conflict will arise. To avoid this, you need to go to the “Network” section.
- Go to the “LAN” tab. In the IP address field, change the number 1 to 2 at the very end of the line. After clicking the save settings button, the router will begin to reboot on its own - wait until this procedure is completed.
- Next, you need to go to the “Wireless” section.
- Find the “Wireless Settings” tab. In the “Wireless Network Name” line, where the network name is indicated, select any one you like or are familiar with. In the “Channel” line, you must specify the same channel that was selected for the main device. We must not forget about this point, otherwise the bridge between the routers will not be installed.
- To confirm the action, you need to check the box next to the line “Enable WDS Bridging” and click “Survey”. A list of networks will open from which you need to select the correct point through which you previously accessed the network. After that, click “Connect”.
- All that remains is to set the desired password in the “Key” line and select the type of secure network.
- After completing the operation, you need to disconnect and reconnect the power to the router to reboot the system, so the equipment accepts the new settings.
Now that the router has turned on, you again need to go to the settings menu and see that “Run” appears in the “WDS Status” line, that is, the device is ready for use.
The additional router must be located within the coverage area of the main equipment, otherwise it will not emit a signal.
The coverage area of the router must be indicated in the instructions or on the factory box.
We use a TP-Link router as a “Repeater”
This means that on our main router we only need to change the channel.
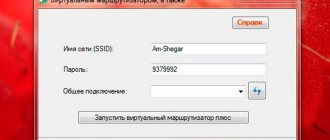
This is interesting: How to configure a laptop to distribute Wi-Fi and connect a mobile device to it? Setting up VirtualRouter Plus
Setting up the main router
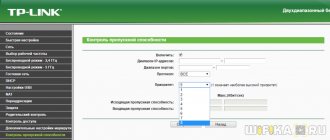
Go to your router settings and go to the Wireless . Opposite the Channel , set the channel number, for example 6 (the same channel will need to be installed on the router that we will configure as a repeater). Save the settings by clicking on the “Save” .
Setting up the “Repeater” router
At the time of setup, the router (which will work as a repeater) needs to be connected to the computer via cable.
Go to the router settings. To do this, enter the address 192.168.0.1 , or 192.168.1.1 (the address can be viewed at the bottom of the router).
Then you will be asked to enter your login and password to access the router settings. If you haven’t changed them, then usually by default they are admin and admin (you can also look at the bottom of the device).
Disable WPS
I wrote more about WPS in the article What are QSS and WPS? Why do you need the QSS button on a Wi-Fi router and how to use it? You can read it. We need to disable this function.
To do this, go to the WPS and click on the “Disable WPS” .
Reboot your router. To do this, you can click on the “click here” that will appear on the page after changing the settings.
After the reboot, the router settings page should open again.
Changing the IP address of the TP-Link router
Go to the Network – LAN . In the IP Address , change the last number of the IP address to 2 . For example, I had an address of 192.168.0.1, but I changed it to 192.168.0.2 . To save the settings, click the “Save” .
The router will reboot itself, ask you to enter your login and password again to access the settings, and you will be taken to the settings page. Please note that the IP address in the browser will be different.
Setting up a bridge on an Asus router
To connect several devices to an Asus router, you must use an additional router from the same manufacturer, otherwise the operation will be problematic and sometimes impossible. Let's look at how to configure each device separately.
First step: setting up the main router
On the main page of the router, you need to remember the MAC address, which will be needed in the future to complete the connection operation.
The following procedure will be:
- We activate the “Wireless” section by going to settings.
- Click on the “Bridge” tab.
- We look for the “WDS Only” item using the “AP Mode” line.
- We select one of the existing channels, to which we will also later connect the second router. Therefore, the channel must be remembered or recorded.
- Enter the MAC address that was saved at the beginning. This field is called "Remote Bridge List". To record the data, click “Add”.
- As soon as the new Mac is highlighted on the screen, click on the “Apply” button located in the lower right corner. You must wait until the router completes the operation.
- Reload the page by clicking on the “Reboot” button located in the upper right corner.
We must not forget about rebooting at the end of the operation. Without it, the router will not save the necessary settings and will not be ready for further operations.
The configuration of the main router is completely completed; you can proceed to the next step with additional equipment.
Second step: setting up a second router
The procedure is as follows:
- We go to the router settings to change the IP address, otherwise a conflict between the two devices will arise.
- Select the “LAN” section.
- Open the “LAN IP” tab - there you can change the information we need. You need to make sure that the IPs are different, otherwise the devices cannot be connected into a bridge.
- Click “Apple” after changing the data and wait for the router to complete the operation.
- Go to the following link https://192.168.1.100 in the browser search bar. A page with further settings for the second router will open.
Once all configuration operations are completed, you need to disable the DHCP of the additional router according to the following instructions:
- Select the “LAN” section.
- Open the “DHCP Server” tab.
- Click on the “No” button in the “Enable the DHCP Server?” field.
- Activate the “Apply” button for the router to make data changes. Wait for the operation to complete.
- Enter the following link into the address bar to go to further settings: https://192.168.1.100.
The MAC address of the second router will be displayed on the open page; it must be used in the first step in the settings of the main router, which were described above.
Let's move on to the next operation on the open page:
- Select the “Wireless” section.
- Open the “Bridge” tab.
- Find the line “AP Mode” and activate the “WDS Only” item.
- You need to select the same channel that was used on the main router.
- Enter the MAC address of the second router in the “Remote Bridge List” field.
- Click on “Add”, “Apply”, and then “Reboot”.
All you have to do is wait for the router to reboot, and you can get to work; the operation will take no more than a minute.
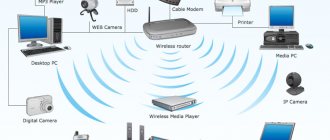
There are often situations when the router does not provide coverage for an apartment, country house or office with a stable WiFi signal . There can be many reasons - low power of the router , the presence of obstacles between rooms in the form of load-bearing reinforced concrete or brick walls, or simply a large area of the room. For example, in the case of deploying WiFi in an enterprise warehouse.
There are several ways to solve such problems. Replace the router with a more powerful one, buy a WiFi signal , or set up a WDS repeater on another router . This technology has two types of uses.
When operating in normal WDS the distribution router , which is connected to the provider’s network, can only work with other repeater routers , and they will distribute the Internet to users. And when using the WDS+AP , the main router distributes the Internet via WiFi to both repeater routers and other wireless clients.
WDS technology are the ability to significantly increase the coverage area of a WiFi network without extending additional cables, simply by turning on another router in the next room.
The disadvantages are that throughput by approximately 2 times for each relay , since routers operating in WDS use one WiFi channel both for transmitting data to the network and for communicating with clients .
It should be noted that not all devices support this mode; flashing and other “ dances with a tambourine ” around the router . We will not touch upon such difficulties and will consider the option of setting up the wds repeater on WiFi routers with official support for this function.
An important point is that wds technology is rather poorly standardized and is organized slightly differently among manufacturers, so in order to ensure stable operation in wds , it is better to use equipment from the same brand, otherwise you may have problems connecting devices .
Let's consider the option of setting up a WDS repeater routers as an example . The web interface of the company's different models is similar, and the instructions will help you understand almost all of them.
First you need to configure the master router . It is assumed that it is already connected to the computer and configured for networking. In any browser, go to the IP address that is set by default in your router - 192.168.0.1 (or 1.1 - depending on the model). Go to the Wireless .
In the “channel” settings, disable the “
auto-detection ” function and manually set the broadcast channel. It’s optimal to choose the least loaded one, but if you don’t know the air condition at the location where the router , set any one. Do not enable WDS on your main router !
This completes the setup of the main router .
Next, connect your second router computer and go to the web interface .
wireless connection tab menu, activate the “ enable WDS ” item, and also set a network name that will be visible to all clients of your WiFi network . After that, click the “ search ” button. of access points that your router should appear .
In it, select your main access point its name will be displayed in the SSID Click the " connect " button. After this, the router will automatically redirect you to the wireless .
The MAC address and primary access point fields will be filled in automatically. This is a very convenient feature that saves the user from having to enter parameters manually, as on routers from most other manufacturers. You will also only need to set a password, which should be similar to the password on the main access point .
DHCP settings tab .
O opposite
the DHCP server . Next, go to the Network menu , LAN submenu and change IP address by changing the last digit.
For example, the address of the main router is 192.168.0.1. Then the repeater router should be 192.168.0.2 or 0.3, etc. After entering the address, click “save”.
This completes the setup. Now your wireless network has been extended to the access area of the second router . Please note - this type of setup is suitable, as mentioned above, only for setting up the “ repeater ” mode on TP-Link routers . The setup process on other routers is different, but we will definitely cover it in other articles on our website.
Connecting routers using a cable
This option can be used when one of the modems does not support the Wi-Fi network or you need a more reliable and stable connection.
You will need a network cable, which usually comes with the purchased router. There is no need to configure the main router. The only condition: a DHCP server must be activated on it, as well as automatic distribution of IP addresses. In most cases, these settings are already enabled by default, and therefore there is no need to go to settings.
The procedure will be as follows:
- Connect the wire to the LAN connector on the main device.
- On the second router it is connected to the WAN connector.
You should make sure that the Internet cable is connected to the main router, otherwise none of the devices will work.
If the second router does not connect to the Internet after connecting, then you need to reset its settings. And then go to the settings, select the “Network” section to make sure that the device has the “Dynamic IP” item, that is, dynamic.