How to create a bootable USB flash drive with Windows to install the operating system from a flash drive? You can create a bootable USB flash drive with the Windows operating system using various programs specifically designed for this purpose.
Now you will learn how to create a bootable USB flash drive to install the Windows operating system using the free Windows 7 USB/DVD Download Tools.
As the name of the program suggests, it is designed for recording the Windows 7 operating system onto an external USB drive or DVD. This program also allows you to create a bootable USB flash drive with the Windows 8 or Windows 10 operating system on computers using the old BIOS.
Why might you need such a bootable flash drive? Most netbooks and some laptops do not have an optical DVD drive. In the absence of a DVD drive, these devices have a pre-installed Windows operating system.
In the event that you need to reinstall the operating system, or install a different edition of the operating system, netbook users will have to buy a rather expensive external DVD drive. Using a Windows disc, you can perform a system recovery if the operating system for some reason does not boot on the computer.
The way out of this situation is to install the operating system from an external USB drive.
In this way, you can install the operating system on a regular computer. You can create a bootable USB flash drive with Windows 7, Windows 8 (Windows 8.1) or Windows 10.
Installing an operating system from a flash drive is no different from a regular installation of the Windows operating system from an optical DVD.
The advantage of storing a boot image of the operating system is that an external USB drive takes up little space; is it more portable? and is also resistant to mechanical damage.
If you simply copy files with the Windows operating system to an external drive, you will not be able to create a bootable USB flash drive this way. To create a bootable USB flash drive, you must use a special program.
Windows 7 USB/DVD Download Tools for burning a bootable USB flash drive or DVD
To create a boot disk with the Windows 7 operating system, you will use the free Windows 7 USB/DVD Download Tools program produced by Microsoft Corporation.
The Windows 7 USB/DVD Download Tools program works in English, but it is easy to use and will be understandable to every user.
Owners of netbooks that do not have an optical DVD drive will need to copy the ISO image with the operating system to the hard drive of their netbook in order to be able to write this image to a flash drive.
To avoid any problems in the future, it is better to use the original image of the Windows 7 operating system or the image of the Windows 8 operating system to install it on your computer. You can activate the operating system after installation on your computer.
Download Windows 7 USB DVD Download Tools
After downloading the program to your computer, start installing the application. The program installation wizard works in English, but this will not cause any difficulties during the installation of Windows 7 USB/DVD Download Tools.
You may also be interested in:
- Creating a bootable USB flash drive in Rufus
- Multiboot flash drive in WinSetupFromUSB
Windows USB/DVD Download Tool
Home » Advanced » Windows USB/DVD Download Tool
- 15
A special program for creating bootable flash drives and DVDs.
Most distributed operating systems are in .iso format (images). To create bootable USB and DVD, you need this program - windows USB DVD Download Tool. Easy to use and understand.
How to use it?
- Launch the program; - Select the system image: windows usb download tool download - Then select what we want to write to - a flash drive or disk: usb dvd download - All that remains is to click Begin and wait until the files are copied to the media.
Download windows USB/DVD Download Tool:
windows7-usb-dvd-tool.zip [2.54 Mb]
For those who do not have an iso image, they are here: windows distributions.
The utility is ideal for creating a bootable USB flash drive for Windows 7, 8 and Win 10.
windowspro.ru
Bootable USB flash drive in Windows 7 USB/DVD Download Tools
After installing the Windows 7 USB/DVD Download Tools program on your computer, you will need to launch the program from the program shortcut on the Desktop or from the Start menu. Before starting the program, you need to insert the USB flash drive into the USB connector of your computer.
The flash drive will be formatted using Windows 7 USB/DVD Download Tools. Before formatting, in order not to lose the files on the USB drive, they will need to be moved to another location, otherwise they will be lost after the formatting process is completed.
The entire process of recording an operating system image occurs in several stages and takes four steps.
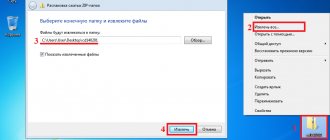
In the first step, you need to click on the “Browse” button. In the Explorer window that opens, you must specify the path to the ISO image with the Windows 7 or Windows 8 operating system.
In this example, I have selected a disk with an image of the Windows 7 SP1 Maximum 32-bit operating system, which is located on the external hard drive “K:”. After selecting the operating system image, you must click on the “Next” button.
In the second step, you need to select an external USB drive. The program can transfer operating system installation files to a DVD disc. In this case, when you select a DVD optical drive, the program will write the operating system image to a DVD disc.
After selecting the USB drive, click on the “USB device” button.
In the third step, the program detects the connected external USB drive. If several external drives are connected, then select the one on which you will write the operating system image. After this, you will need to click on the “Begin copying” button.
Now the fourth step of the program begins. Windows 7 USB/DVD Download Tools formats the USB drive and then writes an image of the Windows 7 operating system.
The operating system image recording time depends on the size of the ISO file, the speed of the flash drive and the power of your computer.
The Windows 7 USB/DVD Download Tools window appears with a message indicating that the process of recording the operating system image has completed. A bootable USB flash drive with an image of the Windows operating system has been created.
In this case, recording an image of the Windows 7 SP1 Maximum 32-bit operating system took me 12 minutes with antivirus enabled.
Now you need to exit the program and then open the USB drive. After opening the flash drive, you will see the recorded files of the Windows 7 operating system on your removable drive.
windows USB/DVD Download Tool
Let's look at how you can use the USB/DVD Download Tool in Windows 7 to make a bootable USB flash drive or DVD.
I think that almost all users have encountered this situation when windows (operating system) stops starting, in other words they say “windows crashed” and in general, it doesn’t matter whether it’s a blue screen or some kind of error, in other words, the system doesn’t start, and We immediately begin to think, what to do?
Either take your computer to a technician and pay a certain amount of money and most likely they will reinstall it for you, or try to reproduce the reinstallation yourself. In this simple situation, it’s up to you, but if you decide to reinstall yourself, then this article will be of benefit to you, in it we’ll talk about how to create a bootable USB flash drive or DVD using a simple program “USB/DVD Download Tool "And we will also discuss all the pros and cons of this software.
You can download the latest Russian version on the developer’s website using this link.
Let's take a look at the characteristics and system requirements of this program.
- Year of manufacture: 2009
- Platform: windows XP SP2\SP3, windows Vista or windows 7 (32/64-bit version)
- Compatibility with Vista: full, no restrictions
- Tablet: Not required
- Developer: Microsoft
System requirements:
- Pentium 233 MHz processor or higher
- 50 MB of free hard disk space
Also, for its installation and correct operation, you need Microsoft.NET Framework 2.0 or higher, but if this package is not installed, this program will prompt you to automatically download and install this “Framework”.
Looking at these data, we can safely say that this program is not very demanding on computer resources, and can work even on weak PCs. I am and will always be inclined to choose this particular utility for creating a bootable flash drive, since it is simple both to install and to operate. And the most important thing is that you try once, it will work, and that’s it! As they say, “farewell to the master with round sums” :))).
How to make a bootable USB flash drive using the windows USB/DVD Download Tool
The first thing you need to do is install the “USB/DVD Download Tool” on your computer.
Next, I will explain the process of burning a Windows image to a DVD using screenshots that will confirm my words.
First, download windows (operating system) from a third-party resource or the official Microsoft website after the image has been downloaded.
Go to Start/All Programs/And find the program USB/DVD Download Tool (I have it signed as Create bootable windows7 disk).
Launching the USB/DVD Download Tool
And we see the initial interface of the utility
Original interface USB/DVD Download Tool
The program prompts you to select an image of the Windows operating system. Click on the Browse button and look for our pre-prepared windows image (I will use Windows 7 32-bit as an example). Select our image and click “Open”. After you have chosen the image, click “Next”
Select our windows image and click “Open”
The program may offer to go back to the beginning in order to select a different operating system image if you make a mistake. Next, we are asked to select the media type USB or DVD; in our case, we choose USB.
Insert our flash drive into the USB connector and press “USB”
Select our USB drive and click “Copy”
Select our USB flash drive from the list and click “Copy”
After a certain period of time, we will see that the image recording will be completed successfully. Next, close the program and remove the flash drive from the USB connector.
But the capabilities of this program have not yet been exhausted, since it can also write an image of the operating system not only to a USB flash drive, but also to a disk. You can also use Micro SD via a 2.0 adapter. This recording method has been personally tested! Everything worked out for me.
And then everything follows the same scheme, but I think that if you managed to make a bootable flash drive using the USB/DVD Download Tool program, then you will be able to burn it to a regular DVD.
USB/DVD Download Tool Errors
I would also like to focus on the topic of possible errors when installing an image on removable media or a CD.
And I will give some of the most common examples of their solution.
The first error you may encounter is when you have selected a system image and moved to the next item and suddenly a window appears with the following text: “The selected file is not a valid ISO file” or in Russian “The selected ISO image file is not a valid ISO file”
Error: "The selected ISO image file is not an ISO image file"
This error appeared because the operating system image was damaged and you can fix it using another utility called “PowerISO”
Using this software, you need to unzip the image and use the same program to recreate the image. Using these manipulations you can solve this problem, but if the operating system image was not badly damaged, if this does not help, then you will have to download another image.
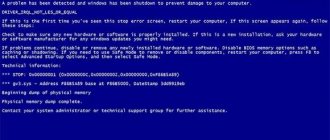
The following error may be the most common when recording Windows 7/8/8.1/10 64-bit version to removable media!
Read it carefully, and then you will be able to correct the error. If you get the Error “Files copied successfully. However, we were unable to run bootsect to make the USB device bootable. If you need assistance with bootsect. Please click “Online Help” link above for more information.”
Windows 7 USB DVD Download Tool error
I will not describe this error at length, but it occurs when you want to write Windows 7 or Windows 8 64-bit to a USB flash drive, but at the same time write it to Windows 7 32-bit.
To solve this error, you need to download the following file from the Internet: “bootsect.exe” if you don’t find it on the Internet, then it will definitely be in Windows 7 32-bit. So this file must be placed at the address “C:\Users\Username\AppData\Local\Apps\windows 7 USB DVD Download Tool” if you did not change the path when installing the program.
Once you place the “bootsect.exe” file in the Windows 7 USB DVD Download Tool directory, you can easily burn different versions of Windows, be it a 32-bit or 64-bit system. After this, your program will become more useful and unique.
And now we can conclude that there is no need to take the computer to a service center if you can reinstall windows yourself, and it turned out that it is not so difficult to burn an image of the operating system to media using windows USB/DVD Download Tool, and I am sure that after Once you have done such work, it will not be difficult for you to reinstall the operating system on your computer, but this is rather a different topic and we will discuss it in the following articles...
I would be grateful if you use the buttons:
BsodStop.ru
Solving the problem if bootsect was not launched
In some cases, at the last stage of creating a bootable USB flash drive, the Windows 7 USB/DVD Download Tools program window displays information that the system files were copied to the flash drive but bootsect was not launched. The status bar is colored red.
You need to do the following:
- Run Command Prompt as Administrator.
- In the command line interpreter window, enter the command:
bootsect /nt60 X: /mbr (X is the drive letter of the bootable flash drive)
The flash drive will become bootable.
Launching a bootable USB flash drive on a PC
To install the Windows 7 operating system, or the Windows 8 operating system, you need to insert a flash drive into the USB connector of your computer.
After this, you should turn on the computer. At the very beginning of the boot, you will need to enter the “BIOS” (by pressing the “Delete” key on the keyboard or another one, which is indicated at the bottom of the monitor screen when you start the logo of your computer’s motherboard). In the BIOS settings you will need to set the boot priority from a USB drive.
After this, the process of installing the Windows operating system on the computer begins. The process of installing the operating system is exactly the same as from an optical DVD.
Bootable Windows 10 USB flash drive the official way
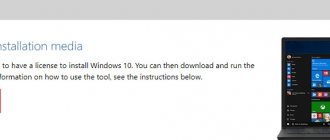
Immediately after the release of the final version of the new OS, the Windows 10 Installation Media Creation Tool utility (today Microsoft Media Creation Tool) appeared on the Microsoft website, allowing you to create a bootable USB flash drive for subsequent installation of the system, automatically loading the latest released final version of Windows 10 onto the drive and creating a USB a drive for booting in both UEFI and Legacy mode, suitable for GPT and MBR HDDs and SSDs.
It is important to note here that with this program you get the original Windows 10 Pro (Professional, including for workstations), Home (Home), Home for one language from the Microsoft website. And such a flash drive is fully suitable if you either have a Windows 10 key, or have already installed licensed Windows 10 or 8.1 on your computer or laptop, and now want to perform a clean installation (in this case, skip entering the key during installation, By clicking "I don't have a product key", the system will activate automatically when connected to the Internet). You can install Windows 10 from such a USB drive without meeting these conditions and work without activation (without any special restrictions), or activate it with a key from a previous version of the system.
The steps to create a bootable Windows 10 USB flash drive in the official way will look like this, it is advisable to connect the drive itself immediately, the size is at least 8 GB, the data from it will be deleted in the process:
- You can download the utility for creating a bootable USB flash drive for Windows 10 Microsoft Installation Media Creation Tool from the official website https://www.microsoft.com/ru-ru/software-download/windows10 by clicking the “Download tool now” button.
- Run the downloaded utility and accept the terms of the license agreement.
- Select “Create installation media USB flash drive” and click “Next”.
- After some time, a window for selecting the architecture, system language and release will appear. By default, the recommended settings are set, in accordance with the characteristics of the current system, but by unchecking the checkbox, you can select a different language or bit depth - 64-bit or 32-bit. Keep in mind that one image contains all editions of Windows 10 at once: you cannot change anything in the edition field; the choice of professional or home version of the OS occurs during installation.
- If you unchecked and selected a different bit or language, you will see a warning: “Make sure that the edition of the installation media matches the edition of Windows on the computer on which you will use it.” Given that the image currently contains all editions of Windows 10, this warning should generally be ignored.
- Select "USB flash drive" if you want the program to write a bootable installation USB flash drive, or, if desired, you can select "ISO file" to download the original Windows 10 image and burn it to a USB or DVD on one's own.
- Select the drive to be used from the list. Important: all data from the flash drive or external hard drive (from all its partitions) will be deleted. However, if you are creating an installation drive on an external hard drive or USB drive larger than 32 GB, you will find the information in the "Additional Information" section at the end of this guide useful.
- The Windows 10 installation files will begin downloading, and then writing them to the USB flash drive: Creating an installation drive. These steps may take a long time.
- Upon completion, you will receive a message “USB flash drive is ready”, you can close the utility and use the created drive.
Upon completion, you will have a ready-made drive with the original Windows 10 latest version, which will be useful not only for a clean installation of the system on UEFI and Legacy (CSM) systems, but also for restoring it in case of failures.
5 ways to make a bootable Windows 10 installation flash drive - video instructions
You may also find some additional ways to create a Windows 10 x64 and x86 installation media for UEFI GPT and BIOS MBR systems, described below, useful.