Usually, the question of how to create a virtual drive in UltraISO is asked when the error “Virtual CD/DVD drive not found” appears in the program, but other options are possible: for example, you simply need to create a virtual CD/DVD drive UltraISO to mount various disk images .
This instruction describes in detail how to create a virtual UltraISO drive and briefly about the possibilities of its use. See also: Creating a bootable USB flash drive in UltraISO.
Note: usually when installing UltraISO, a virtual drive is created automatically (the choice is provided at the installation stage, as in the screenshot below).
However, when using the portable version of the program, and sometimes when using Unchecky (a program that automatically removes unnecessary checkmarks in installers), the installation of the virtual drive does not occur, as a result the user receives the error Virtual CD/DVD drive not found, and the drive is created using the method described below is not possible, since the necessary options in the parameters are not active. In this case, reinstall UltraISO and make sure that “Install ISO CD/DVD emulator ISODrive” is selected.
Creating a virtual CD/DVD drive in UltraISO
To create a virtual UltraISO drive follow these simple steps
- Run the program as administrator. To do this, you can right-click on the UltraISO shortcut and select “Run as administrator.”
- In the program, open the menu “Options” - “Settings”.
- Go to the "Virtual Drive" tab.
- In the “Number of devices” field, specify the required number of virtual drives (usually, no more than 1 is required).
- Click OK.
- As a result, a new “CD Drive” drive will appear in Explorer, which is a virtual UltraISO drive.
- If you need to change the virtual drive letter, go back to the section from step 3, select the desired letter in the “New drive letter” field and click “Change”.
Done, the UltraISO virtual drive has been created and is ready to use.
How to mount an image in a CD/DVD emulator
/ Interesting /
Usually, the question of how to create a virtual drive in UltraISO is asked when the error “Virtual CD/DVD drive not found” appears in the program, but other options are possible: for example, you simply need to create a virtual CD/DVD drive UltraISO to mount various disk images .
This instruction describes in detail how to create a virtual UltraISO drive and briefly about the possibilities of its use. See also: Creating a bootable USB flash drive in UltraISO.
Note: usually when installing UltraISO, a virtual drive is created automatically (the choice is provided at the installation stage, as in the screenshot below).
However, when using the portable version of the program, and sometimes when using Unchecky (a program that automatically removes unnecessary checkmarks in installers), the installation of the virtual drive does not occur, as a result the user receives the error Virtual CD/DVD drive not found, and the drive is created using the method described below is not possible, since the necessary options in the parameters are not active. In this case, reinstall UltraISO and make sure that “Install ISO CD/DVD emulator ISODrive” is selected.
The main part of the program's main window is occupied by the “Image Catalog” area. The images added to the program will be displayed here. Naturally, if necessary, you can delete images from this directory.
On the left side of the program window there is a vertical panel with tabs. In the free version of the program, you will be able to use the functionality from the “Images” and “New Image” tabs. To use additional features from the “Disc Burning”, “Virtual HDD”, “USB”, and “Writer Drive” tabs, you will need to pay.
In the lower left part of the program window, there are buttons “Settings”, “License”, “Help”.
At the very bottom of the program window there is a panel on which all virtual drives connected in DAEMON Tools Lite will be displayed. When you turn it on for the first time, using the “Scan” button, you can start searching for images on your computer to add the found images to the “image catalog.” You can add images to the catalog manually whenever you want.
In the images tab, you can add images to the “image catalog” using the “Add image” (plus) button, or find the image on your computer using the image search.
Developer: DT Soft Ltd.
Distribution size: DAEMON Tools Pro Advanced and DAEMON Tools Pro Standard - 11 MB; DAEMON Tools Lite - 7.4 MB
Distribution: shareware DAEMON Tools is one of the most attractive solutions for emulating virtual drives in terms of functionality. This package is presented in three editions: DAEMON Tools Pro Advanced, DAEMON Tools Pro Standard and DAEMON Tools Lite.
The DAEMON Tools Lite edition has the most modest capabilities - it does not have a graphical interface (access is done through the system tray) and allows you to create up to four virtual drives and mount images on them.
The other two versions already have a convenient graphical interface and provide the creation of from 16 to 32 virtual SCSI devices, and DAEMON Tools Pro Advanced can also emulate two virtual IDE devices, which is important for connecting some copy-protected CD/DVD drives.
As for the images themselves, all three solutions provide for the creation of images from CDs, and not only from regular ones (Audio CD, Video CD, Mixed Mode CD, CD-Extra, Video CD, DVD-Video, DVD-Audio formats are supported ), but also from copy-protected ones, including SafeDisc, SecuROM, LaserLock, RMPS, Hide CD-R, CD/DVD-Cops, ProtectCD, StarForce and Tages.
At the same time, almost any image file formats are supported (B5T, B6T, BWT, CCD, CDI, CUE, ISO, MDS, NRG, PDI, ISZ). If desired, the images can be easily protected with a password. Pro versions also provide image editing, which allows you to add files to the image, as well as replace and delete them.
Working with images is implemented very conveniently - you can add them to the collection by specifying them manually or selecting them from the list of those found during an automatic search (images created in the program itself are added to the collection automatically), and in the collection itself you can place images in subdirectories (this is more convenient for further orientation).
When creating images, compression is provided, which will be very useful if there are a large number of images on disk, however, only MDS images can be compressed - images in other formats will first have to be converted to the MDS format (possible only in DAEMON Tools Pro Advanced).
Demo versions of the program (Russian localization available) are fully functional and operational for 20 days. The cost of commercial versions varies - for DAEMON Tools Pro Advanced it is 39.90 euros, for DAEMON Tools Pro Standard it is 16.90 euros, and for DAEMON Tools Lite it is 14.90 euros.
However, the DAEMON Tools Lite version for non-commercial use is free. Since the easiest to use utility is DAEMON Tools Lite, we will start with it. It does not have a graphical interface, so all operations in this utility are carried out through the system tray. Connecting virtual drives in DAEMON Tools Lite is as easy as pie. First, you will need to install the required number of virtual devices - right-click on the program icon in the system tray, select the Virtual CD/DVD-ROM command and specify the required number of drives.
And then sequentially mount a virtual disk for each of the drives, simply specifying the corresponding image files on the hard drive for them (command Virtual CD/DVD-ROM > “Drive…” > “Mount image”). To remove an image from a virtual drive, you will need the “Unmount image” command.
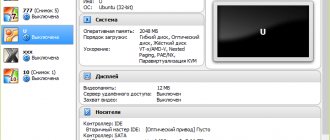
The technology for working with DAEMON Tools Pro is somewhat more complicated. The window of this utility is implemented in the form of three panels - the information panel and two windows: the image window and the drive window. The images window is designed to perform various types of operations on images, and the drives window allows you to manage physical and virtual CD/DVD devices.
The first step in DAEMON Tools Pro is to create a collection of images. If the images were created earlier and you have not yet forgotten which specific folder on the disk they are located in, then you need to click on the “Add images” button and immediately place them in the collection. If you don’t remember where they are, you will have to use the automatic search mode (the “Search for images” button).
If there are no images on the disk yet, you need to create them.
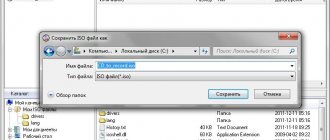
To do this, insert the treasured disk into the CD/DVD-ROM, click on the “Create an image” button, select the appropriate physical drive (of course, if there are several drives) and, if necessary, change the disk reading settings on the “Drive” tab. And then on the “Image Catalog” tab, enter the name of the image and indicate the output format, after which they click on the “Start” button and after a couple of minutes they get the desired image.
After the collection is filled with images in one way or another, install the required number of virtual drives by clicking the “Add SCSI Virtual Drive” button the appropriate number of times - the connected drives appear in the program’s virtual drives window. It should be noted that one virtual drive is created automatically during the installation process of the program.
Then a virtual image is installed on each of the virtual CD/DVD devices.
To carry out such an installation, you should activate the first image and use the “Mount image” command from the context menu, followed by specifying the desired virtual drive.
After this, a similar operation will need to be carried out with all other images. If you need to remove an image from a virtual drive, use the “Unmount” command from the context menu.
You can enter the DAEMON Tools Lite settings from the main program window. To do this, click on the “Settings” button (gear) on the panel.
In the “Integration” tab you can change file associations with the DAEMON Tools Lite program.
Source: https://newsu.ru/interesnoe/kak-sozdat-virtual-nyy-privod-v-ultraiso.html
How to remove the UltraISO virtual drive
If, for some reason, you need to remove the virtual drive from Windows Explorer, this can be done from the application settings.
Follow these steps:
- Run the UltraISO program as an administrator (this is a prerequisite, otherwise nothing will work).
- In the main UltraISO window, open the “Options” menu, and in the drop-down menu, click on “Settings...”.
- In the “Settings” window, go to the “Virtual Drive” tab.
- In the “Number of devices” option, select: “None”, and then click on the “OK” button.
After applying the settings, the UltraISO virtual drive will be disabled and will disappear from the Explorer window.
If necessary, the user can reconnect the virtual CD/DVD drive in the UltraISO program settings using the method described above.
Conclusions of the article
The UltraISO program has a built-in ability to create a virtual CD/DVD drive that emulates a physical drive. The Windows operating system defines a virtual drive as a physical device, so disk image files can be opened directly from the computer, without first burning to optical CD/DVD discs.
If an error appears that the virtual CD/DVD drive was not found, you must enter the UltraISO program settings to enable the virtual drive on the computer.
How to create a virtual drive in UltraISO (video)
https://www..com/watch?v=OW3-CFL_EdY
Source: https://vellisa.ru/create-virtual-drive-ultraiso
Using the UltraISO virtual drive
The virtual CD/DVD drive in UltraISO can be used to mount disk images in different formats (iso, bin, cue, mdf, mds, nrg, img and others) and work with them in Windows 10, 8 and Windows 7 as with regular CDs. disks.
You can mount a disk image both in the interface of the UltraISO program itself (open the disk image, click on the “Mount to virtual drive” button in the top menu bar), and using the context menu of the virtual drive. In the second case, right-click on the virtual drive, select “UltraISO” - “Mount” and specify the path to the disk image.
Unmounting (extracting) is done in the same way, using the context menu.
If you need to delete the UltraISO virtual drive without deleting the program itself, similar to the creation method, go to the settings (running the program as an administrator) and specify “No” in the “Number of devices” field. Then click "OK".
Solving the virtual drive problem
The error notification window looks like this:
First, it’s worth understanding the reasons for its appearance. Fortunately, there is only one: you did not create a virtual drive in the program for further use. Most often this happens when you just installed the program, or when you saved a portable version and did not create a virtual drive in the settings. You can fix the error by adding one. The algorithm is as follows:
- Run the program as administrator.
After opening, go to the settings using the “Options” - “Settings” items.
A more detailed description of the solution to the problem is presented in the article at the link below.
What to do if the virtual drive does not install
In some cases, the steps described above may not lead to the desired result. As a rule, this indicates certain problems either with the UltraISO program itself, or they were caused by a conflict in the system.
- For UltraISO to work correctly, you need an application that can create virtual drives: Alcohol 120%, DAEMON Tools, PowerISO and others. Try installing one of these programs and repeat the steps from the instructions above.
- If the solution from the previous step turned out to be ineffective, try reinstalling UltraISO - in some cases, the application may not install correctly, which is why the described problem occurs. Try not to mess with pirated “cracked” versions: the trial version of UltraISO allows you to mount virtual disks.
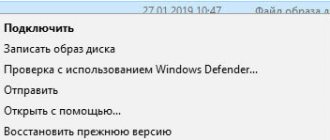
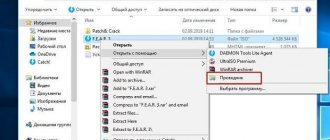
- If you use Windows 10, you can do without third-party programs: this OS contains tools for working with drive images. Simply select the desired file, right-click on it and select the “Open” or “Open with” option – “Explorer”. Please note that this method will not open all images!
How to remove a drive
If the device is not in use, it can be removed through the program interface.
Saving video in Adobe Premier - step by step we analyze all the export settings
To do this, open options - settings - virtual drive .
Expand the list of “ number of devices ” and about
When you uninstall the application, all created devices will also be deleted.
Method number 1 - launching the program correctly
This problem is most often encountered by users of Windows versions 7, 8 and 10, since they contain “fool protection” under the official name “User Account Control”. Therefore, any program that requires access to system files to operate must be run as an administrator. The algorithm for setting up the correct launch is as follows:
- Right-click on the program shortcut and in the menu that opens, click on the “Properties” line.
- Switch to the “Compatibility” tab in the dialog box and check the box next to “Run this program as an administrator” in the last subblock.
To permanently get rid of problems arising from the need to run programs as an administrator, you need to perform the following algorithm:
- In the “Control Panel” go to the “User Accounts” section.
- In the center of the new window, click on the line “Change control settings”.
- In the next dialog box, move the slider down.
- Click “Ok” to save the new setting.
After this, the error in UltraISO “Virtual drive not found” usually disappears.
Programs for creating virtual disks
Personal computer users often encounter optical disc image files in ISO or MDF . These files contain various file information, multimedia content or installation “image” with Windows OS, as well as many other data.
Therefore, the PC user faces a task, the solution of which is to open these files, view them, or process information on these images.
The most popular programs that can create a virtual DVD-ROM for reading ISO images, as well as writing them to optical drives, are Alcohol 120 and UltraISO .
In this material, we will describe with examples how to create a virtual DVD-ROM, and also describe the process of creating ISO images using these utilities.
We create and mount images on a virtual DVD drive using Alcohol 120
Alcohol 120 appeared back in 2002. Since then, it has become very popular among Russian-speaking users. It gained popularity due to the ability to create virtual DVD drives and mount an image on them .
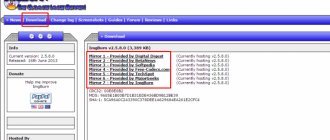
The program can also write images to physical optical drives. You can download the program on its official website www.alcohol-soft.com. After downloading the installer, you can begin installing the program.
When we run the installation file, we will be taken to its start window.
In this window, click the Next button and continue downloading and installing the utility to go to the next window. In this window, we will make a decision regarding the license agreement, after which the main utility installer will begin downloading to the computer. After downloading, the main installer window will launch.
Let's move on to the next step, where we will also resolve the issue of accepting the license agreement, and then click the Next> button. After completing these steps, the installer will ask you to restart your computer , with which we must agree.
After the reboot, the same wizard will launch , in which you must again accept the license agreement. Next we will move on to selecting components to install . Leaving all components unchanged, click Next>.
In the next window, select the installation location for the utility and click Next>. After these steps, the installation will begin . After installing the program, launch it from a shortcut on the Desktop, which will allow us to go to the main program window.
At the bottom of the program you can see that we have two optical drives on our computer, one virtual, which was made by Alcohol 120 , and one physical.
Now let's start creating an image file. To do this, insert a licensed disk with Windows 10 into our PC. Going to the program window, click the “ Create images ” button.
This action will open the Image Creation Wizard.
From this window you can see that the utility itself selected the physical drive from which it is necessary to make an image file, and also displayed all the information about the disk located in the DVD drive. To create an image file, the last step left is to click the Start button.
The recorded ISO image will appear in the main window of the utility. By right-clicking on it, you can mount it to the utility’s virtual disk.
The example shows that creating an ISO image and mounting it on a virtual DVD-ROM is not at all difficult. Also, if necessary, the created image file can be written to a new optical disk directly from the utility menu in the “ Burn images to discs ” section. With this action we will make another copy of the Windows 10 license disk.
Create and mount images on Virtual DVD-ROM using UltraISO
UltraISO program , just like Alcohol 120, can record images, create Virtual DVD drives and mount images on them. In addition, the utility can edit dozens of image formats, which is a big plus.
You can download the utility from its official website https://ezbsystems.com/ultraiso. Even a novice user can figure out how to install the utility, as it is very simple. Therefore, there is no point in describing the installation process of the utility. After installing the utility, launch it from a shortcut on the Desktop.
This action will move us to the main program window.
Before creating an image in UltraISO , insert a licensed disc with Windows 10 into the DVD drive. Now in the program window, press the F8 key to call the image creation wizard.
In the wizard, select the image type “ ISO ” and the DVD drive where our Windows 10 disk is located.
After installing the selected options, click the Make button, which will directly launch the creation process itself.
To mount our created image file, we need to press the F6 button, after which a wizard will appear in which we can select the location of our image , mounting it on the virtual drive created during installation of the utility.
In the same way, we can unmount an image file from a virtual DVD drive.
As can be seen from the example, the utility is as easy to use as Alcohol 120.
Let's sum it up
The utilities discussed are quite easy to use and perform their task 100 percent. Alcohol 120 and UltraISO utilities have become so popular among millions of users around the world. In addition to the programs discussed, there are also such popular utilities that you can familiarize yourself with:
- Gizmo Drive;
- WinCDEmu;
- DAEMON Tools.
These programs have similar functionality as in the utilities under consideration. I would also like to note that these programs and the ones in question support both old and new Windows operating systems, so users, for example, with Windows XP will not have any problems running them.
We hope that our material has introduced you better to Alcohol 120 and UltraISO , thanks to which you can create your own disk images and mount them on virtual drives.
on topic: UltraISO
Source: https://UstanovkaOS.ru/instrument/programma-dlya-virtualnogo-diska.html
Method number 3 - disabling the physical drive
When connecting additional physical DVD drives, sometimes a conflict occurs with programs like UltraISO, causing the latter to not work. To get the application to work again, you need to programmatically disable the added drive using the following sequence of actions:
- Right-click on the “My Computer” icon and use the “Properties” line to open the dialog box of the same name. Next, calling the “Device Manager” depends on the installed operating system. Windows XP: “Hardware” / “Device Manager”. Other versions, including Vista: click on the inscription of the same name on the left side of the window.
- On the left side of the new window, open the “CD and DVD drives” item and select any of them.
- Call the context menu and click “Disable”.
- To restart a computer.
After finishing using UltraISO, you must connect the physical drive again in the same way.
Method number 4 - reinstalling the program
If the previous methods for eliminating the error in UltraISO “Virtual drive not found” did not help, then you need to reinstall the program.
To do this, you need to remove it using the standard program manager in the Control Panel or a third-party application to completely remove programs.
In Windows 8 this is done as follows:
- Hover your mouse cursor over the upper right corner of the screen.
- In the block that appears, select “Settings” and “Control Panel”.
- Go to “Programs and Features”, having first switched the view from “Categories” to “Large Small Icons”.
- Select the program in the list, click “Delete” and follow the instructions of the removal wizard.
When the program is uninstalled, you can check the registry for its remains using CCleaner and restart your computer. After this, UltraISO is installed again.
How to burn an image to a flash drive in UltraISO
This program is a convenient tool that allows you to create a full-fledged flash drive for installing an operating system in a few minutes. The sequence of actions is as follows:
- Select “Boot” from the menu and go to “Burn disk image”.
Note. The media should not contain any valuable information, since the program automatically formats it before recording.
This is the way to write an image to a flash drive in UltraISO.
UltraISO is an application that allows you to fully work with disk images. And if the error “Virtual drive not found” appears in it, it is quite easy to fix it.