Sooner or later, the printer may begin to print poorly, for example, stain the paper, leave black or white stripes, and color distortions will be noticeable. This often happens due to the lack of preventive measures during intensive, frequent printing. Elements of the device can become clogged, and if we talk about an inkjet printer, the cartridges of which are refilled with liquid ink, then the latter are susceptible to drying out, both in the cartridge itself and on the part through which the ink enters the sheet of paper - the print head.
This element, depending on the brand and model of the printer, may be built into the cartridge (non-removable) and vice versa. In both cases, you can restore the operation of the part by cleaning it thoroughly using one of the suggested methods below.
It doesn’t matter what kind of printer you have, Epson, Canon, HP, or even talking about a multifunctional device (MFP), because the only difference will be in the design. And in the material we described various methods that will help you clean the printer head at home in a variety of situations. With the help of the posted images and videos, you will probably be able to understand which method is right for you.
When cleaning is needed
- When running a nozzle test, part of the image is skipped on the sheet, white stripes are visible when printing, colors are not reproduced correctly, or one of them is completely missing. Such signs of clogging occur when the printer is used very intensively.
- The printer did not print documents for a long time. Water-based liquid inks may dry out. For different models, the drying time of the paint varies from several days to a month. If the device has been idle for a long time, has inkjet printing technology, and after turning it on, printing has deteriorated significantly or even blank sheets are coming out, it is likely that the print head has dried out completely.
- Different types of dyes were filled in or the cartridge was filled with paint from another manufacturer. When mixing solutions of different chemical compositions, a reaction occurs inside the ink tank, which can result in rapid thickening of the ink and failure of some elements of the head. If there is a need to use another brand of ink, first thoroughly wash the cartridge, the channels through which the ink is delivered, and the head itself.
- Refilling ink. After each refill, you need to clean the print head for preventive maintenance.
You should resort to cleaning the PG as a last resort, since the reason for a decrease in print quality can be not only its clogging, but also:
- airlock;
- incorrect head position;
- excessive pressure caused by installing the CISS above the level of the head;
- failure of piezoelectric crystals due to printer overload (Epson);
- overheating of the heating element (HP).
If system errors are displayed on the display, cartridge indicators are blinking, or information is given that ink is low, there is no need to flush the head. Even with frequent and intensive printing, cleaning is done no more than once a quarter.
How to clean the Epson printer head manually?
Epson printer head cleaning can be done manually. To do this, you need to perform the following steps:
- Turn off the printing device using the start button and wait until the green indicator lights up.
- Next, the printing paper is placed into the printer.
- A command is given to the printing device to clean the print head.
- The quality of the test sheets is checked.
- Start cleaning.
- After the light stops blinking, the printer turns off.
If the printer asks you to do a test, you don't have to refuse it. After all, the first Epson head cleaning procedure may not give the desired result and will have to be repeated.
Software cleaning
Every printing equipment manufacturer offers washing software. The program is installed on the computer when connecting and setting up the printer automatically or from the installation disk.
Cleaning with software involves running ink through the head nozzles. Ink pressure removes light ink plugs and air pockets.
Before more complex physical cleaning, do a software one according to the scheme below.
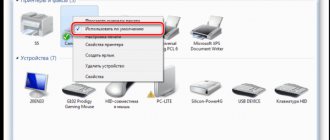
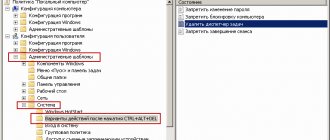
- Go to “Start” - “Control Panel” - “Hardware and Sound” - “Devices and Printers”. Or you immediately get to the desired window: launch the “Run” window and enter the command “control printers”, press “Enter” or “Ok”.
- From the list of connected equipment, select your printer and right-click on it.
- From the context menu, select “Printer Properties”.
- Select the Maintenance or Service tab.
- Depending on the cleaning depth required, select Printhead Cleaning or Deep Cleaning.
- If the dirt is heavily soiled, the cleaning program runs several times.
- Print a nozzle check sheet or any multi-colored image.
The required settings and the item responsible for cleaning depend on the brand and model of the equipment. Install the software that comes with the device upon purchase and study its interface in detail. We are confident that you will find the function you need and clean the part.
For the Epson brand, you can install the PrintHelp utility, which also has this functionality.
Keep in mind that the software method consumes ink, which could be enough to print 3-5 A4 sheets. After cleaning, the printer should be left undisturbed for 2-5 hours.
If after 3-4 cleanings the print quality does not improve, the head must be washed manually.
Recommendations for cleaning the print head from the manufacturer
The manufacturer did not stand aside on this issue. In the technical documentation for your Epson printer you will find several recommendations for cleaning the print head of the device. However, the methods are based only on software cleaning of PG nozzles. This method will cope with only a small part of the problems caused by drying of the dye. To clean the Epson PG in this way, you will need to perform the following steps:
- turn on the printer to the network and start it with the “Power On” button;
- install the printer driver on your computer;
- connect the printer to the computer;
- On your PC, go to “Control Panel” – “Devices and Printers” and find the model of your printing machine;
- Right-click on the printer icon and open its properties;
- in the “General” tab, find and open “Settings”;
- in the settings, go to the “Service” tab and click on the “Print head cleaning” item;
- wait for the process to complete and perform a nozzle test.
If there is an “Ink” button on the printer control panel (a drop symbol is shown), then you need to hold it down for three seconds and the ink will be cleaned automatically. For devices with a full-fledged display, cleaning the print head is started through the “Maintenance” menu. That's all. If this procedure does not help, the developers recommend taking the printer to a service center or changing the print head. However, there are much more effective ways to flush the PG of an Epson printer.
Manually cleaning the print head
First prepare your work area. A simple desk is optimal. To avoid contaminating it, cover the surface with old newspapers or paper in several layers.
What you need for cleaning
- Latex gloves.
- An ordinary medical syringe with a needle.
- A flat container that can then be thrown away. For example, a photo bath, a plastic box with a low side or a saucer.
- Sponges or lint-free wipes.
- Plastic tubes with a small diameter, suitable for droppers.
- Scissors to cut the tubes to the desired length.
- An eraser for removing heavy dirt that cannot be removed by soaking.
All about flushing fluids
For cleaning, it is best to use flushing fluid produced by the same company that manufactured the consumable. If you can't find it, any certified cleaner will do. It will not damage the device, but you need to choose a product based on the type of ink in the cartridge.
To clean water-soluble ink, use:
- Special water. All chemical salts have been removed from it (WWM W01).
- Distilled water. Sold at any auto store.
- Homemade solution. Distilled water is mixed with ammonia (5-10%). The ratio of components depends on the degree of contamination of the nozzles. The resulting mixture is filtered through a mesh measuring 0.01 microns.
To wash nozzles contaminated with pigment dyes, use either a specially designed solvent or isopropyl alcohol.
Popular cleaners from WWM:
- W01 – demineralised water;
- CL-04 – liquid for cleaning the upper parts of the printer from water-based ink;
- CL-06 – a product for removing traces of black and colored pigment paint;
- CL-08 – special liquid for washing and soaking;
- CL-10 – enhanced cleaner.
Regular window cleaner is cheap. At home, “Mr. Muscle” is often used.
When choosing a detergent, it is important to pay attention to its color.
- Green and pink. Suitable for removing water-based inks as it contains ammonia.
- Blue and orange (contains isopropyl alcohol). Used to remove traces of pigment ink.
Before washing, the cleaner must be heated to t=+40..+60 °C to enhance the effect of the solution.
Before cleaning, you can test the effectiveness of the cleaner. A little ink is taken and dissolved in various media. After a few hours, you can analyze the result. If sediment is released or the liquid becomes jelly-like, the cleaner was chosen incorrectly. With the right cleaner, the dye liquefies and the ink clumps loosen.
Flushing the fitting
- The printer turns off when the cartridge carriage is in the central part.
- The cartridge is removed, the device cover is removed and the cable is disconnected.
- The latches are pressed to release the head.
- Turn the head over with the nozzles facing up and carefully remove dirt with a sponge dipped in cleaning liquid.
- Place the head in a prepared container, at the bottom of which there is gauze or a sponge soaked in cleaner.
- Use a gauze swab to remove all dirt from the intake grille.
- Remove the rubber bands from the ink tanks, wash them and wipe the places where they were located.
- Choose a syringe for flushing the print head so that it fits tightly but easily onto the fittings. As an adapter, you can use hoses and tubes of different diameters.
- Fill the syringe with the prepared cleaner.
- Release the air.
- Place the syringe on the fitting.
- Clean the structure slowly and carefully.
- Make sure that the liquid flows into the container.
- When the color of the cleaner becomes natural, you can finish washing.
- Clean each fitting according to this scheme. Then wipe the entire structure and let it dry.
To check the quality of cleaning, place the head on gauze soaked in cleaner for one hour. If after an hour the gauze remains clean or there are only faint stains on it, the cleaning has been done efficiently. Additionally, you can run 2-3 cleaning programs.
Soaking (dropping)
- The head is placed in a container.
- Cleaner is drawn into the syringe and a needle is put on.
- The liquid is dripped onto the fitting a few drops at a time.
- The procedure lasts several hours, and in case of severe contamination – all day.
You can take plastic tubes from the dropper, cut pieces of 5-10 cm from them, put them on the fittings and pour the cleaning agent inside, leaving them to soak for a while. Liquid can be periodically added to the tubes.
To speed up the process, the agent is drawn into the syringe, a tube is put on it, and the entire structure is inserted into the cartridge connector. To clean the nozzles, several cubes of cleaner are fed through the tube with a syringe. This way all head connectors are cleaned, and then two cleanings are done by software.
Broach
- Pour cleaner into the bottom of the prepared container.
- Place the empty syringe tightly onto the fitting.
- Smoothly draw the cleaning liquid through the head into the syringe (pull the syringe plunger towards you).
Ultrasonic bath
This is a rather risky cleaning method; they resort to it if it was not possible to wash the head with other methods.
The procedure requires additional equipment, for example, a medical device or a device for gentle cleaning of small parts. With an ultrasonic bath, there is a risk that the part will fail and cannot be repaired. Those who have used this method claim that within a day or immediately after the first print, the head breaks.
How to clean a mouthguard and knife
The knife (squeegee), which in an inkjet printer removes excess dye from the surface of the nozzles and nozzles, can be carefully wiped with a lint-free rag soaked in cleaner.
The cap, which absorbs moisture and prevents the ink from quickly drying in the nozzles, requires thorough washing according to the following algorithm:
- Unplug the printer.
- Open the cover from the front.
- Remove all parts blocking access to the knife with the guard.
- You wipe the knife.
- Draw the cleaning liquid into the syringe.
- Insert it into the mouth guard.
- Leave it alone for a while.
- Pump out the remaining cleaner back with a syringe.
- Do the procedure several times until the liquid pumped into the syringe stops staining with ink.
Manual cleaning
First you need to choose a place to carry out work. An ordinary room table is best suited, but it is recommended to cover it with paper or old newspaper in several layers to avoid contamination. Also prepare:
- Rubber household gloves to protect hands.
- A syringe with a needle can be easily purchased at a pharmacy.
- A small flat vessel that you won’t mind throwing away later.
- Cotton swabs or lint-free wipes.
- Small diameter plastic tubes.
How to clean
The ideal option is to use products from one manufacturer. In this case, consumables and flushing fluid. If you can’t do this, then there’s nothing wrong with it. Any certified cleaning cleaner will not cause damage or negative changes in the operation of the printing device. But, depending on the type of dyes used, you need to buy the appropriate products.
If water-soluble paint is used, then the best option for removing it from surfaces would be:
- Special water from which all chemical salts have been removed.
- Distilled water, which is easy to buy at a car store.
- A self-prepared solution of distilled water and ten percent ammonia. The proportion is determined by the condition of the contaminated parts.
Pigment ink has a completely different chemical composition and requires different washing fluids:
- Isopropyl alcohol.
- Special substances for dissolving pigment dyes.
When choosing a cleaner, pay attention to WWM products, namely products W01, CL-10, CL-04, CL-06, CL-08. As a budget option, you can consider using window cleaning products. The most famous Mister Muscle. At home, it is often used successfully.
Cleaning liquid for inkjet printers DIY methods.
Cleaning Other Important Components
Many modern models of inkjet printers from Epson, Canon, HP and other companies use built-in print head cleaning systems and ink drying protectors for nozzles and nozzles. We are talking about a knife and a mouthguard. The knife in an inkjet printer is a special part that automatically mechanically removes excess ink from the surface. This allows you to increase the service life and postpone the washing process for some time. The mouth guard absorbs moisture, is located under the head, and when not working, the nozzles are located in it, which prevents them from drying out quickly. Over time, these parts themselves become contaminated and cease to fully perform their job. Also require cleaning.
The knife can be gently wiped with a lint-free cloth moistened with liquid. The situation with the mouthguard is a little more complicated - it requires complete rinsing. Brief instructions for your actions:
- Disconnect the printer from power.
- Open the front cover.
- Remove anything that is blocking access to the knife and mouth guard.
- Wipe the knife.
- Draw a little cleaner into the syringe.
- Slowly insert it into the mouth guard.
- Leave it for a while.
- Draw out the product using a syringe.
- Carry out the procedure until the evacuated cleaner stops being stained with paints from the tray.
Cleaning methods
Flushing
- Place the print head in the prepared container.
- Select a syringe with a size that will allow you to easily and tightly fit it onto the head fittings.
- Fill up with cleaning solution.
- Release the air from the syringe.
- Place it on the fitting.
- Slowly start skipping.
- The liquid should flow into the container.
- As soon as the color of the cleaner stops changing, you can finish washing.
- Carry out the procedure with each fitting.
- Wipe all elements and allow time to dry.
If you notice that the liquid flows poorly or is not absorbed at all, then you need to move on to a more aggressive method, which is described below.
Maceration
- Leave the head in the same container.
- Fill the syringe with cleaner.
- Put on the needle.
- Place a few drops onto the fitting.
- Carry out the procedure for several hours.
- For severe stains, you can leave it overnight.
- Prepare plastic tubes that are easy to put on and fill them with cleaning agent as shown in the picture.
Broach
If all else fails, try the forced pulling method.
- Pour cleaning agent into the bottom of the container.
- Release from the syringe everything that remains there after the last procedures.
- Place it tightly onto the fitting.
- Smoothly try to draw the cleaner through the head into the syringe.
Ultrasonic bath
Recently, an ultrasonic bath has become a popular method for cleaning the print head of a printer. It requires special equipment and some skills to perform the procedure. Judging by the reviews and opinions of experts, it is impossible to make a clear positive choice towards this option. The risk of permanently losing an expensive element of a printing device is very high. A bath can be used if none of the methods helps.
Head disassembly
This option for eliminating print defects caused by clogged nozzles and nozzles is not recommended to be done at home without experience. The likelihood of damage to small structural elements is very likely. This type of work should be delegated to experienced specialists at office equipment service centers in your city. It is advisable to choose a certified company or an official representative of the device brand.
Printing with cleaning fluid
The method helps restore the non-removable head, which is built into the cartridge. Instead of dye, cleaning agent is poured in and cleaning starts. If, when printing with a color printer, defects of only one color appear in the image, then you only need to fill the cleaner into the problem compartment. After cleaning, the device cannot be used for two hours. During this time, the cleaning liquid will have time to dissolve the dye that has dried in the nozzles.
After 2 hours, open any graphics editor and fill the page with the color that you had problems with before cleaning. It is optimal to use Photoshop, since it allows you to use the CMYK color scheme when filling the sheet. The resulting fill is printed on a standard sheet, and you must first set the highest print density. The remains of the cleaner, mixing with the paint, will leave marks on the paper. If white horizontal stripes appear when printing, the head has not been cleaned sufficiently. When the filling is homogeneous, the blockage in the head is eliminated.
After washing, the cartridge is refilled with ink, the nozzles are programmed to be cleaned, and the color sheet is printed again.
When to clean the print head
When you hear the phrase clean office equipment, the first thing that comes to mind is the head of the device. Let's consider in what cases cleaning is necessary. This is required when printing defects are detected. Cleaning should also be carried out after the equipment has been idle for a long time. For example, when used at home, it often happens that office equipment sits idle for a long time.
And another factor when it is necessary to clean the printer is to replace the ink. Ink from different companies differs in composition, and mixing them is prohibited. For this reason, you first need to clean the office equipment, then you will be able to avoid its preliminary failure and improve the quality of printing documents and photographs.
Cleaning the head on the cartridge
If the printer has a cartridge with a built-in head, remove the container from the device, turn the nozzles up and apply a few drops of the product to them. After 10 minutes, remove excess cleaner with a napkin and check whether the dye passes onto the napkin. If it was not possible to wash the nozzles in this way, they need to be soaked in a container with detergent. You need to soak for at least 2-3 hours.
To help the liquid penetrate the nozzles better, you can place a piece of toothpick under the inkwell, so the nozzles will not come into contact with the bottom of the container and will remain immersed in the solution.
After soaking, wipe the entire surface dry with a napkin, especially the contacts. The cartridge is inserted into the printer and the nozzle check test is started. If the cleaning quality is poor, try blowing the nozzles through the air intake:
- Cut the syringe needle in half and put it on the syringe.
- Place a soft elastic band on the needle. This will ensure a tight fit of the syringe to the walls of the inkwell.
- The needle is inserted into the air intake hole of the cartridge, and the rubber band is pressed tightly against the walls.
- The air from the syringe is gently squeezed inside. Under the bottom of the inkwell there should be a piece of gauze or a napkin onto which ink will flow under pressure.
- Color ink tanks with three holes on top are vented in the same way.
Everything you need to know about flushing fluids
You need to wash the head of an HP or any other printer with a special solution - cleaner. It is best to use a cleaner of the same brand as the ink, since the manufacturer is the same, he selects the optimal compositions of dye and solvent that will help more effectively than just any cleaner.
There are several types:
- For external cleansing.
- To remove water-soluble ink, for example when cleaning a Canon print head.
- For removing pigment dyes.
- For removing special heavily dried toners and clearing large dirt and blockages. This often happens when cleaning the Epson print head.
Cleaning for Epson printers
The cleaning technology itself is no different from the instructions above. The only difference is that the head does not need to be removed from the carriage. Then the algorithm will be like this:
- At first, the carriage with cartridges and head will be in the parking position (on the right);
- to move the carriage and move it freely with your hands, you need to give a print job, and as soon as the carriage leaves the parking lot, turn off the printer;
- Next, remove the cartridges.
Then you need to put a clean, folded 2-3 times napkin on the tray (a tray with several compartments for collecting waste ink, located in the parking area), and slide the carriage onto it so that the napkin does not wrinkle. We will evaluate the cleaning result based on the condition of the napkin after washing.
The image shows the carriage with the lid closed. It must be removed to gain access to the head.
Next, take a syringe, fill it 2/3 with cleaner, put it on the fitting and slowly press the syringe plunger.
The liquid should flow easily through the channel. If there is no passage at all, then a plug has formed in the head that needs to be removed. To do this, small forward movements of the piston back and forth are made at intervals of one minute.
So you need to clean every channel. The amount of cleaner pumped should be approximately 1-2 ml. If the fluid flows in one channel more difficult than in others, then the flushing must be repeated until the same force is needed everywhere.
After washing each tubule, you need to check the condition of the napkin. Move the carriage aside and look. If the napkin is stained, replace it with a new one. And so on until the napkin stops staining and only transparent cleaner comes out.
When the cleaning is completely done, remove the napkin, insert the cartridges into the carriage, and place it in the parking lot. Turn on the printer, do cleaning through the software (software) or through the device menu.
If the head is bolted or screwed to the carriage, it can be detached and cleaned outside the printer. Then you first need to remove the board with all the cables, and then get the PG. The part is washed in the same way, only in a container.
Do I need to remove the head? - look at the video.
Complete head disassembly
You can only disassemble the head yourself if you have experience. It is better to entrust the work to specialists from a certified service center. The video below will help you disassemble it.
Printer repair and cartridge refilling in St. Petersburg
Based on the personal experience of a service engineer, I will tell you how to wash an EPSON print head without disassembling it. and most importantly how to do it right! Take your time and try not to spill ink into the printer.
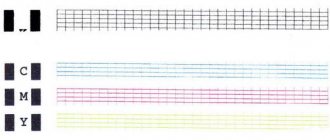
We start with a nozzle test. Studying this printout will help identify the problem with the GHG.
Photos are usually printed on photo paper. People usually print tests for themselves on office paper. The difference in image quality is very large. Even an excellent test on plain paper looks mediocre, the lines are blurry, there is no clarity. A test on plain paper can easily hide signs of problems. When it is not clear why the print is bad, be sure to do tests on photo paper.
Two tests fit very comfortably on 10x15 paper in the “landscape” position. Compress the image moderately; if you do not fit into the allowed volume, divide the test into parts. It is very convenient to post one problematic color in high magnification.
We print the test on PHOTO PAPER!
Some things can only be discovered in large fills. A variant of the Print Quality Check fill test. The easiest way is to print a solid rectangle in a problematic color on the entire A4 sheet.
The IDEAL test can only be done on PHOTO paper
1. The presence of all steps in the staircase (Fig. 1).
The absence of steps means the absence (“falling out”) of part of the nozzles. It produces unprinted streaks on prints.
Causes: clogs, drying out, air... See instructions below.
A special case for cartridge systems. The springs in the cartridges begin to rust and tightly clog the nozzles.
2. The steps go evenly, there are no jumping or falling steps (Fig. 2).
3. The steps are even stripes, there should be no shaggyness (Fig. 3, red circles).
4. The text should not be smeared or doubled - an easily noticeable sign of cross-cutting in black (Fig. 3, red arrows, Fig. 4).
5. The borders of the colors should be smooth and lie in two lines, the points of two colors should form a ladder (Figure 3, blue circle with arrows, Figure 4, red lines)
6. All colors must be pure, without any admixture of other colors (Figure 5).
7. Check color consistency and saturation. You need to know or have a control test in the archive. I personally once confused Magenta with LM when refilling (the colors of the bottom of the donors do not really match the inscriptions).
8. Compare the new test with the previous ones to understand the development of the situation. This means past tests should be at hand.
9. Another interesting test: in one of the channels the printing stops abruptly and also resumes in a certain place.
The cause was an ink stain on the encoder tape. After cleaning the belt (carefully!) with a cleaning solution, normal operation was restored.
10. In one or more colors, some nozzles draw a whole line instead of a short step.
The reason is a short circuit in the PG or control loop. Most often, this is caused by turning on a poorly dried printer after the washing has come into contact with the current-carrying paths. There is no treatment. Because accompanied by burnout of the PG electronics and motherboard. Sometimes the flushing gets in as a result of “pushing the PG with pressure” - which also cannot be treated.
11. On the test (I don’t give it here) in black, a couple of nozzles are askew, but the printout...
The reason was discovered after a series of sandwiches: a clump of wool or hair came off the PG nozzle plate. Keep your printer away from pets, and keep your combs away.
The test is a regular one, it is launched for printing via a standard driver or PrintHelp.
Washing methods:
The warnings below about the need to DISCONNECT the printer FROM THE POWER mean: not only turn off the “Power” button, you also need to physically UNPLUG the POWER CORD from the outlet or from the printer. It is advisable to disconnect the USB cable from the computer, since there is voltage on it even when the power of modern PCs is turned off, but the PC power cord is connected to the network.
It is important to first know the names and locations of the printer components.
Attention!
During the washing process, moisture may enter the electrical contacts of the PG. In this case, connecting the printer to the network will lead to failure of the PG and the printer's motherboard.
If in doubt, after washing, MUST DRY the steam generator!
Supply of washing liquid
- Flushing with syringes
- Capsules and Cartridges
Cleaning
"Software" methods
- Regular printing
- Standard flushing (via the printer driver and PrintHelp)
- Advanced washing (PrintHelp)
- "Single Color Wash" (PrintHelp)
IMHO. The function is not particularly needed, so there is no point in taking risks. It is unknown how it was implemented, and how well it was debugged... No offense to the developers, who deserve respect.
"Manual" methods
- "Sandwich"
- Flushing through the drain
- Backpressure flushing (suction)
- Pressure flushing
- Flushing by pumping
- Immersion flushing of PG
- Washing using an ultrasonic bath (ultrasound)
"Sandwich"
The main remedy for bone blasting (see nozzle test). Helps clean the nozzle plate - i.e. the bottom surface of the PG when dried ink appears there. However, using a sandwich until the cause of the bone blast is identified and eliminated is useless. The scythe will return after a few hours of inactivity. The main reason for scything is overflowing ink. Occurs due to an imbalance in the system or depressurization of the cartridge.
DISCONNECT the printer from the network!
How to make a sandwich will be written in the next article “Making the Right Sandwich”
Flushing through the drain
DISCONNECT the printer from the network!
- If the drain is brought outside, then it is very convenient to rinse the mouth guard and PG through the drain hose by placing an empty syringe with a fitting on the hose. It is convenient if a fitting for the syringe nozzle is installed in the drain hose.
- Before washing the PG, it is advisable to rinse the mouth guard.
- We install the syringes in the PG as needed and park.
- Gently pulling the plunger out of the syringe, we pull the wash out of the syringes, driving it through the PG, cap and drain.
- We drain the waste, put on the syringe, and add rinsing to the syringes. Continue until the wash comes out dirty.
ATTENTION! The method is CONTRAINDICATED when clearing blockages and when using cartridge systems.
The powerful pressure developed will draw into the SG all the debris retained by the SG filter. If the channels are plugged and there is no air in the syringe, it is theoretically possible to push through the PG sealant. It is permissible to use it only when cleaning to change ink, if you are sure that the system is clean.
Backpressure flushing (suction, reverse jerk)
DISCONNECT the printer from the network!
- The syringe (10..20 ml) is filled by flushing with 1 ml of air (safer and more convenient), or completely empty. In the first case, the syringe piston ends up somewhere in the middle of the syringe and can move in both directions. In the second, the piston is in the lower position, the syringe is empty - no air, no flushing.
- The syringe is installed on the channel to be cleaned through a cambric.
- While holding the syringe, pull the piston out of the syringe, creating a vacuum.
- The force and speed of the jerk are experimentally found to be approximately 1 cm/s. The connecting cambric will shrink noticeably in the middle part.
- We carefully watch the syringe. Ink from the PG will go inside, then bubbles.
- We remove the syringe, drain the dirt, rinse the syringe, repeat as necessary.
ATTENTION!. With back pressure in the PG, EVERYTHING below the PG will be sucked in.
Despite the temptation, DO NOT PARK PG .
Pressure flushing
DISCONNECT the printer from the network!
The syringe is filled by flushing with air. Air is a MUST! The air will soften the water hammer, and can save you if the pressure is too high (without guarantee).
The syringe is installed on the channel to be washed through a cambric (see washing with syringes).
A LITTLE pressure is created on the piston. We carefully monitor the level of flushing in the syringe and the connecting casing.
Patience!.
If there is excessive pressure the PG sealant may BURST ; in this case, the printer can be thrown away, because the price of a new PG is equal to the price of a new printer without a starter set of cartridges.
There is also good news . When connecting the syringe with a cambric, the excess pressure causes the cambric to fly off the fitting, flushing flows out in all directions, and the PG can survive.
There is also bad news . If the printer was turned on, then flushing will short-circuit the electrical contacts and tracks, resulting in the motherboard burning out.
Repair is quite difficult and not always successful. If the GHG burns out, it’s cheaper to throw it in the trash.
Keep in mind that there is voltage present on the USB cable even when the computer's power is turned off but the electrical outlet is turned on.
The piston can move down, compressing the air, and the flush can remain in place. Not a good sign. When the piston is released, it will return to its original position.
In this case, you need to use “pumping”
Flushing by pumping
First we use the back pressure (suction) method! And learning about pressure washing!
DISCONNECT the printer from the network!
- The syringe (10..20 ml) is filled by flushing with air (1/4 of the volume), the syringe piston is in the middle position of the syringe and has the ability to move in both directions. The presence of air is MANDATORY (see pressure flushing).
- The syringe is installed on the channel to be cleaned through a cambric.
- We pull the plunger slightly towards ourselves, bubbles come into the syringe and mix with the rinse.
- Now we press lightly on the piston - flushing with bubbles goes into the PG.
- Pull out the piston again...
The piston pumps approximately 1-2 ml. We perform rocking as needed and while there is rinsing in the syringe.
Dip flushing
In 99% of cases, it is possible to wash out the PG using other methods. It is better to avoid this method, because... Having disconnected and removed the SG, not everyone will be able to put it back and connect it.
- A 3-4mm flush is poured into a flat neutral container.
- The PG is removed from the printer and the nozzle plate is immersed in the wash.
Additionally, you can install syringes with flushing on the fittings.
Soaking (soaking) can last up to several months (in the case of pigment). In the case of water-based ink, simpler methods should have helped.
Ultrasonic bath
The same applies to “immersion washing”.
Additionally, ultrasonic vibrations influence the washing, which allows you to soak away dried dirt faster. An ultrasonic bath can be used to soak Epson heads. When soaking Canon heads in an ultrasonic bath, the heads usually burn. This is probably due to the thermal principle of the Canon heads. Be that as it may, Canons can handle significantly less power than Epsons. Therefore, for Canons it is necessary to use appropriate devices with the ability to adjust frequency and power, and also expose them to ultrasonic influence for less time.
By the way, Epsons, if desired, can also be burned in an ultrasonic bath.
I hope this article will help solve problems with print quality on your printers!
Prevention
It is recommended that you perform regular maintenance checks on the entire printer and at the same time clean the head as a preventative measure. Make sure that the devices are free of dust or dirt, jammed paper, paper residue, or any other foreign objects. If found, they must be removed immediately.
If your printer has a continuous ink supply system, regularly check the condition of the hoses that pump the ink from the reservoir to the head. There should be no blockages, air plugs, kinks or mechanical damage. The amount of ink should be kept above the average level. This precaution will prevent air from being sucked into the CISS. It is not recommended to leave the printer idle for a long time without printing. Ink can dry out quickly, especially if it is of poor quality. Every couple of days, do preventive printing of several sheets.
With regular program cleaning, physical cleaning will not be necessary for a long time. To prevent the paint from drying out, you need to print a color page at least once a week.
5 / 5 ( 3 voices)