How to choose a lubricant for a cooler?
For coolers, it is necessary to use inert organic silicon, that is, silicone grease or a mixture of silicone + Teflon.
The best option is to use silicone lubricant from the manufacturer. It lasts about 4-5 years and then dries out.
Branded MX-4 lubricant in a syringe
If such a lubricant is not available, Litol-24 will do. This is a refractory lubricant that is not afraid of heat.
The third option is solid oil. The principle of action is the same.
Synthetic or semi-synthetic engine oil creates a surface film at any temperature. As a result, there is less noise and almost no wear. Motorists usually have leftovers in cans in the garage. But it is best to use it together with Litol-24.
WD-40 is well suited for lubricating non-separable coolers. The tube attached to the can can be conveniently inserted into the gap between the body and the impeller. Adhere to the following rules:
- Insert the tube as deeply as possible so that the lubricant (at least partially) penetrates the bearings and does not spray all over the gap.
- When inserting through the gap between the impeller and the housing, do not use much force to avoid damaging the parts.
- If after this procedure the problems remain (noise, “wedge”), repeat the process.
How to change the processor correctly
Obviously, before you change the processor on your PC, you need to remove the old device. To do this, do everything described above, only in reverse order. That is, first remove the fan with the radiator, then unfasten the processor from the socket, and take out the “heart” itself.
When the socket is free, install a new processor in it, as described in the instructions above.
Before installing the processor on your computer, you may have to remove the motherboard from the system unit. To avoid causing any damage to it, it should be placed on something soft - for example, foam rubber. Also avoid exposure to static electricity.
Some coolers and processors already have a layer of thermal paste. If the processor has thermal paste, then there is no need to apply it to the cooler. Do the same if the thermal paste is located on the cooler. That is, avoid double layering. In general, I would recommend that you erase the factory layer and apply your own, so that it is absolutely normal.
Hello friends! As I already clarified in one of the previous publications, assembling a computer usually begins with installing the processor. This is easy to do if you follow the procedure correctly. Those who are too lazy to read this instruction will find a video on the topic at the end of the article.
The installation of components from AMD and Intel is almost the same - the difference lies in the method of attaching the cooler. And now in more detail about how to install the processor on the motherboard.
Types of bearings
Before you begin disassembling and lubricating, it is advisable to know the type of bearing that is used in your cooler. This affects the choice of oil and lubrication method.
The following bearings are used in fans of household and computer equipment:
- Sleeve bearing is the most common and simplest type, which consists of a bushing with a rotating shaft. The bushing is covered with anti-friction material. WD-40 is suitable for lubricating them.
- Slides with screw threads (rifle bearing, Z-Axis bearing) - have specific threads on the axle bushing that recirculate the lubricant.
- Hydrodynamic (FDB bearing) - a modernized sliding bearing, where the rotation of the shaft is carried out in a layer of liquid substance, which is held inside the sleeve due to the pressure difference created during operation
- The rolling element (ball bearing, ceramic bearing) consists of two rings (balls), rolling elements and a separator. Ceramics can be used as a material. For rolling bearings, grease (silicone) is used.
- Oil Pressure Control (SSO) - Improved fluid dynamic bearing. A distinctive feature is a large amount of liquid (lubricant). To reduce wear, the shaft is centered by a permanent magnet installed in the base.
- Self-lubricating plain bearing (LDP) is an improved plain bearing. There is IP6X dust protection and a special slot for recovered oil, which increase the service life of the fan.
- Polyoxymethylene bearing (POM Bearing) is a modernized plain bearing. To increase service life, the shaft is coated with polyoxymethylene, which has a low sliding friction coefficient.
The article will discuss the lubrication of coolers with bearings of the first and fourth types: sliding and rolling.
Cooler installation
When the user figures out how to install an Intel processor on the motherboard, he will have to deal with the chip cooler. There will be nothing complicated if it is a proprietary cooling system (CO). But there is a difference in installing an Intel and AMD cooler.
The Intel CO has 4 legs that fit perfectly into the four holes on the system platform. When installing a fan, you need to arrange everything so that the power is easier to connect to the connector. It is important that the wire does not hang down or cling to other elements. You need to place the cooler so that the legs fit into the holes and fix them.
AMD has a different mount. And if the question is how to install the processor on the motherboard, then you will have to figure out how to install the cooler. In the center of the radiator there is a bar in which there is a hole. There is a special lever on top of the system that will help secure it to the board.
To install the cooler correctly, you need to carefully place it on the chip so that the lever remains on top. Then you need to insert the lower and upper parts into the grooves, and then fix the structure.
How to remove the fan?
When removing the processor cooler, be careful not to damage the chip and surrounding elements. Fans are attached in two ways: using locks or bolts. There are also non-removable ones.
If the cooler is secured to the radiator with latches, simply bend it out and pull it out of the latches. Then disconnect power from the motherboard. The same goes for the bolts - unscrew them with a screwdriver and remove the fan.
With a fixed structure, only surface cleaning can be carried out.
To remove the fan from the power supply, unscrew the power supply from the case and disconnect all wires. Then unscrew the cap and remove the cooler. Remember how the fan is positioned so that you can return it to its original position at the end of the procedure. In some power supplies, the power cable cannot be disconnected because it is soldered to the board - in this case you will have to work in cramped conditions.
There are 120 and 80 mm fans on the power supply, usually small ones are noisy
To remove the cooler from the video card, remove it from the motherboard slot. Then use a thin screwdriver to unscrew the cooling system bolts. Depending on the video card model, the cooler can be built into the radiator or mounted with separate bolts. You only need the fan itself.
Step-by-step algorithm for disconnecting a video card cooler
conclusions
In this article you learned how to remove the cooler from an AMD processor. This operation requires care and precision, but it is not particularly complicated or incomprehensible.
If you find an error, please select a piece of text and press Ctrl+Enter.
Related posts:
No related photos.
Rate this article:
( 2 ratings, average: 3.00 out of 5)
Tweet Pin It
about the author
diatttor
How to disassemble the cooler?
Having completed these simple steps, proceed directly to disassembling the fan itself:
- Peel off the label on the side where the wires are located.
- Using a sharp object, pry up the rubber plug and remove it.
- Remove the retaining ring with a slot on one side. To do this, insert the tip of a knife or thin screwdriver into the slot and turn it 90° so that it moves apart and lift the ring.
- Remove the rubber sealing ring framing the rod.
- Disconnect the impeller from the fan frame.
- Then you can clean and lubricate.
Remove the sticker and pull out the retaining ring
Following the retaining ring, pull out the rubber seal and separate the parts of the cooler
How to replace the processor in a computer
The processor can rightfully be considered the main component in a personal computer. This part is responsible for any calculations performed by the computer. It is the processor that is responsible for playing video, music, opening graphic files, converting video, and even running the browser.
Any actions performed by a computer require the participation of the processor. Even seemingly video games, for which the main part is a video card, require a fairly powerful processor. Contrary to popular belief, a powerful video card alone will not be enough to run modern games. A mid-price processor and video card will cope with the task much more efficiently than a budget processor and a flagship video card.
Thus, many computer users eventually realize that their processor is the weakest link in the system, especially if it does not support 64-bit systems or limits the frequency of RAM. So, how to replace the processor on your computer yourself.
How to lubricate a cooler?
First, remove dirt and old grease with a napkin or cotton swabs. Pre-moisten them in alcohol or any solvent. Apply a thin layer of new grease to the rubbing parts of the bearing.
Top - dirt removal, bottom - lubrication
The rolling bearing on the housing is designated by the word BALL. Such a bearing can be disassembled with a thin needle. It also has a locking ring that secures the cap that covers the balls. Opening this cover, inspect the condition of the lubricant and add it if necessary.
No disassembly
To lubricate the cooler without disassembling it, remove it from the computer, peel off the top sticker and pull out the protective cover. Then carefully pull the blades up and drop a couple of drops of oil from a pipette or syringe into the gap formed. Then rotate the blades with your hands to disperse the lubricant and repeat the operation.
How can I find out if it is possible to replace the processor and which model is suitable?
Firstly, the processor must have the designation PGA (for Intel) or S1, FS1, AM2 (for AMD chipsets) in the socket name. In other cases, replacement is possible only in service centers that are equipped with special equipment for soldering such parts.
Secondly, the new processor must have the same connector (socket) as the old one. You can find the name of the socket in the instructions that come with the laptop.
You can determine the processor model through the device manager. For this:
- Bring up the Start menu.
- Search for “Device Manager” and click on it.
In the window that opens, click on the “Processors” tab, after which the names of all installed components will be available to you.
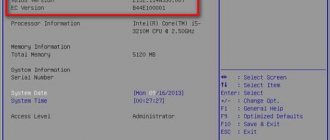
You can also look at data about the processor (and more!) in the Everest program:
- Download the Everest program to your laptop and run it. Open the "Motherboard" section.
- Select "CPU". The processor name and number of cores are displayed next to the “Multi CPU” item.
- In our example, the manufacturer is Intel, the processor model is B960.
Knowing the processor model, go to the official website of its manufacturer. Enter your processor model into the site search. There you will find data on the connector (socket):
Here you can find out the code name of the processor. For example, in this example it is Sandy Bridge. It is recommended to select a new processor from the same series, i.e., codenamed Sandy Bridge. Otherwise, compatibility and correct operation are not guaranteed.
The last thing you need to know when choosing a new processor is the thermal design power (TDP). The TDP indicators of the new processor should be similar or lower. If the new processor has a higher TDP than its predecessor, then the laptop parts will overheat, since the cooling system is designed to remove less heat. But in practice, exceeding TDP by 10 W usually did not cause overheating.
Chip replacement
Some users have to change the processor to a more powerful one. But to do this you will have to remove the outdated chip from the motherboard. To do this, you need to disconnect the cooling system from the power supply, then remove it and get to the processor.
In principle, this process is no different from installing components. You need to do everything in reverse order. The main thing to remember is that you should not use force or sharply pull on the cooler or processor. Otherwise, components on the motherboard may be damaged.
Features of replacing a processor on a laptop
The sequence of actions when changing the CPU on a laptop, in general, repeats a similar procedure when changing the CPU on a stationary PC, however, it has some peculiarities.
First of all, this concerns significant restrictions on the possibility of choosing a new CPU, because batches of mobile processors do not have even a tenth of the variety that conventional processors have.
In addition, all of the components in the laptop are selected in such a way as to be configured to work optimally with each other and no replacement of components is provided at all. For example, there may simply not be enough space in the laptop case to install a more powerful cooling system, the installation of which will be required if you change the processor.
Also, when replacing the CPU in a laptop, you should completely turn off the power to the system, not only disconnecting it from the network, but also removing the battery from it.
Not many users have to deal with system assembly. It is not so difficult to assemble a computer yourself, but there are still many nuances in this matter that you will have to deal with. For example, not everyone knows about the motherboard.
Replacing thermal paste
In this case, you will have to change the thermal paste. For some, this procedure may be difficult. But the matter is actually simple, since it does not require additional resources or special knowledge.
In general, changing thermal paste is necessary in any situation, since it is recommended to do this a couple of times a year. Therefore, the following information will be useful for all PC users.
So, to replace you need a cotton pad and alcohol. This way you can remove the old layer of thermal paste. Now you can start applying the protective layer. To do this, squeeze a small amount of thermal paste into the middle of the metal processor cover. Usually an apple seed is enough to cover the entire surface.
To spread the thermal paste, you need to use a special spatula or an unnecessary credit card. Also, some users advise using a syringe to distribute the protective layer.
The central processing unit (CPU) is the main unit of a personal computer (PC), whose tasks include executing programs. Actually, speaking about the type of PC, we should first of all talk about its CPU, since it is this that determines the maximum performance. A processor can be replaced in two cases: PC upgrade or CPU failure.
In the first case, replacing the processor is due to the need to increase system performance by installing a faster chip. The second case is much rarer, since of all PC components the probability of CPU failure is minimal. This is explained not only by the relatively high reliability of the CPU, but also by the fact that there are at least two channels for protecting it from unwanted influences: thermal and electrical.
Replacing a CPU involves a very complex sequence of actions, which are quite problematic to perform without prior preparation. Questions will arise at each stage of this process: from choosing the type of chip to be replaced to the technical features of the installation itself.
Let's look at how to install a processor on a motherboard in more detail.
Installing a processor on a motherboard involves several steps:
- determining the type of CPU used and possible replacement options;
- selecting and purchasing the desired processor;
- choosing a motherboard (MB), if there is a need for a more radical change in the “stuffing” of the PC;
- choosing a cooling system for a new processor;
- actually installing the CPU and connecting the cooling system.
In the event that the MP is not changed, you also need to know how to remove the processor from the computer motherboard in order to free up space in the socket for a new one.
The choice of processor for a computer is made based on the user's needs for system speed. However, if everything were that simple, then replacing the CPU would not pose much of a problem. Currently, there are several types of processors (so-called generations or families) that often differ not only in speed, but also in design. And this is within the same manufacturer. And, although there are now only two major manufacturers of PC processors - Intel and AMD, each of them has several families of chips, often radically different from each other.
If there is no need to replace the MP, to select a processor you should know which processors are supported by the available motherboard. As a rule, this directly depends on the type of socket used in it. A socket is a connector for connecting a processor. For example, motherboards with an LGA1151 socket only support processors manufactured in a design that matches the LGA1151 standard socket.
In addition, even within the same socket, CPUs can differ in electrical parameters. Therefore, it is imperative to know which types of CPUs can be supported by the MP.
This can be found in the MP instructions. If there is none, you can contact the manufacturer’s support service and download instructions from the Internet.
Choosing a motherboard
In the event that all CPUs supported by the MP do not meet the necessary software requirements, the motherboard is also changed along with the processor. This process is called "platform switching".
Important! Changing a platform is essentially purchasing a new PC, since a number of devices (for example, RAM) may be incompatible with the new platform, and these devices will also have to be changed.
If you select a motherboard, it must fully match the type of CPU used, both in terms of the socket type and its electrical parameters (similar voltage levels, distribution of pins on contact pads, etc.)
In addition, the format of the motherboard must be suitable for the type of case used, the number of connected external devices must be no less than what the user has, the number of fan connectors must also be appropriate, etc.
The cooling system (CO) for the new CPU must meet the following requirements:
- Mechanical compatibility with the type of CPU and MP used.
- The heat dissipated by the CO should be no less (or better even 10-20% more) than the maximum power generated by the CPU at its maximum speed.
- The dimensions of the CO must be such that it fits in the housing.
- The power connector for the active part of the CO (fan) must be compatible with the corresponding connectors on the MP.
Assembly
The sequence of assembling a PC when installing a new processor on it is as follows:
- It is necessary to disconnect the motherboard from all external devices and power connectors and remove it from the PC case. You can, of course, make a replacement without going through this procedure, but it will be somewhat inconvenient.
- Remove the cooling system of the old CPU by disconnecting the cooler clip and removing it from the surface of the CPU.
- It is necessary to open the socket using a special lever located on it.
- Remove the processor from the socket and place the new CPU in it.
- Close the socket using the lever.
- Install the CO and connect it.
- Install the MP into the case, and after connecting it to external devices, you should connect it to the power circuits.
After completing these steps, the PC with the new processor is ready to use.
Installing a cooling system on the processor
Installing a CO may have a number of nuances that should definitely be considered.
The contact between the CPU cover and the base of the CO heatsink must be very tight to promote good heat dissipation from the CPU. This is achieved with the help of a special composition - the so-called. thermal paste, which is applied in a thin layer to the processor cover using a special spatula. If such a tool is not available, apply thermal paste with a regular knife. Excess thermal paste that gets on the socket or motherboard should be removed with a napkin.
Next, the heatsink is installed on the CPU. This must be done by immediately orienting it correctly to attach the clip. If you make a mistake at this stage and perform the installation incorrectly, you will have to remove the CO again and reapply thermal paste.
After this, the CO is secured with a clip attached to the socket or MP.
The final stage of connecting the CO is connecting its connector to the power circuit. Most often it is indicated on the MP with the inscription “CPU_FAN”.
The process of installing a CPU into a motherboard is a rather specific and, to some extent, delicate procedure, carelessness in which can lead to the breakdown of one or another PC component. Moreover, this component will most likely not be the processor.
Modern CPUs are made in fairly durable cases and mechanically breaking them is quite problematic, unlike, for example, models from 10-15 years ago. However, it is very easy to damage the connector into which the CPU is installed, in particular its contact pads.
When installing the CPU, you must strictly observe its pinout (that is, correct installation) in the socket. Most CPUs are square, so sometimes they can be installed on the MP in the wrong orientation. For this purpose, the plastic housing of the connector contains keys - special recesses or grooves into which grooves made in the CPU housing should fit.
You should not use significant physical force when directly installing the CPU in its place and when snapping connectors and clips into place. All dimensions of such devices are selected in such a way that everything fits into place without gaps or effort. If this does not happen, then either the CPU is not suitable for this type of installation, or it is not oriented correctly, or something is preventing it from falling into place.
Important! You should definitely check the overload capacity of the power supply when installing a particular CPU, since if the supply voltage is insufficient, it may not start at all.
The CO should not be very bulky so as not to interfere with other PC components and not interfere with the free circulation of air inside the case.
Cooler installation
When the user figures out how to install an Intel processor on the motherboard, he will have to deal with the chip cooler. There will be nothing complicated if it is a proprietary cooling system (CO). But there is a difference in installing an Intel and AMD cooler.
The Intel CO has 4 legs that fit perfectly into the four holes on the system platform. You need to arrange everything so that the power is easier to connect to the connector. It is important that the wire does not hang down or cling to other elements. You need to place the cooler so that the legs fit into the holes and fix them.
AMD has a different mount. And if the question is how to install the processor on the motherboard, then you will have to figure out how to install the cooler. In the center of the radiator there is a bar in which there is a hole. There is a special lever on top of the system that will help secure it to the board.
To install the cooler correctly, you need to carefully place it on the chip so that the lever remains on top. Then you need to insert the lower and upper parts into the grooves, and then fix the structure.
Chip replacement
Some users have to change the processor to a more powerful one. But to do this you will have to remove the outdated chip from the motherboard. To do this, you need to disconnect the cooling system from the power supply, then remove it and get to the processor.
In principle, this process is no different from installing components. You need to do everything in reverse order. The main thing to remember is that you should not use force or sharply pull on the cooler or processor. Otherwise, components on the motherboard may be damaged.