There can be a large number of problems with printing and, as a rule, they often arise on their own, and sometimes immediately after refilling the cartridge. One of the most common is printing in stripes along the edge or center of the page. Stripes can be black and white. The problem affects devices of different types and manufacturers, most often from Epson and Canon. HP and Brother are less inclined towards this.
Why this happens and what to do if a laser or inkjet printer prints with stripes, we will explain in detail in our article. Here you will find instructions on how to fix the problem for different models and brands of printing machines. Let's look at the most common causes of streaks on paper and their solution.
What causes streaks to appear when printing with an inkjet printer?
There are several typical reasons that lead to the formation of streaks on paper. However, they are different for inkjet and laser printers. First, let's talk about why an inkjet printer can streak:
- Ink is running out.
- The ink has dried out or thickened inside the print head (usually because the device has not been used for a long time).
- The integrity and tightness of the cartridge is broken.
- Shaft deformation has occurred (often associated with a long service life of the device).
- The print head is faulty. She may be airy. Either the cable itself is faulty/pinched. Most often, with such a breakdown, horizontal stripes are observed on the sheet.
- The esconder elements are dirty or damaged. This is the tape itself or the sensor.
These are the most common reasons. However, streaks during printing may also appear as a result of other faults that are not listed above.
Dirty printing, black stripes, causes and solutions
Black lines along the entire page, we tell you the reasons for their appearance and how to eliminate them.
Does your printer leave black streaks along the entire page when printing?
These black lines when printing are a very unpleasant phenomenon, especially when you urgently need to print out an important work or contract, and it’s a shame that this unpleasant moment happens when we don’t have time to deal with this problem.
This problem is one of the most common, faced by almost every user of a laser printer or MFP.
Here's what you'll learn from this article:
— What causes black streaks or spots on a printed page
— How to fix the problem of printing black bars
— What's the matter with weak or missing prints?
WHAT CAUSES BLACK STRIPES OR SPOTS ON A PRINT PAGE?
There are several possible reasons for the appearance of longitudinal black stripes across the entire sheet, as well as pale spots, and each of these faults has its own reason. Let's first determine what exactly you have?
1. Black lines or tracks from top to bottom along the entire sheet, they can be either on the right or on the left, less often they are located in the center.
2. Missing areas when printing, just a white empty spot where the text should be (it happens most often somewhere in one place on the sheet and is always repeated, or not).
3. Black dirty spots from toner on a sheet of paper, they can also be repeated all the time in the same places on the sheet.
In any of the cases shown above, the first thing you need to do is run the printer, image drum and fuser cleaning wizard. All this is in the printer system menu; cleaning can be started both from the console of the device itself and from the computer. Now after cleaning the printer everything remains unchanged, we proceed to the next steps:
BLACK LINES ALONG THE ENTIRE LENGTH OF THE SHEET
Reason: Inside the printer, a sheet of paper is moved by rollers and a transfer belt, it is a piece of film. So, longitudinal lines along the sheet can appear due to their contamination or the coating of these elements with excess toner powder, and accordingly, when the paper moves along them, our unpleasant lines remain.
Solution: You can perform the following series of procedures to try to resolve this issue.
1. Take a lint-free cloth, rubber gloves to prevent toner from getting on your hands, isopropyl alcohol and a soft brush, and use them to gently clean the rollers that you can easily reach;
2. Use a vacuum (carefully with a vacuum cleaner not at full power) to remove visible toner particles;
3. Using a lint-free cloth, very carefully wipe the transfer ribbon (not all printers have this);
4. If after this the problem remains, then only replacing the transfer belt will solve the problem.
Warning: Do not touch the transfer ribbon with your fingers; you may leave fingerprints on it, which can also have a negative effect on future printing.
Remember, you need to be extremely careful when cleaning the printer, but if you are not sure, it is better to contact a specialist who already has experience in cleaning the printer.
MISSING PRINT AREAS (either always in the same place or not)
Cause: There are several possible causes, so we need to check each of them during the troubleshooting process to find it, but in most cases, the problem is caused by a worn-out drum cartridge.
The principle of operation of a laser printer is that a beam throws an image of what you want to print onto a photodrum (metal green shaft) or, as it is also called, onto a drum cartridge or photoconductor. Then this shaft rotates and transfers the fixed toner onto the paper, and then it is thermally “baked” on the sheet; we described in more detail about the operation of a laser printer here.
If the drum is damaged in any way or has fingerprints, dirt and other foreign matter, this can lead to blocking the fixation of the powder on its surface, which is what the white - empty prints on the sheet tell us.
Another reason that causes white spots on a printout may be damage to the fuser.
The fuser is a component part of the printer, which, like other components, has its own printing resource; it is responsible for “melting” the toner (powder) or, more simply, for fixing it on a sheet of paper.
Solution: Unfortunately, this technical part of the printer cannot be cleaned so simply and easily, but the following steps may help fix the problem:
1. Replace the toner cartridge, it may already be finished and a small amount of toner powder may lead to this problem;
2. Try replacing the drum block;
3. Replace the fusing unit (oven, fuser), this is unfortunately the most expensive part in the printer, but it also has an impressive resource of more than 100,000 pages.
Warning: Never touch the metal cylinder (image drum), and remember, if you are unsure, call a professional.
DIRTY SPOTS ON A SHEET OF PAPER (either always in the same place or not)
Reason: your printer printed a sheet of paper with dirty, black spots on it, this indicates that there is a problem with the drum or rollers.
This reason is very similar to the wear on the drum that we described above, a fingerprint or dirt on the roller that lubricates the toner on the page as it passes through the fuser.
Solution: if the printer allows you to remove the photodrum, then after removing it you can visually inspect for any defects on its surface (the presence of fingerprints, scratches, chips and other foreign objects). You can also remove the toner cartridge and look inside the printer and see if everything is clean and beautiful. Let's try to fix this problem step by step and get the desired clean sheet without any defects.
1. Clean the rollers with a brush or vacuum;
2. We will replace the toner cartridge, if we have a spare one, it may be faulty or have already exhausted its printing life;
3. Replace the drum block;
4. Replace the fusing unit.
One of these steps is guaranteed to eliminate the problem of dirty pages when printing. Be careful and careful when carrying out this work, and if you are not sure, then calling a specialist will be the best solution.
It also happens that when printed, a white, blank sheet comes out!
You can be very impressed by focusing on the fact that you will now receive a beautifully printed document from the printer, and then you will receive a blank sheet of paper. Or a sheet with faintly visible text.
This is the least common problem, I didn't focus on it too much, but don't worry, I'm here and will cover it too!
Weakly noticeable or missing prints can be caused by the fact that the cartridge does not fit tightly to the drum, is not completely seated in its place, or is not completely closed.
Here's one way to help fix this:
1. Visually check the cartridge or drum for the presence of protective tapes and shipping seals, whether you have removed everything unnecessary, whether you have pulled out the protective tape if any, and also all the orange plastic “things” must be removed.
We hope that you carefully examined everything, removed or pulled out what you forgot to remove and received a high-quality and beautiful print. This method, of course, was suitable for a new cartridge that you just inserted; with any other method, this means that the cartridge is already exhausted and needs to be replaced.
Troubleshooting algorithm for inkjet printer
We figured out why the printer prints in stripes. Now let's talk about how to diagnose and eliminate all the faults listed above, which are often the reasons for the appearance of streaks on paper. To make it easier for you, we recommend following the following algorithm:
- First, check your ink levels. To do this, use the printer control panel, where almost every model has a similar function that allows you to check the remaining toner. For example, for HP devices it is located in the “Estimated Ink Levels” tab. Click on it and the result will appear on the display. If you use CISS, you can check the remaining ink visually. Naturally, if the toner runs out, then we install a new cartridge or refill the old one.
- It is also necessary to replace the cartridge if it is leaking. It is easy to check the integrity of this part. Pull out the cartridge and shake it a little over a table on which you have previously spread some paper or newspapers. See spilled toner? Then the cartridge must be replaced. If the part is sealed, then we put it back and continue the diagnostics.
- Now you need to check the CISS loop. Pay attention to its integrity. Make sure it is not pinched anywhere. Although it can be difficult to independently diagnose a faulty cable. It is also not easy to replace it. Therefore, we recommend that in case of such a breakdown, contact the service src=”https://www.orgtech.info/wp-content/uploads/2017/08/printer_shleyf_SNPCh_1-680×453.jpg” class=”aligncenter” width=”680″ height ="453″[/img]
- You have made sure that the CISS cable is in full working order. After which it would be a good idea to inspect the air vent filters. They often become clogged with ink and stop allowing air to pass through. Thus, forming stripes when printing. If they become dirty, it is best to replace them with new ones .
- Is the printer still streaking? Why do white and unprinted stripes appear with image displacement? This means that the encoder tape needs to be cleaned. This is a translucent film located along the carriage. All you need to do is take a lint-free cloth, soak it in the cleaning solution and wipe the tape. Then let it dry. Did not help? Do streaks continue to appear when printing? Let's move on to the next point.
- You will have to clean the print head. It may be airborne or contaminated. It should be remembered that in inkjet printers the head can be located either inside the cartridge (Canon, HP), or separately, as an independent part of the device (Epson). With the first option, everything is quite simple. It is enough to replace the cartridge. However, if the head is separate from the cartridge, then replacing it will be expensive. It is more advisable to clean the print head. This is done programmatically:
- Insert clean paper into the printer tray.
- Open the management utility or go to the specialized device settings center.
- Find the “Service” or “Maintenance” section.
- We start cleaning the print head and checking the nozzles.
- If the problem is not solved, then repeat the operation 1-2 more times. Don't forget to wait about 2-3 hours. Then we check whether the printer has stopped printing in stripes.
However, it is not always possible to clean the print head using software. For example, this procedure is pointless on the Canon Pixma MG2440 inkjet MFP. This model does not have a pump for cleaning the print heads. Therefore, you can remove dried ink manually. For example, using chemical cleaning products.
Did cleaning the print head and manually flushing with liquids not help? Then, most likely, this part has failed. Print head failure occurs quite often. The most common reason is careless handling of this mechanism during removal/installation. In addition, if you print a lot on a printer or MFP, then the head failure is simply due to normal wear and tear. Which exit? The answer is obvious - replacement of the part. The easiest way is if it is built into the cartridge. But most printers (for example, Epson) have a separate head, and its price ranges from 50 to 80% of the cost of a new device.
Have you followed the given algorithm, but the inkjet printer continues to streak? This means you should contact a service center for help. Or even seriously consider purchasing a new device.
Why does an inkjet printer streak?
Ink levels are low.
If you print a lot and haven’t refilled or replaced your inkjet printer cartridges for a long time, then the cause of all your troubles may be low ink levels or no ink at all. Different models allow ink tanks to be refilled, but some require complete replacement of the cartridge. In the second option, solving the problem will be much more expensive. Check the possibility of refueling at the service center for your model.
Special utilities that are installed from the disk included with the new printer along with the drivers will automatically begin to notify the user about the ink level. If this does not happen, then you can do this procedure yourself.
The second option for checking the level may be inspection. To do this, disconnect the printer from the power supply and open the top cover. Take out each cartridge one by one and inspect it. For CISS, this is the only verification option. To replenish your paint supply, use our instructions:
- How to correctly and quickly refill a Canon PG 445 (black) and CL 446 (color) printer cartridge yourself.
- Recommendations and instructions for refilling Canon Pixma and other series inkjet printer cartridges at home.
The print head nozzles or nozzles are dry.
Quite a common occurrence for old and some models of new inkjet printers. The essence of this version of the problem is the drying or thickening of paints due to long periods of inactivity. Depending on the model and manufacturer, even one week is enough for trouble to arise.
Inkjet paint is not just a liquid of a certain color, but a full-fledged chemical substance with its own properties and storage rules. If you don’t adhere to them, the result is known.
But not everything is so hopeless in this difficult situation. In this case, the owner of the printing machine has two solutions:
- Program. It's easier to use, but doesn't always help. As a rule, only in the simplest manifestations of drying.
- Physical. The cartridges will need to be revived manually using additional tools.
Before using any of the methods, as an alternative, you can try soaking the cartridge. Remove the cartridge and gently shake it several times. Place a napkin or sheet of paper on the table and, with a little force, press the cartridge against the table with the nozzles. If possible, use your fingers to press on both sides. It is advisable for the paint to come out a little.
If this procedure does not bring success, then proceed to the program method. Open the printer properties and select the “Maintenance” tab.
Complete the first two steps on the left one by one. Deep cleaning can be done even several times. This procedure will not harm the device in any way. For preventative purposes, if you have time, we recommend that you perform all possible procedures that directly relate to print quality. Try printing the desired picture or document again. If the problem remains, then proceed to physical action.
To do this you will need dishwashing liquid or glass cleaner. Pour the product you have on hand into a small container (a polypropylene lid for jars is perfect for anything else). Place the cartridges there after slightly getting wet and leave for some time, from several minutes. When the print head is located in the printer body itself, then in such cases special means are used. They are inexpensive and you can buy them at any computer store without any problems.
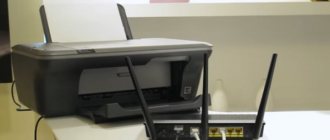
Air in CISS.
The problem in nine out of ten cases is relevant for printers equipped with a continuous ink supply system. In this case, you need to check the tubes and cables, as well as the air filter for clogging and kinks. It is the entry of air into the tubes that makes it impossible for the ink to flow evenly into the head, which causes gaps that turn into stripes during printing. And the lack of air in cans of CISS paint, due to a clogged filter, makes it difficult for the entire paint delivery mechanism.
Carry out cleaning according to the instructions for your system.
The problem is very relevant for Epson L series printers, namely models: L110, L120, L210, L222, L366, L800, L805.
Physical problems with the printer.
In addition to a malfunctioning cartridge, the reason why the printer prints in stripes along the edge may be physical damage to some elements of the device. Such elements include the encoder cable or its disk. This unit is responsible for determining the coordinates of the sheet position during the printing process. If it doesn't work correctly, it doesn't give any errors, but because of this, the printer streaks a lot when printing.
Photo of the tape.
Photo of the disc. May vary slightly between models.
Such things happen after paint gets on the cable or disk itself. After many years of use, the disc may simply be worn out. With this development of the situation, only its complete replacement will help. Paint stains can be easily removed with a regular napkin. First, try doing it dry.
Service center specialists do not recommend using liquids other than plain water.
We recommend entrusting disk replacement to specialists if you do not have the skills to repair equipment.
Problems with the device software.
Rarely, but the cause of black and white stripes on a sheet when printing on a printer is incorrect operation of the device software. During operation, they can be damaged by the user, viruses, or due to a loss of power supply. When none of the above helps, then reinstalling the driver is the only remaining option.
Download drivers only from manufacturers' websites to avoid infecting your computer or laptop with viruses or unwanted programs. Where and how to download, as well as installation options are described in detail in our separate article.
Why does a laser printer print in stripes?
You can often observe streaks when printing on laser printers. What could be the cause of such a malfunction? The list is quite large:
- Ink levels are low.
- Cartridge depressurization.
- The photoconductor is damaged/destroyed.
- The magnetic shaft is damaged or a foreign object has fallen on it (with such a malfunction, in 80% of cases the sheet comes out of print with a black stripe along the edge or side).
- The hopper is full, where waste toner goes.
- The toner dispensing blade is not securely attached.
- The contact between the photodrum and the magnetic shaft is broken
And this list can be continued for a very long time. But we have named the most common reasons, so let’s move on to how to fix printing failures and finally forget about sheets with stripes.
Causes and solutions to problems with the laser device
There are many more reasons why a stripe or several appear when printing on a laser printer and they are more expensive to eliminate. Let's take a closer look at what affects the appearance of stripes when printing and how to eliminate it. Remember that you may have several breakdowns at once and eliminating one will not guarantee results.
Toner is low.
The simplest and most common reason is that there is not enough toner left in the cartridge. Depending on the intensity of printing and the saturation of black color on documents, toner consumption varies. Accordingly, the number of printed sheets per refill will not always be the same. A sign of a small amount of powder are white stripes. A temporary solution to the problem may be shaking the cartridge, but sooner or later this will no longer help. Refueling is inevitable and the only thing that will radically solve the problem.
An example of printing when the toner level is low.
It is recommended to refill with a certified powder suitable for your model. If you plan to do the refueling yourself, then first find a room for this where there is good air circulation or there is the possibility of ventilation.
Remember that laser printer toner is toxic.
Image drum.
The drum is the most noticeable part, since the plastic of the cartridge is black, and it is green. It is also called a photodrum or photoroll. Covered with a special coating of green and sometimes blue. The photo roll does the most important part of the printing process - applying the toner directly to the sheet of paper.
An example of photodrum wear.
The very first sign of wear will be black stripes on one or both sides of the printed sheet of paper on the side. Over time, the width of the strip will increase in proportion to the wear of the shaft coating. If you pull back the curtain, you can visually see it. Wear of the coating is normal; cartridges of any model are susceptible to it.
Service center specialists recommend immediately replacing the part to protect other cartridge units from failure.
An example of printing a worn photo roll.
The photodrum with the magnetic shaft are in close contact with each other, therefore high-quality contact between them is very important. If you notice that the printer prints on a sheet with horizontal black stripes, then this may be a sign of poor or no contact between these two parts.
The cartridge itself is damaged.
Damage or leakage can be inferred from the appearance of stripes on a sheet as an example. If these are black lines of different sizes and thicknesses, and are also unevenly located, then this is most likely the option. The following manipulations should be carried out with the cartridge:
- Remove from the printer.
- Inspect for cracks and loose parts. Check the places where the bolts are screwed in.
- Gently shake it slightly, and then see if the toner spills.
- Pull the curtain near the photo roll and check for powder on it.
If found, eliminate areas of leakage and depressurization.
Workout.
The design of the laser printer cartridge includes a special hopper into which waste toner automatically falls. This compartment can overflow and then some of the powder begins to fall out, and therefore forms a continuous black stripe of large width on sheets of paper.
To avoid such developments, we recommend cleaning the waste after each refill or once every two toner replenishment procedures.
Magnetic shaft and blade problems.
Magnetic shaft.
The magnetic roller is one of the most important parts of the cartridge, which is responsible for applying toner to the drum. The toner itself is a chemical that affects the coating of the magnetic roller. Over time, the latter wears out considerably, which leads to problems. They may appear as follows:
- White uneven stripes.
- Gray color of different size figures. These can be lines, circles, spots, dots.
- Gray print of black text.
- Uneven filling of solid patterns.
Dosage blade.
Print defects like these are often caused by a faulty dosing blade. Often it is replaced together with the magnetic shaft.
Getting rid of streaks when printing on a laser printer
When diagnosing problems in the operation of a laser device, we recommend that you pay attention to the specific appearance of stripes. This will help you understand what exactly caused the printing defect.
- Let's say a laser printer prints a stripe in the middle. Typically, this indicates that the toner is running low. Moreover, the less ink in the cartridge, the wider the stripe. If you checked and made sure that there is enough toner, then the supply system is faulty. It is better to contact a service center.
- The stripes consist of small dots. In 90% of cases, such a printing defect is due to the fact that the hopper, which collects toner residues, is full. What should be done in such a situation? Of course, clean the bunker. By the way, it is advisable to carry out this procedure every time you refill the cartridge. Sometimes streaks of small dots also occur because the dosing blade is not installed correctly. So don't forget to check it out too.
- Unprinted, white and rather wide stripes on the sheet. There may be several reasons. For example, toner is low. Or a foreign object (a paper clip, a piece of paper or tape, a coin, etc.) has fallen onto the shaft. In this case, getting rid of the stripes is not difficult. It is enough to remove the foreign body.
- Are there faint black stripes across the sheet? This doesn't bode well. This is often caused by wear on the magnetic shaft. The situation can be corrected by replacing the unit or cartridge.
- Dark stripes on one or both edges of the leaf. These indicate wear or damage to the photoconductor unit. Most likely you will have to change the part. The fact is that the sensitive layer of the photodrum wears off over time, which, to put it mildly, is problematic to restore.
- Irregularly shaped stripes fill the entire sheet (looks like a background). It is likely that low quality toner was used when refilling the cartridge. Another potential reason for this printing defect is that the magnetic roller or optical system of the printer is dirty.
- Horizontal and almost equidistant stripes from each other. Most often, the problem lies in poor contact between the magnetic shaft and the photodrum. Perhaps the toner has spilled out, the ink waste bin is full, or the fault is due to poor quality cartridge refilling. It is recommended to clean the shaft contact and other surfaces. If this does not help, then it makes sense to install a new cartridge.
As you can see, there is nothing complicated. At the same time, eliminating streaks when printing on a laser printer is often easier and faster than on an inkjet printer. If the device produces stripes on printed paper, then you just need to pay attention to their shape and area of appearance, and also check:
- Toner level;
- The health of the photodrum;
- Cartridge condition;
- Position of the dosing blade;
- The fullness of the mining bunker.
Diagnostics by the nature of the stripes
The cause can only be determined based on the visual display of the stripes using a laser printer.
- They appear randomly. The reason is that the cartridge is leaking.
- Consist of small dots. It may leave the printer if the ink tank is not refilled correctly, the waste ink container is overfilled, or the dispensing blade is not installed correctly.
- Vertical unprinted areas in the center of the sheet. The printer is running low on toner. The smaller it is, the wider the stripe and the paler the printed text.
- Empty stripes in the same place. There is little toner or a foreign object is stuck on the cartridge shaft.
- Wavy or solid black stripes run along the edge of the sheet (on one or both sides). The problem is wear or failure of the photodrum.
- The stripes are frequent, narrow and horizontal. Sign of contamination of the optical system.
- White uneven lines, gray circles, spots or dots, gray printing of black text, uneven shading of solid images. This is how the print shows wear on the magnetic roller coating or when the cartridge is refilled with low-quality toner.
- Dark lines are equally spaced. The waste toner bottle is overfilled and incorrectly refilled. In severe cases, the problem is a loss of contact between the magnetic shaft and the photodrum due to wear.
- High definition transverse lines with equal spacing between each. The reason is poor contact between the photo roller and the magnetic roller due to spilled toner, problems with the blade, or lack of space in the hopper.
- Transverse white lines blurred on the sides. The reasons are the overflow of the otkhodnik, a foreign body inside the device, problems with the blade.
Useful tips
- If you clean the print head or nozzles on your printer yourself, never use alcohol or water. It is best to purchase a special cleaning liquid. It is sold in the same stores where printer ink is sold. In extreme cases, you can use glass washing liquid.
- To quickly eliminate streaking when printing on HP and Canon printers, we recommend that you first pay attention to the ink level, as well as the waste toner tank. Basically, devices of these brands begin to “strip” because of this. Owners of printers and MFPs from Xerox or Samsung do not have to think about cleaning the waste buffer. As a rule, the cartridges of such devices are not equipped with it.
- If your inkjet printer has black and color cartridges full of toner, the nozzle and print head tests are excellent, but stripes still appear when printing, then perhaps the reason lies elsewhere. For example, the head is calibrated. This happens if the device has been transported somewhere, rearranged, or shaken a little, moving the carriage. You need to go to the printer control center and start calibrating the print head.
- To prevent streaking when printing, you should regularly clean the cartridge. Especially if you refill it yourself. The fact is that the ink for refilling is usually non-original (most users do not buy it because of the high cost), which is inferior in quality to the toner from the manufacturer. In particular, they dry out faster and clog the nozzles.
"Striped" printing defects on an inkjet printer
There are not so many reasons for the appearance of “striations” on a sheet coming out of the printer.
A manufacturing defect cannot be ruled out, especially if your newly purchased device begins to draw stripes.
But, if before the appearance of this defect your machine printed well, then in most cases the problem can be fixed at home, and you can do without a trip to the service center.
Checking Ink Levels
First of all, you should check the ink levels on your inkjet printer. To determine the ink level, you can use software, namely a utility that comes with any printing equipment. For example, to determine how depleted the cartridge resources are in HP equipment, you need to launch a program designed to control the device and select the “Approximate ink levels” tab. The utility window is shown in the figure below.
For Epson units the window will look like this:
When the ink level in the cartridge reaches zero, it must either be refilled or replaced with a new one.
If a CISS is connected to the printer, this program will be useless. The ink level is easily determined by looking at the transparent CISS containers. If there is enough ink in them, then you should check the cable through which the ink enters the cartridges. It should not contain kinks, the cable tubes should not be pinched by anything, and there should be no air pockets (small areas with air) in them. You should also check the air filters on the CISS tanks. If they are clogged with dust or paint, then there will be no air leaks into the container, and the ink from these containers will stop flowing to the print head, which will cause streaks to appear during printing.
Cleaning the print head
For inkjet printers, it is very important that there is no downtime. Otherwise, due to a long pause, the ink in the print head dries out and clogs the nozzles - the holes through which ink is sprayed onto the paper.
In some models of printing equipment, the print head can dry out within a couple of days of equipment downtime.
But for most devices, it takes 1 to 3 weeks for the ink to dry in the nozzles. In any case, you need to turn on the device regularly so that it can “blow through” the nozzles with ink.
In modern printers and MFPs, the manufacturer has provided the ability to clean the print head using the device itself, using a proprietary utility. For example, for an HP device this function is called “Cleaning cartridges”.
For Epson printers, this function is called “Print Head Cleaning”. This software also allows you to do a preliminary check, which allows you to determine from the printed impression whether the nozzles are actually clogged. This function is useful for saving ink, since when cleaning the print head there is an increased consumption of ink: it is the ink that washes the nozzles.
For Canon devices, to clean the head, in the utility window you need to click on the “Cleaning” item, or “Deep cleaning” - a more advanced type of it, with a high consumption of ink.
If the inkjet printer prints in stripes, it is recommended to repeat this procedure 2-3 times in a row, and let the device “settle” for a couple of hours, after which it can be used for its intended purpose.
If hardware cleaning does not help, then you will have to resort to manually washing the print head, as shown in this video.
If the inkjet head is built into a cartridge, it is recommended to soak the nozzles in Mr. Muscle glass cleaner for at least a day. It is desirable that the liquid be green or blue. The nozzles should be soaked in such a way that the detergent does not come into contact with the electrical contacts. After soaking, carefully blot the nozzles with a napkin, insert the cartridge into the printer, and run the standard cleaning procedure described above.
It is not recommended to soak and wash the inkjet head from an Epson printer at home, since it is very “capricious” and can easily be rendered unusable . The price of a new head is comparable to the price of a new printer. Therefore, if you suspect that the nozzles have dried out, it is better to contact a service center.
Problems with encoder strip and disk
Also, the reason that a white stripe appears during printing, which is repeated at the same distance, may be the presence of blockages on the encoder disk. It is usually located on the left side of the machine on the paper feed shaft. The disc is made of transparent plastic and has special markings.
When there is dust, paint or other contaminants on the disk markings, the optocoupler sensors are not able to correctly read the information, and the paper is positioned incorrectly. You can also use Mr. Muscle to clean the disc. It is important that this product is intended for cleaning glass and contains ammonia.
The carriage into which the cartridges are inserted is positioned along the encoder tape. It is a transparent strip of plastic with strokes applied to it. It is located near the back wall (inside the device).
If dirt gets on the tape, the correct positioning of the carriage is disrupted, and the text or image when printed is shifted to the side at regular intervals. Wipe this tape with the same product as the encoder disk. Just be careful during this procedure. If the tape comes off the fasteners, you will have to disassemble half of the device to put it back in place.
Important! Acetone and other solvents cannot be used to clean the encoder disk or tape, as this can erase the markings.
Algorithm of actions to eliminate streaks.
The print head needs to be cleaned. To do this we do the following:
- In the menu of the document you are going to print, open the “Print” tab.
- Next, open the “Print Settings - Service” tab (or the same tab may be called “Properties” - Service, depending on the operating system installed on the computer). Please note that in the picture the arrows indicate the tabs that need to be clicked:
- Following this, you will need to select the “Check Nozzles” menu item, insert paper into the printer and confirm the operation. It will look something like this:
After cleaning the nozzles, you will be printed with a sheet of stripes of four colors (or seven, depending on how many initial colors your printer works with). If there are interruptions in the lines on these strips, you will need to perform additional print head cleaning. If all the lines of four colors are printed without problems, then you can continue to work calmly, there should be no stripes. - If cleaning the nozzles did not help, click “Clean the print head”. All the steps are the same, again we look at the control from the seals of lines of four colors. If print defects remain, the head must be cleaned again.
- There are also cases when even repeated cleaning of the head does not help. Then you will have to carry out technological cleaning. This operation leads to the consumption of a very large amount of ink and is a rather “painful” procedure for the printer in terms of the functioning of various parts. After performing the technological cleaning, in the vast majority of cases everything gets better, but if not, then you will have to take the printer to a service center.
Again, it should be understood that each such cleaning consumes a certain amount of ink, which leads to the need to reset the so-called “Pampers” counter - which is very problematic. So we should try to carry out such cleanings as little as possible.
If your laser or LED printer streaks
The reasons for the appearance of stripes on LED and laser prints may be problems with the cartridge, thermal transfer system (oven) or the optical unit of the printer itself.
Cartridge problems
- The toner is almost empty.
- Toner spills out of the container due to loose closure.
- The waste bunker is full.
- A foreign object has entered the cartridge.
- The photodrum is damaged or worn out - a cylinder-shaped element of the cartridge to which, under the influence of laser or LED illumination, toner sticks and is transferred from it to paper.
- The drum cleaning blade (squeegee) is damaged.
- The magnetic roller is damaged or worn out - the element that charges the toner particles, due to which the latter stick to the illuminated areas of the drum.
- The magnetic roller is not making full contact with the image drum.
- The toner dispensing blade that removes excess toner from the magnetic roller is not installed correctly.
- The sealing elements of the drum and magnetic shaft are damaged.
- Connections, mechanical parts and other parts of the cartridge are faulty.
Problems with fixing dye to paper are usually caused by damage or wear of the heating and pressure rollers of the stove.
Problems with optics are most often associated not with a defect, but with contamination of the latter by spilled toner or dust.
Problem with ink and cartridges
The main reason why a printer prints in streaks is because the ink level is low or the cartridge is damaged.
Checking Ink Levels
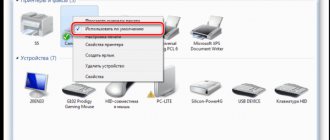
To check your print ink supply:
- install Epson Status Monitor 3 on your computer;
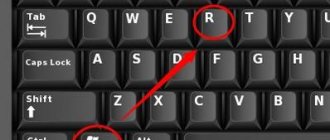
- open a text editor or document for printing and press Ctrl + P at the same time;
- in the “Printer” section, select the connected model, be it Epson L110/ L210/ L312, and click on the “Properties” or “Settings” button - depends on the version;
- from there, go to the “Maintence” tab and select “Epson Status Monitor 3”;
- A window will appear with information about the ink level in the cartridge, which will look like a graphic image.
When a continuous ink supply system, also known as CISS, is connected to the printer, it is enough to determine its level by looking at the transparent containers connected to the Epson L355/L364/L805. If streaks appear when printing in color, it means one of the colors has run out.
Damaged cartridge
Damage appears as:
- leaks on the body or compartment where the cartridges are installed;
- contamination in the air intake holes, causing ink to flow intermittently and print defects to appear.
It will not be possible to fix leaks manually, so the best solution is to replace the cartridge. If the problem is dirt, then get rid of it by washing the containers. Dried paint can be pressed on, which will temporarily eliminate horizontal streaks on documents.
Incorrect ink
When streaks appear on an inkjet printer after refilling, the problem is due to the wrong ink. Each printer has a special set of inks, and if you try to replace them with an available option, printing will break.