Kodi plugins (Addons) are special add-ons that provide the online cinema with a source for broadcasting. A standalone application does not have materials to display, so you will have to connect additional repositories that expand the capabilities of the standard player. However, given that there are many repositories, it is easy to get confused in them. We have compiled a list of those that will be most useful.
Best Kodi Repositories in 2020
Kodi repositories are folders (archives) that provide the player with a source for playing movies, TV series, news, shows, channels and other files.
Maverick Repo
If you are looking for an extension for unlimited access to YouTube Music, Flex, Cartoon Network, and so on, then the Maverick Repo server is definitely suitable. It gives you videos in 4K format. If we evaluate the market of repositories and addons, Maverick Repo is the leader.
KodiBae
This is also a popular addon, its downside is that now the developers have stopped upgrading it. Kodibay is access to Seren, cCloud TV, PrimeWire in good quality.
Kodi Nerds
If you are a fan of European content, then Kodi Nerds is your choice. This is an extension that gives unlimited access to analogue and digital content from Europe, so the viewer will always be aware of the latest news and trends.
How to install Okko on Smart TV and watch for free: instructions
Super Repo
Super Repo has collected all entertainment sources, sports matches, channels with broadcasts of boxing, TV series and films. The advantage is that it is possible to find broadcasts in different languages.
TVAddons
Live streaming using a VPN or proxy provides access to many pirated versions of films. Some condemn this feature, while others appreciate and welcome it. In addition to channels, there is also access to FM waves.
If you have any questions or complaints, please let us know
Ask a Question
One nation
Here the content is distributed according to the criteria of its specific features. A variety of streaming services, the ability to personalize YouTube, Adult Swim, Cartoon Network, etc. High quality streaming.
Superiority
The addon includes Yoda, Cartoon Network, Thunderstruck, etc. In addition, the archive provides additional goodies in the form of subtitles in different languages, TV shows and the ability to choose the resolution for playback.
Kodi Neu Erleben Repo
This plugin also aims to bring European programs to Russian viewers. There is compatibility with Amazon Music and YouTube Music, and an additional bonus is Spotify.
Simply Caz
The Simply Caz addon is a real find for fans of American programs and TV shows. This is coupled with the fact that the videos are high-quality and lively.
13 clowns
This is a small rep, but it has 13clowns, Cartoon Network and Adult Swim, which you rarely see in others.
System installation.
Using any archiver (7zip, WinRAR), unpack the “CoreELEC-*.img.gz” file downloaded for your processor:
- *S905 – for Amlogic S905/905W/905X/905D
- *S912 – for Amlogic S912
Write the resulting image (CoreELEC-*.img) to an SD card or USB flash drive using “Win32 Disk Imager”.
Since various types of problems often arise with installing/starting the system from a USB flash drive (either the flash drive does not fit the console, or the console does not fit the flash drive), I recommend using an SD card.
As for choosing an SD card: it depends on whether you leave the system on the card (with the ability to run “Android” if necessary) or install the system in the internal memory of the set-top box.
In the second case (CoreELEC will be in the internal memory instead of Android), there are no special restrictions, as long as the image fits on the card (a 1 GB card is enough). If you plan to use both systems (Dualboot: Android/CoreELEC), then you need to take the choice of card more seriously. I would recommend an SD card of at least class 10 and a capacity of at least 16 GB (this is a combination of price/quality). For the system itself, 8 GB (and 4 GB) is enough, but the larger the card, the faster its read/write speed, and this greatly affects the system’s performance.
When recording an image, two partitions will be created on the SD card: “FAT” with a size of 512 MB and “ext4” with a size of 32 MB (not displayed in Windows). The Linux partition (ext4) will be expanded when installed to the entire available capacity of the SD card. So don’t worry that after burning the image, your card is reduced to 512 MB. You can return the previous volume by formatting the card, for example, with the “SDFormatter” program.
After the image is recorded, do not rush to remove the card from the computer; you still need to add a “device tree” compatible with your set-top box. This is a special file (dtb.img) with a description of the components installed on the set-top box board. For example: processor (SOC), amount of RAM, WIFI/Ethernet modules, DVB adapter, etc. Without the “correct device tree”, the “u-boot” boot loader (analogous to the BIOS for set-top boxes) will not be able to recognize them and either some component will not work (for example WIFI), or the system will not boot at all if it is a critical component (for example The amount of RAM is not suitable).
You need to copy the desired file “*.dtb” from the “device_trees” directory, which is located in the root of the FAT partition of the SD card, to the root of this partition and rename it to “dtb.img”.
In the given example, the “device tree” for the “KII Pro DVB-S2/T2/C: Amlogic S905, 2/8, 100Mb” set-top box is copied.
The first part of the dtb file name (for example: gxl_p212) is the identifier (code name) of the device board/processor. They can be like this:
- gxbb_p200/201 – for Amlogic S905
- gxl_p212 – Amlogic S905X
- gxl_p230/231 – Amlogic S905D
- gxl_p281 – Amlogic S905W
- gxm_q200/201 – Amlogic S912
The second part of the dtb file name (1G/ 2G/ 3G) is the RAM size. The system will not boot if the values in the “tree” and the device do not match.
The difference between the trees "gxbb_p200" and "gxbb_p201" (and in the models gxl_p230/231, gxm_q200/201) as it is described in the kernel and should be - relates mainly to the speed of the network adapter (100Mb or 1Gb). But in practice, box manufacturers do not really adhere to the rules and where the ID should be a 1GB adapter, they put 100MB and vice versa. Therefore, the third part of the file is an indication of the speed of the network adapter and the model of the WI-FI module.
Plugins for watching movies and TV series
If you are used to organizing a weekend evening in front of the TV with cola and popcorn, then it is important to have sources with good films and TV series. There are many of these in the repositories, but we have highlighted the most popular and convenient to use.
How to choose a Wi-Fi adapter for a digital TV set-top box: comparison, cost, which is better?
Kino-live
Videos with good resolution and high loading speed are the main features why viewers prefer Kino-Live. There are many old and new paintings there, and the list is constantly updated.
Ivi
Ivi is a cinema that is known to all users of the CIS countries. This is one of the leaders in the market, known for films and TV series. Its advantage is that many of the tapes are free, and for a small subscription you will find a lot of interesting things.
Mosfilm
Fans of domestic films always focus on Mosfilm, since even old films are presented here in high resolution and with good sound.
Seasonvar
Can't imagine your life without TV series? Then Seasonvar is a real find. For now there is a small variety of TV series that are definitely worth watching, but the library is expanding quite rapidly.
Kinopoisk
The best repositories for kodi are also offered by the legendary Kinopoisk, films from which are downloaded via torrent. But with it you won’t miss a single tape.
Lostfilm
This is a collection of series and voiceovers, among which everyone will find something suitable for themselves. Lostfilm also stands out among others with its high loading speed.
Elementum
Convenient, intuitive, has a nice interface. It has been on the market for more than four years, but has not gained much popularity.
Creating a list of channels for Torrent TV.
With default settings, the playlist is generated from the Pomoyki website. This is the fastest way (meaning the speed of the utility) to obtain a list of channels and takes from 1 to 10 seconds depending on the number of selected categories and settings. There is also a longer method when the “Garbage Garbage” is not available, but it will not be considered here.
In the file “/storage/.config/acestream/trash-url.conf” you can change the address of the “Trash” site by setting the value of the “TRASH” variable if your provider blocks the default address:
Updating the list of channel logos, as well as one of the options for receiving EPG, requires you to register on the Torrent-TV website. If these data (username/password) are not specified in the settings, these options simply will not work, which in itself is not fatal.
In the list of categories, select the ones you need.
In the playlist creation section, enter (if you have) your account details from “torrent-tv.ru” and activate the option – “Update playlist”.
This option (Update playlist) is needed to automatically update the channel list when the system starts, and it is also necessary to update playlists according to a schedule in “Tvheadend”.
Click “Execute” and wait until the creation of the channel list is completed. When asked to “Restart Kodi,” we answer “No.”
We could finish with the channels here, but we will go a little further: we will select only those channels that we are really going to watch. The fact is that Torrent TV has a huge number of channels and most likely you will never watch most of them.
Let's make our own “favorites” list.
Rename the file “/storage/.config/acestream/Trash-favorite.list.sample” to “/storage/.config/acestream/Trash-favorite.list”, open and delete lines with unnecessary channels. Believe me, there will be such people. Empty lines are not allowed in the file.
After that, go to the “TTV Playlist” tab again, disable/enable (or enable/disable) any of the categories and create the playlist again - “Execute”.
This “disable/enable” is necessary for the system to recreate the playlist. Otherwise, you will be told that the playlist is new and there is no need to recreate it. The system updates (recreates) the list only when changes have occurred on the Garbage Garbage site. This saves time and protects you from getting banned.
Setting up "Tvheadend".
Let's start with the fact that, starting with the version “CoreELEC (ae-fork) – 8.99.10”, there are two versions of “Tvheadend” in the system. The stable version is 4.2.7 and the version from the “master” branch is 4.3-xxxx. By default, stable 4.2.7 will be launched. If you need version 4.3, you need:
- stop TVheadend
- rename the file “/storage/.config/tvheadend-4.3.sample” to “/storage/.config/tvheadend-4.3”
- launch TVheadend
To return to 4.2.7 again, instead of the second point, you need to delete the file “/storage/.config/tvheadend-4.3”.
We will be configuring version 4.2.7, although the visible differences between them are minimal and the same settings apply to version 4.3.
All program settings are made via the web interface:
When we first log in, we are greeted by the “Settings Wizard” window. We can safely skip it.
For convenience, a network (Configuration – DVB Input – Networks) for Torrent TV with the name “Torrent-TV” has already been added to “Tvheadend”.
There is nothing you need to do there, but please look at the important options that I have highlighted in red.
I will not explain their meaning, since I have done this many times already (use the search on the site), and the help in Tvheadend itself is quite detailed. I just want you to pay attention to these options when you create an IPTV network for Torrent TV yourself.
Go to the “Services” tab (Configuration – DVB Input – Services) and do the channel mapping.
On the “Channel Tags” tab, we make the top two categories invisible to Kodi, and set indexes for the rest.
It is not necessary to do this, it will just be more convenient to navigate through the “Channel Categories” in Kodi.
Now let's set up receiving the program guide (EPG) for our channels.
On the “EPG Grabber Module” tab, we disable modules that we don’t need that pull EPG from the stream itself (Over-the-air).
We enable “XMLTV: Torrent-TV.ru grabber” and set its priority.
If in the settings for creating a playlist for Torrent-TV you specified your login/password from torrent-tv.ru, then you can enable “XMLTV: Torrent-TV.ru API grabber” in addition to the first one or instead of it. This “grabber” receives data through the API of the torrent-tv.ru site and only for the current day, but can be useful since the archive of the first one is updated once a week (and not always) and this one always contains current data.
The following information is for those who use the set-top box 24/7 and want to have up-to-date channels and programs. Those who turn the set-top box on/off can skip this item, since upon startup the system updates the program and channels.
Starting from the current version (8.99.10), the “XMLTV: Torrent-TV.ru grabber” and “XMLTV: Torrent-TV.ru API grabber” modules not only receive the program, but also automatically update the links of the “Torrent-TV” channels. That is, to keep information up to date, it is enough to use the built-in Cron “Tvheadend”. You can set the channel/program update frequency on the “EPG Grabber” tab. In the example shown, the update occurs every six hours (6:10, 12:10, 18:10, etc.).
At this point, we will consider setting up “Tvheadend” complete.
Installing Kodi, setting up IPTV
First of all, after installation, you will want to change the English language to Russian. This is easy and quick to do:
Open “Settings (gear icon in the upper left corner)” then select “Interface setting”, in the left menu select the “Regional” tab. You will see the first line “Language” in which you need to select “Russian”.
By and large, you don’t need to configure anything else, but if you are an experienced user, you can customize everything for yourself.
Turn on IPTV, add a playlist and EPG
The interface is now in Russian, only a small matter remains. So that IPTV appears in the menu on the TV tab:
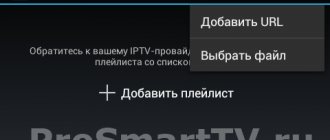
- Return to the home screen and open the TV tab. After that, click on “Login to Add-on Browser”.
- Find “PVR ITV Simple Client” in the list and open it.
- After opening, click on the “Enable” button and then on the “Settings” button.
- The first tab of the open General window. Here you need to enter the address of the m3u playlist.
- Now in the left menu, go to the “EPG Settings” tab. Enter a link to the guide in XML format.
- In the left menu “Channel logos”. Open and enter the same link as in the previous paragraph.
- Exit settings and restart Kodi.
Ready! After restarting the application, you need to wait literally a minute while the playlist, program guide and channel logos are imported. Now by opening the “TV” tab you can enjoy comfortable viewing of IPTV.