Check the physical switch
ytimg.com
There may be a switch on the casing of SD cards and some USB drives that activates physical write protection. Even knowing its purpose, users sometimes forget about this detail, which is why they experience difficulties.
If your flash drive has such a switch, disconnect it from the system and move the lever so that it is not in the Lock position. After this, try recording again.
Is it possible to format a write-protected flash drive using third-party programs?
Sometimes standard Windows tools do not help solve a problem related to the operation of removable media. Therefore, you should not neglect special utilities. They are specifically designed for restoring and formatting USB flash drives, SD cards, etc. So you can use:
- Special proprietary software produced directly by the manufacturer itself. For example, for Transcend products this is the JetFlash Recovery program.
- If for some reason it is impossible to use proprietary utilities, then download and try other formatting programs. There are a lot of them. Some of the most popular and convenient are Hp disk format tool, HDD low level format, Recuva, SDFormatter, etc.
Make sure there is free space on the disk
If there is not enough space on the flash drive to copy files, the system usually reports this in plain text. But sometimes, instead of the standard message, the computer writes that the flash drive is write-protected.
Just in case, look at the free capacity of the drive and, if it is not enough to record new data or is simply too small, delete unnecessary files from the flash drive. After that, try writing the necessary information onto it again.
Mechanical removal of write protection from a flash drive
When deciding how to remove the protection if “The disk is write protected”, first of all check if there is a special small switch on the case.
It is always present on SD cards, and is somewhat less common on regular USB drives. Accidental switching is not uncommon when a flash drive is carried in a pocket. Also, be sure to check the functionality of the flash drive in other USB ports, or even better, on another computer. If you are the owner of a desktop computer with a system unit, it is preferable to check the flash drive by connecting to the ports on the back wall of the system unit. The problem may lie in poor contact, poor-quality wires, or failure of the USB controller.
Disable write protection in the system registry (Windows)
If the protection was enabled as a result of a software failure or a change in Windows settings, the Registry Editor can help you. To open it, press Win + R, enter the regedit command in the field and click OK.
Using the sidebar, navigate to the directory: HKEY_LOCAL_MACHINE\SYSTEM\CurrentControlSet\Control\StorageDevicePolicies. When you see the WriteProtect option, double-click it and make sure its value is zero. Change it if necessary and click OK.
If the system does not have a StorageDevicePolicies directory, create it yourself: right-click on the Control section, select “New” → “Section” and name it StorageDevicePolicies.
If the WriteProtect parameter is missing, you can add it too. Right-click on the StorageDevicePolicies section and select New → DWORD Value (32-bit) and name it WriteProtect. Then open it and make sure the parameter value is zero.
Readonly attribute of USB disk
If the previous methods did not help, check whether the readonly attribute is set for the USB drive. For this:
- Open Command Prompt with Administrator rights
- Run the command: Diskpart
- List disks with the command: list disk
- Find your USB drive in the list and remember its number. In our example: Disk 1
- Let's select it with the command: select disk 1 .
Note : If the error “DiskPart has encountered an error: The request could not be performed because of an I/O device error” appears. See the System Event Log for more information”, this most likely indicates that the flash drive is physically damaged, and it will not be possible to do anything with it programmatically. - Let's check the current disk attributes: attributes disk.
In our case, the result of the command: Current Read-only State : Yes Read-only : Yes Boot Disk : No Pagefile Disk : No Hibernation File Disk : No Crashdump Disk : No Clustered Disk : No - The lines Current Read-only State : Yes and Read-only : Yes indicate that the disk attribute is set to “Read Only”. Let's clear it: attributes disk clear readonly
- Quit the Diskpart session (exit) and verify that the write does not cause a write protection error.
Disable write protection on the command line (Windows)
Protection can also be deactivated using the command line. To open it, type cmd in the system search, right-click on the found element and select “Run as administrator.”
- In the window that appears, enter the command diskpart and press Enter.
- Then type list disk and Enter again.
- When the disk table opens, determine by size which one is your flash drive and remember its number.
- Enter the command sele disk [number of your flash drive] (indicate the number without square brackets) and press Enter.
- Then attributes disk clear readonly and again - Enter.
After this, the write protection should be removed and the flash drive will work as it should.
Let's start unlocking disks and flash drives
You have a USB flash drive connected to your computer and you want to copy some files.
Here a surprise awaits you: “The disk is write protected. Please remove write protection or use another drive."
Then you say, "...fuck, how did this happen"? Don't panic - take a deep breath and remain calm.
This is just an error message. Now we will go through a few simple steps together to remove write protection on a USB flash drive. It's just technology and we can fix a lot of things.
Check the flash drive in Disk Utility (macOS)
The write-protect message on Mac may be caused by a software glitch on the flash drive. In this case, you should check the drive using Disk Utility. Open it in Finder → Programs → Utilities.
In the sidebar, select the problematic flash drive. Then click “First Aid” in the top menu and click “Run”. If the system finds errors on the drive, it will try to restore it.
What errors look like
Let me show you what the error looks like. On the first window for formatting a removable disk, you will see “The disk is write protected.”
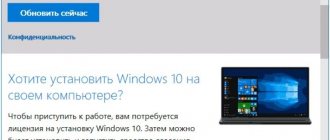
By clicking ok, you will see another interesting warning:
Windows cannot format. Check that the drive and disk connections are correct, make sure the disk is not read-only, and then try again. For more information, see Help by searching for information about read-only files and how you can change
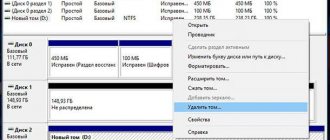
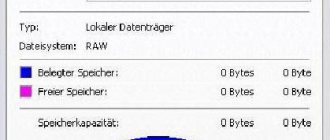
If you open Disk Management, you will find that the media has a Read-Only status.
There is also a situation where the flash drive is visible and opens, but writing to it does not give anything, even if you take into account that write rights are present on the “Security” tab. Here you already see the message “ Remove protection or use another disk .”
We can easily cure all these symptoms.
Format the drive
If none of the above steps help, try formatting the flash drive using built-in tools or third-party utilities. This will erase all content from it, but you can first copy important data from the drive to your computer.
If you cannot format the disk, you may have to restore the flash drive using special utilities from the manufacturers.
What to do if the flash drive cannot be formatted
HP USB Disk Storage Format Tool - A simple utility for formatting disks.
Also used to create multiboot Windows. Formats the file system “FAT”, “FAT32” and “NTFS”.
It will also help restore the true size.
You should know it:
- If you have Windows XP, then the program is launched by two mouse clicks on the shortcut (as usual).
- If you are using Windows 7, then you need to unpack the archive onto your desktop and run the program as “Administrator”.
Right-click on the shortcut and select “Run as Administrator” in the window that appears.
The interface is quite simple, despite the fact that the HP USB Disk Storage Format Tool program is in English. (Found the Russian version).
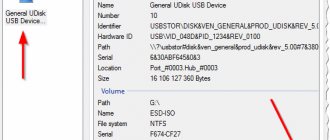
In our case, we need to determine the identifier letter. If you forgot, go to my computer and look at the letter.
- Device - select our flash drive.
- File system - select the desired file system, usually “FAT32”.
- Click start - Start the process.
Confirm the action by clicking the “YES” button
The following problems may arise:
"Device media is write-protected - Devices are write-protected."
If the flash drive is not formatted, check the “Quick Format” box. It is also recommended to change the file system “FAT” and “NTFS”.
If it doesn't help, move on to the next program.
- How to recover a flash drive if the computer does not see it
JetFlash Recovery Tool - A program for formatting USB Flash drives. Helps restore true size. (It happens that a flash drive is 32 GB, but only shows 10 GB).
Let's launch the program.
The program detected our flash drive. If you haven’t determined it, then skip this moment and move on to another program, a little lower.
If the program has detected your device, then this is a good sign. Then we follow the program prompts.
As you can see in the screenshot, “JetFlash Recovery” helped me revive my device and completely restored the full amount of memory.
Well, this does not mean that this utility will help you. If not, then try the next program.
Flash-Doctor - A simple, clear interface, entirely in Russian. It will help you recover your flash drive.
- The program will help you identify broken clusters on your flash drive.
- You can also create a disk image using the utility.
- Save the created image.
- You can scan your flash drive for errors.
Launch Flash-Doctor. Select the desired drive, in our case the letter “K”
Then there are two options for the development of events:
- We scan the flash drive for errors and find out which clusters are damaged.
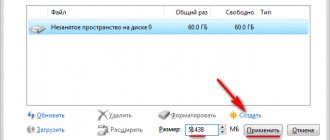
- Let's move straight to formatting.
Launch Flash-Doctor.
Before formatting the protected flash drive, I decided to scan the media for errors.
And the program showed that there are bad sectors.
After scanning, we try to “recover the media”
After completing the recovery operation, I recommend scanning it again for errors.
As you can see in the screenshot, the program completely restored the bad sectors and formatted the flash drive with the same size as it was when purchased.
- Simple ways to protect a flash drive from viruses