How to connect the Netis WF2780 WiFi router to the Internet?
In order to log into the personal account of the Netis router, you first need to reset all network configurations on the computer itself. To do this, we need to go to the network connections settings and make sure that all the checkboxes are in the “Automatic” mode (IP address, Subnet mask and DNS servers)
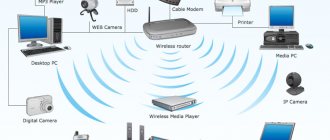
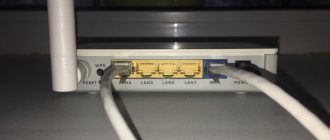
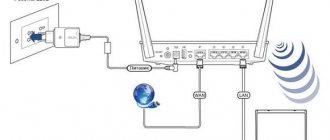
After this, we connect the Netis router to an electrical outlet using the power adapter that came with it. We insert the cable from the Internet provider into the WAN port (on this model it is blue), and the cable with which you connect the router to the computer into the LAN port
Firmware update for Netis WF2409E router
When purchasing, it is important to immediately check for the latest firmware for the configurator. This will allow you to manage your device more efficiently and protect yourself. It's easy to update routers manually. To do this you need:
- Go to the official website of the manufacturer;
- Select your router version;
- Download the latest firmware;
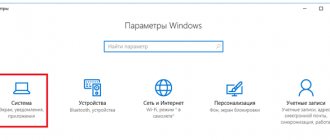
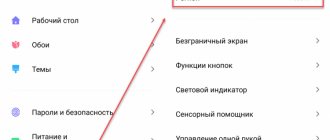
- Go to the device parameters and in the “System” tab find the “Copy and Restore” item;
- In it you need to save a copy of the current settings and go to the “Update” item;
- Select the downloaded file and click “Update”;
- After some time, the device will reboot and will be ready for use.
Login to your personal account NETIS.CC - 192.168.1.1
To log into the Netis router, launch the browser and go to either the web address https://netis.cc or the IP of your personal account, which by default is the standard https://192.168.1.1 (do not confuse it with the address 192.168.LL - on at the end you need to write numbers, not the letters “l”).
If everything was done correctly before, the quick setup page will open - no additional authorization in the admin is required at the initial stage.
How to configure a Netis router through your personal account 192.168.1.1?
For the convenience of further work, I would recommend immediately changing the interface language to Russian. This is done by simply selecting a language from the drop-down list at the top of the netis.cc page.
Also, the first thing that will be useful is to reset Netis settings so that you can use the login and password for the web interface that were set by default from the factory. Perhaps someone has already tried to connect a router before you and set their own parameters.
Connecting the Netis router to the Internet
All basic Netis settings are located right on the start page. First of all, this is the configuration of the Internet and wireless networks. To connect the router to the Internet, you need to select one of the types:
- Dynamic IP
- Static IP
- PPPoE
- Other
Which one you have, you need to look at the contract for the provision of services with the provider - depending on this, you will need to enter certain data for connection. You also need to find them out from your operator.
Here you can activate MAC address cloning. This is done if the provider binds a specific connected computer to your contract. In this situation, to change it, you need to call technical support. To avoid this, check the “MAC Clone” box and it will automatically be copied from the main computer.
WiFi mode
To enter WiFi parameters, you need to enter the “Wireless Mode” section, where you specify the name of the WiFi being created, its access code, type of encryption protection, channel width, etc.
After completing the adjustments, click on “Save”.
In the future, when connecting devices to the created network, you will need to specify the name and password entered in this window, so it is strongly recommended to write them down in a notepad, since even the worst notepad is always better than the best memory.
To be honest, until now I was not familiar with Netis routers. I bought the Netis WF2411 model to see what kind of devices they are, and to prepare several instructions for setting up these routers for the website. And in this article I will tell you how you can enter the settings of your Netis router. There is nothing complicated there, but I have already seen similar questions several times, so I decided to prepare a short instruction on how to get into the Netis control panel. As you already understand, I will show you using the Netis WF2411 as an example. But if you have a different model, then the process itself should not be different.
After entering the settings, you can set up the Internet, Wi-Fi network, set or change the password, etc. By the way, for all these points I plan to prepare detailed instructions, which I think will be useful to many. Compared to other routers, the Netis login process to the settings page is no different at all, so if you already have experience, then there should be no difficulties.
Setting up a Netis wifi network
The next block is the wifi settings on the Netis router. The model I presented supports two frequency ranges, so here you can set data for two networks at once. Namely
- SSID (network name)
- Security (must be checked ON)
- Password
Initially, the two networks will work simultaneously, but later they can be activated separately in the Netis advanced settings.
After entering all the parameters, click on the “Save” button, after which two new wifi networks will appear in the field of view of all devices with a wireless module.
Internet setup on Netis WF2411
Open any browser (the manufacturer recommends Chrome or Internet Explorer), I configure it through Opera. In the address bar, type the address 192.168.1.1 , or https://netis.cc , and go to it. The router settings page will open. I have prepared separate instructions for logging into Netis settings.
If you want, you can update the firmware of your router before setting it up. You can do this according to the instructions in which I wrote about firmware for Netis routers. You can update the software after setup.
You will see a page with quick settings. On it you can configure a connection to an Internet provider and Wi-Fi. But first of all, I advise you to change the language of the control panel to Russian, and by clicking on the Advanced , go to the advanced settings. There we will set everything up.
Next, go to the Network - WAN . There are very important settings here; if they are set incorrectly, the Netis WF2411 router will not be able to connect to the Internet and distribute it. What type of connection your Internet provider uses, you need to check with the provider itself. It can be: Dynamic IP, Static IP, PPPoE, L2TP, PPTP. If your connection type is not Dynamic IP, then you must also have connection parameters: username, password, and possibly an IP address. This data is provided by the provider.
In the WAN connection type , select our connection type, and if necessary, set the necessary parameters.
For example, setting up a popular PPPoE (Beeline, Dom.ru) on a Netis router will look like this:
To save the settings, click on the Save . If you need to set any special parameters, for example: clone MAC address, set DNS addresses, server name, etc., then click on the Advanced and additional settings will open.
The main purpose of these settings is for the Internet to start working through the router. If you are connected to the router and the Internet is already working, and there is no “no Internet access” status, then everything is fine. Save your settings and follow these instructions. If you can’t set up an Internet connection, then I advise you to check the settings again, check with your provider, and read this article.
Setting up Wi-Fi and setting a password on the Netis WF2411 router
Under setting up a wireless network, I will enter a change in the name of this very network. If the standard name does not suit you. And of course, I advise you to protect your Wi-Fi network with a good password.
To do this, in the settings, go to the Wireless mode – Wi-Fi Settings (if necessary, select the 2.4G network, or 5G if the router is dual-band). On this page we are interested in the SSID field, where we enter the name of our wireless network.
To set a password, select WPA2-PSK Authentication Type . And in the Password , create and write down a password that will be used to connect to your Wi-Fi. The password must be at least 8 characters, English letters and numbers.
It is better not to change the remaining parameters. Click the Save . After this, you will need to connect to Wi-Fi with the new password that we set. Try not to forget it, and if you do, this article will be useful to you.
If you only changed the password, then on computers that have previously connected to this network, an error may appear: “Windows could not connect to,” or “The network settings saved on this computer do not meet the requirements of this network.” In this case, you just need to delete the network on your computer and connect again.
How to change the default password and set your own on the Netis router?
Now let's see how to change the password on the wifi router, which was the default for connecting to your wireless network. Go to the administrator section (how to do this is described here) and click on the “Advanced” button
If your router is dual-band, that is, it distributes the Internet at 2.4 and 5 GHz frequencies simultaneously, you need to understand the password for which specific band you want to change. The settings for each of them are located in different subsections of the same name. I will show the example of the most used of them - I open the “2.4 GHz Wireless Mode” section, the “Wi-Fi Settings” section.
Here in the “Access point security parameters” block we look for the “Password” item - this is where you can register a new key for connection.
To apply the change, click the “Save” button and wait for the router to reboot.
Video on connecting and setting up a netis router
If the article helped, then in gratitude I ask you to do 3 simple things:
- Subscribe to our YouTube channel
- Send a link to the publication to your wall on a social network using the button above
- Leave a comment under this post.
This will greatly help the development of our site! Thank you!
Greetings! We have already written enough on the topic of Netis, so we will present the next article about the general configuration of Netis routers briefly and straightforwardly. Begin!
If something remains unclear, write about it in the comments. There you can share your experience with other members of our club on common problems.
Content
Those. If you need precise instructions for your model, I recommend looking at the list above - most likely your router is already there.