What is IMEI and where to find it on Android
Literally, this abbreviation can be deciphered as “international mobile equipment identifier.”
This is a 15-digit number that can only be issued by special institutions. It serves to identify and track the device. Smartphone manufacturers indicate IMEI in several places: on a sticker under the battery (on the battery/back cover), on the box, in the warranty.
When the phone is in working order, the IMEI code can be viewed by writing the combination *#06# in the dialer menu. But, of course, it is stored in another place, to be more precise - in NVRAM. This is a permanent memory compartment in which basic system-important settings are stored.
There are also other identification parameters, such as MAC address. The safety of this memory section is especially important, so it cannot be accessed from conventional file managers.
Why sometimes IMEI disappears after flashing?
If you flash your phone with official firmware using proprietary software, most likely you will never encounter this type of problem. Risks appear when you decide to switch to custom and unlock the bootloader.
They are especially great if you want to try out firmware from a little-known developer. The fact is that inexperienced developers can change memory fragmentation or mess up in some other way, ultimately damaging NVRAM.
Another reason for getting an incorrect Android IMEI after flashing the firmware or not getting it at all is due to a glitch or crooked firmware. If the USB cable is disconnected before installation is complete, the battery is dead, or you did not follow the instructions exactly. All this can disrupt the order of the settings, as a result of which the IMEI will be lost. But how do you understand that this is the reason?
How to detect damage in NVRAM
There are several ways to detect the problem. For example, when the phone turns on, but you cannot make or receive calls. If you see this, go to the “Phone” application and dial the code “*#06#” there.
As you can see in the screenshot, the codes are shown. By the fact that there are two of them, you can determine that the phone has two SIM cards. If there were blank lines, this would indicate damage.
Another diagnostic method can be to turn on Wi-Fi. After turning it on, go to the list of available networks, and if the message “Nvram warning err = 0x10” appears there, then you have an error and will need to solve it.
Why is this happening?
A failure can occur for several reasons:
- The firmware was not installed correctly;
- An error occurred when returning the device to factory settings.
There are models of Chinese-made gadgets that can function without this identifier, but if you are the owner of a high-quality mobile device of a popular brand and the Name suddenly disappears, it will start to work incorrectly.
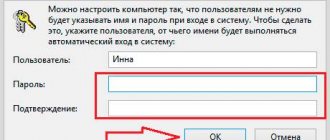
What to do in such a situation? First of all, carefully read the article, follow all the instructions and find combinations of symbols to call the engineering menu. For example, you have a Samsung Galaxy smartphone, which means you need to look for a combination specifically for it.
Getting root rights
To solve the problem using the standard means of the device, you will need to obtain superuser rights. To do this, use the short step-by-step instructions:
- Charge the battery above 30-50%.
- Download the Kingroot program to your computer or smartphone (you can use any other, it doesn’t change the essence).
- Open the program and follow a few simple steps that will be described there.
It is best to download applications for rooting your device not from the Play Store, since for some reason there are fakes with a lot of advertising. Well, now let’s move directly to recovery methods.
Recovery via the engineering menu
You can download the application to enter this menu from the Market, or you can simply enter a special combination in the “Phone” application. For most devices this is “*#*#364633#*#*”. The code may vary depending on the model.
If you don't want to search and select it, you can download this application. There you will have to manually register the IMEI on Android. For this:
- Remove the SIM card from the phone.
- Enter the engineering menu.
- Swipe right once and select “CDS Information”.
- Next select Radio information.
- In the menu that opens, you will have one or two lines, depending on the number of SIM cards. Select "Phone1" to start.
- In the top line of the menu that opens, enter the command “AT+EGMR=1.7,”your IMEI.” It should look like this:
- Send the command by clicking on the “SEND AT COMMAND” button.
- For the second SIM card, carry out similar manipulations, just do not mix up the code. Please note that for dual-SIM devices, instead of “1.7”, after the equal sign you need to put “1.10”.
- If an error occurs, just put a space after “AT+” in the command and try again.
- Reboot your phone.
If after turning it on you enter “*#06#” and it is still empty, it means that changing IMEI on Android through the engineering menu did not work and you need to resort to more complex recovery methods.
What to do if after the firmware the phone does not see the network
Users do not always turn to the service center for help. Changing the firmware is not a simple process, after which problems with the device may arise, so a successful installation is very important for the performance of the smartphone. One of the possible consequences due to an error during the procedure is that the phone does not see the network. If this happens, you need to check if you have a code in your phone. If it is missing, then below are ways to restore IMEI on Android after flashing it.
- The human immune system and its organs
- How to delete a page on VK permanently or temporarily
- High temperature in an adult, what to do
Using SP Flash Tool
If you want to restore IMEI using this program, first you need to make a recovery file. Yes, this method is not suitable for those who have already lost their code, but it will be a good insurance policy for everyone else.
How to create a recovery file
Step-by-step instruction:
- Install Flash Tool on your computer if it is not already installed.
- Install drivers for your device using any of the available methods.
- Charge your smartphone battery at least halfway.
- Launch the program and connect your smartphone.
- Click on the “Scatter-loading” button and select the scatter file. We take it only from the official firmware.
- Switch to the "Readback" tab.
- Click on “Add”, then in the line that appears you need to select the location to save the IMEI firmware and name the file “nvram.img”.
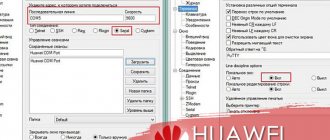
- In the window that appears, in the “Region” field you will need to enter the value “EMMC_User”, and in the “Start Address” and “Length” fields you need to copy the values from the scatter file shown in the following screenshot.
- If everything is entered correctly, you can click on “Read Back”.
- Now you can turn off the device and put the recovery file in a safe place.
How to recover from a file
Here is the sequence of actions:
- Open SP Flash Tool and select your scatter file.
- Go to the "Write Memory" tab.
- In the “File Path” line, write the path to the recovery file.
- In the line just below, enter the value from the line “linear_start_addr” of your recovery file.
- In the “Region” tab, select the “EMMC_User” value. All completed fields should look like this:
- Click on the "Write Memory" button.
- Connect your switched off smartphone to your computer and the program will do everything you need.
If you save the recovery image to the cloud, you will always have insurance in case of an IMEI error. This is much easier than looking for other recovery methods. But after the recovery process using this method, it is recommended to reset to factory settings.
Why IMEI disappears and how to restore/change it
The main reason for losing IMEI is unsuccessful phone firmware, and a little less often, an attempt to obtain root rights.
As mentioned above, IMEI is one of the main identifiers of your phone when communicating with a mobile network. And if it fails (all values are set to 0), communication problems may arise.
If you bought a used phone and found a discrepancy between the IMEI indicated on the phone and the one registered under the battery, it is better not to install the original IMEI.
Things to remember about IMEI:
- deleting IMEI means changing IMEI to a zero value (000000000000000), restoring IMEI means changing IMEI to its original value;
- there are no ways to restore the original IMEI if you do not know it, since information about it is not stored anywhere;
- if it is not possible to determine the original IMEI, you can always invent or generate it;
- Never trust services that offer to find out your original IMEI for restoration - these people are scammers and offer the impossible;
- The only way to find your missing/stolen phone by IMEI is to contact the police.
Recovery via the engineering menu
To change IMEI, you will need to enter the engineering menu. You can enter it by dialing a special number on your Android device. The most common number to enter the engineering menu is *#3646633#* . And if it doesn't help you, try these:
| Manufacturer | Service code |
| MTK processor | *#*#3646633#*#*, *#*#54298#*#* |
| Samsung | *#*#8255#*#*, *#*#4636#*#* |
| HTC | *#*#8255#*#*, *#*#4636#*#*, *#*#3424#*#* |
| Sony | *#*#7378423#*#* |
| iPhone 5 on Android | *#*#4634#*#* |
| Phylips, Fly, Alcatel | *#*#3646633#*#* |
| Huawei | *#*#2846579#*#* |
In addition to the above list, the engineering menu entry number should be indicated in the instructions for your device.
Changing IMEI through the GPRS tab
- Enter the engineering menu.
- Open the GPRS tab in the Telephony section.
- Enter the IMEI you want to install and click Write IMEI.
- If you have two SIM cards, switch to SIM2 and enter the IMEI for the second SIM card.
- Reboot your device.
Changing IMEI via the CDS Information tab
- Enter the engineering menu.
- Open the CDS Information tab in the Connectivity section.
- Select the Radio Information subsection.
- Select the Phone 1 subsection.
- Enter AT+EGMR=1,7, “your IMEI” (leave the quotes) and press SEND AT COMMAND. If the system does not accept the command, add a space after the + sign.
- If you have two SIM cards, return to the Radio Information (Phone Information) section and select Phone 2.
- Enter AT+EGMR=1,10,“your IMEI” (leave the quotes) and press SEND AT COMMAND. The command is different from the one entered in step 5 - this one has the number 10 instead of 7. If the system does not accept the command, then add a space after the + sign.
- Reboot your device.
Video: IMEI repair through the engineering menu
Repair IMEI using applications
If you have difficulty entering the engineering menu, or the engineering menu is not available on your device, you can always change the IMEI using applications. As mentioned above, the last IMEI digit is a control digit and is generated using the Luna algorithm based on the previous ones. And if you want to register a non-native IMEI, then it is better to generate it using one of these applications.
To download the application for changing IMEI, go to the Play Market and enter the word IMEI in the search bar.
All found applications for changing IMEI are identical, and we will look at them using Chamelephone as an example. It is worth saying that each of the applications requires root rights, and this is a separate story.
Getting root rights
Root or superuser rights grant the user special powers, such as:
- deleting system files;
- embedding programs and melodies;
- removal of advertising;
- CPU overclocking;
- Activation of hidden Android functions.
Having Root rights will be required for some subsequent actions when cleaning the device. Rooting will void your device's warranty. Each device has its own characteristics, and the risk of damaging the system when obtaining root rights or after always remains. If you have root rights, you will not be able to receive warranty updates to the operating system.
- If you haven't installed apps from external sources before, go to Android settings and open the Security tab under Personal Data.
- Activate the "Unknown Sources" option.
- Download the latest version of Framaroot from the Internet. This application has analogues in the Play Market, but they may not be as reliable.
- Install Framaroot. If the installer blocks the process, select "Additional information" and click "Install anyway (unsafe)."
- Launch Framaroot and select “Install SuperSU”, then click on any of the methods for obtaining root rights. Once received, reboot your device.
- There is a possibility that your device is not supported by this application. You can try alternative programs, but this will increase the risk of crashing your system. The best thing to do is to find out the individual method for rooting your device.
- Google the name of your device + the word root and follow the first couple of links found.
- Follow the instructions to root your device.
Restoring IMEI through an application using the example of Chamelephone
If you have successfully obtained root rights, you can proceed to change IMEI through the Chametelephone application.
- Install the Chamelephone application via Play Market and launch it.
- Generate a random one (preferred) or enter your own IMEI, then apply the changes using the Apply new IMEIs button.
- Reboot your device.
Losing IMEI occurs in quite rare cases. It leads to such serious disruptions to the operation of the device as loss of the mobile network, but it is surprisingly easy to fix.
Via Chamelephon app
This is definitely the easiest way to flash IMEI on your Android phone. All you have to do is install the application from the Play Store and click on two buttons.
First, the upper one, for generating the code, and then the lower one, for installing it.
The downside of this method is that it does not work on all processors. Only MTK will do, and even then not all. But it’s worth a try if you don’t want to bother with more serious recovery methods.
Using ADB RUN
With this software you need to act like this:
- Download and install the ADB RUN program on your computer.
- Launch the program.
- Go to Manual Command-Restore IMEI and press number 1 (if your phone has one SIM) or 2 (if it has two).
- Enter your code.
- Move the newly created file “MP0B_001” to the phone’s flash drive or to its internal memory.
- Using any explorer with root access, move the file to the path /data/nvram/md/NVRAM/NVD_IMEI/MP0B_001 and reboot the device.
Restore_IMEI
Don't want to install Adb Run, but still need to restore IMEI? Then you should try this program, which generally repeats the actions of the previous one, but is a little easier to use.
After downloading and unpacking Restore_IMEI to any convenient directory on your computer, the owner of an Android phone should:
- Find the run.bat file in the folder and open it using the context menu.
- In the Notepad window, without changing other entries.
- Change both identifiers to be recoverable or generated by any of the previously listed methods. If there is only one SIM card slot in the phone, the second value should be deleted.
- Save changes using the File menu.
- Then close Notepad and run the script.
- In the directory with the unpacked program, the MP0B_001 file will be automatically generated, containing exactly the same information as in the previous example.
You should do the same with it: copy it to the internal memory of your Android smartphone and move it to the NVD_IMEI folder, and then reboot the device and check the IMEI using the command *#06#.
Using IMEI&SN Writer
This method is quite complicated; it requires a PC and the IMEI&SN Writer program installed on it. You will also need to install drivers for your smartphone. If all this is present, you can begin recovery.
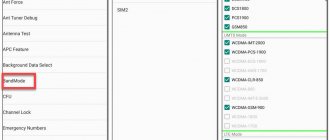
- Launch the program.
- Configure all items as shown in the screenshot.
- Click on the select DB button and in the window that appears, select the modem and processor database files depending on the smartphone model (they must be taken from the original factory firmware).
- After that, click on the “Start” button and connect the switched off phone to the PC.
- Once the installation is complete, you will have IMEI codes again.
If the phone is not detected or the program does not see it, reconnect until it is recognized. This error occurs quite often. But don’t do it too quickly, let the utility think about it.
Software solutions
There are many programs that help restore the unique code of a smartphone. Most of them have a number of additional functions that will not be discussed.
The main reasons why your phone heats up during use and their solutions
Chamelephon
Works with processors (CPU) based on MTK 65xx and running Android OS. Requires superuser (root) access. The first thing you need to do is look at the identifier on the smartphone itself. The procedure is as follows:
- is launched .
- Click the “ Generate Random IMEIs ” item.
- Random numbers are replaced with real ones and “ Apply ” is clicked.
You need to know what CPU is installed in the phone and the device itself must be rooted.
ADB Run
The method is more complicated and only works with MTK processors and with root access. It also requires installing the ADB Run program on your computer and the Root Browser application on your smartphone. If the IMEI on your phone is missing you will need:
- Run the program.
- Go to the following menu: Manual Command - Restore IMEI .
- Select the number of SIM cards installed in the device.
- Enter the required ID. The file will appear on the desktop.
- The file must be copied from the computer desktop to the phone memory (internal or on the card).
- Using Root Browser, move the file to the following location:
Unfortunately, the method requires too much preparation and is difficult to use. However, it often turns out to be the only solution (particularly on Chinese smartphones).
MTK65xx Changer
The program definitely needs root access . It works with MTK65xx series processors. MTK65xx Changer is installed on the phone and used from it:
- Launch the programs and go to “ Settings ”, where “ Clean IMEI ” is selected.
- “ link to original IMEI as the “ Selection mode .
- Click " Read ", copy the text into the " New... " field and click " Write ".
Note! If the link does not provide information, you will need to enter the value in the “New...” field. And only after that click “Record”.
How to connect a printer to your phone to print documents and photos directly
SP Flash Tool
It is performed from a computer and does not require Root rights on the phone. In return you have to pay with the complexity of actions. You need the SP Flash Tool installed, a working cable and a smartphone charged at least 40%:
- Connect the phone to the computer using a data cable (not a charger, since most chargers cannot transfer data. It is better to use the “native” cable).
- Find the original firmware for the phone (often available on the manufacturers' websites).
- Select “ Scatter- load ” and mark the previously downloaded firmware.
- Go to the “ ReadBack ” tab.
- Click “ Add ” and when a new line appears, double-click on it. Now one of the most difficult actions: specify the name of the firmware , save it to the computer. And the created additional IMEI firmware should be called “ nvram. ing ."
- Open the firmware for your smartphone in notepad and find the following lines:
- In the program itself, the “ Readback block start address ” window will open. In this window, “ EMMC_User ” is selected.
- The corresponding values are copied from notepad to the program window:
- Click Readback and wait until the green check mark appears.
The method is complicated, but it does not require rooting the device. Therefore it is suitable for most users. Alas, it only works with MTK processors.
MAUI META
Requires installation of a huge amount of additional software. Here is the complete list of what you need:
- MAUI META itself;
- SP Flash Tool Driver Auto Installer;
- CDC Driver;
- Original firmware of the smartphone.
Now you can proceed to direct recovery:
- Launch the MAUI META program, turn off the device and click Connect .
- When all connections have been made, you will need to act sequentially.
- Click the “ Load DB ” button (#2).
- Select “ From File ” (#3).
- Find in the original firmware a file whose name begins with BPLGUInfo (#4).
- Click on the search bar (#5) and select “ Imei Download ” (#6).
- Write the ID from the sticker on the device (#7).
- Click “ Write ” (#7)
- If successful, we get the message “ Write IMEI to target successfully ” (#9).
Ways to start a phone or tablet without a battery
IMEI&SN Writer
IMEI&SN Writer works from a computer. You only need to download the original firmware for the device in advance. There is no need to disassemble it. Alas, the method is not universal, although it is very simple. The following actions are required:
- Run the program.
- Check the box for USB.
- In the “ Write LITEM ” section, select “ IMEI ”.
- The “ Select Db ” button is pressed and the basic firmware of the device is selected.
- Click “ Start ”
Device Id IMEI Changer Xposed
Works on the phone itself and requires Root access . Device Id IMEI Changer Xposed is very simple.
Restoring the identifier is possible if you know it in advance. The real value is entered in the corresponding line , and then the “ Apply ” button is pressed. The creation of backup copies is supported, alas, only for the program itself. The advantage is that it is independent of the processor model; it can be used on both MTK and Qualcomm Snapdragon.