| Developer: | Christophe Grenier |
| License: | Freeware (free software) |
| Language: | Russian yes |
| System: | Windows 10/8.1/8/7/XP |
| Size: | 11.8 MB |
| Updated: | June 30, 2017 |
Your computer may experience occasional malfunctions. The cause may be viral activity, power failure and much more. As a result, the hard drive disappears, that is, the system cannot recognize it. The worst thing is that the data on the hard drive may also be lost.
If a similar situation occurs, you need to use specialized software for disk and data recovery. Such applications include the TestDisk program. It should be noted that this software is distributed free of charge.
Before using the program, it is recommended to become more familiar with it. It is also recommended to perform restoration using the instructions. If everything is done correctly, the hard drive will be restored within half an hour.
What is TestDisk
The TestDisk utility is a program that can find and restore hard drives, boot sectors and data. The program accesses the BIOS to find the device connected to the PC. In the same way, the utility determines the CHS geometry and LBA size of the disk.
The program checks the hard drive for errors. If errors are detected in a hard drive partition, the application repairs damaged sectors. If necessary, the application is able to create a new partition table, or if the old table is not found or is empty. In addition, the utility is capable of creating a new MBR.
Please note that anyone can download the TestDisk program for free. It is worth knowing that the application is open source. The utility copes with its tasks no worse than its paid counterparts. If desired, you can use additional software that is included in the TestDisk kit.
Documentation
- How to Get TestDisk Download - Binary executables and source files are available under DOS, Win32, MacOSX and Linux.
- TestDisk compilation - Instructions for assembling TestDisk and PhotoRec.
- TestDisk and Live rescue cd - List of distributions that include TestDisk.
- Recovery from damaged hard drives. (with bad sectors (blocks))
- Specifics of use under different operating systems.
- Intel Partition Table
To recover lost pictures or files from digital cameras or hard drives, use PhotoRec.
TestDisk home page: . Christophe GRENIER
Program features
On the Internet you can find more than a dozen programs that restore hard drives and data, but most of them are paid. As for TestDisk, the program has more capabilities than some paid products. Before you figure out how to use the program, you should consider its capabilities. The program is capable of:
- Fix the partition table;
- Restore boot sector;
- Copy files from a remote partition (FAT, NTFS);
- Reconfigure boot sectors;
- Select table files;
- Define a backup SuperBlock (for Linux);
- Recover deleted files;
- Create a backup copy.
Data recovery will be faster if beginners study the TestDisk instructions. Professionals can also use this application. It is important that users pay attention to the context clue. All commands are located at the bottom of the terminal.
Powerful data recovery program - TestDisk & PhotoRec 7.1 Stable Portable
TestDisk
is a powerful free data recovery program! It was designed primarily to help recover lost partitions and/or restore bootable disks if the problem is caused by software, viruses, or human error (such as accidentally deleting the Partition Table). It is very easy to restore Partition Tables with TestDisk. PhotoRec is a program for recovering lost (deleted) files (video files, documents and archives from hard drives, CDs and other media), as well as for recovering images (hence called Photo Recovery) from the memory of digital cameras. PhotoRec ignores file systems and "follows the data trail", so it will work even if the media's file system has been severely damaged or formatted.
System requirements:
DOS (real or in Windows 9x, DOS-box) Windows 10/8.1/8/7/Vista/XP, Windows Server 2016/2012/2008/2003 x86/64
Torrent Powerful data recovery program - TestDisk & PhotoRec 7.1 Stable Portable in detail:
TestDisk can:
· Correct the partition table, recover deleted partitions; ·Restore FAT32 boot sector from backup; ·Rebuild (reconstruct) the boot sector FAT12/FAT16/FAT32; · Correct the FAT table; ·Rebuild (reconstruct) the NTFS boot sector; ·Restore NTFS boot sector from backup; ·Restore MFT using MFT mirror; ·Define backup SuperBlock ext2/ext3/ext4; ·Recover deleted files on FAT, NTFS and ext2 file systems; ·Copy files from remote FAT, NTFS and ext2/ext3/ext4 partitions.
TestDisk
Suitable for both beginners and experts. For those who know little or nothing about data recovery techniques, TestDisk can be used to collect detailed information about non-booting drives which can then be used for further analysis. Those already familiar with such procedures should find TestDisk a handy tool when performing recovery.
File systems:
TestDisk can find lost partitions for all specified file systems: BeFS ( BeOS ) BSD disklabel ( FreeBSD/OpenBSD/NetBSD ) CramFS, Compressed File System DOS/Windows FAT12, FAT16 and FAT32 Windows exFAT HFS, HFS+ and HFSX, Hierarchical File System JFS, IBM's Journaled File System Linux ext2, ext3 and ext4 Linux LUKS encrypted partition Linux RAID md 0.9/ 1.0/1.1/1.2 RAID 1: mirroring RAID 4: striped array with parity device RAID 5: striped array with distributed parity information RAID 6: striped array with distributed dual redundancy information Linux Swap (versions 1 and 2) LVM and LVM2, Linux Logical Volume Manager Mac partition map Novell Storage Services NSS NTFS ( Windows NT/2000/XP/2003/Vista/2008 ) ReiserFS 3.5, 3.6 and 4 Sun Solaris i386 disklabel Unix File System UFS and UFS2 (Sun/BSD/…) XFS, SGI's Journaled File System
Additional information PhotoRec:
For greater security, when working with media from which you are recovering lost data, PhotoRec uses read-only access.
Important:
as soon as an image or a desired file is accidentally deleted, or you discover a loss, stop writing files to this medium (hard drive, flash drive, floppy disk); because you can write new files to replace the deleted ones and there will be nothing to restore. Well, accordingly, when using PhotoRec, you cannot select the same partition from which the recovery is being performed to write recovered files.
Photorec ignores the file system, so it works even if the file system is severely damaged. It can recover lost files from:
·FAT, ·NTFS, ·EXT2/EXT3 filesystem ·HFS+
Carriers
PhotoRec works with hard drives, CDs, memory cards (Compact Flash, Memory Stick, SecureDigital/SD, SmartMedia, Microdrive, MMC, etc.), USB flash drives, DD-raw images, EnCase E01 images, and so on. PhotoRec has been successfully tested on players such as iPods and digital cameras.
Known file formats
PhotoRec looks for known file headers.
If there is no fragmentation, which often happens, it can recover the entire file. Photorec recognizes numerous file formats, including ZIP, Office, PDF, HTML, JPEG and various other image file formats. The complete list of file formats supported by PhotoRec >>>
contains over 390 file extensions.
How PhotoRec works
FAT, NTFS, ext2/ext3/ext4 - file systems for storing files in data blocks (called “clusters” under Windows). The number of clusters and their size remains a constant number after initialization during file system formatting. In general, most operating systems attempt to store data continuously to minimize data fragmentation. The search time for data by mechanical drives is non-zero, so it is important to keep fragmentation to a minimum level.
When a file is deleted, meta information about that file (file name, date/time, size, location of the first cluster (data block), and so on) is lost. And for example, in an ext3/ext4 file system, the names of the deleted files are still present, but the position of the first data block is deleted. This means that the data is still present in the file system, but only until it is all replaced by new files with new data.
To recover these lost files, PhotoRec first tries to find the size of the data block (cluster). If the file system is intact, this value can be read from the superblock (ext2/ext3/ext4) or from the boot record (FAT, NTFS). Otherwise, PhotoRec reads the media, sector by sector, looks for the first ten files, from which it calculates the block/cluster size based on their location. Once the block size is known, PhotoRec reads the media block by block (or cluster by cluster). The signature of each block is checked in the database that comes with the program. It contains all types of files that can be recovered since the first version of PhotoRec was released.
For example, PhotoRec identifies a JPEG file when the block begins with:
·0xff,0xd8,0xff,0xe0 ·0xff,0xd8,0xff,0xe1 ·or 0xff,0xd8,0xff,0xfe
after which PhotoRec begins to restore the file. Stops recovery when it checks the integrity of the file, if possible, saves the file (which is determined by the signature found).
If the data is not fragmented, the recovered file should be identical in size or larger than the original file. In some cases, PhotoRec can learn the original file size from the header, so the recovered file is truncated to the required size. However, if the recovered file ends before its header indicates, it is discarded. Some files, such as *.MP3, are a data stream. In this case, PhotoRec analyzes the received data and then stops recovery when the stream terminates.
When a file is recovered, PhotoRec checks previous data blocks, looks for file signatures there, if it finds it, it considers that the file was not successfully recovered (for example, the file was too small), and tries to recover again. In this way, some fragmented files can be successfully recovered.
Portable version:
·The portable version of the program is presented by the developer and works without installation on a computer.
Changes >>>
Screenshots Powerful data recovery program - TestDisk & PhotoRec 7.1 Stable Portable torrent:
Download a powerful data recovery program - TestDisk & PhotoRec 7.1 Stable Portable via torrent:
Where to download the program
The TestDisk application can be downloaded for free from the official website located at: “www.cgsecurity.org”. On the page that opens, click on the “TestDisk” link.
After 1-3 seconds, the product description page will load. You need to go down to the “Operating systems” section and then click on the “Download” hyperlink.
Immediately after this, another page will open where you can download the latest stable as well as beta version of the product. Download the software by clicking on the graphic link “TestDisk 7.0 Free Download”.
After the utility is downloaded, you need to unpack the downloaded archive to any convenient location. If desired, the program can be moved to removable media, since it is completely portable. This means that the software does not need to be installed and does not need to be unpacked into a system folder such as Windows or System32.
Now all that remains is to run testdisk_win.exe and you can get to work. Please note that the program is not distributed in Russian, so do everything according to the instructions. Users unfamiliar with English are advised to use a translator.
How to use the program: overview and instructions
Cross-platform - the ability of software to run on more than one hardware platform and operating system
TestDisk is a cross-platform utility that is available for DOS, Windows 9X family, Windows NT4, 2000, XP, 2003, Vista, 2008, 7, 8, 8.1, 10, Mac OS X Intel, Mac OS X PowerPC, Linux, FreeBSD, NetBSD , OpenBSD and SunOS.
Data recovery takes from a few minutes to several days, depending on the condition of the disk being restored and the technical characteristics of the host computer.
Benefits of using TestDisk:
- small size;
- portability (can be started without installation);
- cross-platform (works on various OS);
- open source;
- no malicious code, advertising or advertisements;
- thorough disk scanning and data recovery.
Installation
TestDisk is a portable program: it does not require installation on a computer, and you can run it from a USB drive. For the first launch you need the following:
- Download TestDisk from the official website using this link.
- Extract TestDisk Zip (.zip extension).
- Find and open the testdisk_win.exe file.
Portable TestDisk does not store its settings or parameters in the Windows registry and is not tied to a specific system - it can be launched from any directory
Interface and Features Overview
The command line is a software shell that allows you to give various commands to the computer in text form.
The command line interface is probably familiar to everyone. Programs of this type are simpler than they seem.
A black screen with words is open in front of the user. You need to enter the correct command, and the computer will respond - easy, right? In most cases, data recovery using TestDisk requires only commands and nothing more.
The program is capable of the following:
- Corrects partition tables and recovers deleted sectors.
- Restores the FAT32 and NTFS boot sector from its backup.
- Reanimates the boot sector FAT12/FAT16/FAT32 and NTFS.
- Copies files from remote FAT, exFAT, NTFS and ext2 / ext3 / ext4 partitions.
- Recovers files from FAT, exFAT, NTFS and ext2 file systems.
How to use the program
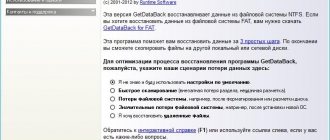
After starting the program, a terminal window will appear. The application first asks if you want to create a progress report. To create reports, select “Create”. To control the program, just use the “Up”, “Down” and “Enter” buttons.
In order to select “Yes”, you need to press the “Y” button. If you need to cancel the action, press the “N” button. To exit the menu, just press the “Q” button. It should be noted that the ESC key does not work. To copy files, just press the “C” button.
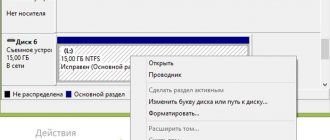
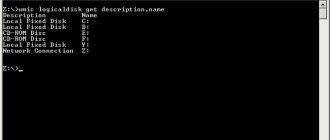
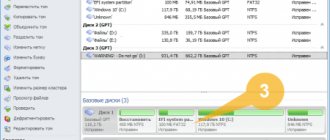
Now you need to select the hard drive on which the files were lost. It should be noted that the list shows not only local drives, but also removable media. After selecting the hard drive, click the “Enter” button.
When a list of available Partition Tables appears, you must select the one that matches your computer. For example, Intel. Most often, the utility automatically detects the partition table and places it in the first place in the displayed list.
To test the partition structure of the selected storage medium, as well as search for missing files, select the “Analyze” item. When the result appears, you will see disk information. Now you need to select Quick Search from the menu located at the bottom of the screen. Immediately after this, the program will ask whether you need to search for partitions created under Vista. The best thing to do is to agree and press the “Y” button, which means “Yes”.
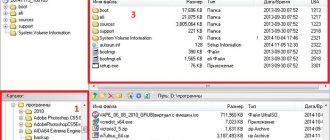
In a few minutes, all disk partitions will be displayed on the screen, even those that need to be restored. To view a list of files, select a section and press the “P” button. Directories and files with Russian names will not be displayed correctly (short names are displayed normally). If necessary, files can be copied by specifying the destination folder and pressing the "C" button. The copying process may take some time.
To exit this section, press the “Q” button. To thoroughly search for files, select the “Deep Search” command. If you need to write structure data to the MBR partition, you need to click the “Write” command.
After you succeed in restoring the partition, you need to restart your computer. When the PC turns on, you can see all the missing files appear. It should be noted that the hard drive may not appear immediately because it is missing a letter. To do this, you need to enter the administration section and then assign a letter.
Retrieving deleted files.
TestDisk is one of the most popular tools for recovering lost data on Linux. In addition to simply retrieving deleted files, it can restore a damaged partition table and rewrite the boot sector. Today I will tell you how to do both.
First, let's install the necessary packages:
sudo apt install testdisk
Let's launch:
sudo testdisk
and we see something like this:
Here they tell us what program we launched and offer to start recording a new log. We agree by selecting Create (you can refuse if you want). Below is a list of available media. Choose the one you need. After this, you will need to specify the partition table type. In most cases, either Intel or EFI GPT . If you are not 100% sure, just select the option that the program recommends ( inscription at the bottom of the screen ):
With TestDisk it is very easy to render the system inoperable or erase your data, so be extremely careful, read and think before you start any operation.
Next, select the Advanced . On this screen, you can create an image of a partition using the Image Creation and work with it. I advise you to do so if the data is very important. To go directly to searching and restoring files, select List . After this, you will see the contents of the partition's root directory.
If you need to return to the previous screen, press the q .
Next, navigate using the up and down arrows Enter to go to the directory . If you need to go back, select the “..” located at the top of the list. In addition, you can navigate to the selected folder by clicking the right arrow , and to the parent folder by clicking the left arrow .
Two dots traditionally represent the parent directory, one dot the current one. Files whose names begin with a dot are considered hidden in Linux and are not shown by default. TestDisk in red font indicates deleted files. Thus, if you deleted an important document by mistake, look for it in the red lines .
If you are not sure which file you need , pay attention to the date and size. Once you find the file you want, press c to save it. After this, you will again see a list of directories. Select the one you want and press c again to mark your choice.
If you need to save a large number of documents at once, this can be done at once. For multiple selection, press “:” (with the US English keyboard layout, this works by pressing Shift + :). Pressing a in the English keyboard allows you to select all the contents of a folder at once. Selected files are colored green . you can save everything you selected by pressing Shift + C.
Recovering deleted files is a very useful feature that TestDisk does a good job of. But the main purpose of this program is to restore a deleted or damaged partition table. This is exactly what we will do now. For example, I’ll take a Windows HDD on which the MBR area was deleted (accordingly, the partition table was also deleted).
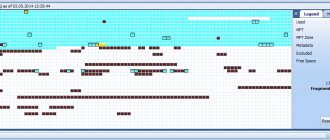
The OS does not boot, Gparted sees the HDD as a continuous unallocated space:
TestDisk again , select the desired device, partition table type, then the Analyze - and we see that we do not have not only bootable partitions, but any partitions at all:
We select the only option in this case, Quick Search , and we get a complete and accurate list of sections. If you need to change the characteristics of the found partitions, for example, set the boot label to one of them, use the right and left arrows . Explanation of symbols is at the bottom of the screen.
Press Enter to continue. You can now create a new partition table by selecting Write . But what if you didn't find what you were looking for? In this case, choose the Deeper Search and be patient. As soon as the desired partition is found, you can stop the search and proceed to recovery.
If more partitions were found than there actually were, do not be surprised: these are traces of previous disk layouts. To select the correct partitions to recover, pay attention to their size, which is displayed at the bottom of the screen. , you can display a list of files by pressing P. By the way, you can restore them from here by clicking , as we already did in the first part of the article. TestDisk itself will determine which partitions need to be restored; others will be marked D ( Deleted ) at the beginning of the line. Unless you manually change this value, they will not be restored.
Let's see what happened:
The partitions are in place, the OS boots without any questions asked.
Advantages
An application like TestDisk has a number of advantages that we recommend you pay attention to. The main advantage is that it is completely free to use. Moreover, the program is open source.
Users will like the fact that the program is capable of not only finding a missing hard drive, but also recovering information. Data can be copied to another hard drive. It should be noted that the application copes with such serious situations that even paid products cannot cope with.
In addition to restoring information and connecting the hard drive, the utility is capable of finding errors. After testing, all errors found are automatically corrected by the program. Similar work can be done with any file systems.
Another advantage is the ability to recover the boot sector. Most programs are not capable of resuscitating a disk with an operating system. It does not matter what OS was installed on the computer.
Main features of Testdisk
Let's list the main functions of this application.
The main purpose of the TestDisk utility is to restore damaged partitions and fix boot disks.
Damage to sectors or deletion of Partition Table are quite common problems. The cause may be a Windows system failure, improper operation of the hard drive, or a virus attack.
Other features of the TestDisk application:
- Recover deleted and corrupted data from supported file systems, including (ex)FAT, NTFS and ext2. This is enough to work with desktop operating systems.
- Copying files from one partition to another (or creating an exact copy of a partition): a useful function if you need to transfer data to DOS when Windows is not working
- Correcting markup in partition tables
- Restoring the boot sector from a previously created backup (FAT/NTFS)
- Master File Table (MFT) Fix
- Collect diagnostic information that can be sent to the laboratory and data recovery specialists.
Flaws
Despite all its advantages, the application has several significant disadvantages. First of all, it should be noted that there is no graphical interface. The user will have to work through the terminal, and this can confuse many beginners.
The second disadvantage arising from the first is the lack of a Russian-language interface. All commands are written in English. The same applies to hints. If you have difficulties with the language, you will have to use a translator.
What kind of instrument is this?
TestDisk is a freely available and useful program that queries the BIOS (DOS/Win9x) or OS (Linux, FreeBSD) to find hard drives and their characteristics (LBA size and CHS geometry). The app does a quick check of your disk structure and compares it to the partition table for typing errors. If the partition table has typing errors, TestDisk can repair them. It won't be difficult. If partitions are missing or completely empty tables are found, the utility can search for missing elements and create a new table, and if necessary, even a new MBR.