Control Panel in Windows 10 Creators Update
Good afternoon, dear readers, not so long ago we updated to windows 10 creators update version 1703 and surprisingly it turned out to be much more stable than its predecessors, it no longer has so many blue screens and other glitches, but there is still a fly in the ointment and is called Control Panel. Surely many have already noticed that the control panel is now missing in the Windows 10 Creators Update; it is now hidden so far away that you will spend more time finding it. I'll show you how to fix this and return the control panel to the context menu of the start button.
What is Control Panel
To put it simply, this is a snap-in application whose task is to systematize snap-ins by area of application so that the user can conveniently make settings for the operating system and administer it from a single panel. It includes the following groups:
- Windows To Go
- Windows autorun
- Administration
- Windows Firewall
- Windows Recovery
- date and time
- Storage Spaces
- device Manager
- Credential Manager
- Home group
- Sound
- Infrared communication
- File history
- Keyboard
- Mouse
- Taskbar and Navigation
- Indexing Options
- Explorer Options
- Remote Desktop Connections
- Programs and components
- Default programs
- Work folders
- Speech recognition
- Regional standards
- Windows Backup and Restore
- Browser properties
- System
- Phone and modem
- Color management
- Troubleshooting
- Devices and Printers
- user accounts
- Security and Service Center
- Sync Center
- Accessibility Center
- Network and Sharing Center
- Bitlocker disk encryption
- Fonts
- Windows Power Options
- Language
Download Control Panel and Recycle
| Purpose: | Free program to bring back the classic Control Panel in Windows 10 |
| The name of the program: | Control Panel and Recycle |
| Manufacturer (author): | genesistoxical |
| Status: | For free |
| Category: | Conductor |
| Installer (archive) size: | 377 kb |
| OS support: | Windows 10 |
| Interface language: | English |
| Safety: | No viruses |
| Similar programs: | — |
| Link to installer/website: |
…
…
...unzipped and installed it...
After installation, we get a shortcut on the desktop, click on it with the mouse (launch the program)…
In this single window of the Control Panel and Recycle program, click on “Add” to add the Control Panel (top left button) or the Recycle Bin (bottom left green button) to the Windows Explorer window.
“Remove” should be understood as canceling or returning to the previous state of the navigation area, without the control panel and recycle bin.
That's it, the program can be closed and deleted using standard system tools or CCleaner - the changes made are saved...
I recommend
Congratulations - you learned how to return the Control Panel and Recycle Bin to Windows 10 Explorer.
Of course, it was possible to do all this manually, through the registry, but who needs this heroism, dubious for inexperienced users.
By the way, I always hide the navigation area in Explorer windows - I’m so used to it and love the space...
Until new “returns” and useful computer tips.
Where did the control panel go in windows 10?
Although the new version of the operating system has become more stable and there are no problems with the OS giving the msvcp140.dll error, Microsoft is trying to get rid of classic applications in Windows 10 and in version 1703 the “Control Panel” came under the knife. According to Microsoft, this is done in order to make it easier for the user to learn tens, so that all actions are the same on:
This seems to be good, but for people who use Windows from XP and higher, they don’t like it very much, since they have become accustomed to it over the years of use. Previously, in Windows 10 you could easily right-click on the start button and see the item in the context menu
now it’s simply not here, you must admit that it was more convenient before, but don’t worry, we can return the control panel to the Windows 10 start context menu (Win+X menu) in minutes.
The taskbar does not work in WINDOWS 10.
The taskbar is one of the most important components of any Windows OS. This is perhaps one of the most active areas of the user interface. In Windows 10, sometimes the taskbar may become unresponsive. You may not be able to open Start, you may not be able to click icons on the taskbar, the taskbar may not hide automatically, or you may not be able to perform other actions on the taskbar. If the taskbar is not working properly, you can try the following troubleshooting methods to get it working again.
Method 1 of 6
Restart Windows Explorer
Restarting File Explorer will also restart the taskbar. So, it is a good idea to restart File Explorer when the taskbar is unresponsive or not working. Here's how to restart File Explorer.
Step 1: To open the Task Manager, press three keys on your keyboard simultaneously: Ctrl + Shift + Esc.
Step 2: If you cannot see the full version of the task manager, click on the More details button. If you receive the full version, proceed to the next step.
Step 3: Under the Processes tab, find File Explorer and right-click on it, and then click the Restart button to restart File Explorer as well as the taskbar.
If you don't see the Windows Explorer entry, open any folder or file in Explorer to see the entry.
Method 2 of 6
Restarting File Explorer should resolve this issue. But if this does not happen, close all running applications and restart your computer again. Check whether the taskbar is currently working or not.
Method 3 of 6
Official Launch and Troubleshooting of the Taskbar
If the Start menu doesn't open when you click the Start button, use the official Windows 10 Start menu troubleshooters to diagnose and fix any existing menu problems. Download the Start menu troubleshooter and run it to fix all problems.
Method 4 of 6
Restore Windows 10 to a previous date
If System Restore Point is enabled for your drive in Windows 10, then you can restore Windows 10 to an earlier date when the taskbar was working.
Method 5 of 6
Create a new User account
If the Taskbar is not working even after following the troubleshooting instructions mentioned above, you can create a new local User account and check whether the Taskbar is working there or not. If the Taskbar works without problems, you can move all files from the current User account to the new one and install the necessary programs.
Step 6 of 6
Reset or reinstall Windows 10
If none of the solutions solved your taskbar problem, then you have no choice but to reset or reinstall Windows 10.
How to open Control Panel in Windows 10 Creators Update
So, how can you access the Windows 10 Control Panel after update 1703? There are three methods to get into the Control Panel. Below we will also return the old method through the Start context menu.
- via the Start menu structure
- Execute through the window
- Via command line
- Through search
- Via shortcut
Open Control Panel via Start Menu
You can access the Windows 10 control panel using the old classic method, through the menu structure of the Start button. We find the item “Utilities - Window” and in it the item “Control Panel”
Open Control Panel via the Run menu
And so press the key combination WIN + R and in the “Run” window that opens, write control panel and press Enter, as a result of which the classic control panel will open.
In the command line, you can also enter control panel and press Enter, the effect will be the same.
Open Control Panel via Search and Shortcut
You can go to the control panel using the search; to do this, click the magnifying glass icon to the right of the “Start” button. Enter control panel in the search field and the desired shortcut will appear in the search results at the top.
And the last method is through a shortcut. Since the equipment itself lies along the path:
Then by launching it or creating a desktop shortcut from it, you can enable the Windows 10 Control Panel.
We have learned how to find the control panel in Windows 10 Creators Update, now we will return everything as it was and add an item to the start context menu.
Opening methods
In order to find the Control Panel in Windows 10, you can use one of the three methods presented below.
Using quick search
In the new Windows 10, you no longer need to remember the locations of applications and services; you just need to use the integrated search. For example, to call the “Control Panel” you need to:
- Launch the built-in search by clicking on the magnifying glass icon next to the Start button.
- In the search bar that appears, enter “Control Panel” and it will appear in the results.
Using the Start Menu
You can go another way:
- Click on the “Start” button and open the “All applications” list.
- Find and expand the “Service” section.
- Click on the “Control Panel” link.
Advice! There is another, faster way, which involves using the “Start” button - right-click on it and select “Control Panel” from the menu that appears.
Using the Run menu
Also, the “Control Panel” is opened using the universal “Run” menu:
- Press the Win + R key combination.
- In the window that appears, enter “control” and click “OK.”
How to get control panel back in windows 10
In order to return everything as it was, there are two ways:
- Create a shortcut and place it in the desired location
- Using the Win+X Menu Editor utility
Setting up Win+X Menu Editor
Win+X Menu Editor is a free utility, you can download it from the link and it is needed in order to customize the context menu of the fart button, which is called using the WIN+X hotkey combination.
- Launch the Win+X Menu Editor program
- Select Group 2, this area allows you to return the control panel to the desired location. Please note that the already existing “Control Panel” item has a gear icon and will open the “Options” item, but we need to click on the Add a program > Add a Control Panel item at the top, it will return the old control panel in Windows 10.
Returning the Control Panel to the Start context
If you remember, some time ago the coveted panel was in Windows 10 in the context menu of the Start button. But after updating the system, it disappeared from there. However, it is not hopeless. You can return it back in more than one way:
- By inserting a copied shortcut into a special directory, which is responsible for displaying the corresponding item in the Start context.
- Creating a new shortcut using the console utility HashLnk.
- Creating a shortcut and menu command using the Win+X Menu Editor utility.
Inserting a shortcut
The first method is perhaps the easiest, but it requires the original Control Panel shortcut, copied from another copy of Windows 10, where it was saved.
You won’t be able to simply create it on the spot, since the system checks the checksum of the file. So, if you managed to get the shortcut you need, just place it in the %LocalAppData%\Microsoft\Windows\WinX\Group2 . Please note that under the name “ Control Panel ” a shortcut to the “ Settings ” application is stored there. If you want to keep both, copy the new one without replacing.
This is interesting: How to set default programs in Windows 10. What to do if the setting is not saved
For the new command to appear in the menu, restart your computer or restart Explorer through the task manager.
How to return the Control Panel to the Windows 10 Start context menu (Win+X menu)
I think many users, like me, are accustomed to the fact that you can go to the Control Panel in Windows 10 from the Start context menu (called by right-clicking on “Start”) or using the Win+X keyboard shortcut, which opens the same thing menu.
However, starting with Windows 10 versions 1703 (Creators Update) and 1709 (Fall Creators Update), this menu displays Settings (the new Windows 10 Settings interface) instead of the Control Panel. As a result, there are two ways to get from the Start button to settings and not a single one - in the control panel (except for going in the list of programs to "Utilities - Windows" - "Control Panel". This instruction details how to return the launch of the control panel to the context menu, the Start button (Win + X) and continue open it in two clicks, as it was before. You may also find it useful: How to return the Windows 7 Start menu to Windows 10, How to add programs to the desktop context menu, How to add and remove “Open with” menu items.
Changing the location and appearance of the Taskbar in Windows 10
The most common system failure associated with the incorrect display of the “Taskbar” in Windows 10 is an arbitrary change in its location or appearance. This set of problems can manifest itself in the following:
- The “taskbar” no longer automatically minimizes or appears on top of all other windows (including when switching to full-screen mode while watching a video online);
The “taskbar” will always be displayed when the “on top of all windows” mode is enabled (even when watching a video through a media player)
- The “taskbar” has changed its appearance (for example, it has become completely transparent);
Changes in the appearance of the Taskbar may affect its color palette or icon size
- The “taskbar” began to be located in a completely different part of the screen (left, right, top).
The location of the Taskbar icons themselves may also change (for example, they may be located in the center of the panel)
To solve this kind of problem, it will be enough to use the built-in tools of Windows 10.
Display problems
To configure the “hide/show panel on top of all windows” function, you must:
- Go to the Start menu and select Settings.
You can also open the Options menu by pressing the Win + I key combination
- In the window that opens, go to the “Personalization” category.
You can also use the Windows search bar to quickly go to the Personalization settings window
- Click on the “Taskbar” tab and configure the display of the Windows panel using the “Pin the taskbar” and “Automatically hide the taskbar” buttons.
All changes you make will take effect immediately.
Video: how to disable the display of the “Taskbar” when watching a video in full screen
Problems with appearance
To adjust the color settings and size of displayed icons on the “Taskbar” you will need:
- Go to settings: “Options” / “Personalization”.
- Open the “Colors” category, select the color of the “Taskbar” and adjust its transparency.
You can change the color scheme of individual elements or all of them at once (to do this, you need to put markers in the “Display the color of elements on the following surfaces”)
To change the size of the icons, you just need to toggle one button in the settings: “Options” / “Personalization” / “Taskbar” / “Use small taskbar buttons”.
The size of icons can decrease/increase ~2 times
There is a number of additional third-party software for customizing the appearance of the Taskbar, for example, Classic Color Panel, Task Manager DeLuxe and others. However, I do not recommend using them to solve visual problems with the panel. This can only lead to additional errors and malfunctions not only in the operation of the “Taskbar”, but also in the entire operating system.
Location problems
To configure the location of the “Taskbar” you need to:
- Right-click on the “Taskbar” and select “Properties”.
You can also find the settings you need in the Personalization options
- In the settings window that opens, go to the “Taskbar” tab and set the desired location parameter.
After selecting the location of the “Taskbar”, do not forget to click the “OK” button
- To change the arrangement of icons within the panel area, just right-click on the “Taskbar”, uncheck the “Unpin taskbar” checkbox, and then select “Panels”/Links.”
Right-click on the “Taskbar”, uncheck “Unpin the taskbar”, and then select “Panels” / Links”
- After this, you can freely adjust the location of all icons by holding down the left mouse button next to the icon on the “Toolbar” in the form of two vertical lines.
To return the original appearance of the “Taskbar”, you need to disable the “Links” functional tool
Video: how to change the location of the Taskbar in Windows 10
Based on personal experience and based on the comments of several acquaintances, I can also note that an additional reason for the occurrence of all the above-mentioned problems with the “Taskbar” may be a failure during automatic updating of Windows 10. In this case, try rolling back the OS version to the previous one and re-updating.
Using Win+X Menu Editor
The easiest way to return the Control Panel to the Start context menu is to use a small free program called Win+X Menu Editor.
- Launch the program and select the “Group 2” item in it (the parameter launch item is located in this group, although it is called “Control Panel”, it opens Settings).
- In the program menu, go to “Add a program” - “Add a Control Panel item”
- In the next window, select "Control Panel" (or, my recommendation, "All Control Panel Items" so that the Control Panel always opens as icons rather than categories). Click Select.
- In the list in the program you will see where the added item will be located (you can move it using the arrows on the right side of the Win+X Menu Editor window). In order for the added item to appear in the context menu, click “Restart Explorer” (or manually restart Windows 10 Explorer).
- After you restart File Explorer, you'll be able to use Control Panel again from the Start button's context menu.
The utility in question does not require installation on your computer (it is distributed as an archive) and at the time of writing this article it is completely clean from the point of view of VirusTotal. You can download the Win+X Menu Editor program for free from the website https://winaero.com/download.php?view.21 (the download link is at the bottom of this page).
Creating a shortcut using Win+X Menu Editor
This method will seem most convenient to those users who prefer applications with a graphical interface.
The utility, as its author writes, is created based on the HashLnk code and, for ease of use, is enclosed in a “tangible” shell. Unfortunately, it has not been translated into “great and mighty,” but it’s not difficult to figure out what’s what. In addition to such an important and necessary control panel, Win+X Menu Editor allows you to add commands for opening other programs and system tools to Start. And also create new groups, move shortcuts from one group to another, change their order, rename and delete.
To add a panel to group 2 (where it was originally), select Group 2 in the main program window, open “ Add a program ” and click on the line “ Add a control panel item ”.
In the list that appears, find the item of interest and click “ Select ”.
To make the panel appear in the Start context, click “ Restart Explorer ” to restart Explorer.
If a command is not displayed in Start in the proper form (for example, in English spelling), simply select it in the program, press F2 and enter a new name.
Like this. With Win+X Menu Editor, we don't have to worry about unexpected Start changes, which are not always useful or convenient. Now its configuration is completely in our hands. And I think the rest of the tricks collected here will also come in handy.
How to manually change Settings to Control Panel in the Start context menu
This method is both simple and not entirely simple. In order to return the control panel to the Win+X menu, you will need to copy the control panel shortcut (you won’t be able to create your own, they will not be displayed in the menu) of the context menu from the previous version of Windows 10 (before 1703) or 8.1.
Assuming that you have access to a computer with such a system, then the procedure will look like this
- Go (on a computer with a previous version of Windows) to C: Users username AppData Local Microsoft Windows WinX Group2 (you can simply enter %LOCALAPPDATA%MicrosoftWindowsWinXGroup2 in the address bar of Explorer and press Enter).
- Copy the “Control Panel” shortcut to some storage device (for example, a flash drive).
- Replace the "Control Panel" shortcut (it's called that despite the fact that it opens "Settings") in a similar folder in your Windows 10 with the one you copied from another system.
- Restart Explorer (you can do this in the task manager, which is also launched from the Start context menu).
October 2020 Update:
Now we recommend using this tool for your error. Additionally, this tool fixes common computer errors, protects you from file loss, malware, hardware failures, and optimizes your computer for maximum performance. You can quickly fix problems with your PC and prevent other programs from appearing with this software:
- Step 1: (Windows 10, 8, 7, XP, Vista - Microsoft Gold Certified).
- Step 2: Click “ Start Scan ” to find Windows registry issues that may be causing problems with your PC.
- Step 3: Click " Fix All " to fix all problems.
If you are having problems with the Windows 10 taskbar not working, not responding or frozen, these tips will surely help you solve the problem.
Method 1: Restart Windows Explorer
This is a simple solution that will help you get your taskbar up and running again. If the problem with the taskbar is not that critical, this method should do the job for you. You don't need to play or manipulate other system settings. Here's what you need to do:
1 Press Windows Key + R combination on your keyboard to start Running immediately. Type taskmgr.exe and press Enter to open Task Manager .
2 Scroll down under Processes and search Windows Explorer .
Application "Win+X MenuEditor"
It is intended for adding or removing items. You can get the installer for free using the link:
The utility takes up less than a megabyte and does not require installation. The only nuance that should be taken into account is the bitness of your operating system (it is determined as follows). In the downloaded archive you will find two folders and a text document with instructions. You need to run the “WinXEdiror” file from the directory whose name corresponds to the Windows bit depth (x86 or x64).
- In the application, find the group called “Group 2” and click on it once with the left mouse button to select it. Then, at the top of the window, click on the “Add a program” button, then select “Control Panel Item...”:
- At the next stage, you should find the object indicated in the screenshot in the list and select it using the “Select” button:
- After returning to the main application window, click on “Restart” in the lower right corner to restart Explorer:
Now the context menu displays the familiar element again:
Where is the Control Panel in Windows 10: ways to launch the control panel
When switching to a new operating system, users have to get used to the changed interface. Sometimes it’s not without difficulties: for example, after the release of “tens”, many did not figure out where the control panel is in Windows 10. It’s not in its usual place in the Start menu, but you need to configure the system.
Opening methods
In order to find the Control Panel in Windows 10, you can use one of the three methods presented below.
Using quick search
In the new Windows 10, you no longer need to remember the locations of applications and services; you just need to use the integrated search. For example, to call the “Control Panel” you need to:
- Launch the built-in search by clicking on the magnifying glass icon next to the Start button.
- In the search bar that appears, enter “Control Panel” and it will appear in the results.
Using the Start Menu
You can go another way:
- Click on the “Start” button and open the “All applications” list.
- Find and expand the “Service” section.
- Click on the “Control Panel” link.
Advice! There is another, faster way, which involves using the “Start” button - right-click on it and select “Control Panel” from the menu that appears.
Using the Run menu
Also, the “Control Panel” is opened using the universal “Run” menu:
- Press the Win + R key combination.
- In the window that appears, enter “control” and click “OK.”
Pin an icon to the desktop or taskbar
If you use the Control Panel very often, then display its icon on the desktop or pin it to the taskbar. These operations are performed in different ways, but the effect is the same - you will get quick access to system settings.
Desktop
Displaying an icon on the desktop:
- Right-click on an empty space on your desktop and open the “Personalization” section.
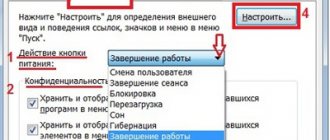
- Go to the Themes tab and open Icon Options.
- Check the box next to “Control Panel” and click “Ok”.
The icon for launching the management console will be pinned on the desktop along with the trash can and other necessary icons. You won’t be able to remove it; if you want to remove it, you need to go to the icon settings again and just uncheck it.
Pinning an icon to the taskbar:
- Expand the Start menu.
- Find “Control Panel” among the utilities.
- Right-click on it and select the “Pin to taskbar” option.
Advice! You can add the Control Panel tile to your Start screen using the same method.
Video
The video shows 6 ways to open the control panel.
Conclusion
We figured out where the “Control Panel” is located in Windows 10, although Microsoft developers hid the necessary icon from users. If you often need to access management tools, then it is recommended to display the icon on the desktop - this is the most convenient way to have constant access to tools that allow you to customize the operation of the operating system.
WindowsTen.ru
Making changes manually
The essence of the method is extremely simple, but putting it into practice may seem like a complicated process, especially for beginners. Initially, you should seek help from other Windows 10 users who have the previous version of the build installed. You need to copy their PU shortcut, which is located along the path:
Now open a similar location on your PC and paste the shortcut copied from others there. All that remains is to restart the Explorer service. The easiest way to do this is from the task manager:
- Press Ctrl + Shift + Esc ;
- In the list (usually at the top) select the required element;
- Click on the restart button:
Now you can press Win + X and make sure that the “Control Panel” item has returned to its usual place in Windows 10.
I am sure that this method will be useful to your acquaintances and friends, so it is worth sharing it on social networks. If you have questions on the topic, I welcome comments.
Windows 10: taskbar not working
There is a very simple way to bring the Windows 10 Toolbar back to life. If, in your opinion, the problems with the Panel are not so critical, because it at least somehow responds to your requests, this method should work.
Press WIN + R , bringing up the Run search bar and typing the command taskmgr.exe . This in turn will cause the Windows Task Manager to appear. Open the Processes tab:
Find the Explorer process (it is responsible for the correct display of directories and correct navigation through the system) and simply restart it. For a second, almost everything on the screen will disappear, but after a moment you can check if the taskbar is working or proceed to the next step.
Returning the “Control Panel” item to the Windows 10 Start
Greetings, dear readers! After installing the next major Windows 10 update called Creators Update 1703 (build number 15063.13), the Control Panel from the Start .
Now in its place is the Settings , which opens a settings window in which a good half of the settings are missing, which can be changed in Windows 10. It’s a shame that Microsoft has chosen this path for itself and is trying in every possible way to complicate the ability to use fine-tuning settings, knowingly believing that that users do not understand anything, and they should not touch the settings at all.
Fortunately, not all is lost, and the opportunity to return the good old “Control Panel” item remains. And it's surprisingly easy to do.
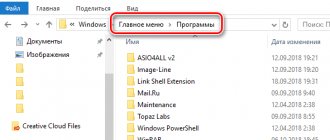
Windows has a special system folder in which shortcuts are located, some of which are picked up by the system and used in the corresponding menus.
Adding the “Control Panel” item to the desktop menu
The menu in which we are going to include an additional item opens by right-clicking on an empty space on the desktop.
Adding a new command to it is done by entering data into the registry, more precisely, into the HKEY_CLASSES_ROOT\DesktopBackground\Shell . In it we have to create 2 subsections and several parameters.
To create a new registry key, launch the RegEdit editor, go to the above folder and right-click on an empty field in the window. Click on the menu command “ Create ” and “ Section ”. Let's give the new section an arbitrary name, for example, control .
MUIVerb parameter in the “ Control . To do this, click on the free field again, select “ Create ” and “ String parameter ”.
The value of " MUIVerb " must be a phrase or word that will be displayed in desktop context. Right-click on the parameter name and select “ Edit ”.
In the next window, set the parameter to “ Control Panel ”.
Next, in the same way, we will create a subsection in the HKEY_CLASSES_ROOT\DesktopBackground\Shell\ control , that is, in the one that we just created and filled with data. It should be named " Command ". It, like everywhere else, initially contains the “ Default ” parameter, and we have to assign a value to it.
To assign a new value to the “ Default ” parameter, right-click on it and select “ Change ”. The value should be the name of the control panel executable file - control. exe .
After updating the desktop, the “ Control Panel ” item will appear in its menu.
another string parameter in the HKEY_CLASSES_ROOT\DesktopBackground\Shell\ control icon ” and assign it the value “ control. exe ".
This is interesting: Cortana in Windows 10: everything you wanted to know, but were afraid to ask
To make the command appear in the top or bottom group of the menu, create a “ position ” parameter here with the value “ top ” (top) or “ bottom ” (bottom).
Here's what I got:
If the method of entering data into the registry seems too labor-intensive to you, you can automate it. For example, by creating a batch file in bat format. Then all operations will be performed by the command line instead of your hands.
The contents of the bat file look like this:
@echo off chcp 1251 >nul reg add “HKEY_CLASSES_ROOT\DesktopBackground\Shell\control” /v MUIVerb /t reg_sz /d “Control Panel” /f reg add “HKEY_CLASSES_ROOT\DesktopBackground\Shell\control” /v icon /t reg_sz / d Control.exe /f reg add “HKEY_CLASSES_ROOT\DesktopBackground\Shell\control” /v position /t reg_sz /d bottom /f reg add “HKEY_CLASSES_ROOT\DesktopBackground\Shell\control\command” /v “” /t reg_sz /d control.exe /f :: If you want to place the panel at the top of the menu, change the word bottom to top in the penultimate command.
Copy these lines into Notepad (or a program that replaces it) in the same order as they appear here. Then save the file under a random name with a .bat extension.
To enter data into the registry, run this file as an administrator. The changes will take effect immediately - without restarting the computer. If the desired command does not appear in the menu, refresh the desktop by clicking on its free area and pressing F5.
To remove “ Control Panel ” from the desktop menu, run the following instructions in a command prompt running with administrator rights:
reg delete " HKEY_CLASSES_ROOT\DesktopBackground\Shell\control " /f
Or manually delete the created key and all its contents from the registry.
Returning the Control Panel item to the Windows 10 Start context menu
After updating, Windows 10 prudently saves the system files of the previous build in the Windows.old .
Just copy this path and paste it (followed by pressing the Enter ) into the address bar of the Windows file manager:
Do not be alarmed by strange characters in the path to the treasured folder, these are standard variables that take the form of the corresponding disk folder, and the required folder will open regardless of what disk the system is installed on and what user name you have entered.
If you managed to delete the Windows.old , you can download the correct shortcut here.
Having obtained the shortcut under the name Control Panel, copy it with a replacement to the system folder, which is located in the following path:
And then restart your computer.
As a result, the much-loved and convenient Start in Windows 10 will return to its place.
The need on Microsoft's part didn't end there. Also under the knife were the command line launch items, which were replaced by launching Windows PowerShell. If PowerShell is foreign to you and you are used to using the command line, then the material “Returning the Command Prompt item to the Windows 10 Start” tells you how to return them to the Start context menu.
If you still have questions, then use the comments, where you can get a comprehensive answer.
In turn, you can also help us a lot .
Just share the article on social networks with your friends.
By sharing the results of the author’s work, you will provide invaluable assistance to both him and the site as a whole. Thank you!
Solution
To solve the problem, I recommend watching the following video on how to restore the taskbar after an unsuccessful registry cleaning with Auslogics.
To restore normal operation of the taskbar and the Start button, you need to restore the deleted registry branch, which was located here: HKEY_CURRENT_USER\Software\Classes\ActivatableClasses. This branch can be restored by copying it from another PC running Windows 10.
To do this, on a PC where the taskbar works correctly, you need to do the following:
- Launch the registry editor: START –> Run (Win + R) –> regedit.exe (you must have administrator rights).
- In the window that opens, find the branch HKEY_CURRENT_USER\Software\Classes\ActivatableClasses and go to the menu File -> Export .
- Select the path (most likely to a flash drive) where you want to save the registry entry as well as the file name and click “Save”.
- On the second PC (on which the taskbar does not work), open the registry editor in the same way START –> Run (Win + R) –> regedit.exe , select the File menu -> Import and find the just exported registry branch.
- Confirm the changes and restart the computer.
After you restart your computer, the Windows 10 taskbar, Start button, menu, and notifications should work again.
How to change Settings on Control Panel in the Start context menu manually
To return the Control Panel to the Start context menu (Win+X), you need to borrow the shortcut to this section from a previous version of Windows 10 installed, for example, on your friend’s computer.
- On it, paste %LocalAppData%MicrosoftWindowsWinXGroup2 of Explorer and press Enter to go to the specified folder.
- Copy the shortcut Control Panel to any USB drive.
Important: If there are files from the previous version of Windows 10 on the system partition of your computer, go to the path Windows.oldUsersAccountAppDataLocalMicrosoftWindowsWinXGroup2 and copy the desired shortcut from here.
- On your computer, follow the path indicated in the first step of this method.
- Move the shortcut from the removable media to the newly opened folder and confirm the replacement. If the system did not offer to replace the shortcut, but simply inserted another object into the directory, go to the external drive window and change the name of the shortcut to 4 - control panel . After that, copy it to the already open Group 2 . This time the system should definitely replace the old label with a new one.
- Go to the path C:ProgramDataMicrosoftWindowsStart MenuPrograms and change the name of the Settings to Control Panel . Confirm the change.
- Call Task Manager , select the Explorer and click on the Restart .
- Press the Win + X , find Control Panel and click on it. The Control Panel should open.
Pin an icon to the desktop or taskbar
If you use the Control Panel very often, then display its icon on the desktop or pin it to the taskbar. These operations are performed in different ways, but the effect is the same - you will get quick access to system settings.
Desktop
Displaying an icon on the desktop:
- Right-click on an empty space on your desktop and open the “Personalization” section.
- Go to the Themes tab and open Icon Options.
- Check the box next to “Control Panel” and click “Ok”.
The icon for launching the management console will be pinned on the desktop along with the trash can and other necessary icons. You won’t be able to remove it; if you want to remove it, you need to go to the icon settings again and just uncheck it.
Task bar
Pinning an icon to the taskbar:
- Expand the Start menu.
- Find “Control Panel” among the utilities.
- Right-click on it and select the “Pin to taskbar” option.
Advice! You can add the Control Panel tile to your Start screen using the same method.
Using Win+X Menu Editor
For users who want to customize the Start context menu, an enthusiastic developer has released the Win+X Menu Editor utility. It provides a simple set of commands and has an intuitive interface for editing menus using the Win + X keyboard shortcut. Although this tool was designed for use in Windows 8, it does the job just fine in Windows 10.
You can return the Control Panel to the Start context menu using Win+X Menu Editor as follows:
- Download the archive and extract the directory with the utility from it. Open the x86 or x64 (depending on the OS architecture) and run the program.
- After that, select Group 2 .
- At the top, click on Add a program and click on Add a Control Panel item .
- In the new window, find and select Control Panel , and then click on the Select . If you prefer Control Panel display icons for all tools rather than categories, select All Control Panel Items .
- Select the added item and, using the arrows on the right side of the window, move it to the desired position.
- If you need to rename it, right-click on it, select Rename and enter a new name.
- Click on the Restart Explorer .
Now you know how to return the Control Panel to the context menu (Win + X) Start in Windows 10 Creators Update (version 1703).
What to do if the taskbar in Windows 10 stops working
The easiest way is to scan the system using the utility built into it. It's called SFC. It is with its help that problems that come to us with automatic updating of the operating system are solved. If the taskbar in Windows 10 really does not work, then to restore it to full functionality you will have to do the following:
- Launch the command line as Administrator. It’s as easy as pie to do this – you just need to right-click on “Start” and select the appropriate item in the context menu. If that doesn’t work, then press the key combination (start button on your keyboard) win + R and enter the command “cmd” without quotes.
- A command prompt window opened. Here you need to enter the command “sfc /scannow” (without quotes, of course);
- A notification will then appear in the line indicating that scanning has started. The information will constantly change depending on the stage of scanning. It may take some time - about half an hour;
- Problems in the Registry will be found and fixed automatically. After the scanning process is completed, be sure to restart the computer and check the functionality of the taskbar.
If it still does not function, do not despair - we have prepared another method that will certainly help cope with this problem. The result will not be long in coming!