I think many of you have heard this expression, but not many understand what it is (not to mention how to do it). Now I will help you figure it out.
The article consists of the following sections:
- General questions about root rights.
- Basic ways to get root access.
- USB debugging mode.
- Full access using PC programs (Kingo Android Root, VROOT).
- Full access using Android programs (KINGROOT, OneClickRoot, RootToolCase, ToverLoop).
- Rooting Android 7 and higher.
What are root rights and why are they needed at all?
When you buy a new smartphone, you notice a lot of programs on it that, let’s say, as is, you don’t need at all. In one of the articles, we looked at how to remove system applications without root rights that interfere with your work with your phone. But what happens if you can't remove them. At the same time, they also take up space in memory! So, root rights mean full access to the system. You can do whatever you want, from changing the icon on a system app to uninstalling it.
It is worth knowing that there are three classes of root rights. Full Root - full and permanent rights without any restrictions. Shell Root – permanent root, but without access to change the system folder (\system). Temporary Root - temporary root rights.
In addition, depending on the device model and its firmware, it is not always possible to obtain full superuser rights; in turn, temporary root can always be obtained. For the most part, temporary root rights are provided by most applications that are available on PlayMarket.
Key benefits of full access:
- ability to work with system applications;
- the ability to “give” any application full access to the system;
- unlimited work with the interface: change icons, themes (which can be done not only thanks to launchers), system sounds, greetings and pictures or animations when turned on;
- full access to the bootloader, which allows you to change the firmware without difficulty;
- the ability to install applications directly onto the memory card;
- a backup copy with all applications that were installed on the system at that time;
- a special system manager that allows you to see and edit previously hidden system files.
And the last thing to tell you before moving on to the practical part is this warning:
- you will lose the warranty on the device;
- you can damage the operating system if you do things you are not sure about. Therefore: delete, add, change, but only if you are confident in the correctness of your actions.
What are root rights?
Root is the root folder in the Linux system, of which Android is the successor. Access to this folder, called root rights, allows you to use the device, phone, tablet or PC “to the fullest”: enable or disable system options, remove programs installed by default - in a word, make working with the device as convenient as possible.
Obtaining root rights means enabling access to the root folder with all the ensuing consequences; It is impossible in most cases to carry it out manually without using special applications, although in a number of modern devices of Chinese origin, root is either installed in the factory firmware or enabled from the system menu.
Basic ways to get root access
Naturally, there are special programs that make this easier. I will roughly divide them into two types:
- PC programs;
- programs for an Android device.
Below I will tell you about the main ones and teach you how to use them. But first you will have to learn how to perform the actions that you will need in any of the ways:
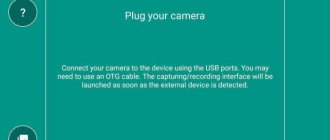
- connect the device in USB debugging mode;
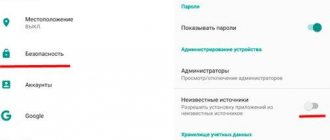
- Allow installation of applications from unknown sources.
USB debugging mode
The algorithm of actions is quite simple and similar on devices with any version of Android OS. 1. Go to the settings of your device and select the “Accessibility” section, the “For Developers” item.
2. Set the switch to the “on” position opposite the “USB Debugging” item. Confirm your decision.
3. After connecting the device to the PC, you will see a message in the notification bar about enabling debugging.
Permission to install from unknown sources Go to settings, go to the security section. Set the switch to the “on” position next to the “Unknown sources” item.
That's it, we're done with the preparation, now let's move directly to root rights.
Removing Root rights from Android
Some users, using root access, return the device to its previous state. For example, after deleting unnecessary applications or when you need to return the warranty on your smartphone.
There are several ways to remove rights:
- Via a mobile application.
- Through the PC program.
For the first method, you only need to download the SuperSu application, if it has not been downloaded previously.
Next we proceed like this:
- Launch the application and go to settings, find the item “Complete removal of Root”.
- We confirm the choice by clicking on “Continue” .
- We wait until the uninstallation is completed and the device restarts.
Removing rights via PC is a labor-intensive process that takes a lot of time and requires the use of several third-party programs. Therefore, it is not recommended to use this method, giving preference to tools from the Play Store.
Full access using PC programs
In this section, I will talk in detail about how to root your android device using some PC software.
Root access using the Kingo Android Root program
1. Download Kingo Android ROOT program to your PC.
2. Install the program.
One of the screenshots when installing the KingoRoot program
3. Now you need to enable USB Debugging Mode on your device and allow installation of applications from unknown sources. 4. Next, launch the Kingo Android ROOT program. Only after this, connect your device to the PC via USB cable.
5. When the device is detected and all drivers are installed, click “ROOT”. The process of hacking the system will begin. When it is done, reboot your device.
I hope everything is clear to you. Let's move on to the next method.
Root access using the VROOT program
If you were unable to get root access using the previous program, then most likely your Android device is made in China. Therefore, try to do approximately the same thing using the VROOT program. Below are instructions. 1. Download the program from the official website to your PC. Yes, it is worth noting that it is in Chinese, so be careful. Click the green button to download as shown in the picture.
2. Now install the program. The installation process is identical to any other, just look at the pictures and follow it. Don't forget to check the box to launch the application (last screenshot).
3. Now you need to enable USB Debugging Mode on your device and allow installation of applications from unknown sources.
4. Connect the device via USB cable. And click the "Root" button. Wait for the root access process to complete.
These are, in my opinion, the two best programs in this category. Just follow all the steps as described above and you will succeed.
Kingo Root without computer
It is worth noting that it is quite difficult to obtain superuser rights through Kingo Root without using a computer, especially when it comes to more or less recent versions of Android. However, many gadgets still lend themselves to this application. Note: Rooting Kingo Root requires you to download some files, so expect the program to consume approximately 10MB of bandwidth.
Instructions:
- The first thing you need to do is download the Kingo Root application for Android. You can do this on Trashbox. After downloading the program, install it on your device.
Kingo ROOT 4.5.6 ROOT requiredAndroid 4.1 and higher
- Launch Kingo Root. You will be presented with a screen with one button and a checkbox. The big blue button labeled “One Click Root” will start the process of obtaining root rights. You may also notice a checkbox with the description “Install Recommended Apps”. If you do not want Kingo Root to install its additional applications after rooting, then uncheck the box.
- Click the big blue button and watch the progress of rooting your Android.
- If everything went well, you will see the message “Root Succeeded”, and if not, “Rooting failed”. In the latter case, try this operation again, or proceed to the next instructions using a computer.
Full access using Android programs
In this section, I will show you how to get root rights using Android programs. All actions will need to be performed directly from your Android device.
Root access using the KINGROOT program
(Since the article was written earlier, today, the application interface has changed somewhat. The old option for obtaining root rights will be described below, and in the second part of the article we will describe the capabilities of the utility provided to us today. IMPORTANT to note that the process of installing the program and obtaining root rights - did not change).
This is a fairly easy-to-use program, which is why it is the most popular. 1. First, download the installation file from the official website directly from your device (this will be easier than from a computer). Click "Free Download". Confirm saving the file. The screenshot clearly shows the site address and also shows what needs to be done. You can see the download status in the notification bar.
Note: When downloading the installation file, it is advisable to have a high-speed Internet connection via WiFi. 2. Now you need to install the application. Before doing this, allow installation from unknown sources. Then go to the downloads directory and click on the appropriate file. Everything is shown in the pictures, please be careful.
3. Now install the application by clicking on the “Install” button.
4. Find the Kingroot application shortcut on one of your desktops. Click on it to launch. Immediately the application will begin to determine the model of your device, as well as whether it is already rooted.
5. Now that the definition is over, click on the “TRY TO ROOT” button to get root rights. And wait for the device to reboot, which will inform you that the process of hacking the system is over.
King Root program update
In the updated version of the program, the developers paid tribute to security, namely, built-in protection against malware, optimization of boot processes, and improved system capabilities that speed up smartphones. After completing the previously described steps, the user will see the following download window:
So, in the right corner there will be information about the status of your root rights. At the bottom of this function there is a field that allows you to track the authorization of a number of applications installed on the smartphone and control their access to the system directory.
The start window looks like this:
By clicking the “Security” button, KingRoot optimizes all processes and displays a report:
Root access using OneClickRoot program
Unfortunately, this program no longer works for free (a couple of years have passed since this article was written). At the office The site only has a paid version for $30.
This program is much lighter than the previous one and, moreover, immediately after scanning it tells you whether it can open root access to your device.
- I won't tell you much about how to download and install the application. You need to perform all the steps similarly to the case described above. Everything (including the official website) is visible in the pictures. Just follow the instructions.
2. After opening the application, you will immediately be prompted to get root. So click on “Root Device”. Then scan your device to see if the program can provide root access to your system. If not, you will see a message like in the third screenshot. You can click “Notify Me” if you want to be informed when the program can help you.
3. If it is still possible to grant you root rights, you will see a screen like this. Click "Root Device".
Program selection
Let's look at the most popular computer programs for obtaining Root rights to Android.
Kingo Root
Using Kingo Root is the most effective way to obtain superuser rights by connecting a smartphone or tablet to a computer. The program supports 10,000 models of Android devices, and also has a number of useful additional functions. The only thing you need to work is a stable Internet connection.
During rooting, you cannot disconnect your smartphone from your computer.
Before you proceed directly to rooting your device, you need to download the current version of Kingo Root for Windows and install it. Further:
- We connect the device to the computer using a USB cable and wait until the automatic installation of drivers is completed.
- A notification confirming USB debugging will appear on the smartphone screen. Check the box “Always allow this computer” and confirm the action by clicking on the “OK” .
- After Kingo Root detects the connected device, the Root . Click on it to start the rooting process.
The program uses several methods to root the device, and will also download additional files if the standard methods do not work.
When the rights are successfully loaded, a corresponding message will appear on the monitor, and the mobile device itself will restart.
We recommend: Setting up mail on iPad
VRoot (iRoot)
VRoot (iRoot) is another easy-to-use program for obtaining superuser rights on mobile devices. The program works with smartphones running Android 4.4 and higher. After downloading root rights, the Chinese SuperUser program will be loaded onto the device, which can later be replaced with the usual SuperSU.
To obtain superuser rights:
- Download and install the program on your computer. If necessary, disable anti-virus software or add the program to the “Exceptions”.
- Launch VRoot and connect the device to the PC, confirming debugging.
- After connecting the smartphone, the process of identifying the device by the program itself will begin.
- Upon completion, click on the Root in the lower right corner of the screen.
- Follow the instructions that appear on the screen. After closing the last installer window, the device will begin to reboot. Then you can disconnect it from the computer.
If root rights have been installed correctly, a new program will appear in the main menu of the device - SuperUser. When you launch it for the first time, a window with permission to use root rights will appear on the screen. The same window will appear in other applications that require special rights to change system files and data.
Unlock Root
Unlock Root is a universal tool with which you can get root rights. As in other programs, the process of hacking a device occurs in conjunction with a computer.
Unlock Root is used to obtain root rights on devices with Android from 2.1 to 4.0.3.
Using Unlock Root:
- Install the utility on your computer.
- We connect the device and wait for the program to detect the smartphone.
- To start rooting, click on the Root . The entire process will be accompanied by repeated reboots of the smartphone.
- After loading root rights, reboot the device again.
The fact that root was obtained successfully will be indicated by the appearance of a corresponding message in the program window. If a failure message appears on the screen, you should start the installation again, or remove Unlock Root and find a suitable alternative.
We recommend: Features of a wireless monitor for Android
Root ToolCase – get root capabilities with one click
This is a universal application that allows you to configure and manage your smartphone without any restrictions, remove unnecessary utilities, clear the cache and much more without root rights. After installing the program from PlayMarket, we will see the following window:
IMPORTANT, this program does not root the device, but provides a number of system features that are not available without installing it (information from the developers in the image below).
The application's start window prompts us to select what we need, namely:
- Click Advanced Reboot and get acquainted with the following features:
The user can customize the smart startup process, access safe mode if problems arise, and also reset to factory settings by pressing just one key.
- App Manager
Allows you to edit installed applications (including system ones) and even remove malware that cannot be removed using built-in protection systems.
- Additional system settings.
Ability to work in the ADB development environment using wireless networks, mounting partitions, changing the language, etc. The Build.prop Editor allows you to change ROM properties. An installer function for flash devices is available, which makes it possible to configure almost any functionality on the phone, thereby making it completely individual.
Toverloop
A kind of “veteran of the root”. A well-known application that works on almost all devices with old Android firmware (up to version 5 inclusive). Despite this, it is very popular because the rooting process is possible in one click. A list of devices available for upgrade is on the application website.
- Download the apk file from the official website to your smartphone and install it.
- By clicking on the key, we root the device.
A list of devices available for upgrade is on the application website.
Dangers when installing Root rights
When installing root via a PC or other method, you need to consider several points:
- Rooting a device voids the owner's warranty on the smartphone. Therefore, if a breakdown occurs, the service center may refuse to repair the device free of charge.
- There is a risk of accidentally damaging the OS by deleting important files. Also, the performance of the device may be affected by poor firmware installed manually or incompatible software.
- The device will no longer receive over-the-air updates from the developer.
On the other hand, there are a lot of benefits to rooting your device. If you do everything correctly and follow the instructions, working with root rights will not bring any trouble.
Rooting Android 7 and above
Traditional methods of obtaining super user rights on new types of devices do not always give positive results. Installing the application will only allow you to control some functions of your smartphone, but not become super su.
We will provide a short guide for OS version 7 and higher.
- It is mandatory to unlock the Bootloader on your smartphone. Depending on the model and firmware, this procedure will be slightly different.
- Go to “developer mode” (again, depending on the model, this menu item may be in different places) and enable “USB debugging”.
- Download the development environment - Android SDK Platform Tools - to your PC.
- On a specialized website we find the custom firmware we need for your smartphone, usually TWRP.
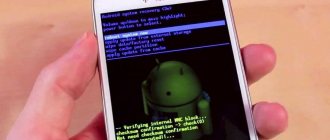
5. After flashing, our initial TWRP window loads, select Recovery Mode using the volume keys, confirm the selection by point-pressing the power button.
6. Next, open the SuperSU.zip archive and thereby obtain root rights. Reboot the device and exit recovery mode.
Pros and cons of rooting on Android
The benefits of getting root access on your device have been described above. This is the freedom to install any applications, remove unnecessary programs that take up too much space or are too blatantly monitoring the user, and keep useful but unloved software running in the background.
The disadvantages of installing root rights include:
- Increased user responsibility . Android will no longer be able to protect a rooted device with the same effectiveness. Having installed malicious code by mistake or uninstalled a really necessary program, the smartphone owner will be forced to deal with the problem on his own, looking for help not from built-in applications, but from the Internet or from friends.
- Possible warranty issues . Here everything depends on the model and manufacturer of the phone: sometimes the owner of the device is officially allowed not only to install root, but even to use third-party firmware. Most often, companies scare the buyer with a waiver of obligations, without having any real grounds for this: as already noted, obtaining access rights to the root folder and then deleting them in most cases does not affect the condition of the device.
However, you shouldn’t take too many risks: before installing root rights, it makes sense to find out about the consequences for the selected model on the Internet by contacting the manufacturer’s support service or contacting friends who understand the topic.
Checking for root presence
Some smartphones (mostly Chinese brands) are sold with open superuser access - you don't need to do anything at all. Also, if you bought the device secondhand, the previous owner may have already obtained root rights.
How to check their availability:
- Download the Root Checker application (available in the Play Market).
- Launch it. Next, you will be shown a warning that the software wants to take some data from your phone - if you refuse, nothing bad will happen.
- Click “Check status” and wait for the result - an icon with a green checkmark or a red cross should appear. It’s not hard to guess that in the first case, extended access is activated on the phone, but in the second, it is not.
By the way, you can skip this step if you already have an application prepared that you would like to install, but it requires root access. Try downloading it and check how it works.
KingRoot
The program interacts with most smartphone and tablet manufacturers and supports Android versions 2.2 Froyo-6.0 Marshm.
The developers claim that the product installs and works on 10 thousand models and modifications of devices. Among the main gadgets are Huawei, Samsung, LG, Sony, Google Nexus, Lenovo, HTC, ZTE, including mobile devices of category “B” from China. Supports Android versions 2.2-7.0.
The installation process is intuitive and simple, adapted for the average user, and includes several steps - connect the device and follow the recommendations. The entire mechanism is described step by step, which allows even an unprepared gadget owner to gain root access.
Among the advantages of KingRoot:
- Supports most versions of Android and devices, including technically sophisticated Samsung and Sony models.
- Well-thought-out interface without unnecessary add-ons.
- Downloading from the official page is free.
- Installation does not take much time and requires a few simple steps.
We recommend: Viber for Android
Among the inconveniences is the need to connect the smartphone via USB to the PC, after which they proceed to launch the program. The developers did not provide a Russian-language version of Windows. Additional software is downloaded simultaneously with KingRoot.
There is a version for installation directly on Android. To do this, you need to download it from the official website and copy the apk file to your device. Start the installation.
Once the installation is complete, you can begin to root your device.
Why do you need Root or superuser rights?
Such rights are necessary to gain full access to the system and its files. This allows you to upgrade the Android platform to suit your needs to perform some specific tasks. Moreover, we are talking here not only about mobile phones and tablets, but also about other devices running this OS.
For example, if you enable Root access for Android on a TV set-top box, you will be able to install a noticeably larger list of applications on it: codecs, file managers, games and other software that was previously unavailable or is somehow limited for installation.
Features of a rooted gadget:
- fine-tuning the interface (fonts, animation, icons, element sizes, etc.);
- removal of applications built-in by the developer/manufacturer;
- free purchases in gaming applications;
- backup of all files, including system ones (for future experiments with the platform);
- block built-in advertising (Aliexpress, taxi services, etc.);
- install programs on the memory card.
Is it even necessary to get root rights for an Android smartphone?
Opening access to superuser rights is fraught not only with expanding the capabilities of the smartphone owner, but also with possible complications in the operation of the device. And before answering the question “do I need it?”, I advise you to familiarize yourself with the positive and negative sides of this privilege.
pros
Among the most requested functions of the Full Access owner:
- The ability to make changes or completely get rid of system applications and files;
- The right to customize the interface (change the appearance of icons, menu items, sounds, etc.);
- Permission to install “special” software that requires full access;
- Increasing device performance through the use of necessary programs;
- Gaining access to the bootloader necessary to make changes to the phone's firmware.
Minuses
The most common side effects of this procedure are:
- Violation of the operating rules, which is what rooting a device is, leads to a complete loss of the right to warranty service;
- Malfunctions of the operating system and the gadget as a whole (often due to the deletion of system files or incorrect use of tweaks);
- Malfunction of some applications, requiring additional manipulations to configure them;
- Inability to obtain an official firmware update from the manufacturer;
- The likelihood of being left with a “brick” instead of a phone if you thoughtlessly use the device with full access.
If, after evaluating all the pros and cons, you still decide to implement the idea of becoming a superuser, then it’s time to talk about how to get root rights on Android.
Getting full root access on Android 9.0, 10.0
The fact is that with the development of each new version of the Android OS, its creators also improve protection against hacking, which is essentially what obtaining root rights is. When working with devices with firmware version 9.0 and higher, standard methods are unlikely to give the desired result.
According to the latest data, the SuperSU and Magisk software packages can provide the owner with full access. Before you start analyzing the principle of installing and launching them, you need to acquire a custom recovery. Usually this is a more current TWRP or CWM. In order to find a recovery that is suitable for your phone model, you will have to rummage through thematic sites and forums. Unfortunately, there is no universal method in this matter.
The further installation algorithm for SuperSU and Magisk is identical:
- Download the latest version of SuperSU/Magisk that is suitable for installation from recovery (usually this is a zip archive, not an apk ! );
- We send this file to the root of the memory card;
- Turn off the phone and start recovery mode by pressing the “on/off” + “volume down” ;
- Select the item “install from SDCard” ;
- Find the SuperSU/Magisk installation file and confirm the installation;
- After completing the operation, select the command «Reboot now».
Installing SuperSU via TWRP
If you use Magisk, the user will have the opportunity to make additional changes to the OS. To do this, you need to download the apk version of the program from the Play Market.