There can be many reasons for such problems, as well as ways to combat them. Sometimes you have to try several options, and as a result at least one of them will work.
How to set write protection on a memory card
You can prevent writing to a removable drive that is not equipped with mechanical protection using standard Windows tools or using special utilities. Since it is most effective to perform such procedures on a computer, you first need to connect the memory card to the PC via a card reader.
Method 1: Change Group Policy
First, you will have to format the flash drive, changing the file system to NTFS. This will erase all data, but will allow you to operate security settings. Next, you need to find the removable drive in the “My Computer” section, right-click on it and select “Properties”.
Going to the "Security" tab, select "Everyone" in the "Groups and Users" section and click "Edit". Now all that remains is to uncheck all the boxes except for the “Reading” and “List folder contents” items and click “Apply”.
This setting prohibits recording, but the protection will only work when the drive is connected to a PC running Windows. An experienced user will be able to bypass such protection, but this will help prevent viruses from getting onto the flash drive.
Method 2: using specialized utilities
There are deception programs that simulate the lack of free space on the card by writing zero-sized files to the storage medium. However, the actual size of such programs is several kilobytes. The method works as simply as possible: the user downloads the tiny utility USBDummyProtect or Flash Defender, copies the program file to a flash drive and launches it by double-clicking the mouse. As a result, the utility will create a file that takes up absolutely all the free space on the flash drive, which will serve as write protection.
How to enable it?
So, if you suddenly need to make a read-only flash drive, then let's look at two ways that will help you do this:
- The simplest is to use the already marked switch located on the body of the flash drive itself. If you don’t have it, then you can go straight to the second method. Otherwise, simply move it to the active position manually.
You can enable read-only mode on a flash drive using the switch
- The second method is to connect the device to your computer or laptop using the appropriate input. Go to “My Computer” and right-click on the icon of the connected device. Select “Properties” on the desired folder, in the window that appears, check the box next to the inscription: “Read only”. Click "Apply" or OK and close the window. Ready! But this way you can prohibit recording only for a specific folder, but not for the entire flash drive.
The second way to enable the “Read-Only” mode is to check the box next to the corresponding inscription
How to remove protection from an encrypted microSD card
Some Android users use the ability to expand the built-in storage capacity of their smartphone by attaching an external drive. This formats and securely encrypts the microSD card. As a result, it becomes an integral part of the smartphone, but at the same time completely unsuitable for use on other devices.
Sometimes, due to software glitches, a card with encrypted content switches to Read-Only mode. As a result, when copying files to a flash drive, the process is interrupted with the error “The file cannot be read.” Or the smartphone displays a notification that there was an error decrypting the memory card. In some cases, the device does not display files on encrypted media, or completely stops reading the memory card.
There are at least 2 ways to solve all of the above problems. However, to restore the drive to functionality without losing encrypted information, you will have to perform several sequential steps.
- Remove the MicroSD card from the slot in the smartphone, insert it into the card reader and copy all encrypted data to the computer.
- Insert any other MicroSD card into the smartphone that does not contain important data.
- Format the new drive using standard Android tools.
- Connect the new formatted card to the PC and copy all encrypted content from the old card to it.
- Install a new card with encrypted data into your smartphone. If the decryption request does not appear automatically, restart the device. When a notification appears asking you to decrypt the drive, enter the previously set PIN code.
Upon completion of the process, encryption will be removed from the flash drive, and all user files will again be available for reading and writing.
But what should you do if you performed a factory reset (which leads to the loss of the encryption key), or the smartphone is faulty, but you need to extract encrypted files? If you do not have access to the phone or to a full backup of the firmware, it will not be possible to remove the encrypted data. Alas, in this case, no workshop will help.
Restricting access to the memory card
In the topic Memory on Android. for all sections of the memory of Android devices . Many users of smartphones based on Android versions 4.4 and older are faced with a situation where programs from third-party developers do not have access to the root of the memory card. Moreover, this problem occurs both for those who purchased a new device with Android KitKat and higher on board, and for those who upgraded to the new system after the purchase.
Why can't Android programs access the root of the SD card? The fact is that open access to the root of the drive is a big security hole in the entire operating system. In an attempt to protect users from intruders, Google has taken such a step as limiting access to the memory card.
In simple terms, in many firmware based on Android 4.4 and higher, programs from third-party developers can no longer write data to the root of the memory card. The ability to write to directories located on a flash card is preserved. The situation is aggravated by the fact that this limitation affected all applications without exception, including file managers.
This state of affairs does not suit everyone, so below we will look at a way to return access to the root of the memory card to third-party programs.
to contents
How to remove password from microSD
The information applies exclusively to cases where the password to access the microSD card was set via a Nokia phone. If the owner does not remember the password, to solve the problem you will need a device running the Symbian operating system, no matter how strange it may sound. With most Nokia smartphones, you can remove the password by formatting the card. But there are a couple of nuances:
- The installed storage capacity must be supported by the device;
- Symbian 9.1 OS recognizes cards up to 2 GB, and Symbian 9.2 – up to 8 GB.
To format, you need to open “Settings” and go to the “Memory” section. A pop-up message “Card blocked” will appear, after which you should press “Options” and select “Format card”. In some firmware, you need to open “Files”, call up the context menu of the memory card using a long tap and click “Format”.
Unfortunately, some models still do not have the ability to format the card without entering a password. In addition, not everyone has access to old Nokia smartphones. Alternatively, you can connect the microSD to your computer and format the memory card in Windows. But there is a nuance here: when you connect a locked drive to a PC or laptop, the card is not recognized by the system, since Symbian writes the password directly to the boot area. The HP USB Disk Storage Format Tool can recognize and format such media.
How to remove write protection from a memory card
Sometimes while working with the drive (for example, when trying to copy or delete data), the process is interrupted with the “MicroSD Memory Card is Write Protected” notification. Similar errors can appear both on a computer and when working with other equipment (smartphones, digital cameras), as well as with any formats of removable drives.
It also happens that when you try to access content on external media, the system notifies you that the disk must be formatted to continue using it. And when I try to format using standard means, the error “The disk is write-protected” pops up.
If the contents of the memory card are valuable to the user, there is no need to rush: it is better to gradually try simple options, and only then proceed to more radical solutions.
Removing mechanical protection
First of all, SD card owners should exclude the option of physical locking (write protection). There may be a switch on the side of the drive case. If it is set to the lock position (opposite the Lock inscription), just move the slider and the mechanical protection will be removed. The same applies to microSD cards connected to a PC or laptop via a microSD to SD card reader.
Flash drive software repair
Viruses. If the “Disk is write-protected” error appears exclusively on a Windows device, there may be a virus on the flash drive. It is necessary to scan the drive with an antivirus program for pests and eliminate the threats found.
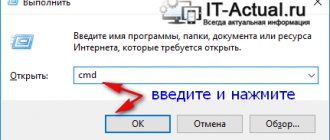
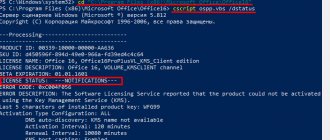
Diskpart tool . If no viruses were detected, you can try to fix the “Storage is write-protected” error via the command line. To launch it, click Start, type cmd and run it as administrator.
In the console that opens, you need to enter the commands sequentially, pressing Enter each time:
- Diskpart.
- list disk (The command displays a list of all disks in the system. Find the number of the required drive, based on the amount of memory).
- select disk X (where X is the flash drive number from the previous step)
- attributes disk clear readonly
- exit.
Now all that remains is to copy any file to a flash drive to check the result of the tool.
Surface formatting . It is recommended to use if previous methods have not brought a positive result. As practice shows, standard OS tools are not capable of formatting drives that have become unwritable as a result of software failures. To format problematic microSDs, it is recommended to use specialized software.
Many well-known memory card manufacturers produce their own utilities to correct errors in the operation of the media. For example, Kingston has a free program called Kingston Format Utility, Transcend has JetFlash Online Recovery, etc. You should determine the manufacturer of your card and download the appropriate software from the official website.
If you cannot determine the manufacturer, or there is reason to believe that the memory card is not original, you should use a universal solution. The SD Memory Card Formatter program is compatible with almost all external drives and allows you to format even Chinese “no-name” microSD.
The formatting process will erase the contents of the memory card. At the same time, if you perform formatting with the Quick format checkbox active and do not change the file system type, there will still be a certain chance of recovering files (more on this later).
Low-level formatting. A drastic but very effective method. This is done using the universal utilities HDD Low Level Format Tool or HP USB Disk Storage Format Tool.
During this procedure, all data is completely deleted, followed by filling the physical sectors with zeros. It is worth considering that this is a last resort measure, which should be resorted to only if other options do not help. Information from the drive will be lost forever !
If the priority is to preserve information, the only right decision in this case would be to contact a qualified specialist who can read the data directly from the chip.
Signs and reasons affecting the detection of a drive in the “RAW” format
Often, the designation of a device in the “RAW” is a sure sign of an error or a specific malfunction in the operation of USB flash drive or memory card. In rare cases, such a detection is associated with an unknown file system or a completely new drive that does not have any file markup. Quite often, a situation arises when the operating system, after accessing a memory card or USB flash drive, displays the message: “To use the disk in the drive, first format it .
If then the user opens the properties window of the problematic drive, he will find that the file system has become “RAW” , and the available space is “0 bytes” .
As a result, users cannot access or perform any actions on files on the RAW (for example, reading data, assigning a volume label, defragmentation, etc.). However, such a device is not useless, and you can return it to functionality and restore the data stored on it, in ways that we will discuss later in our article.
Users can determine that the operating system is experiencing certain difficulties when accessing a memory card or USB flash drive, based on certain symptoms that are a consequence of the device switching to the RAW format. The main features include:
- Incorrect media type detection when reading a disk;
- Frequently occurring system warnings from the Windows when accessing the drive;
- The file system in applications is displayed as “RAW” or not displayed at all;
- “CHKDSK is not valid for RAW disks” appears ;
- Windows operating system asks you to format the disk when you connect it;
- File names contain non-standard characters, are unreadable and any action with them is blocked;
- A message appears indicating that the sector cannot be located or detected;
- Access to the contents of the storage device or memory card is prohibited, restricted, missing, or unavailable.
The following types can serve as the primary source of uncertainty in the file system of the memory card and USB drive, the occurrence of various types of errors and loss of access to devices:
General external and internal factors. Power surges, lack of supply or interruption when writing or reading data to the device, failure of the operating system or individual applications when using devices, the presence of bad sectors that jeopardize the file system of the drive can lead to “ RAW” .
USB flash drive or memory card is damaged by a virus. When the file system is damaged by a virus, files or the entire drive may be detected in "RAW" and may not be accessible. To prevent a possible virus attack, users should use an antivirus program to protect the system and keep the virus database up to date.
Incorrect user actions lead to damage to USB flash drive or memory card. Skewing the device or excessive force when connecting it or removing it from the computer connector, disconnecting the USB drive and memory card before the reading or writing process is completed, interrupting the device formatting procedure before it is completely completed, or unsafe removal will also lead to damage to the file system with subsequent detection USB flash drive and memory card in RAW format.
In rare cases, users may encounter the following reasons:
USB drive is password protected. When a USB the Windows operating system cannot read it or write data to it. You must first unlock your device before connecting it to your computer so that Windows can communicate with it.
The file system is not compatible with the personal computer operating system. Sometimes users may accidentally format a memory card or USB drive in a special format that the operating system will not be able to recognize when such a device is connected to it. Therefore, users must ensure that the drive's file system format is compatible and supported by the connected computer's system.
Recovering data deleted from a memory card
You can try to recover deleted files using special software. There is no guarantee that you will be able to return everything, but if the information is important, it is worth a try. The main rule is that after deletion, do not save any new data to the flash drive and do not move directories with files.
Advice: you should not restore data to the same drive where you are searching for deleted files, to avoid repeated overwriting and loss of information.
File Scavenger . This program is often recommended to recover lost data. Saves you from accidental deletion or even superficial formatting! The free trial version can be downloaded from the official website.
Puran File Recovery . Another free data recovery program. It does its job well: it restores files after deletion and quick formatting.
Recovering “RAW” flash drives and memory cards
Failure to recognize the file system USB flash drive or memory card makes it impossible to further use the devices for storing data, and also creates difficulties in accessing existing information previously stored on such devices. Therefore, it is important for users to troubleshoot a removable drive and restore the device and all data on it.
There are several simple ways to recover “RAW” flash drives and memory cards ( “SD” , “MicroSD” ).
Using the CHKDSK application
Windows operating system has various pre-installed tools that help diagnose the system and devices connected to it, and eliminate various types of damage to the system and its individual elements. One such tool is the CHKDSK , which checks any specified storage device for errors and then corrects them, searches for bad sectors of the device and excludes them from the list of available for new entries.
launch the CHKDSK from a command line launched with administrator rights. For example, click on the "Start" , located on the "Taskbar" in the lower left corner of the desktop, and enter the query "Command" or "cmd" . In the results found, find the line “cmd.exe” , call the pop-up context menu by right-clicking on it, and select the “Run as administrator” .
In the Command Prompt window that opens with administrator rights, enter the following command:
chkdsk H: /f /r
“CHKDSK” application for the “H:” (in our example), and the “/f” and “/r” will respectively set action parameters aimed at diagnosing a “USB flash” drive or memory card, searching for existing errors and their automatic correction, as well as search, identification and marking of damaged sectors with subsequent restoration of their contents.
However, it is not always possible to restore full functionality of USB flash drive and an SD, MicroSD memory card using the specified method. The presence of certain types of damage may cause the CHKDSK to perform troubleshooting procedures on the storage device. MBR partition table and boot sectors is damaged or not found, then the CHKDSK will not be able to fix the device problem and will display the corresponding message: “CHKDSK is not valid for RAW disks" .
This means that the existing damage does not allow the standard application of the Windows to eliminate it and the user will have to use another method.
Change the security settings of the USB flash drive or memory card
In some cases, the uncertainty of the device’s file system may arise due to access to it being prohibited at the system level. Therefore, by correcting individual security settings in the Local Security Policy , you can eliminate “RAW” format and return access to the drive.
Open the application in any way convenient for you. For example, click on “Taskbar” button “Start” , in the list of all applications, using the scroll bar slider, go to the “Administration” , in which, from the nested list of available actions, select the section “Local Security Policy” .
In the left pane of the application window that opens, select the “Local Policies” , and then in the right pane, double-click the left mouse button on the “Security Settings” , or right-click on it to open a pop-up menu in which select the “Open” .
Now, in the right pane of the “Local Security Policy” , the security settings of all available policies will be presented with the specified internal settings for the characteristics of each of them. In the list of policies presented, use the scroll bar to find the section "Network access: Sharing and security model for local accounts" . Then open the found section by double-clicking it with the left mouse button, or by right-clicking it, select the “Properties” .
In the network access model properties window in the “Local Security Option” , open the submenu and select, from the proposed options, the section “Regular - local users authenticate as themselves .
To save the changes made to the network access policy settings, click the “Apply” and “OK” . Now check "USB flash" drive or memory card for access to the device and resolution of the "RAW" .
Format the problematic device
Note: This method of restoring “RAW” “SD” or “MicroSD” memory card involves completely clearing all data on the storage device. Therefore, if it is important not to lose the data saved on a device of an unspecified “RAW” , then before formatting the device it is necessary to restore the data using professional software. We will provide a detailed description of using an advanced file recovery program in the next section.
Often, when you try to open USB drive or memory card of an unknown file system type, the Windows will offer to format the device in any known format for further use. If the removable drive does not contain important data, the safety of which can be neglected, then feel free to format it, as often this method completely eliminates the problem and prepares the device for operation. Formatting in the Windows performs a complete analysis of the device and searches for damaged sectors, which are marked and subsequently not used by the system to write new data. Therefore, if the reason was the presence of bad sectors, a file system error, damage due to a virus attack, etc., then by formatting the device, users will restore it for further use. However, all information on the storage device will be erased.
Formatting can be done in several ways. For example, when accessing RAW the Windows operating system will prompt you to format the drive or memory card before further use.
Click the Format Disk to access the device format settings window.
Windows file explorer by double-clicking the “This PC” located on the desktop, find your problematic drive in the list of available local drives, right-click on it, and then, in the pop-up context menu that opens, select the section “ Format" .
In both cases, a settings window will open in which you must specify the file system of the user’s choice and a number of other additional parameters, and then click the “Start” to start the formatting process.
At the end of the process, the RAW will be corrected and the device will be completely ready for use.
In some cases, you may need to format the device from the Disk Management . “Run” dialog box by pressing the “Windows + R” , and then enter “diskmgmt.msc” application launch command “Open” and click the “OK” to execute.
Find the required drive in the list of available drives presented and right-click on it. In the pop-up context menu, select the “Format” .
In the new window, set the file system settings and click OK to format the device.
Recovering files from a RAW flash drive or memory card (SD, MicroSD)
USB flash drive or memory card is often used to transfer files from one device to another or to exchange data. Therefore, before you start recovering files from “RAW” devices, you need to make sure that the files you are looking for are not stored somewhere else. This could be another drive or computer hard drive that has previously stored lost data, perhaps shared by email, uploaded to a cloud storage service, or created a backup copy. If the data is not found, then you need to start recovering files from the “RAW” device using professional software.
The best software solution for recovering files from RAW flash drive or memory card is a product called Hetman Partition Recovery .
The program has extensive capabilities, thanks to which it easily recovers data not only from damaged, inaccessible and unreadable drives and returns, in most cases, files almost in full, but is also capable of recovering user data from formatted or deleted partitions or disks, even if the file tables are empty or missing.
An innovative progressive algorithm for searching for lost files retrieves the remaining system information, which allows, with high accuracy, to determine the beginning and end of each file, processes it and presents ready-made recovered files to users.
Hetman Partition Recovery program is available for download on the official website. Download the installation file and run it. The step-by-step recovery wizard is made in a standard form, so installing the product does not take much time and is intuitive even for novice users.
Once the installation is complete, run Hetman Partition Recovery , which will perform an initial scan of the system and identify all connected storage devices. The program has a clear, simple user interface that closely resembles the appearance of the Windows for the convenience of users. “RAW” devices and double-click on it. The program activates the file recovery assistant, which prompts the user to choose the “RAW” for the device.
Clicking the “Next” will start the selected process of analyzing and restoring files on the selected drive. Real time countdown and action execution line will allow the user to track the entire process in real time until its final completion.
Once the analysis and recovery process has completed, all detected files will be presented in the program window. Users will be able to view the contents of each of their files for later selection and saving. The advanced preview function, pre-installed in “Hetman Partition Recovery” and available in any version of the program, will allow users to select the best of the detected files.
Having moved the files you like to the “Recovery List” click the “Recover” , and in the new window select ways to save the marked files.
The program offers several options for saving files: save data to any internal hard drive or external drive, burn files to an optical disk “CD” or “DVD” “ISO” data image or upload files to the Internet via "FTP client" .
Having selected the option he likes, the user will need to specify the path to save, after which the program will complete the process of restoring and saving files in accordance with the specified parameters.
Now users need to open the location specified earlier to save the files and check the recovered data. You can then format “RAW” using the method described in the previous section.
Also on our video channel in the review “How to fix a flash drive: the computer does not see it, the wrong size, the RAW system, insert the disk” you can familiarize yourself with methods for correcting various types of errors and problems when using a USB flash drive or memory card (for example, when lack of access, device detection in “RAW” , unsuccessful search for a device with a connected drive, etc.)
How to erase data permanently
Due to the design features of drives, files deleted in the usual way can be restored. Even standard (surface formatting) of the media does not guarantee complete destruction of information, but only clears the table containing data storage addresses. The data itself does not disappear anywhere - it is subsequently simply overwritten with new ones.
Accordingly, to permanently destroy information, utilities are provided that overwrite the contents of cells with random data. One such program is CCleaner. You can use the free version.