In my third part of the article on working with layers in Photoshop, I want to tell you some tricks and nuances that will help you when working with layers. This article will give you general quick tips and tricks. Sometimes our knowledge is not enough to understand what is happening in the layers panel. If you are a novice user, you have probably encountered a situation in which you do not understand what kind of layers are in the Layers panel, how to work with them, how to generally bring everything into a more familiar form for you? How to make quick selections? How to get rid of styles? How to merge blending modes?
If you have just joined Chronophage, you should start with the first articles in this series:
- Layers in Photoshop: Types of layers
- Layers in Photoshop: Layers Panel
How to merge layers in Photoshop?
The point of working in Photoshop is layers and their presence. However, in some situations you simply need to merge all layers into one raster layer. Layer > Flatten Image command will help you with this .
Flatten Image - merges all existing layers into one Background Layer . It removes invisible layers. There is no need to select specific layers. The same command can be applied directly in the layers panel. Just right-click on any of the layers and select Flatten Layers .
In other situations, you might want to merge all layers but leave the ones that are invisible. Flatten team , as you understand, kills everything in the world. To merge only visible layers use Layer >Merge Visible Layers . It is not necessary to select specific layers in the Layers panel. The command merges all visible layers and leaves all hidden ones intact.
Utilities for various OS
Windows
- Adobe DNG Converter;
- FastStone Image Viewer;
- ACDSee;
- GIMP;
MacOS
- GIMP;
- Aperture;
- Apple Photos.
Linux
- gThumb;
- MATE;
- GIMP;
- Darktable.
Android
- Photoshop for Android;
- File Viewer for Android.
iOS
- Photoshop for iOS.
As you can see, the selection is impressive, although this list does not include all of them, but only the most common utilities. Let's look at some of them in more detail.
FastStone Image Viewer
Free, simple and understandable program. It consumes very little computer resources, so you can install it on low-power machines and use it without worry. The interface is intuitive and reminiscent of Windows utilities. Allows you to convert several photos at the same time.
FastStone Image Viewer window
Also free, but more powerful program with a wide range of tasks. It supports more than 400 extension options and converts them into 50 of the most popular formats. Of course, it weighs more than the previous one, but it will allow you to forget forever that some image or video cannot be opened.
A very lightweight (only 2 MB) utility that works with this photo format provided that an additional plugin is installed. It has a convenient function for taking screenshots.
If it is installed on a computer, it opens CR2 files by default. Lightweight, clear and simple free utility.
Perhaps the most famous program for working with photographs. It's paid, but it's worth it.
Users who have just started learning Photoshop have many questions. This is normal and understandable, because there are nuances that those who want to achieve high quality of their work in Photoshop simply cannot do without knowing.
These undoubtedly important nuances include the rasterization of images. Don’t let the new term scare you – as you read this article, you will easily understand everything.
First of all, let's understand that there are two types of digital images: vector and raster. Vector images consist of simple geometric elements - triangles, circles, squares, diamonds, etc. All simple elements in a vector image have their own key parameters. These include, for example, the length and width, as well as the thickness of the border lines.
With raster images, everything is much simpler: they represent many points that we used to call pixels.
How to rasterize layer styles?
When working with graphics, in some situations you have to rasterize layer styles. Of course, the whole point of layer styles is not to rasterize them, but to preserve them if possible. However, often you need to create a quick layer style for the sole purpose of rasterizing it and continuing to work with the resulting graphics.
In fact, the layer style commands give us the ability to turn each of the style effects into its own raster layer. However, this topic is Layer Styles, not Layers, and I will talk about it separately. However, there is not a single command that would simply merge all the styles into one raster piece of graphics. To get around this, designers use various workarounds.
Create an empty layer (new layer icon in the layers panel). Select the layer with styles and the empty layer by holding SHIFT . Now apply Layer > Merge Layers or CTRL+E . By merging an empty layer with a layer with styles, you kill the styles, turning them into a piece of raster graphics.
How to merge blending modes?
If by blending modes you mean 2 balls overlapping each other in an interesting way, and you want to merge the effect, then all you need to do is select both layers and press CTRL+E to merge them together with the blending effect.
Another situation is where you get an overlay effect on a complex surface. Again, you would like to keep the colors, but remove the blend mode. You don't want to lose or merge layers. There are no automatic ways to do this in Photoshop. You need to understand that the appearance of the design when using blending modes is the result of the interaction of the top layer with the bottom. As soon as you move the layers, the effect changes. If you change the blending mode, the effect disappears. The only way to fix the effect without losing layers is to copy the bottom part of the gray layer and merge it with the top layer.
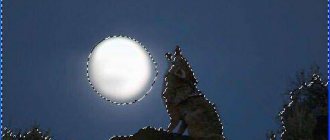
For example, I have a gray rectangle and two circles of different colors, with the Multiply mode. They intersect with each other, but also with the lower background. To begin, I will press SHIFT+CTRL and click on the thumbnail icon of both balls. CTRL is needed to load the selection, and SHIFT is needed to add a second selection to it.
Next, I'll copy the gray area and Paste it in the same place Edit > Paste Special > Paste in Place . Now I can easily merge it with the shadow CTRL+E
What does it mean to rasterize a layer and how to do it in Photoshop
If you try to apply filters or tools such as Brush, Eraser or Gradient to a vector layer, you will not succeed. Photoshop will display a dialog box telling you that you will have to rasterize this layer first.
Why? First you need to remember what vector layers actually are. In the article, I have already described in detail how they differ between vector and raster images. In short, the difference is in what these layers are made of: for a raster, these are pixels, for a vector, these are figures based on mathematical formulas.
Since Photoshop is designed primarily to work with raster images, most tools in one way or another affect exclusively pixels, that is, raster images. Therefore, when in Photoshop we still need to work with a vector layer (and when can we get it? - for example, we created a shape layer or a text layer), but for this we take tools created only for rasters, then Photoshop shows us the error indicated higher.
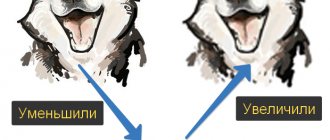
Let's say we created a shape layer:
Now I want to apply a blur effect to this star or draw something else on top of it, but the program will show an error and inform you that you need to first rasterize the layer.
In other words, Photoshop can convert the contents of a layer from one type of image - vector, to another type - raster. This process is called rasterization.
It is noteworthy that there is no reverse process from raster to vector in Photoshop. Take this fact into account.
Note
Keep in mind: once you rasterize a layer, there is no going back. You will lose the advantage of a vector image - resizing without losing quality. For beginners, it is recommended to rasterize on a duplicate layer - then you can always return to the original. Duplicate the layer before rasterizing, and then turn off the visibility of the original layer so you don't accidentally rasterize the wrong layer.
How to select similar layers with one click?
In other situations, we need to select all layers of the same type in the layout. For example, we need all Text fonts of the same type to hide/merge/change font/group. And so on.
In this situation, you usually go through all the layers in the Layers panel and manually select what you need. If the desired layers can be grouped according to some characteristic, it is wiser to use the Select > Similar Layers
Unlike Illustrator, Photoshop does not recognize the color or shape of the layer, it does not respond to the presence of a vector or raster mask. Ignores linked layer styles. Similar Layers command selects layers according to the Layer Types that we discussed in the first part of the article. Here is a list of layers that Photoshop classifies as one group.
- Regular raster layer
- Fill layer – Fill Layers (Solid, gradient, pattern)
- Color correction layers - Adjustiments Layers
- Text Layers
- Smart layer - Smart Layers
- 3D layers _ _
If you need to select all text layers, or just fill layers, or color correction, Similar Layers is the way to go. Another way to use this command is to right-click on the desired layer in the Layers panel and select Similar Layers
How and why to rasterize an image
So, we’ve sorted out the types of images, let’s return to rasterization. Simply put, the term "rasterize an image" means converting a picture that is made up of many shapes into one that is made entirely of dots. You can rasterize an image using Adobe Photoshop or other similar ones, which use vector images for work, because they are easy and simple to scale or edit (for example, change the font, deform a line, etc.).
At the same time, it is impossible to apply many tools, as well as almost all of them, to a vector image; therefore, it must be rasterized. After rasterization, you can apply any filters and use any drawing tools.
Rasterizing a layer is very simple. In the lower right window of Photoshop, which is called “Layers”, select the layer you need, if necessary, unlock it, then right-click on it and select “Rasterize”. Then you need to select the appropriate item in the drop-down menu, namely, text, shape, fill, smart object, etc.
Well, now you know what types of images there are, why you need to rasterize a layer, and also how exactly the rasterization process occurs. Good luck in your endeavors!
In this tutorial we'll learn how to easily create ghost text using Photoshop CS5. This lesson can be performed in other versions of the program. Filters will play a major role in the lesson. Let's begin!
How to copy layers?
Copying, or more correctly duplicating layers in Photoshop is very simple. Click on the layer in the layers panel and press ALT . Without releasing ALT, start moving the layer higher with your mouse. A copy of it will appear.
The second method is the layer copy command CTRL+J or Layer > New > Layer via Copy
Another way to copy a layer is with the duplication command Layer > Duplicate . Duplication differs from the previous command in that when duplicating, you can direct a copy of the layer to any other file opened in Photoshop. Including in the new document.
How to manage layers?
Of course, you'll most likely be using the Layers panel when moving layers around. After all, grabbing a layer with the mouse and visually moving it a couple of layers higher is both visual and understandable. However, you don't have to use only this method. Photoshop has a number of commands designed to move layers up and down without having to interact with the Layers panel.
Of course, it’s not convenient to constantly navigate the menu, so it’s wise to remember the quick commands that are marked in the menu itself:
- Layer > Arrange > Bring to Front - moves the layer to the very top
- Layer > Arrange > Bring Forward - moves the layer 1 step higher.
- Layer > Arrange > Send Backward - Moves the layer one step lower.
- Layer > Arrange > Send to back - Moves the layer to the bottom.
Along with them comes an interesting command Layer > Arrange > Reverse , which swaps layers. To do this, of course, you need to select two layers. Can be useful when working with layers.
You may also find the commands for aligning layers to each other useful. Of course, it is much more convenient to do this with the Move Tool and the alignment commands in its settings panel. But these commands are also present in the Layers menu, duplicating the commands on the Move Tool .
They are located in Layers > Align > and Layers > Distribute >
For more information about how alignment of layers works in relation to the work area and in relation to each other, read the article All about the Move Tool.