Hi all! Today we will talk about how to create a Google document with shared access and why it is important for modern webmasters, freelancers and remote workers to know this.
While creating an information site (which I’ll talk about in more detail in the following articles), I took several free courses, one of which touched on the topic of optimizing work with copywriters. After spending some time studying this issue, and also figuring out how to create a Google document (Google Docs) with shared access, I began searching for my first freelancer. As a result, quite fruitful cooperation and a bunch of excellent articles for my site with a minimum of time spent on modifications.
Google documents online: advantages of Google's service
Online Documents is a very useful service from Google, which is a kind of analogue of Microsoft Word. If you know how to work in it, then it can make life much easier for a webmaster, freelancer, or simply a remote employee.
Here are the main advantages that I discovered during my work:
have interfaces that are almost identical to Microsoft Word, which means you don’t have to spend a lot of time understanding the features of the work (it took me literally half an hour)
Once you figure out how to link to your file, you can share it with a hired freelancer and check the progress of the order right as they work
Having paid for the order, public access is also easily closed from outsiders
as a freelancer or remote employee, you can create your resume and portfolio, and also share them with your employer, who, I’m sure, will be very happy that you didn’t have to download a bunch of files
Using the built-in commenting function, you can easily ask the contractor to make changes and thus avoid downtime that occurs when a task is sent for revision
Google Docs provides easy integration of articles and tables into your website without the need for additional editing and thereby saves a lot of time
the service is absolutely free
There is another fairly popular and in-demand service from Google - tables (analogous to Excel). You can read more about it in this article - Google Docs: Sheets.
You may be wondering: “What is freelancing and why is working via the Internet becoming increasingly popular and in demand?”
Access settings in Google Docs
In order for another person to open our document, and even be able to make edits to it, we need to set up a file access system. To do this you need:
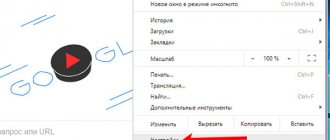
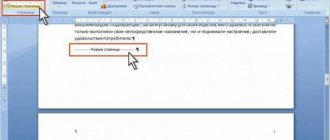
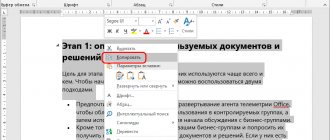
1. Open the file that we want to share in the Google Dox service and pay attention to the “Access Settings” button, which is located in the upper right corner:
2. Be sure to click the “Enable access via link” option and select from the drop-down list the access option that we want to provide. There are 3 options available here:
— View (if there is a link, people will be able to view this file);
— Comment (using the comment option, if there is a link to the file, users will be able to leave comments);
— Edit (in this case, the user who follows the link to the file will be able to make his own edits to our document, which will be recorded in the “Change History”).
3. Select the type of access that interests us, click the adjacent “Copy link” button. By the way, you can also copy the link manually from the URL line. The copied link goes to the clipboard and is freely pasted into a personal message to the person to whom we want to show the document or give the opportunity to edit it.
To complete the procedure and close the access settings, click the “Finish” button.
Important:
Surely, the reader noticed the line “People”, in which we can configure shared access for each E-mail. In this case, corresponding letters with attached documents and our messages will be sent to the email addresses specified here.
For example, we will enter here the E-mail of the project manager and set him the ability to correct/edit the document. Next, we will enter several E-mails of our clients and, for example, give them the opportunity to comment on the text. Finally, we can indicate the secretary’s email so that he can view the document and print it, without being able to comment or edit the file.
This is exactly how a sharing system is set up for different user groups in practice!
Note: Please also note that when setting up access via E-mail individually, we do not necessarily need to provide access via a link! Quite the contrary. If the document is particularly secret, access via a direct link should be closed! And people can be invited to the project only by E-mail and privately.
An example of a Google Docs document link that we will give to other users to provide access to the file - https://docs.google.com/document/d/10w9xPFn77VLQOwfc_8J2i1qoi39u4rN-qD8ciYUolvM/edit?usp=sharing
By the way, if there is an error when transferring a link or after deleting a file from access, we will see the following window:
Registration and getting started
In order to start creating Google documents or spreadsheets with shared access, you need gmail mail. If there is one, you can safely move on to the next point. If not, here are some instructions for registering:
- Go to the Google search page and click "Mail". In the window that appears, select create an account:
- And go through a short registration (in two steps) by filling out the required fields:
When finished you will be sent to the mailbox. That’s all with registration, you can start working with a clear conscience.
Google Docs (Google Sheets): how to work with tables
Let's now step away from Word documents and get acquainted with Google spreadsheets (analogous to the MS Excel office program). To quickly go to the main page of the Google Docs service, use the link:
https://docs.google.com/document/
You can immediately see that in recent documents some files have already appeared that were viewed or created earlier. But, first of all, we will be interested in the MENU:
To expand the menu, you will have to click on the list icon. In the menu block that opens, now select the “Tables” item.
All further operations in Google Sheets will be similar to how we worked with Google Docs. For example:
1. To create a table, you need to click the plus icon in the lower right corner again.
2. The Tables interface reminds us of office Excel, with the only difference that there are the options “Comments”, “Download file”, “Change history”, “Access settings”, as well as other functions characteristic of Google Docs.
Simply put, all the operations we did in Docs can be easily done in Sheets. Naturally, the tables are also available:
— automatic calculations using specified formulas;
— graphs, visual diagrams, filters and functions;
— all arithmetic operations performed online;
— settings for individual cells, data output options;
— options for copying, cutting, pasting, printing, importing/exporting data;
- other functions that we will not dwell on here.
Note: If desired, files from Google Sheets and Docs can be combined into shared files, freely copied and integrated both within and outside of Google Docs. For example, we can create some documents or tables, and then insert them into our personal website for users to see!
Create a shared Google document
Now it's time to learn how to create a shared Google document.
You may be interested in “How can you make money from photographs via the Internet?”
Open Google Docs
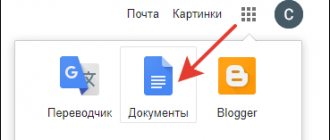
It doesn’t matter whether you are now in your gmail mailbox or on a Google search page, just click the button in the upper right corner in the form of 9 small squares and in the window that appears, click “More”:
You will see a full menu with all tabs, where feel free to click on “Documents”:
Tadaaam, you are in the documents. You can see a short overview prepared by the staff. It will help you understand the interface. By the way, the templates presented here are sometimes very useful and save time, so I advise you to study them carefully.
Create a new document
Feel free to click “Empty file” (red arrow in the screenshot below):
If you suddenly don’t have enough templates presented, you can click on the “Template Gallery” button (shown in the screenshot above) and open the entire list.
Right now you are in a new document. As you can see, in appearance it is almost an exact copy of Microsoft Word, and the set of functions is almost the same.
First of all, enter the name in the special field at the top left, above the menu. Without this, you will not be able to open public access. However, by clicking on the “Access Settings” button you will still be asked to do this.
Opening access to the file
So, let's say you hire a freelancer and want him to work on a pre-created file. To do this, you will need a special link (or invite him by entering his email address in a special field. I will describe how to do this below), which can be found in the access settings. And once again, don’t forget to enter the name!
By clicking “Access Settings” a special menu will pop up consisting of two blocks:
- The top block is needed to invite people by entering their email;
- The bottom block creates an invitation link.
First of all, let's deal with the upper block. Everything is simple here and you only need to enter the email of the desired person. After this, a special field will appear in which you can write a message, as well as set its rights: reader, commentator, editor.
When everything is ready, click "Submit". After some time, he will receive an invitation and your message.
Another important point I should mention is the settings. To open them, click on the gear on the top right. Having done this, a menu will open in front of you with two items that can be turned on or off by checking the boxes:
Well, we're done here. Now let's move on to block number two, which is needed to create an invitation link. To do this, click on the words “Copy link” and the required form will open in front of you, which will contain the link you are looking for, as well as setting up rights:
By checking “Available to users who have a link”, set the rights: reader, commentator, editor.
Once you're done, don't forget to copy the link and send it to the freelancer. Well, or post it in your VK group, telegrams, etc.
You may be interested in “How to use VKontakte: a detailed guide for all occasions.”
Computer literacy with Nadezhda
There are a lot of programs that allow you to work with documents. But sometimes there is no text editor at hand.
For example, you are on a business trip, but your computer (or a device that replaces it) does not have the Word text editor from Microsoft, and you urgently need to send a report to your boss.
When away from home (or from work), cloud technologies are a great help, especially if you have a MacBook or other device that does not have the necessary software. Contents: 1. What can you do in Google Docs? 2. Google Docs tools for working with text 3. How to create a Google document
4. Table of contents 5. Automatic table of contents 6. Select text font 7. Text font size
8. Text formatting 9. Changing the color and background of the text 10. Comments on the text for editing 11. Other formatting tools
12. View modes of a Google document 13. Box 14. Useless goodies 15. Let your colleagues help you with your work 16. Saving and other options Computer literacy exercise
Google took care of its users by integrating the MS Word text editor into the Google Drive service.
The result is a good free text editor “in the cloud”, with which you can not only type, edit, print reports or other documents, but also instantly send them. These are Google Docs documents.
Why did I write: “Google took care of its users”? Yes, yes, Google provides its services only to those users who have their own Google account, or rather, have their own mailbox on gmail.com something like this Nadezda @ gmail.com.
If you don’t have an email account on Google, it will take 10-15 minutes to create one. The main thing is to come up with a suitable login and password for your email.
I write everything below for those who have (or will have) their own Google account.
What can you do in Google Dox?
Google documents online have almost the same functionality as in the usual local Word from Microsoft (MS Word), namely:
- The mobility of Google Dox is useful for those who move and work with documents where it is convenient and where there is an Internet connection. You can continue working on a document even if you are disconnected from the Internet.
- Want to create documents from scratch? Easily! In addition, it is possible to upload regular Word documents from your computer and edit them.
- Documents in html, txt, odt, rtf, doc, docx, pdf formats are uploaded to Google Dox.
- You can work as a whole team on a document: just send your colleagues a link to the document.
- All changes in the document are logged and in an unexpected case, when, for example, “a cat walked across the keyboard,” you can “roll back” to the previous version of the document.
- You can work with Google Docs documents on Android and iOS devices. To do this, you will need to install the corresponding free Google Docs application on your Android or iOS device.
Google Docs text tools
The first thing to note is the ability to write text, perhaps this is the most important thing.
There are also tools that allow you to work with text:
- color,
- size,
- fonts,
- alignment,
- formatting,
- spell checking,
- inserting tables, figures, hyperlinks
- and "children's" opportunities.
How to create a google document
Before you start working with the text, you should write it or download it, for example, from your computer. Let's try to create a new document, as they say, “from scratch.” So, this can be done as follows.
1) Go to Google Drive https://drive.google.com/drive/my-drive.
Enter your username and password.
2) Click on the “Create” button located in the left vertical menu (number 1 in Fig. 1), after which a list will appear in which we select Google documents (Docs).
The same can be done using the hotkeys Shift + t.
Rice. 1. In Google Drive, find a GoogleDocument and create it
After you enter text, you can style it or “comb it.” Let's start with styles. We are invited to format our text as regular text, with headings and even make a table of contents.
Table of contents
Although the table of contents is usually placed at the beginning of the text, in fact it is formed after the entire text has already been written. To automatically create a table of contents, you need to tell Google Dox where your document title is, where the subheadings are, and where the chapters are. That is,
For the table of contents you need to mark up the text.
If you place the cursor in any place in the text or select any part of the text, then in the window marked with number 1 in Fig. 2, the style that matches the marked text will immediately appear.
Rice. 2. How to change text styles: Plain text, Heading, subtitle, etc.
In Fig. 2 the text “Punish me with contempt” is highlighted and in window 1 in Fig. 2 you can see that this is “Plain text”.
To make a document title, you need to select the corresponding text and click on “Title” (number 3 in Fig. 2), it will have the largest font. This is usually the title of a book or project.
The following chapters can be made in the text: Heading 1 – number 5 in Fig. 2, Heading 2 – number 6 in Fig. 2, smaller font than Heading 1, Heading 3 – number 7 in Fig. 2, smaller font than Heading 2.
In addition to headings, there may be subheadings - number 4 in Fig. 2.
Automatic table of contents
1) After the text is marked up using the above styles (Heading 1, Heading 2, etc.), you can create a Table of Contents for the entire document.
2) Place the cursor in the place where the table of contents will be, usually this is the beginning of the text. 3) Go to the “Insert” menu (number 8 in Fig. 2). 4) There we select the last menu item – “Table of Contents”.
This will automatically generate a table of contents for the text.
Selecting the text font
Fonts are created by designers and have a specific license. You cannot add fonts for the Russian language - this is considered a violation of copyright. Therefore, in the Google Dox service there is a choice of free fonts for which the service has the right to use.
Rice. 3. How to change the font in Google Docs
To select a font, select the text (number 1 in Fig. 3). And then click on the list with fonts (number 2 in Fig. 3), and select the one you need (for example, number 3 in Fig. 3).
What is in Fig. 3, a check mark next to the Arial font means that the selected text (number 1 in Fig. 3) is typed in this particular font.
Just click anywhere in your text and the Google Docs Toolbar (number 2 in Fig. 3) will tell you everything about this text: what font it has, color, font size, style, etc.
Text font size
To change the font size of text in a Google Docs document, you need to select the desired piece of text (number 1 in Fig. 4), and then click on the appropriate font size from the drop-down list (number 2 in Fig. 4).
Rice. 4. How to change the font size of text in a Google Docs document
If there is no suitable size for the selected text, for example, 13 or 20, then click in the field marked with number 2 in Fig. 4, and enter the desired font size there.
Text formatting
If you want to format the text, first be sure to select the part of the text that you want to “comb” using formatting, and then click on any formatting option (Fig. 5).
Rice. 5 Buttons for formatting text in Google Dox
As can be seen in Fig. 5, the following formatting options are available:
- B - Bold
To make an important part of the text bold , you need to highlight (in other words, paint over) this text, and then click on the “B” icon, or press the hot keys Ctrl+B.
If you need to remove the bold text and make it regular text, select this text and click on the “B” icon, or press Ctrl+B.
- I - Italics
If you select the text and then click on the “I” icon, or press the hot keys Ctrl+I, then the text will also become italicized (italicized).
To remove italics from text, you need to select the italic text and use the “I” icon or the Ctrl+I keys.
- U - Underlined
Select part of the text and click on the “U” icon, or press Ctrl+U, the text becomes underlined.
Don't like the underlined text? Select (paint over) it and use the “U” icon or the Ctrl+U keys.
- A - Text color
First of all, select the text, and then you can change the font color or background color for the selected text
Change text color and background
To change the color or background of text, first select the section you want. Then click the button on the toolbar, select “Text Color” or “Background Color” and specify a color.
Rice. 6. Change the text color, text background color
The Google Dox service offers to stylize text by changing its color and background. To do this, just select the required area of text and click on the button with the image of the underlined capital letter “A”, after which a list will appear (Fig. 6), in which you can select the appropriate color and background of the font.
Comments on the text for editing
If any text causes you doubts, then you can mark it: select it, click “Insert comment” (Ctrl + Alt + M) and indicate the reason, so that later it will be clear what needs to be corrected.
Rice. 7 Insert comments on selected text to explain corrections that need to be made
This can also be useful when several people are working on the same document.
Other formatting tools
You are writing an article in which you want to cite a source that confirms your words, then click on the “Insert link” button, then enter the text of the link, and add it in the field below.
Rice. 8 Formatting tools in Google Doc
1 in Fig. 8 - Insert link (Ctrl+K) 2 in Fig. 8 — Insert comment (Ctrl+Alt+M) 3 in Fig. 8 - Alignment
There is also a situation where it is necessary to align the text. Most often this is a heading that needs to be placed in the center. To perform this procedure, select the desired area and from the top menu choose how you want to align: left, center or right.
From left to right there are buttons:
- Align text left (Ctrl+Shift+L)
- Center (Ctrl+Shift+E)
- Right Align (Ctrl+Shift+R)
- Align Left (Ctrl+Shift+L)
To perform Alignment, select the desired area and in the top menu choose how you want to align: left, center or right.
4 in Fig. 8 —Line spacing (or Line spacing)
There is no need to select anything here, just click on the “Line spacing” button and select the required indentation; by default it is 1. You can also set the spacing yourself: click on the “Adjust spacing” button and adapt it to suit you.
5 in Fig. 8 - Numbered list (Ctrl+Shift+7)
Are you creating a menu for a restaurant that includes different types of salads? Of course, this is where a list tool comes in handy. You can choose a bulleted or numbered list. You can also change its design: click on the dropbox (arrow) next to the one you want to select.
6 in Fig. 8 — Bulleted list (Ctrl+Shift+8) 7 in Fig. 8 —Decrease indentation (Ctrl+[) Increase indentation (Ctrl+]) 8 in Fig. 8 —Clear formatting (Ctrl+Space)
Google Doc Viewing Modes
Despite their uselessness when creating files, it’s still worth familiarizing yourself with them, in case they come in handy.
In the “View” menu (Fig. 9) you can select different document viewing modes.
Rice. 9 Google Doc Viewing Modes
This tool will be needed in any case, since you can go into viewing mode and see what the final document will be like, and then return to editing and correct any errors found.
Insert
Rice. 10 You can insert a table of maximum 20x20
Using the “Insert” tool (number 1 in Fig. 10) you can insert
- image,
- table or
- formula
- and also make a footnote, used in books to explain something.
You can also work with pages: add a table of contents, numbering, bookmarks. As you can see, there are enough tools to write your book.
Useless buns
Of course, it’s hard to believe that such a serious service will include children’s buns. Yes, they are quite unchildish. But they can be called that because they harm the document.
This is a translation of a document through Google Translator, as well as a spell check. You shouldn't use them. It’s better to pay a freelancer a little and get high-quality results.
Allow your colleagues to help you with your work
To do this, you need to give them access to the Google document.
Rice. 11 We give access to Google documents to our colleagues
You can make your work publicly available. To do this, in the upper right corner, click on the “Access Settings” button (number 1 in Fig. 11), go to “Advanced” settings (number 4 in Fig. 11) and configure the file access level (number 3 in Fig. 11) .
Setting up access is also useful if several people are working on a Google document, when there is team work. You can add people who will subsequently have the right to edit, read and comment on the document. A very useful tool if used correctly.
Saving and other options
The main feature of Google Docs is that the file is saved automatically in Google Drive and you don’t have to press the “Save” or Shift + f12 button every time, as in MS Word.
For each Google document, a history of changes is saved (number 5 in Fig. 11) and there is a chance to find a normal copy, where everything was not as bad as it became.
You can also rename the Google document, and also download it to your computer in various formats.
In addition to these functions, the service allows you to print a document to a printer directly from the cloud: in the top menu there is a button with an image of a printer (number 1 in Fig. 9), after clicking on it, a page with file settings for printing will open.
In Fig. 9 you can see that in the top menu there is not only “File”, but also “Help”. By clicking on this option, you can get even more information than what is stated above.
Computer Literacy Exercise
Dear Colleagues! Checking the operation of Google Docs. To do this, follow the link:
https://docs.google.com/document/d/18Uyqwj0pnPGQunzNV2CoLtgTcTfpv6nTLZlBe_wvn6Y/edit?usp=sharing
We print a couple of lines of text. Is Google Doc working?
Check out other computer literacy articles:
1. How to Protect Your Gmail Account: Quick Guide with Screenshots
2. How to add a dash in Word?
3. How to easily count letters in a text
4. Search by image - Google to the rescue
Print this article
Receive the latest computer literacy articles directly to your inbox
.
Already more than 3,000 subscribers
.
Important: you must confirm your subscription!
In your mail, open the activation letter and click on the link provided there. If there is no email, check your Spam folder.
Author: Nadezhda Shirobokova
September 28, 2015
How to block access to a file
Everything is simple here. Open your document again, click “Access Settings”, and then one of two things:
- If you sent an invitation;
In this case, click on the special field to the right of the desired person and select “Delete”. By the way, you can immediately transfer administrator (i.e. owner) rights to this file.
- Created an invitation link.
In this case, simply change the settings to “Restricted Access.”
Google Docs (Google Documents) – comments, how to comment
Working with Google Docs wouldn't be as convenient without the commenting option. With its help, when sharing a file, the project manager, without interfering with the work of his colleagues or subordinates, can simply leave comments on individual fragments of the file. Example comment:
To leave your comment you must:
1. Gain access to the ability to comment on a file, and not just view it. Since we created this document ourselves, the option of commenting and even editing is available to us by default, as the author of the document.
2. Select the desired fragment in the text (letter, word, line, paragraph, paragraph, section, pictures) and to the right of this line click on the “Add comment” icon.
3. In the block that opens, simply enter your comment from the keyboard and click “Comment”.
4. Additionally, we may also respond to comments from other people sharing the file. If you click on a comment, an empty “Enter your answer...” field will appear below it, and the “Question resolved” button will also be available.
5. If we want to change our comment or delete it, we will use the vertical ellipsis icon to the right of the “Question resolved” button. When you click on the ellipsis, the options “Change” and “Delete” will appear.
6. You can view the full list of comments to the file, as well as the history of responses to comments, using the “Comments” button, which is located next to the “Access Settings” option.
7. After working with a specific file, we can access the list of all documents if we click on the list icon in the upper left corner:
Practical meaning
The practical value of the procedures and operations described above lies in the sharing and editing of some documentation.
By the way, many trainers who provide online services via the Internet use the same principle to teach and check homework. The student completes the work, opens access to the document for the coach and provides a link in the report, and the coach reads and comments, making his corrections.
The second case is that we need a group of company specialists to work on the text. To do this, you need to: upload the file to Google Docs and send links to colleagues for editing and commenting.
As soon as the work is completed, we will be able to open the corrected document using the same link and track all its changes/edits and comments. Additionally, we can correct some minor details and download the finished file to your computer, print it on paper or save it in the Google Drive cloud. That's how easy and simple it is!
Useful features
And finally, I want to show you a few useful functions that I’m sure will help you a lot.
- How to create a report;
The template gallery contains a huge number of ready-made files. All you need to do is select the one that suits you and enter your details. The gallery is here:
Just scroll down until you find documents prepared for reports (there are several varieties, so choose according to your taste and color):
- How to create a resume;
Resumes are created according to the same principle as reports. Open the gallery:
And scroll down until you find ready-made templates:
- How to create a copy of a Google document;
To do this, open the required document and click “File” in the menu on the top left:
Select "Make a copy":
- How to create a table;
To do this, open the file and click “Insert” in the menu at the top:
Select tables:
And by dragging the cursor, specify the number of columns and rows:
- How to download a file.
Click "File" again in the menu at the top:
Point to "Download" and select the format:
How to create a Google Doc
If you already have a Google account, you can immediately begin following the following instructions. And if not, register first. It will take literally a couple of minutes.
How to create a Google Doc from scratch:
- Go to the service page - follow the link or find it yourself by name.
- Log in using your Google account username and password.
- On the page that opens after logging in, you will see a template panel - it is located at the top of the window. Notice the template on the far left, with a colored “+” sign in the middle and the name “Empty File”. Click on it.
- A blank Google document will appear on the screen, available for editing.
How to create a document from a Word file in Google Docs online:
- Log in to the service as described above, but do not click on “Empty file”.
- Look on the right side of the “Recent Files” section. There is a “Folder” icon - if you hover over it, the message “Open file selection window” will appear. Click on this icon.
- Switch to the “Download” tab.
- Here you can click on “Select file on device”, then through the explorer window select a Word file to upload* to create a Google document with the ability to edit online.
Once the item is uploaded, it is automatically converted from Word to Google Dock format and becomes available for editing.
*You can also simply drag and drop the file into the “Downloads” tab window. To do this, you need to reduce the browser window so that the computer desktop is visible.
How to get started with Google Docs?
To start using the service, you need to create an account in Gmail. Immediately after registration you will be able to use the service.
How to create a document in Google Dox? In the Gmail menu you need to go to the list of recent documents. There is a Create button (a cross in a circle), which you need to click.
A document will open on the screen, very similar in appearance (and functionality, to be honest) to MS Word. Now you can safely work with the text.
There is another way to open a document. To do this, go to the Gmail menu and click Drive - this tool is created automatically when you create an account on this service. Next, right-click on an empty space and create a document. The system will immediately redirect you to the created document.
Plugins for efficient work
Google Docs has many plugins. To install them, open the “Add-ons>Install add-on” tab.
Plugins are classified into sections:
- Business tools.
- Education.
- Job.
- Social networks and communication.
- Utilities.
Select an application from the list and install it. After that, it will be linked to your account and will always work. All installed plugins are available on the toolbar in the “Add-ons” tab. Let's look at the most useful of them.
Docs to WordPress - helps you send any document from Google Docs directly to the Admin posts of your WordPress site.
Please log in before starting work. Click “Add-ons>Docs to WordPress>Manage WordPress Sites>Edit”, in the form that appears, enter your WordPress account information. Now you can send the document. Open the Add-ons tab and go to Docs to WordPress>Publish.
URL Shortener - allows you to shorten links to Google Docs.
Texthelp Study Skills - Highlights text with a highlighter and transfers the selected text to a separate Google Doc. To do this, click on the “Collect Highlights” tab. The document is created automatically.
OpenHere - places a marker in the right place and moves it to it the next time you open the document, eliminating scrolling. Unlike Bookmarks, the marker is not visible in the text.
Table Of Contents - allows you to create a table of contents for the document in the right sidebar. It allows you to quickly navigate through text headings. This plugin is similar to the Document Structure feature.
The table of contents displays only headings created by formatting. It is bad form to create them by enlarging the font.
EasyBib - allows you to add citations directly to your document.
In the right sidebar, the app will show you where the quote appears: book, website, article.
Select what you find and create a bibliography at the end of the document. This application only works with English sources.
Remove Line Breaks - Helps remove line breaks from selected text.
Track My Words - helps you track your words per minute and daily rate, and allows you to view statistics in charts and graphs. Before starting work you must:
- Register on the website: https://www.trackmywords.com (free).
- Enter the received license key in the application in Google Docs.
To start tracking your word statistics, select Add-ons>Track My Words>Start Tracking WPM.
Make Urls Clickable - Converts all URLs in a document into links. This plugin is useful when you need to insert text with a large number of URLs. Typically, to make links from them, you have to manually press the “Enter” key after each address. This is too long. The plugin converts them with one click.
Word Cloud Generator - creates a tag cloud from words that are often repeated in the text. The application only works with words in Latin.
Thesaurus - Shows synonyms, antonyms and more. You can replace the selected word with a term from the application. Supports Russian language.
Preview Markdown - Real-time preview with syntax highlighting in the sidebar.